What you need to know:
Moving blocks up and down your document hierarchy allows you to rearrange your content. The three most popular ways of moving blocks include dragging and dropping a block to a new place, using the Move Handles from the Contextual Toolbar, and via the keyboard shortcut
Ctrl+Shift+Alt+TorYon Windows/Linux and⌘+⌥+⇧+TorYon macOS.
Have you ever created a post or a page in WordPress only to realize at some later point that your content would look and work better if it was rearranged? If so, this tutorial is for you. Here, we’ll show you how to rearrange your page elements by moving the blocks that contain them up and down your document hierarchy.
Table of Contents:
What Is Gutenberg?
Gutenberg, also known as the WordPress Block Editor, is the main way of creating posts, pages, and widgets on your WordPress site. Unlike its predecessor, Gutenberg stores every piece of content in its own block. This allows you to effortlessly manage and edit a single block with minimal negative repercussions on its neighboring blocks.
If you are new to Gutenberg, we suggest reading our tutorial on the basics of the WordPress Block Editor as well as our guide on the Gutenberg interface. After you have done so, you can further your knowledge by learning the various keyboard shortcuts and the best third-party plugins that are available for Gutenberg as well as the best ways to customize the block editor to your liking.
Tip:
If you don’t have your own website yet, you can take advantage of our free hosting plan or one of our premium WordPress hosting packages and install WordPress in a few easy steps.
What Are Blocks in WordPress?
Gutenberg differs from most document editors in the way it stores and lays out content. Most editors emphasize free-from text and make it the backbone of the entire document. And should the document contain images or other multimedia elements, these will get inserted among the text itself. All of this makes for a messy document that is difficult to maintain and edit.
The WordPress Block Editor takes a different approach by encapsulating every piece of content in its own block. So, you can have a heading block followed by an image block, three paragraph blocks, a quote block, and so on. All of these blocks are self-contained entities that can be modified independently.
As you might imagine, there are many different types of blocks available in Gutenberg. All of them are stored in the WordPress Block Library along with any available block patterns and reusable blocks.
Tip:
If you wish to expand the number of available blocks even further, take a look at our roundup of the best WordPress plugins that add new blocks to Gutenberg. You can also try updating WordPress as new versions often include new blocks as well.
What Is the Benefit of Moving Blocks?
Every block contains a small portion of your website. So, by moving blocks up and down your WordPress document hierarchy, you will be able to rearrange the content that your visitors see.
How to Move Blocks in WordPress?
Since moving blocks is a basic feature of the WordPress Block Editor, there are five different ways of doing so. We will cover all approaches in the next few sections, starting with the more popular options.
Via Drag and Drop
Perhaps the most intuitive way to move blocks in your WordPress document is via drag and drop. To do so, follow these steps:
- Click on the block that you wish to move to select it.
- From the Contextual Toolbar that appears, click and hold on the Drag grabber. This is the second button on the toolbar.
- Drag the block to its new position within your document.
- Release the left mouse button to move the block.
You can drag a block and drop it in a different place in your WordPress document in order to move it.
Tip:
You will notice some blue lines that appear as you drag your block across the document. These are indicators of where your block would be placed if you dropped it at that moment.
Via the Move Handles
Another straightforward way of moving blocks in Gutenberg is to use the Move Handles from the Contextual Toolbar. These two small buttons can move the selected block either up or down the document structure.
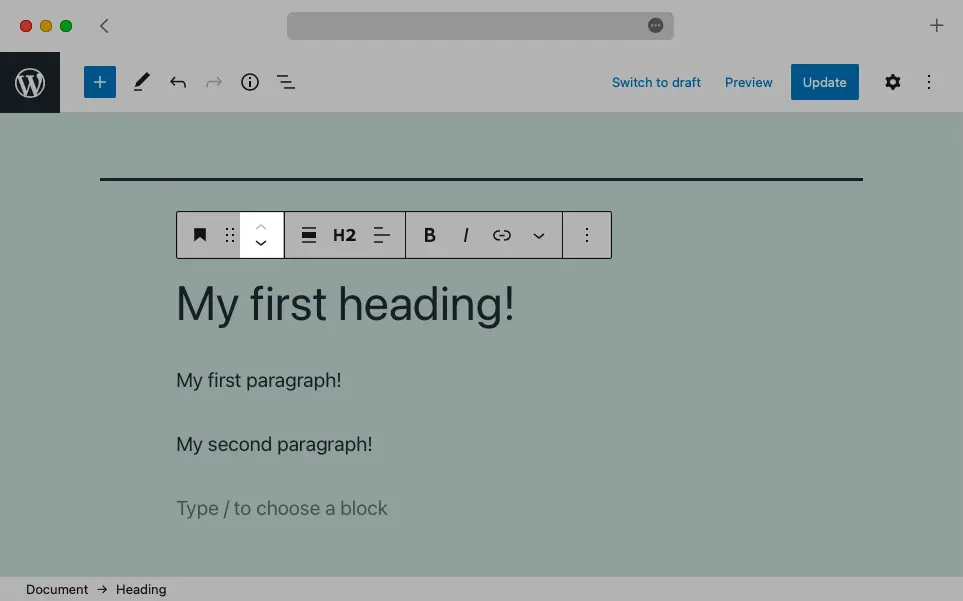
The Move Handles can be used to quickly move a block up and down the document structure.
Via a Keyboard Shortcut
If you like using keyboard shortcuts, you will be pleased to learn that there is a keyboard shortcut that can move blocks in WordPress. To start, select the block that you wish to move. Then, press Ctrl + Shift + Alt + T on Windows/Linux and ⌘ + ⌥ + ⇧ + T on macOS if you wish to move the block up. Conversely, press Ctrl + Shift + Alt + Y on Windows/Linux and ⌘ + ⌥ + ⇧ + Y on macOS if you wish to move the selected block down.
Tip:
Did you know that there are even more keyboard shortcuts available in WordPress? To learn more, you can check our guides on the keyboard shortcuts available in Gutenberg, when moderating comments, and when navigating the WordPress back-end.
Via the Move to Option
The Move to option offers a mix between using the mouse and keyboard to move a block in WordPress. Here’s how it’s done:
- Select the block that you wish to move.
- Click on the three-dot button at the end of the Contextual Toolbar.
- Choose the Move to option.
- Use the
UpandDownarrows on your keyboard to move a blue placeholder up or down your document. - Once the blue placeholder is in your desired position, press
Enterto move your block there.
Activate the Move to option from the Contextual toolbar and use your arrow keys to reposition the selected block.
Via the Tools Button
The last way of moving blocks in WordPress that we’ll look at is by using the Tools button from the Top Toolbar. Here are the steps that you need to follow:
- Click on the Tools button from the Top Toolbar and choose the Select option.
- Click on the block that you wish to move.
- A minimal Contextual Toolbar with just a few options will appear.
- Click and hold on the Drag grabber (the middle button) and drag the block to a new position in your document.
- Release the left mouse button to move the block to its new place in your WordPress document.
You can leverage the more streamlined Contextual Toolbar provided by the Select tool when moving blocks in WordPress.
Admittedly, this way of moving blocks is nearly identical to the drag and drop method we discussed earlier. The main difference is the more streamlined Contextual Toolbar that is used when you are selecting the blocks in Select mode.
How to Move Blocks in and Out of Block Groups?
It is notable that not all of the above methods of moving blocks work when it comes to WordPress block groups. If you wish to move a block in or out of a block group in WordPress, you should use either drag and drop or the Select option from the Tools button. Conversely, the Move Handles, the keyboard shortcuts, and the Move to option are not capable of moving a block in or out of a block group.
Next Steps
At this point, you should have a good grasp of the various methods you can use to move blocks in WordPress. Not only that, but you should also be aware which ways of moving blocks work with block groups and which do not.
In order to fully cover the basics when it comes to creating content in WordPress, we recommend going over our tutorials on inserting, editing, and deleting blocks. And finally, you should also take a look at our tutorial on publishing in WordPress, so that other people can find and consume your content.