Creating a website from scratch might seem a daunting task. Many people associate the process with numerous technical terms and a lot of coding. This was indeed the case in the recent past. Nowadays, however, as the number of websites rises exponentially, so does the number of platforms that can help you build a website without the need to learn to program.
Such platforms oftentimes provide a graphic interface and numerous pre-built instruments that make the site construction process intuitive and straightforward.
One such platform is WordPress. It is by far the most popular site-building platform, as it offers great versatility and flexibility when it comes to creating and maintaining a website and all of its content.
In this guide, you will find everything you need to know about WordPress and how to use it to construct a fully functional site.
Create a WordPress Website – The Ultimate Guide
The topics you will read in this guide are:
FAQ Section:
- WordPress.org vs. WordPress.com
- How Much Does a WordPress Website Creation Cost?
- What is Hosting?
- What is WordPress Hosting?
- What is a Domain Name?
- How to Choose a Domain Name?
- Can I Own a Domain Name?
- How do I Acquire a Domain Name?
- How to Choose a Hosting Service?
How to Create a WordPress Website section:
- How to Install WordPress?
- How to Enter the WordPress Admin Panel?
- WordPress User Roles – What Are and What They Do
- What are the WordPress Themes and How to Use Them?
- What are WordPress Widgets?
- What is a WordPress Menu?
- What are URLs, Permalinks, and Slugs?
- What are the WordPress Plugins?
- How to Add New Pages To Your WordPress Site
- How to Add Content to Your Web Pages?
- How to Create a WordPress Blog Section?
- How to Create a WordPress Post?
- Conclusion: How to Create a WordPress Website – The Ultimate Guide
How to Create a WordPress Website: FAQs
Here are the answers to some of the most common questions about WordPress.
FAQ: What is a Content Management System?
The Content Management System (oftentimes abbreviated as CMS) is a digital platform that is designed to ease the site-building process for non-technical people and is oftentimes used to fully control the creation and management of any kind of content that would be present on the website.
The idea behind such platforms is to help you build a site without learning and writing programming code. With a simplified graphical interface and numerous useful instruments, a given CMS usually does all the coding for you and lets you construct your web pages with its intuitive interface and graphically visible instruments that do the hard work for you.
Along with being very user-friendly, many CMS platforms usually include one more great advantage – oftentimes they allow collaborative work. This means that several people can use the same platform to work on the same site, all at the same time. An example would include a team of content writers working on the creation of a new article, while a team of developers is testing the website’s security and a team of designers is experimenting with different visual effects, and they are doing that at the same time and on the same site.
There are all kinds of CMS platforms out there – some of them are great for blogs, and others are convenient for crafting online stores. There are some that manage and visualize media files very well, and others that are well-rounded and can deal with many different tasks.
With this being said, it is important to understand that WordPress is a type of CMS as many more similar platforms are. Other content management systems are:
- Joomla
- Drupal
- Magento
- HubSpot CMS HUB
- Ghost
FAQ: What is WordPress?
WordPress is a type of Content Management System. By far, it is the most popular and one of the most reliable CMSs out there. It is estimated that its market share on the Internet is more than 40 percent!
Simply put, WordPress is a free platform that offers a simple and visual way of creating and managing a website. The platform uses easy-to-navigate boxes and menus that act as a substitution for writing programming code. This approach allows you to benefit from an intuitive and simple way to create your own, unique, and completely functional website.
Also, the platform’s visual interface allows you to see what is happening in real-time when using any of the WordPress instruments.
In more technical terms, WordPress is an online, open-source content management system, based on PHP and MySQL codes and licensed under GPLv2.
This means that the platform isn’t restricted by any copyright or trademark and is completely free.
As it comes to MySQL, is a data management system, which allows you to store and use data relevant to your site. A database system like MySQL is required because all the site’s components should be stored somewhere.
Initially, WordPress was created as a simple blog-publishing tool, but since creators and users noticed its vast potential, the platform quickly evolved to become a comprehensive system for supporting e-mail lists, online forums, media galleries, membership websites, and even online stores.
WordPress.org vs. WordPress.com
WordPress.org and WordPress.com are the two denominations of WordPress. Both are based on the CMS concept, yet are different from each other.
On one hand, there is WordPress.org, which is an open-source and free content management system, owned by no one. Also, the majority of plugins and themes are created for this particular version of WordPress, which makes it noticeably more flexible and versatile, compared to WordPress.com. To use it, you need to purchase a domain name, subscribe to a hosting service, and install the platform. Later in this guide, we will see how to complete each of these steps.
On the other hand, there’s WordPress.com which is a service created by Automattic, a company led by WordPress co-founder, Matt Mullenweg. Unlike WordPress.org, you don’t need to search for any third-party providers, as the platform offers both hosting and domain registration services. When using WordPress.com, you don’t need to download and set up anything – you simply log in via their website and start building your site.
Another difference is that WordPress.com offers different free and paid subscription plans, according to which, different sets of utilities are available – eCommerce options, themes, and plugins. As it comes to WordPress.org, is always free, but includes some optional premium instruments and components.
Also, among all the other differences, there’s one more noticeable. WordPress.com has a strict policy according to which you cannot sell ads on your site unless you meet some specific requirements. And even then the revenue is being shared. Also, WordPress.com can run unwanted ads on the .com-based websites. When it comes to WordPress.org, you have full control over publishing ads and benefiting from their revenue.
In this guide, we focus on building a website with WordPress.org – although it might seem a little more complex than WordPress.com, it is worth delving more effort and time into learning the platform.
FAQ: How much does a WordPress Website Creation Cost?
The answer to this question varies on many factors.
A single website can cost somewhere between $0 and $30,000 a year, depending on the scale of the project, its components, design complexity, and construction approaches.
In this tutorial, we will show you how to build a completely functional WordPress website for free.
However, if you wish to reach the potential of site-building capabilities and make your content stand out from the competition, you should consider checking out some of WordPress.org’s premium offers. Such include mainly premium plugins and themes. Later in this tutorial, we will show you what these are and how are they incorporated into your site.
FAQ: What is Hosting?
Hosting is a business service that provides a physical computer on which your website files and other vital data are uploaded and stored.
All websites in existence contain different kinds of files and other information and therefore take up memory space. For any site to exist and function properly, this set of files must be stored on a physical driver. The most popular way by far is storing these on dedicated and powerful computers named servers.
Servers can work uninterruptedly and do not switch off so that your website is always online. Usually, the organization that offers the hosting service is also the one responsible for maintaining servers in good working condition, securing the stored data,
and making sure that your website content reaches your site visitors.
You can think of web hosting as renting a bit of memory space on which your website files are stored and published on the web.
FAQ: What is WordPress Hosting?
WordPress hosting, as the name suggests, is a dedicated hosting service, with the idea of supporting WordPress-based websites and thus reducing the risk of technical errors to the bare minimum. Also, WordPress hosting enhances security and contributes to a quick and easy setup process.
FAQ: What is a Domain Name?
The domain name, also known as a domain, reveals the name of your website. However, there’s much more to the term, than what meets the eye.
The Internet is an enormous network of computers that share information. To be part of this network, each unit receives a unique code, comprised of a string of numbers, which sets it apart from all other wired devices. This code is named an Internet Protocol address (IP address) and looks like this:
96.126.114.82
To find a precise piece of info within the vast ocean of data, you can type in this string within a web browser, which will make your device connect to the computer with this specific IP address and then open the website. This process also works the other way around – should an Internet user decide to visit your website, he should type in the unique IP address that leads to your site and thus open it via an Internet browser.
However, a great inconvenience appears when using this method. Every time you wish to surf the net, you must type in all these IP addresses over and over again in order to access the information you search for. This can be burdensome, given that you should keep an always-expanding list with the IP addresses of all the websites you wish to visit.
This is where domains come into play.
The domain name simply uses words, letters, and numbers that comprise a meaningful phrase, which leads to each individual IP address. The idea is that it is far easier for users to memorize and use names and meaningful phrases when searching for a website – instead of typing in something like 96.126.114.82, you can simply write ZETTAHOST.com in your browser, and you will open this particular site. Domain names, just like IP addresses are unique for each connected computer on the World Web.
In short, domains give a more recognizable image to an IP address and ensure that you find websites as fast and as effortlessly as possible.
Each domain name includes a few elements:
- Domain name: the combination of words and numbers you chose. For example, ZETTAHOST is the domain name in ZETTAHOST.com
- Top-level domain (TLD): this is the suffix at the end of the domain name. It includes a dot and a word. In the example ZETTAHOST.com, the top-level domain is .com. Other examples include .org, .edu, .gov, .net, and many others.
- Subdomain: these are added in the front of the domain name and indicate that the subdomain is a part of the main domain. For example, if a given website offers an online shop, it might well use a subdomain such as this – shop.example.com – the subdomain, in this case, is shop.
FAQ: How to Choose a Domain Name?
You can choose any combination of words and symbols for your domain name – without the ones that are already in use by other website owners.
To make the right choice, there are some things that you should consider. The domain name is an identification of your website and hence, it should be a good representation of the content you share.
Here are several tips to keep in mind when thinking up a domain name:
- Keep it short and memorable: don’t make your potential visitors remember too long and intricate names; it won’t do you a favor.
- The domain name should resemble the vibe of your website: it should indicate what the website’s all about. Think up a name that is related to the content on your site.
- The domain name should be unique: or, at least, not close to other Domain Names, so visitors do not confuse websites with each other.
- The domain name should be brandable: when creating a business website, make sure that its name resembles your branding strategy.
- It is advisable to include a keyword in your domain name: by doing so, you will add a kick to the system engine optimization.
Register a domain name today!
FAQ: Can I own a Domain Name?
It is important to say that you cannot buy and own a domain name. You can rent and register one (or as many as you wish) from a domain name provider. When it comes to renting, this is a service provided by numerous businesses out there. In the majority of cases, the firms that offer hosting services also provide domain name registration options.
When it comes to prices, the rent can vary between $10 a year to several hundred million dollars a year. This difference is based on many factors. Two include:
- The type of TLD – each different TLD indicates the aim of a website. This means that .org is commonly used on the sites of non-profit organizations, whereas .com is usually the choice for commercial activities. Some other TLDs such as .gov and .edu are used for governmental sites and educational purposes and thus require an additional level of verification because they include a higher level of authority. Indeed, because of this reason, the price of renting such a domain name can go up.
- Is the domain name considered premium? A premium domain name means several things at the same time. First, the premium domain names include a trustworthy TLD. Second, a premium name oftentimes includes a short and memorable word. Furthermore, a premium domain name includes words that act as brand names. Also, a premium domain name can add a kick to a better site ranking in the search engines.
Since we answered some of the most frequent questions, it is high time we made the first steps in our setup. In the following sections, we will see how to acquire a domain name, subscribe to a hosting service, and install WordPress – the three fundamental steps that would allow you to use the CMS for the purpose it is built for – construct and maintain a website.
FAQ: How do I Acquire a Domain Name?
Once you’ve decided what the domain name of your website will be, it is time to check whether it is available to acquire and register it. In this section, you will see how to check whether the domain name is not taken and how to register it via our platform.
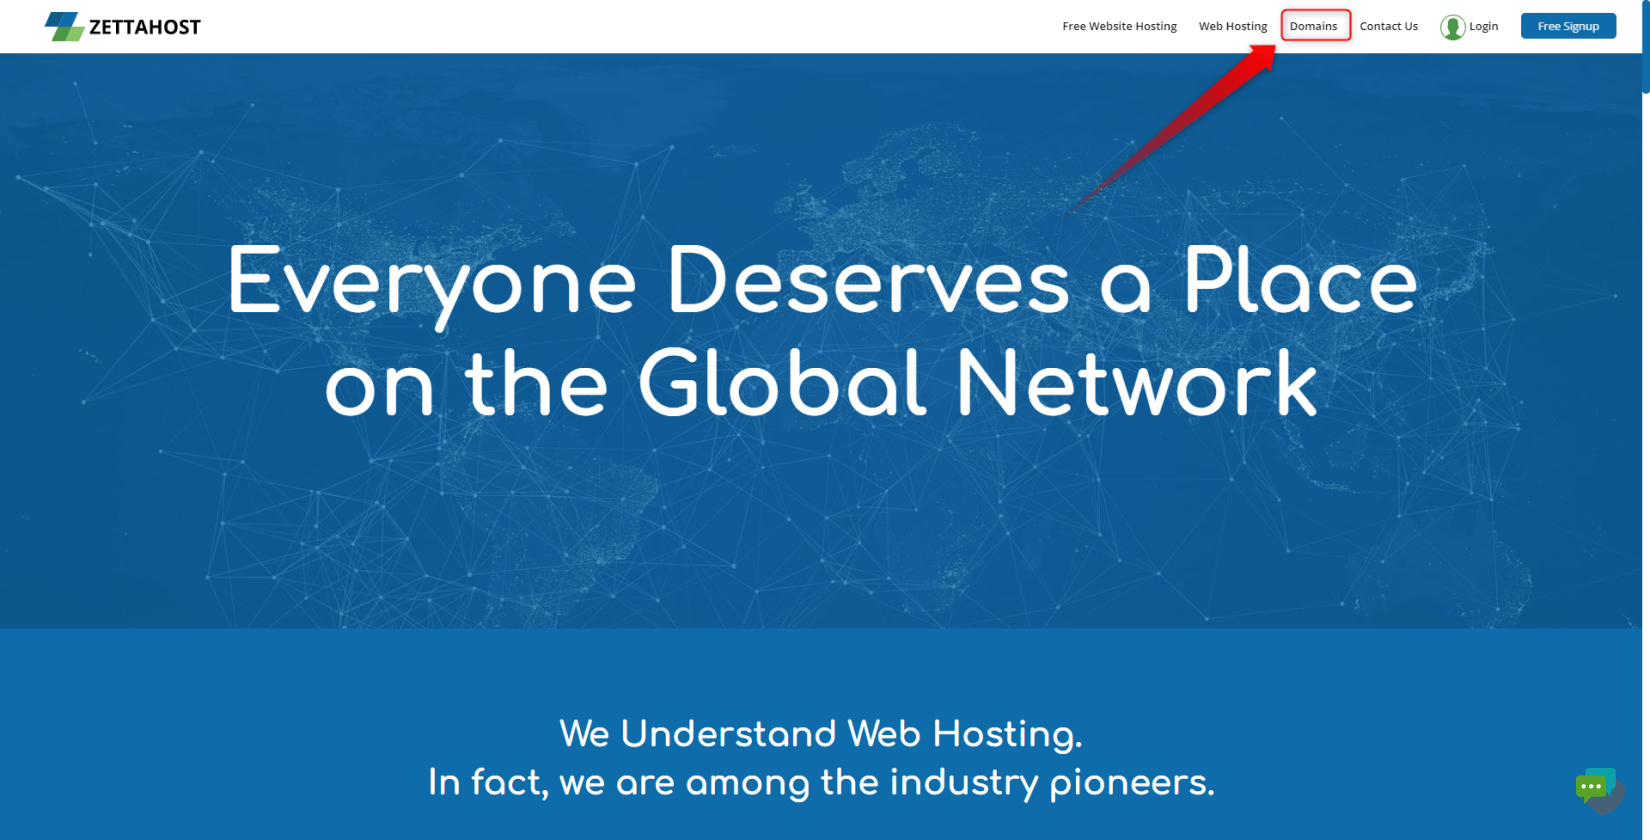
Step 1: Visit ZETTAHOST.com and look at the menu options at the top right corner of the page. Search for the Domains button and click it:
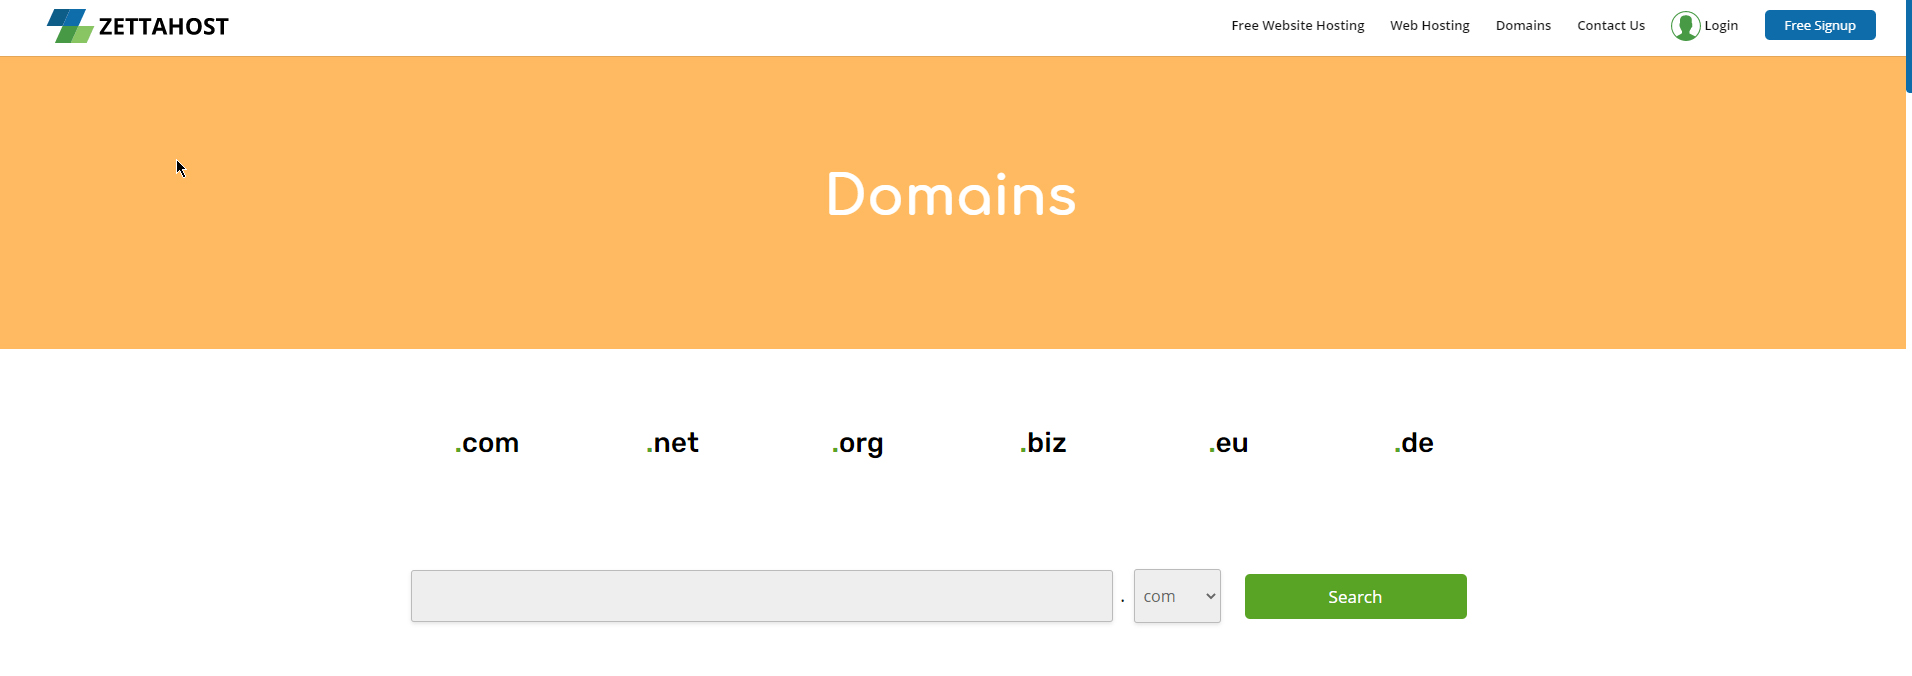
Step 2: Once you’ve clicked on Domains, you will be redirected to a page in which you can check whether the domain name you’ve chosen is not already in use. Below the search area you will also find some general info, a table with useful information, subscription plans, and a FAQ section:
Step 3: Type in the name you chose and click on the Search button. By doing so, ZETTAHOST.com will make a quick and comprehensive search and will show you all possible ways to use the domain name you’ve chosen.
(For this particular example, we will be using myfirstdomainname.net)
After a few short seconds, a list of possible options will appear. Have a close look, and choose the most fitting option for you:
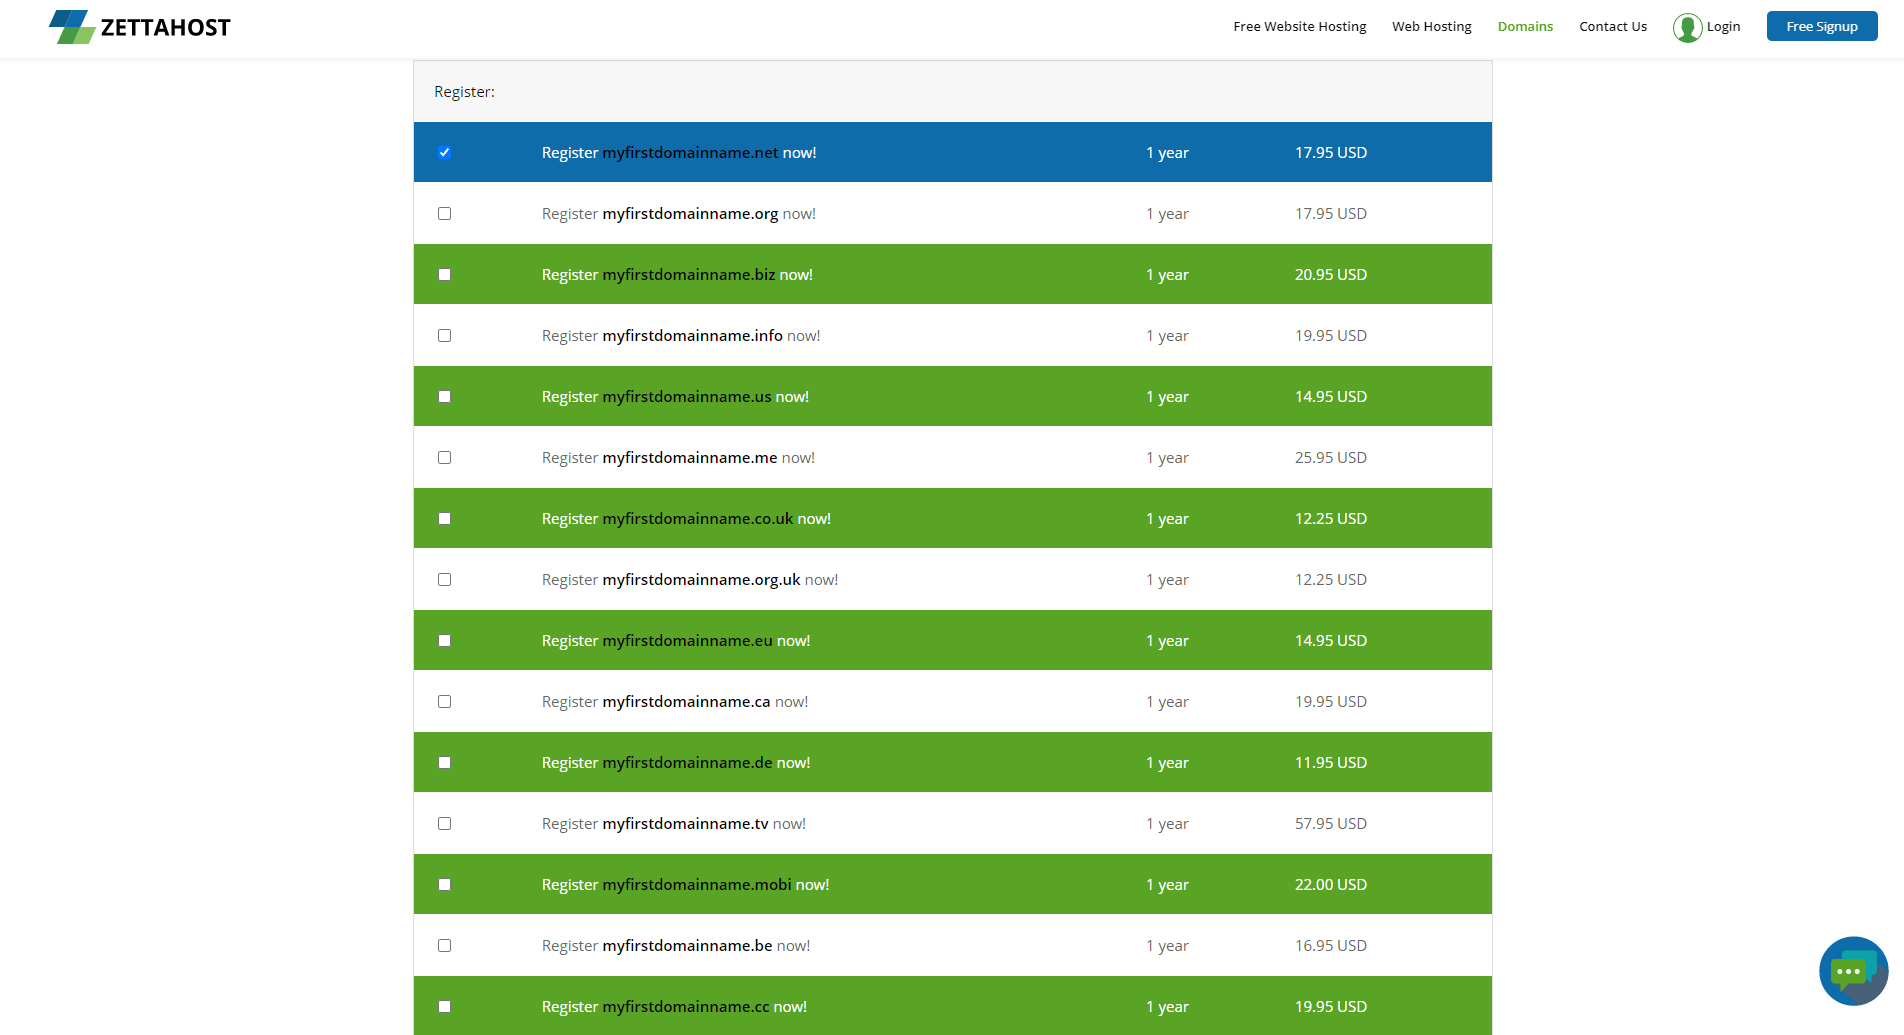
Step 4: At the end of the table you will see an Order button. Once you’ve decided which of the options fits you the best, click it and then carefully follow the instructions. When you’ve done so, you will have registered your domain name.
Remember that you can register a domain whenever you wish preliminary to building your site (which will use that particular domain). This means that once you have rented the desired domain, you can use it for months and even years.
Now it is time to continue with the process and search for a fitting hosting service.
FAQ: How to Choose a Hosting Service
Since we will be building a WordPress.org-based site, you should choose the WordPress Hosting service. In this example, we will be using indeed this one.
Depending on your budget and your goals, you can choose either a free WordPress hosting plan or a premium service.
Here’s how to do that:
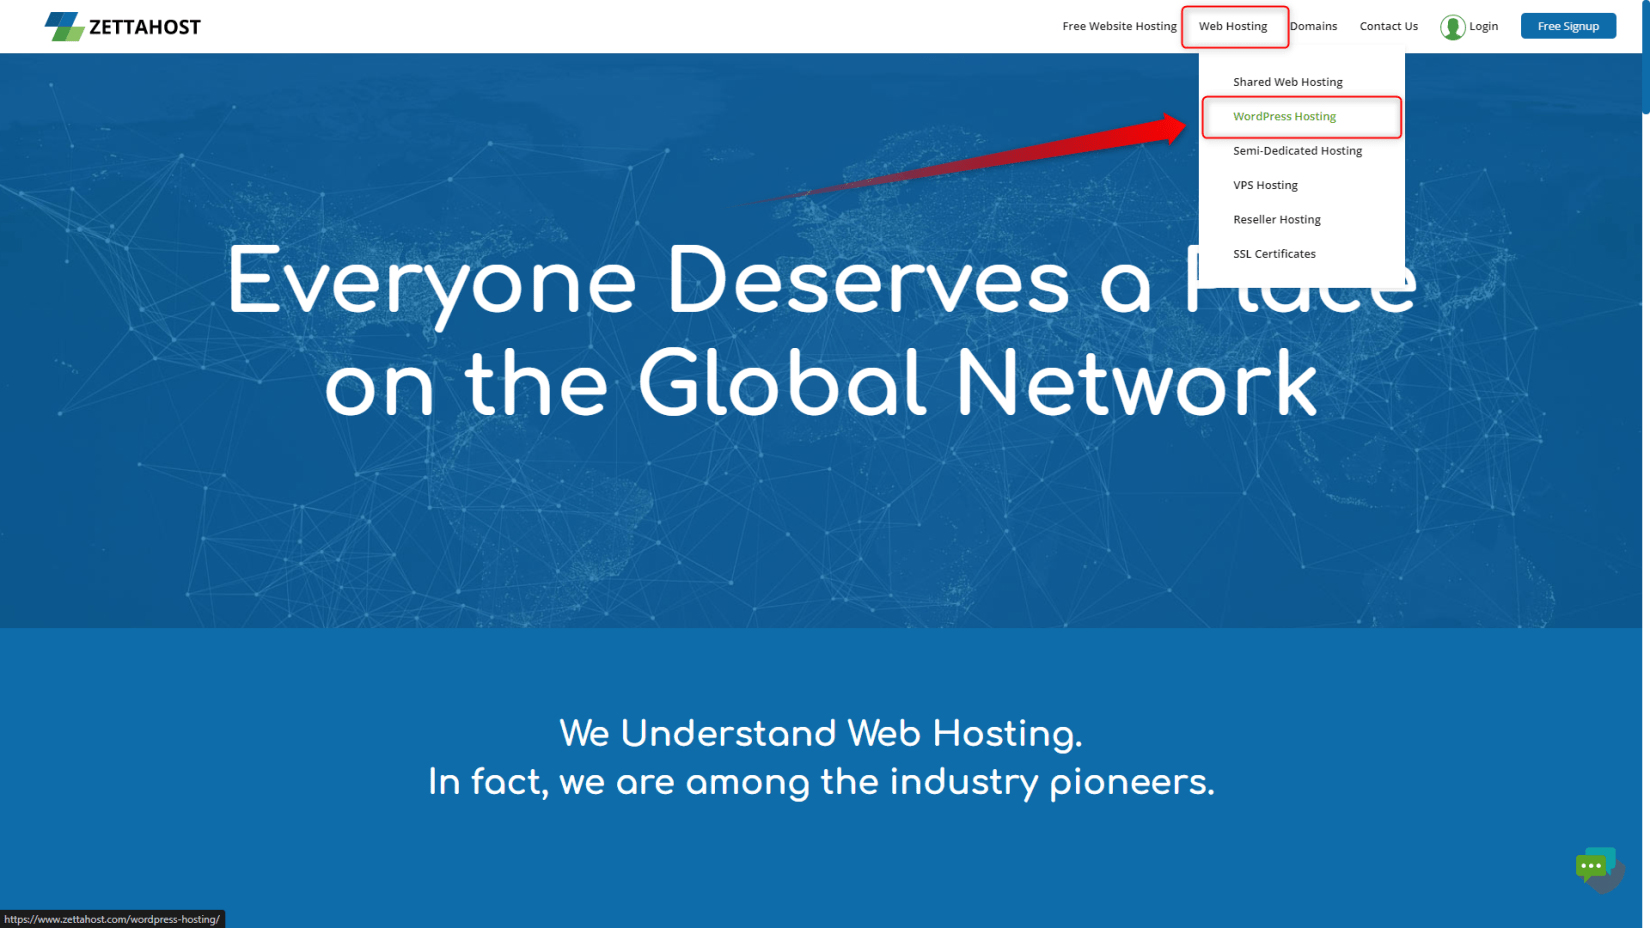
Step 1. Once again, enter ZETTAHOST.com, however, this time locate the Web Hosting button at the top right corner. When you hover your cursor over the button, a drop-down menu will appear. Select WordPress Hosting:
This will open a new web page. There you will find comprehensive information about our hosting subscription plans, some additional information about WordPress Hosting, and a handful of tips and tricks. Have a look at the page and after you make sure everything makes sense for you, proceed with the next steps in the process.
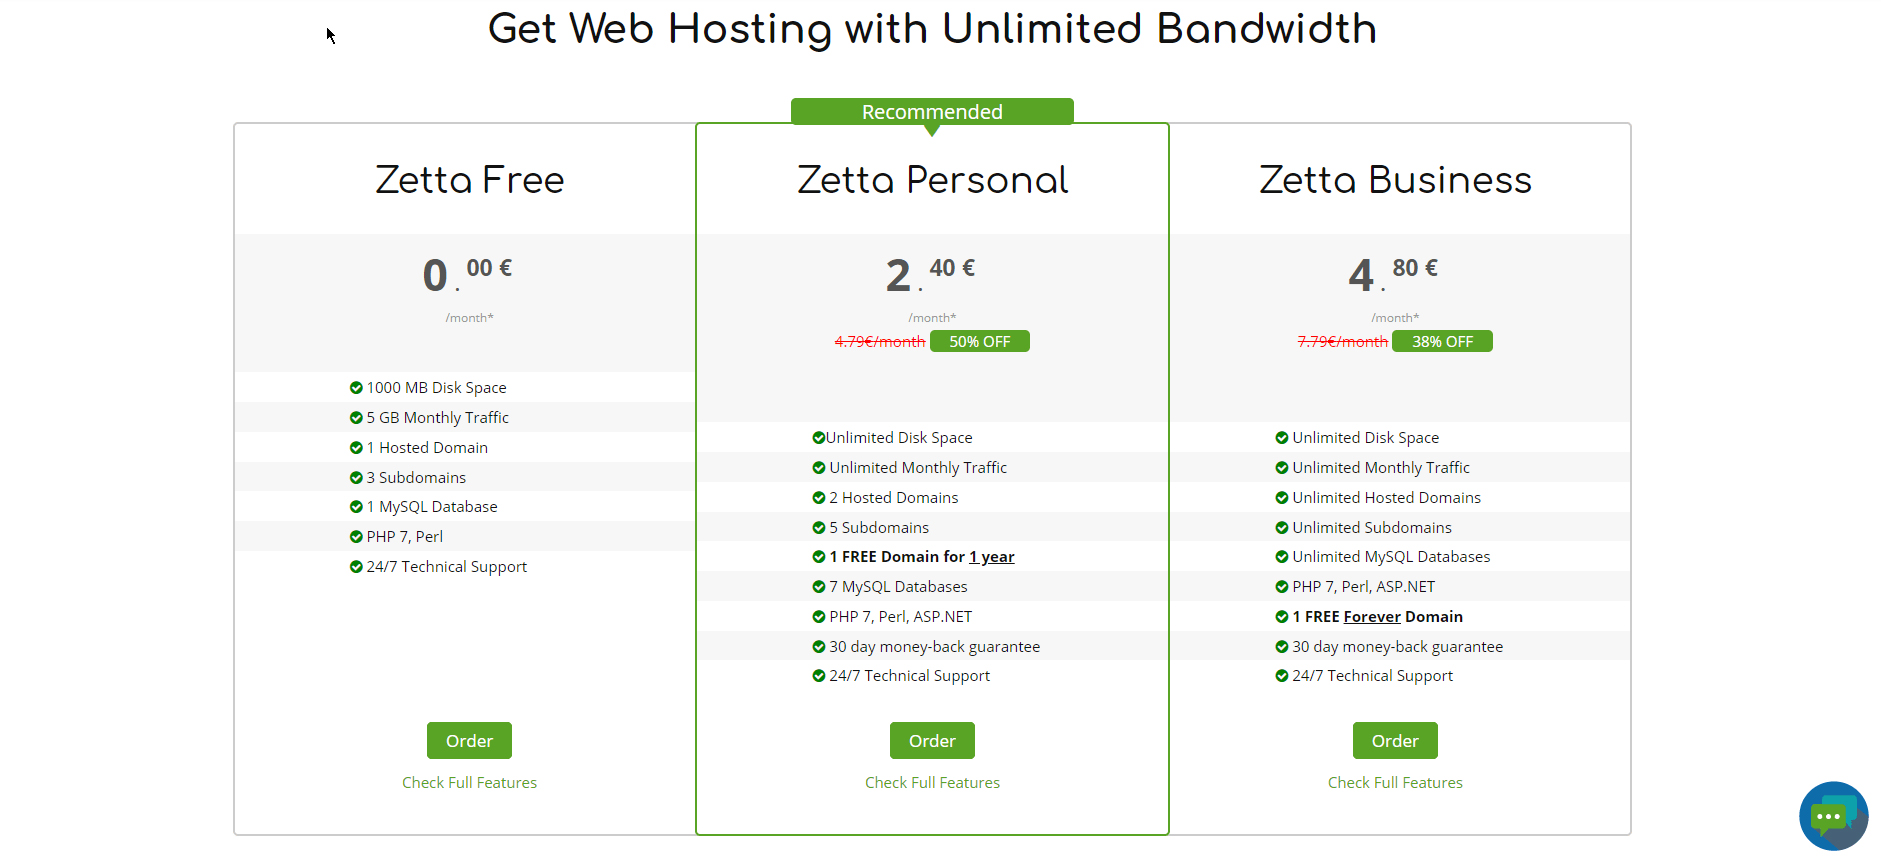
Step 2: Choose a plan.
Take a closer look at each individual pack and decide which one will be the most suitable for your needs. If you are not completely sure which plan is right for you, click on the “Check Full Features” link for further information.
After you’ve decided which plan suits your needs, click on the green Order button at the bottom of the box. Carefully read and follow the instructions. Once you’ve done so, you will have registered to our WordPress hosting service!
How To Install WordPress
To be able to use WordPress, you should first install it.
Since the big idea behind WordPress is to make it easier for all Internet users to build and manage websites, the installation process is also as simple as using the platform itself.
With a few clicks, you will also be able to access the WordPress admin panel and start building your website. So, without further due, let’s see how to manage the setup process.
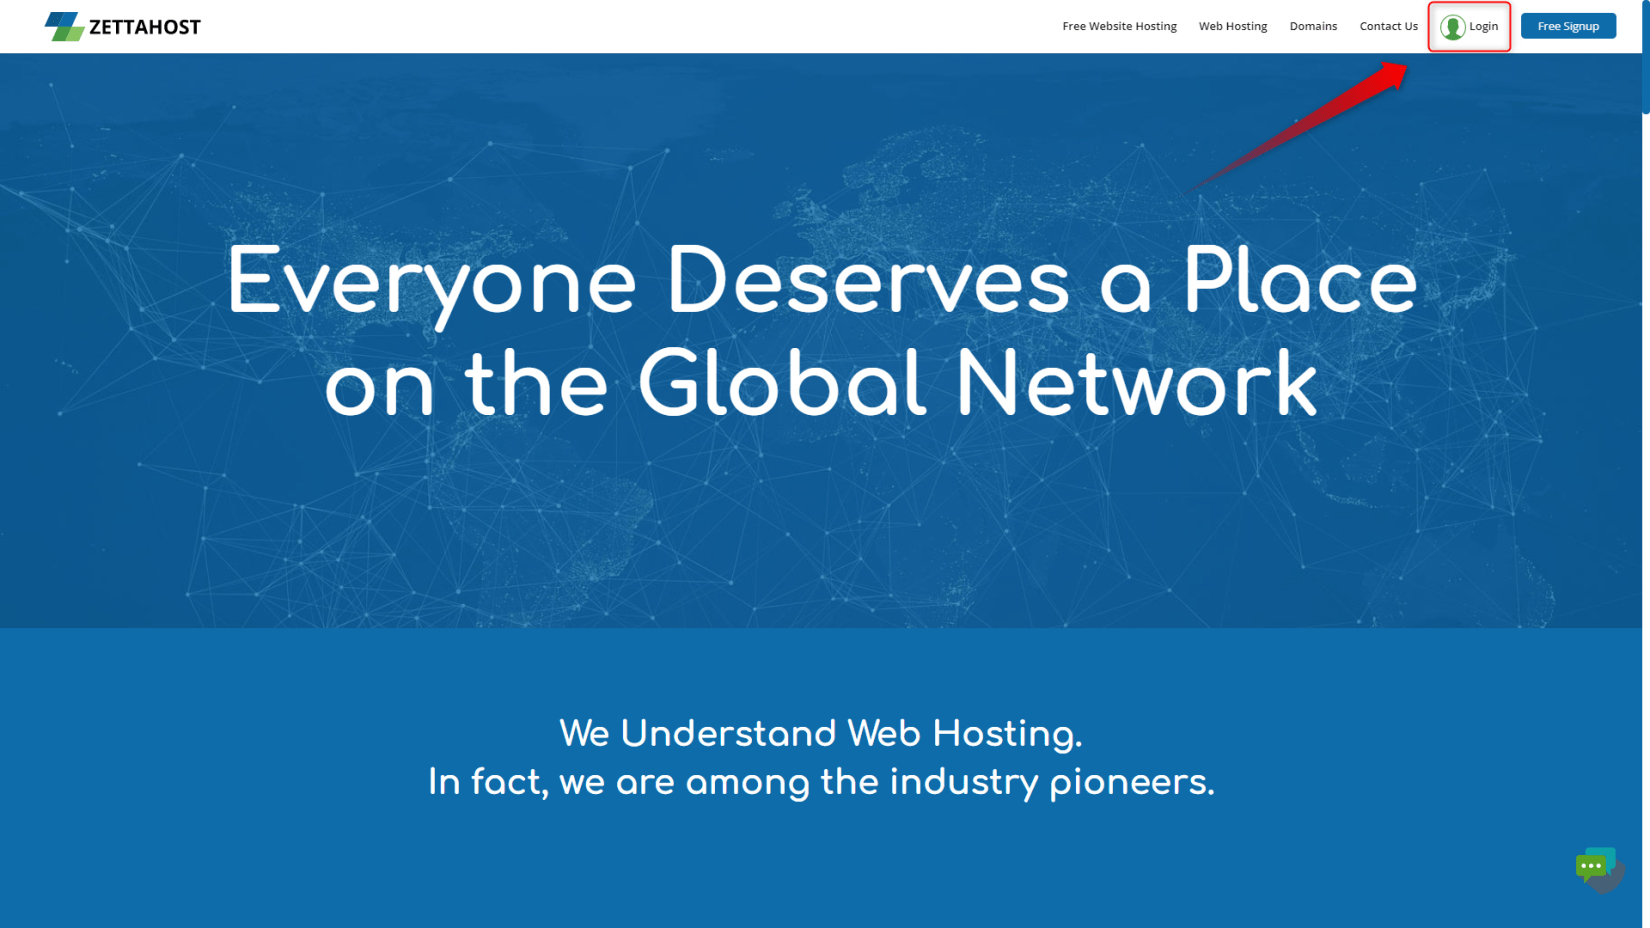
Step 1: Enter your ZETTAHOST control panel. To do so, first, take a look at the top right corner of the home page. There you will see a large Login button. Click it:
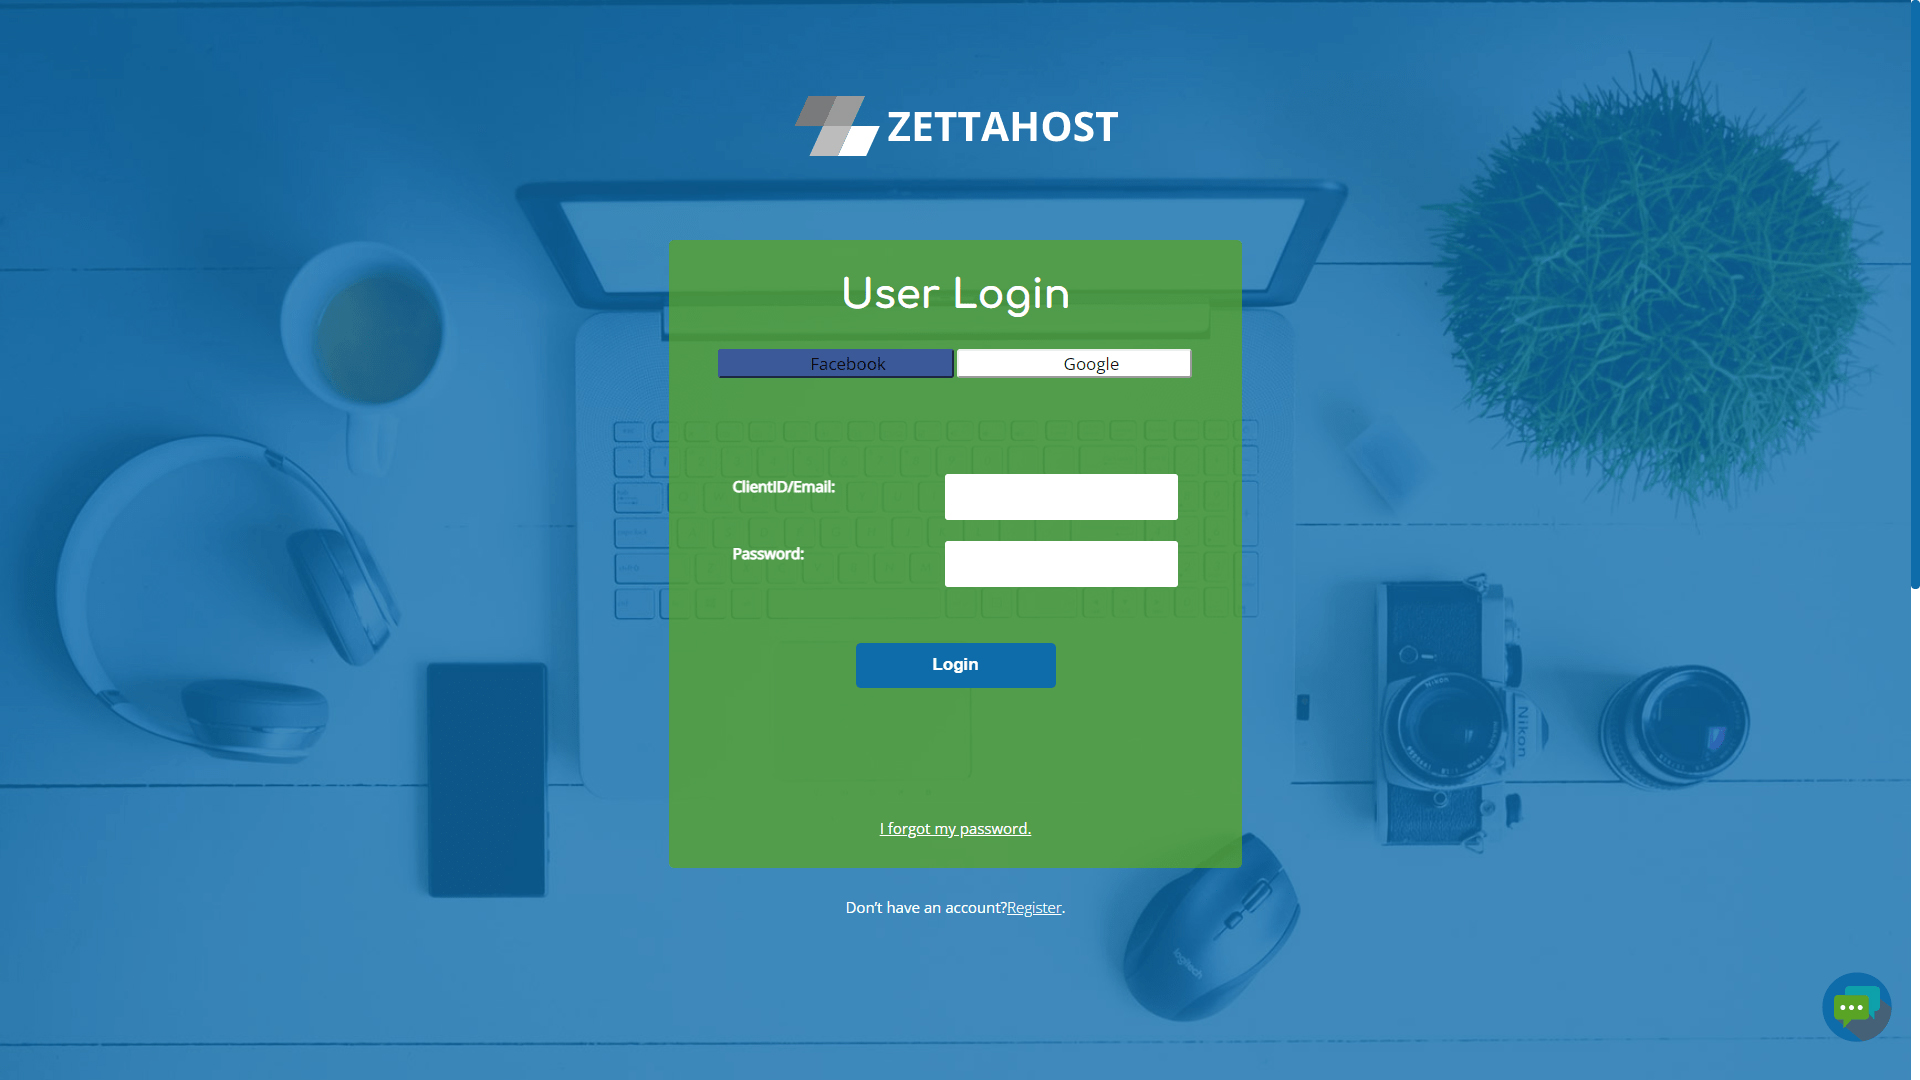
A dialogue box will appear. It will ask for your ClientID/Email and Password. These are the same credentials that you entered when registering for a hosting service. Enter them, and then click the large Login button:
This will lead you to the ZETTAHOST admin panel. It looks like this:
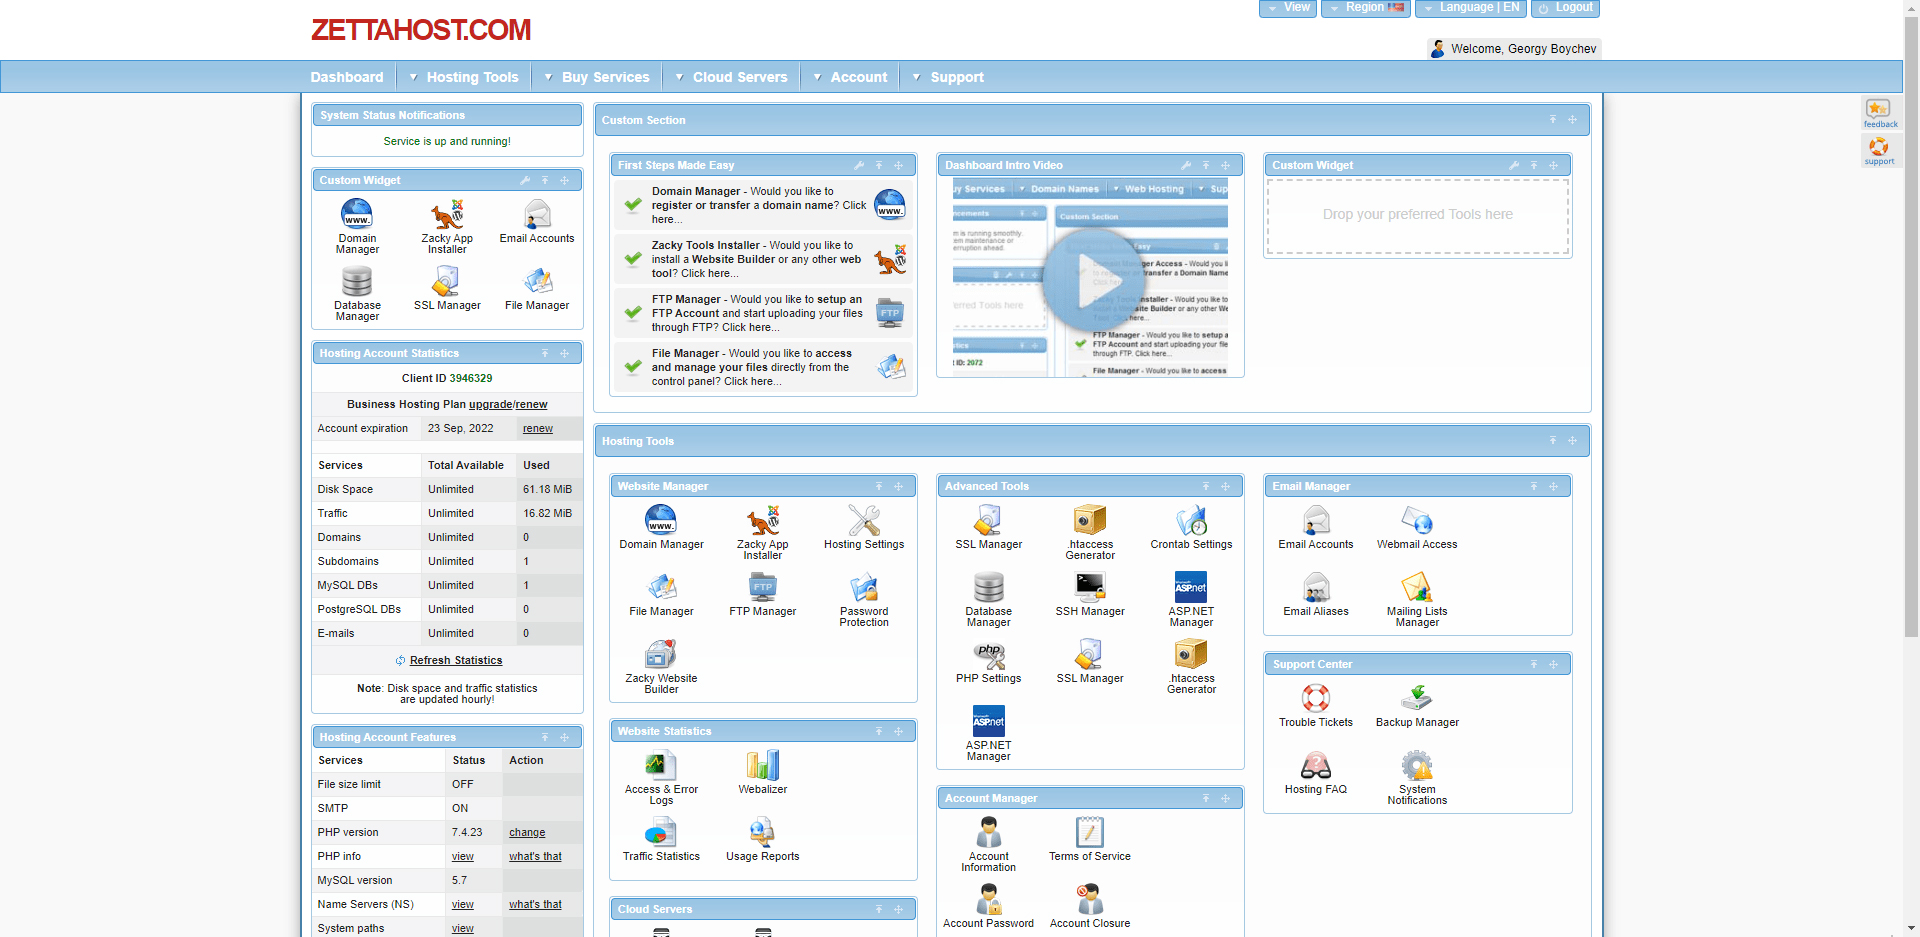
This is the place where you can manage your ZETTAHOST account and benefit from some of the dedicated tools that will help you manage all the data on your website. From this admin panel, you can also check different website stats, buy services and install different types of software.
Also, this is the place from which you will be installing WordPress on the server you rented.
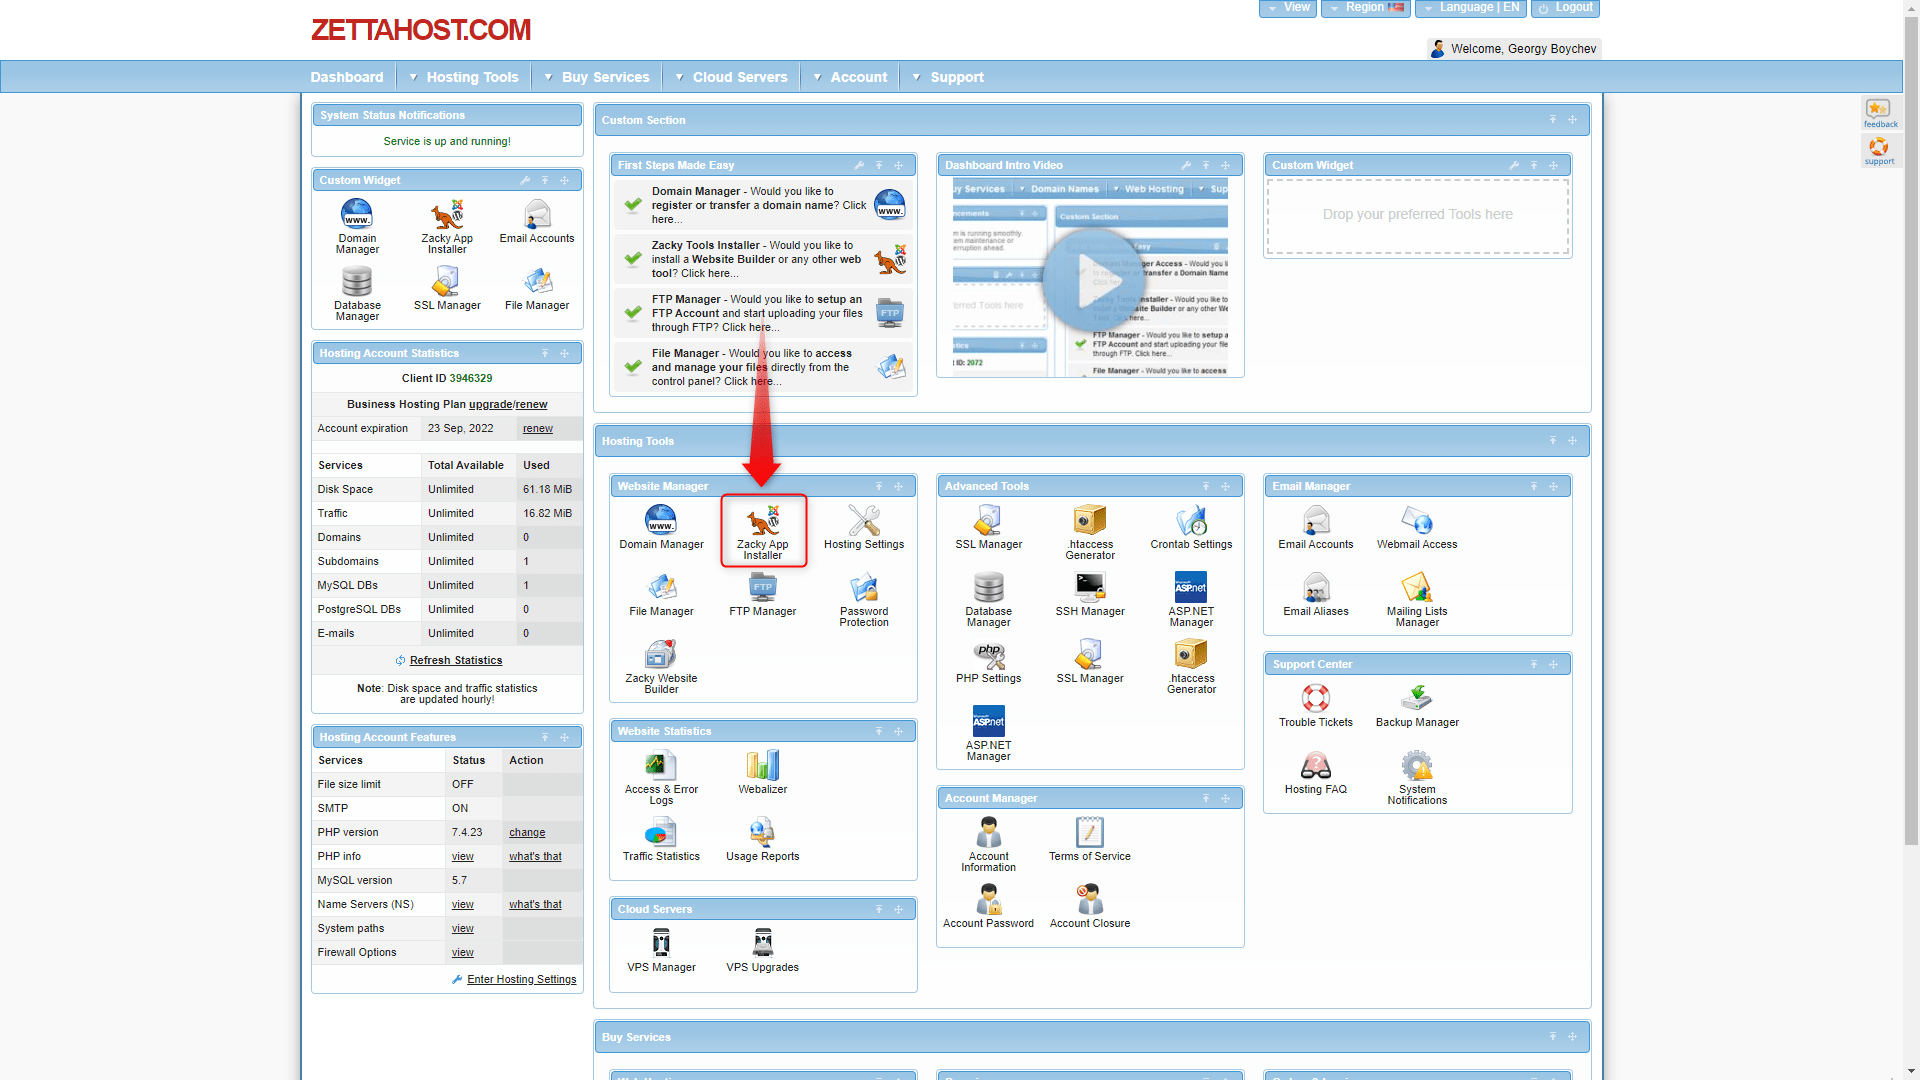
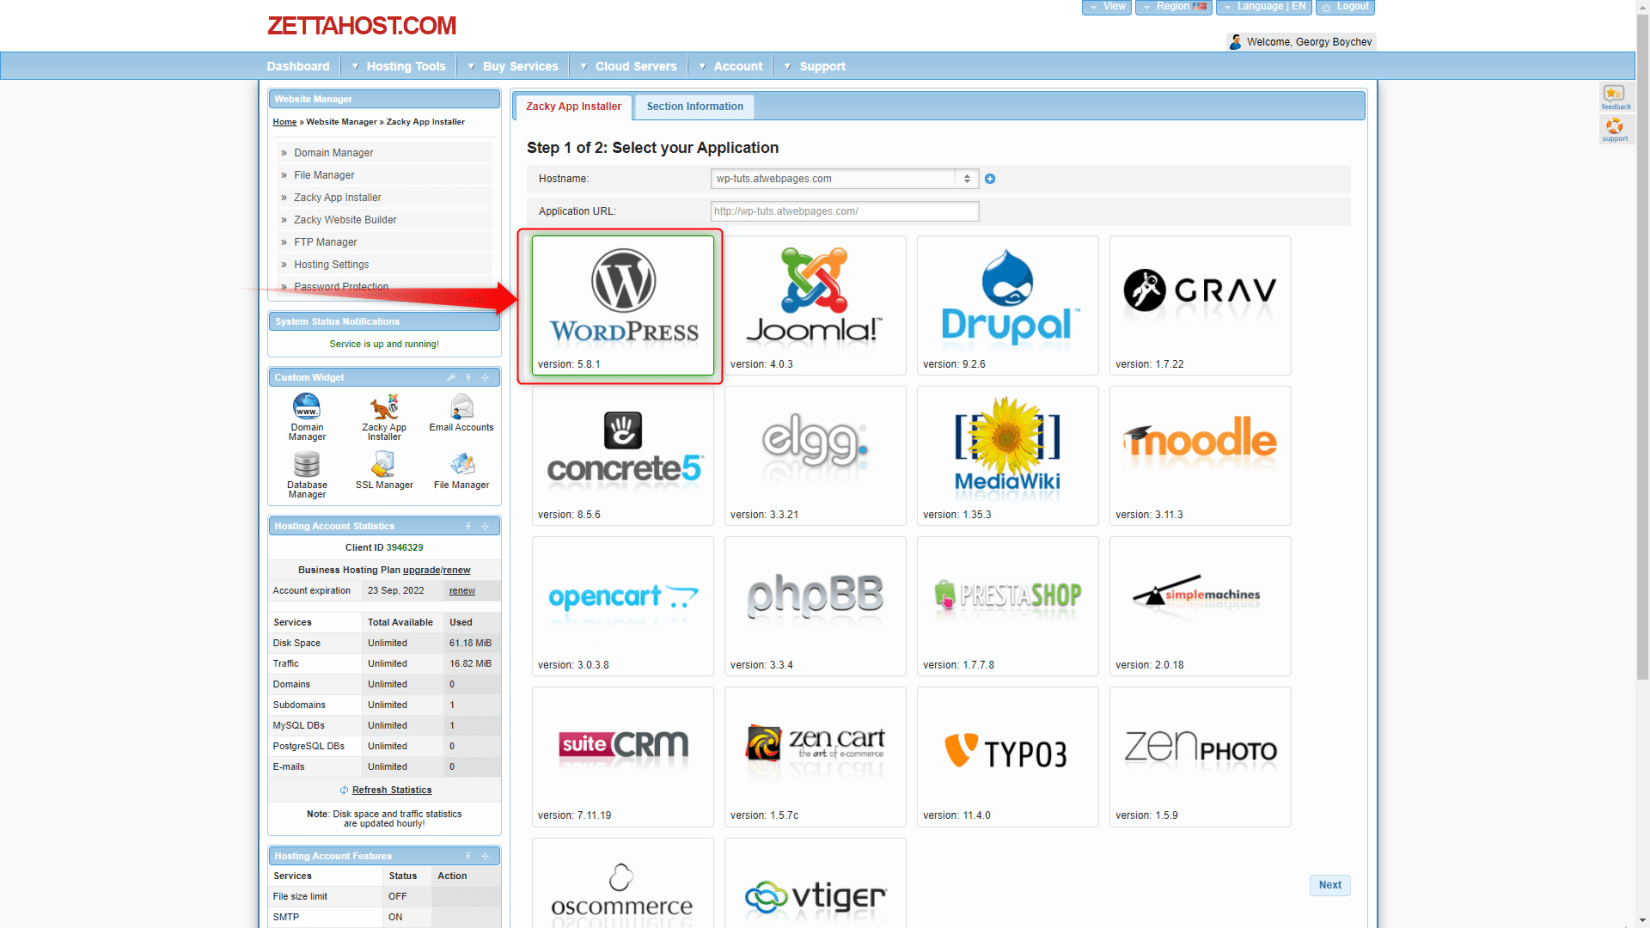
Step 2: Find and open the Zacky Installer. This is the instrument that will install WordPress on the server, so you will be able to use it. The icon is located in the large Hosting Tools box and within the smaller Website Manager:
Step 3: When you open the Zacky Installer, a new window will appear. Click on the large green Browse and Install Apps button:
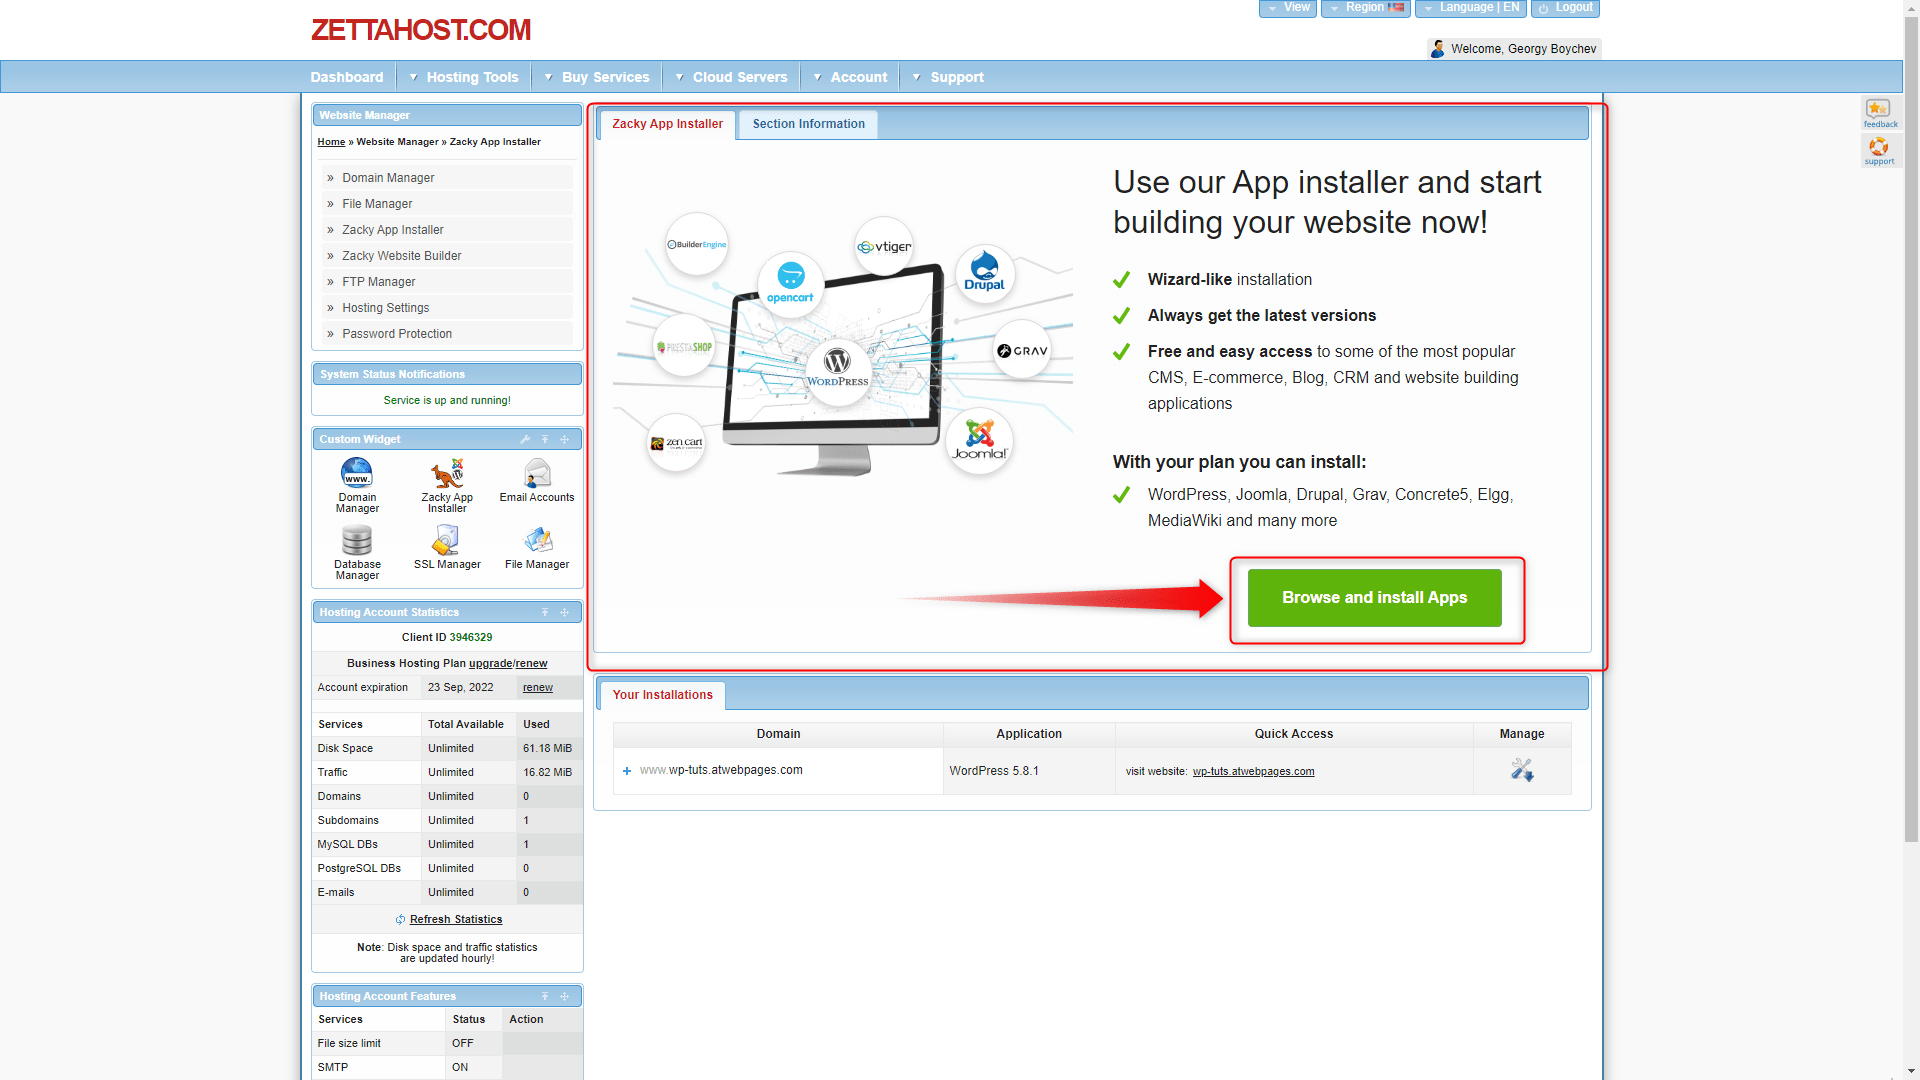
This will open up the list of available software.
However, before we proceed with the installation process, you should make sure to add your domain name to the system. This will ensure that your new site will include the domain you have chosen, registered, and rented.
In the opened window, locate the Hostname and Application URL at the top of the screen:
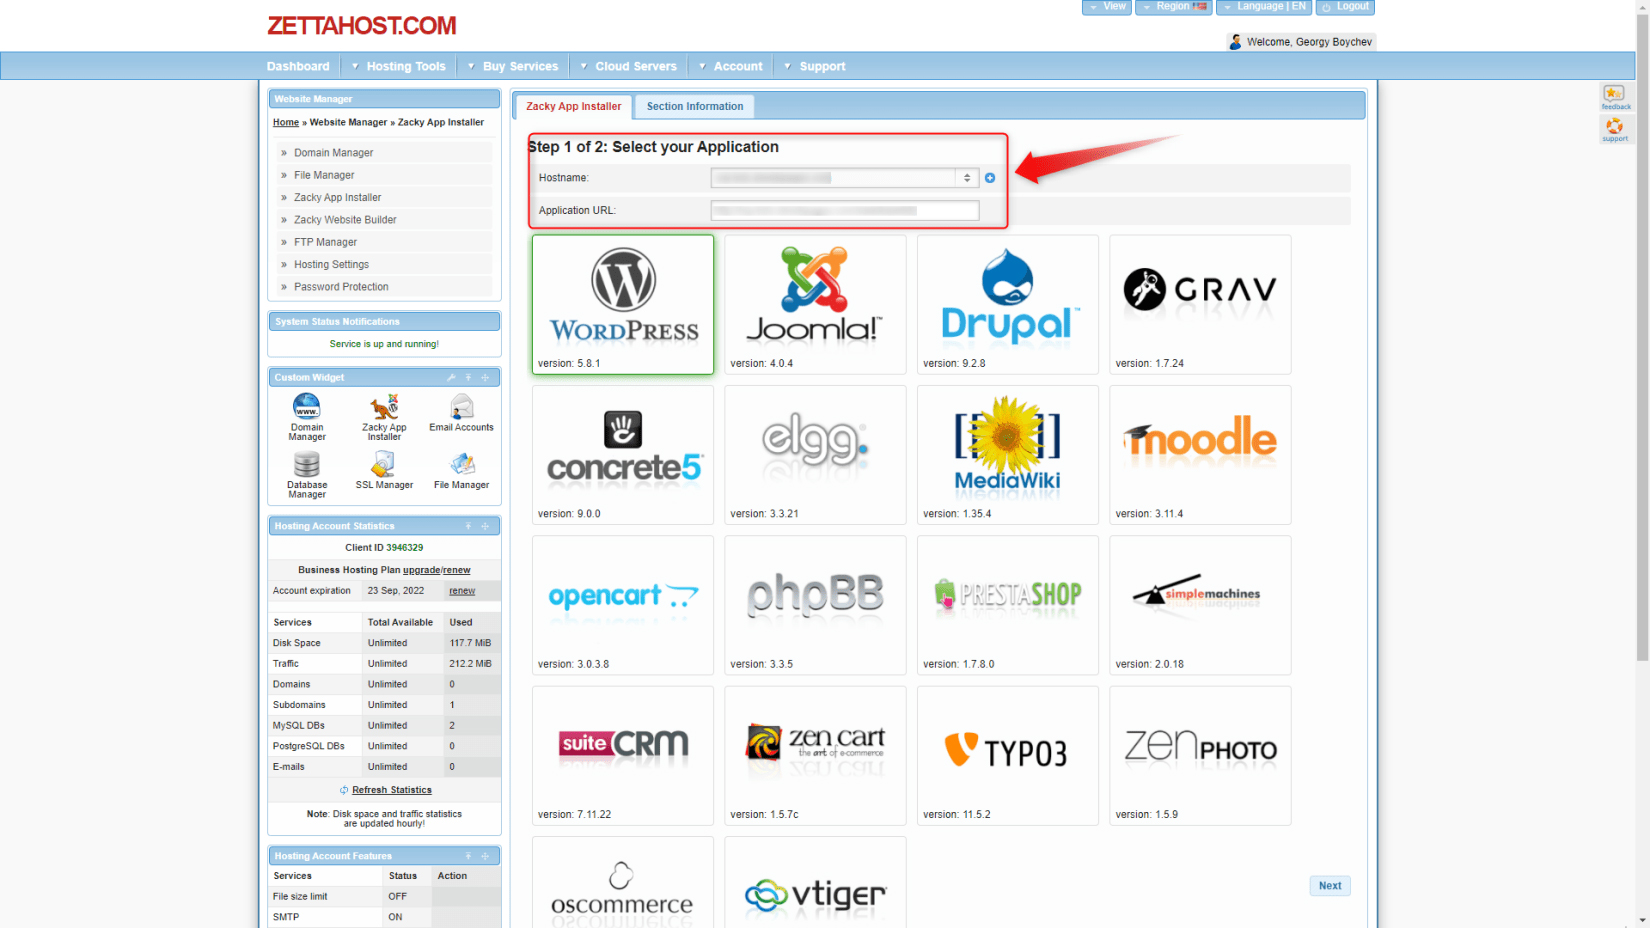
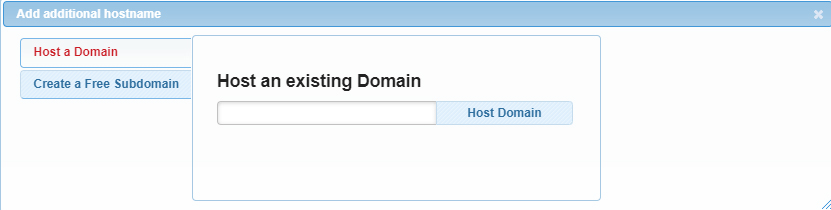
Now, click on the small blue plus icon and select Host a Domain. This option will allow you to enter your already existing rented domain name. Type it down and hit host Domain.
Once you have included your domain, we can proceed with the rest of the installation process. While in the Browse and Install Apps menu, locate the WordPress icon and click it:
Step 4: While following the installation process, you will be asked to choose an Admin Username and Admin Password. These credentials are very important, as you will be using them to enter your WordPress admin panel – the control place from where you will build your site.
You will also be asked to enter an Email address on which you will receive different kinds of important information regarding ZETTAHOST.com and WordPress.
Note! The credentials that you use to enter the ZETTAHOST.com admin panel are not the same as the credentials that you use to enter your WordPress admin panel!
When you’ve entered all these credentials, install WordPress:
Once the installation is complete, you will receive an email at the address you’ve entered. Carefully read it and don’t forget to save it for future reference.
Remember! This email contains your login details, so make sure to save it in case you need to find your login name or password.
These were the three fundamental steps in acquiring WordPress – choosing a domain name, registering for a hosting service, and installing the platform. After we have successfully completed each of these, it is high time you entered the WordPress admin panel – the workstation from where you will build and manage your website.
How to Enter the WordPress Admin Panel
Now that all the setup and installation are complete, it is time to have a look at the WordPress admin panel – the place from which you will access and use all the instruments needed to build a website.
First, you will learn how to access the admin panel of your site and then get familiar with the interface.
There are two ways of accessing the admin panel – via the link in the email you received when registered and installed WordPress and typing down the exact URL to your WordPress admin panel.
If you prefer the first method, simply open the email and follow the instructions.
If you wish to enter the admin panel manually, follow these steps:
Step 1: access the WordPress login window by typing down the URL in your Internet browser.
To do so, first, open your Internet browser and type in the full name of your website. In the case of our example, this is:
myfirstdomainname.net
However, before hitting Enter, there’s an additional component that you should add – an extension to the URL, which looks like this:
/wp-admin
You should add this text right after your website’s name without adding space or any other symbol. The final result should look like this:
myfirstdomainname.net/wp-admin
Now hit Enter. This is the page that should open:
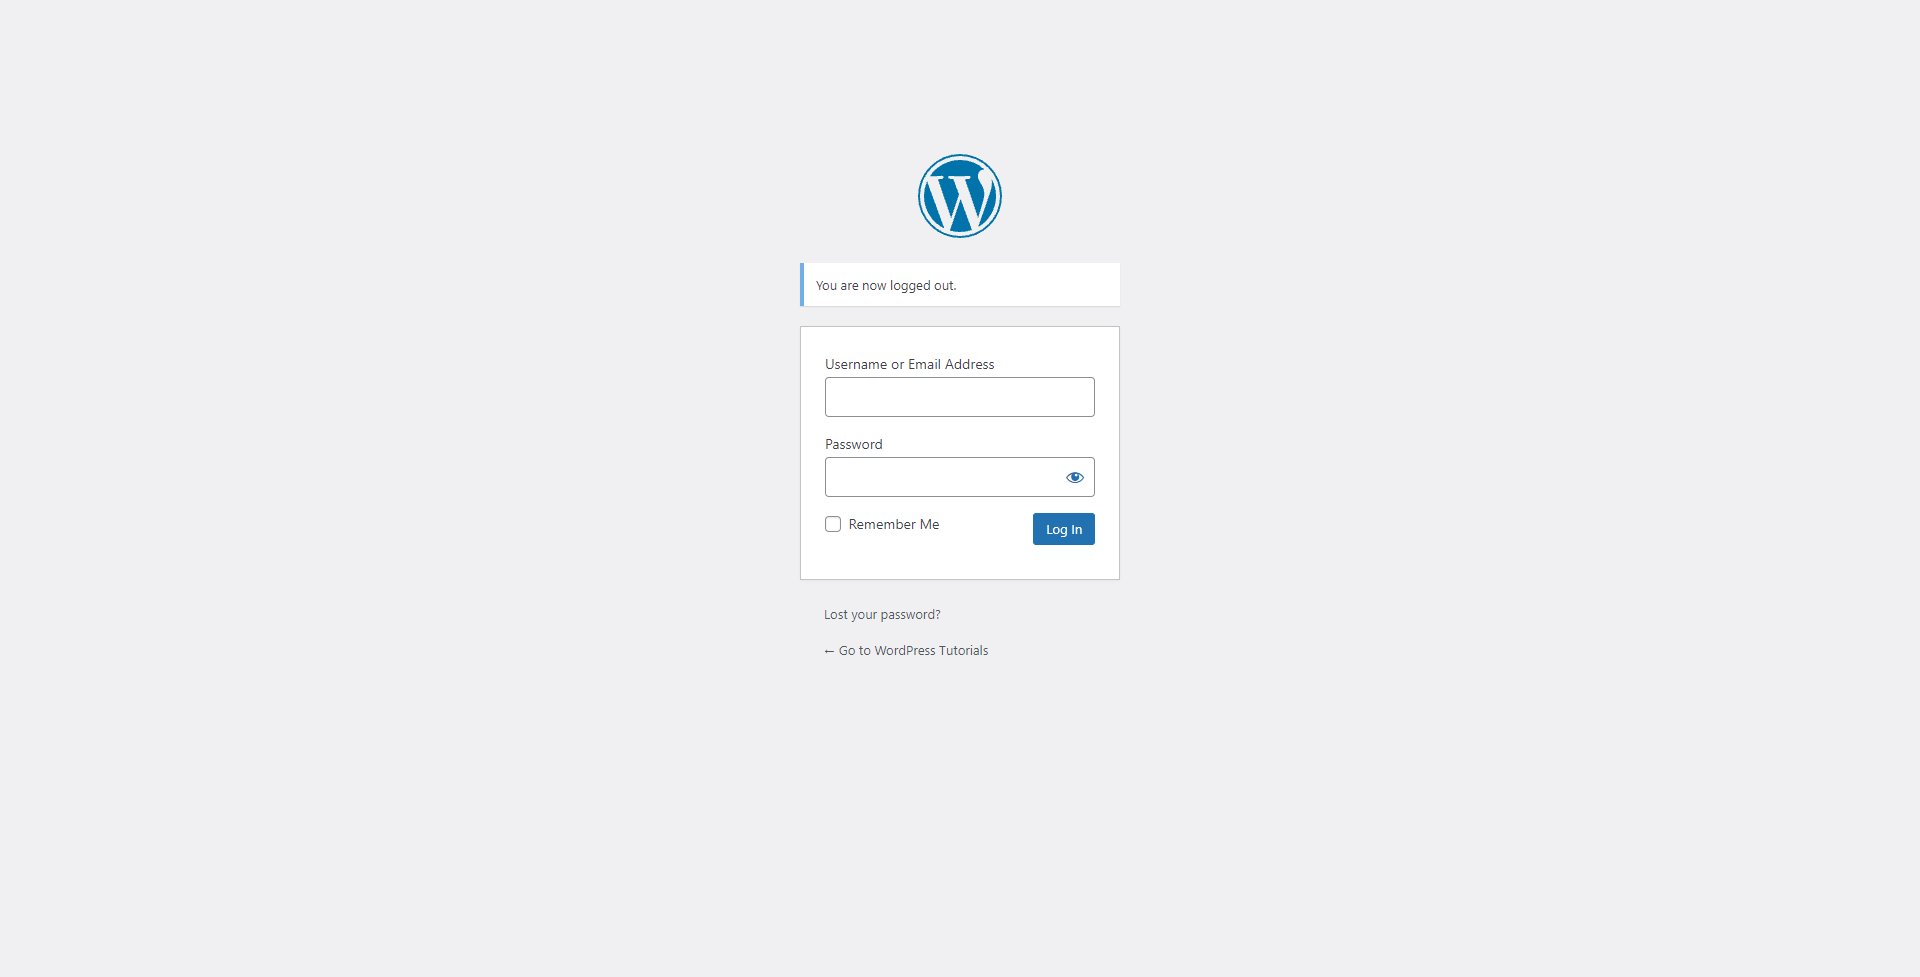
Fill in your login details, (the ones that you chose when installing WordPress), and click the blue Log In button.
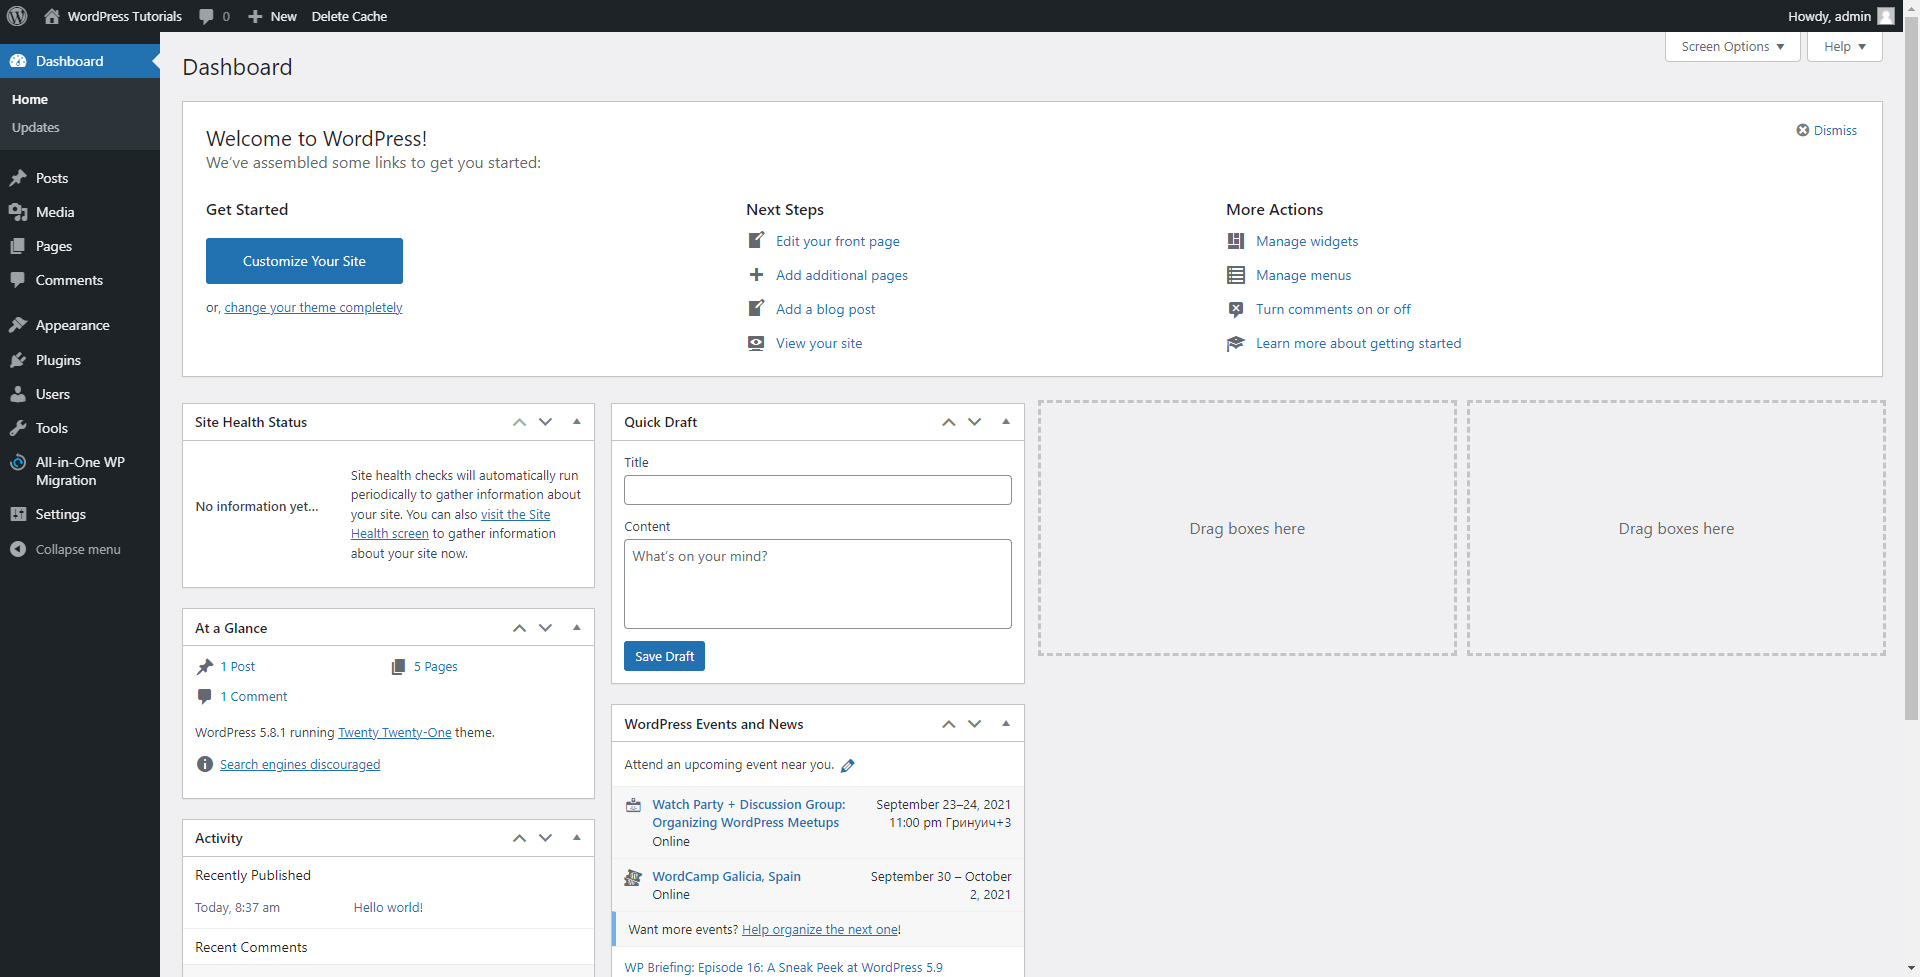
This will open your WordPress control panel. It looks like this:
From here, you will create and manage your website pages, access and use different instruments, upload content, tweak all the website’s components, add or remove visuals, change and customize the layout of the site, add optional functionality, and many more.
This panel is divided into two main segments – the Dashboard and Sidebar:
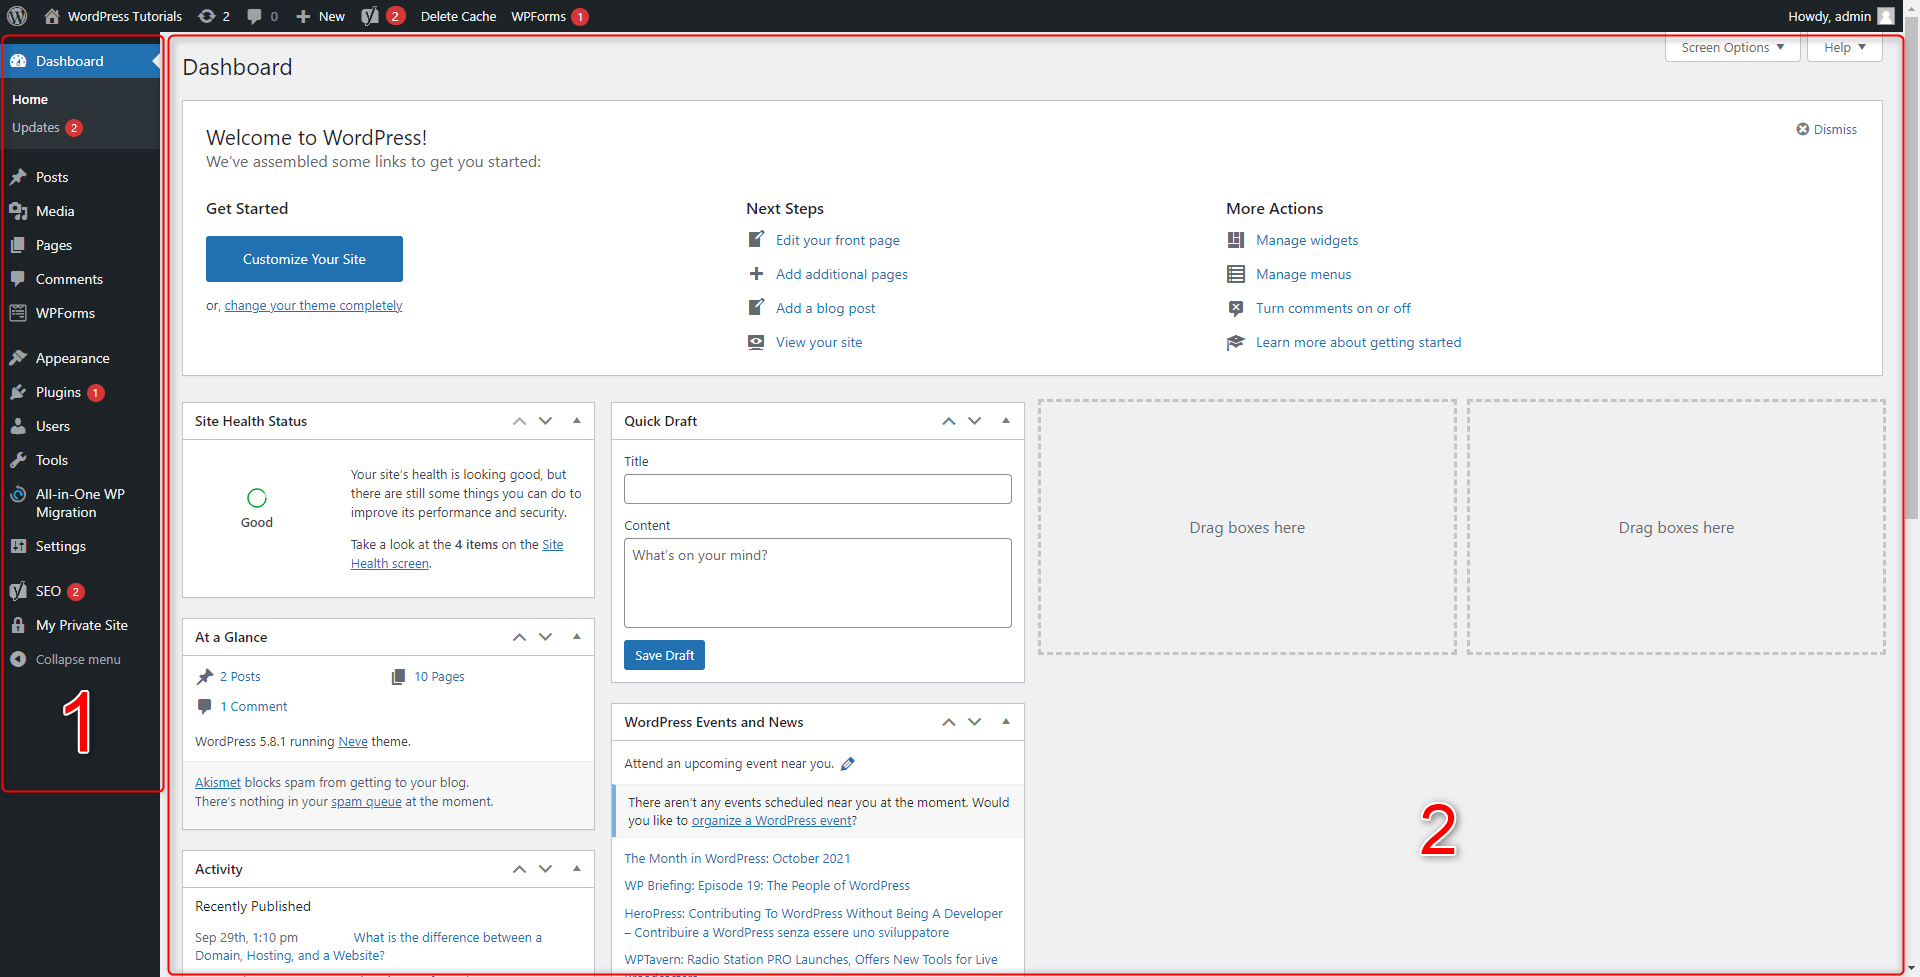
- The tall dark box at the left, marked with 1 is the Admin Sidebar. This panel contains a menu with links to all your website directories and sorts them neat and tidy. The menu allows quick access to different sections such as pages, blogs, plugins, image galleries, options, and more. As we progress with this guide, we will show you more of the Sidebar’s functionalities and how to use them.
- The large box at the center of the screen, marked with 2 is your Dashboard. By default, it shows information about some recent activities and lets you quickly complete a task or two, or access a particular directory. From here you will be able to apply changes to your pages, quickly add posts, and manage widgets, menus, and similar. Or, you can fully customize the dashboard to display the functions and information you find most suitable. Also, depending on what menu section you are browsing at a given moment, a different set of content will appear on the Dashboard.
Although the WordPress admin panel might look overwhelming, with time and practice you will find out that it is intuitive and very user-friendly. Take your time and have a look at all the dashboard’s components, browse each menu and get yourself familiar with the platform’s layout. Then you will read more about the WordPress User Roles.
WordPress User Roles – What Are and What They Do
Simply put, WordPress roles give access to different components to WordPress users. WordPress users are always taking up roles and depending on what these are, they can tweak the site to a certain degree, limited or unlimited by their role’s capabilities and accessibility.
All of the roles contribute to improving your website, however, some can do more than others.
The roles also represent a hierarchy in the CMS – each higher role can do everything the lower one is capable of, but also benefit from access to more functions.
All WordPress roles are (from the one with the fewest capabilities to the one with unlimited access): Subscriber, Contributor, Author, Editor, and Administrator.
Let’s have a closer look at each one, shall we?
- The Subscriber is a role that stays at the base of the hierarchy. It is the role with the most limitations in the CMS. Usually, it is taken by your fellow website visitors who wish to interact with your website. Subscribers can only change their profile info and write comments in the forum sections.
- The Contributor role is similar to the Subscriber but with fewer limitations. This role is taken up by users who wish to help you fill in the content for your site. Alongside comments, contributors can also write and publish blog articles. Also, they can edit and delete their content.
- Authors write, edit, publish, and delete content. However, they are also able to upload and use different kinds of files. They can also edit other profiles and change their passwords.
- The Editor is the next in the hierarchy. They can add, edit, and delete any post or comment, regardless of who the author is.
- The Administrator, also called simply the Admin is the role without any limitations. This is the WordPress user who created the website or someone appointed by him. Admins are able to create, edit, and delete every post and comment within the website. They can also install, change, customize, and delete themes, and do the same with plugins. Admins also can tweak pages, categories, and tags, and edit other accounts that they own. In short, admins can tweak the site in any way they find suitable for their needs.
- The Super Admin. This is the ultimate role. It adopts all the capabilities of the Administrator and also can add and delete numerous sites on multisite networks.
Why Are There WordPress Roles?
Roles help achieve greater efficiency. They also contribute to the structure of the workflow. As the name suggests, different roles deal with different tasks. For example, the author can create a new post and before publishing it, he can hand it over to the Editor who would edit it before publishing.
Additionally, a website can become way too complex to be maintained by a single user, so inviting more people to help with the site’s maintenance might well be a good idea. This is usually the case with popular e-commerce sites and blogging platforms.
Another reason that makes WordPress roles useful is the enhanced security they offer. Not all users need to access all parts of the website. Their access can be quickly and effectively limited by applying them to a certain role.
Now that you know a thing or two about the WordPress roles, next, we will talk about how to change the appearance of your site with WordPress themes, and we will find out what they are and how to use them.
Read more about roles in our special article:
What are WordPress Themes and How to Use Them?
WordPress themes change the appearance of your site. This means each theme changes the design of your website’s areas, sections, colors, media components, and text blocks – all along with adding theme-exclusive visuals and features.
Technically, a WordPress theme is a zipped folder with a set of PHP page templates, and different files, altogether combined with CSS stylesheets.
Each theme changes the feel of the website and the vibe it gives to visitors. The WordPress themes are pre-designed and you need only choose the one that fits you the most. As you will see, you can also customize your selected theme.
WordPress themes are handy for numerous reasons. Some of them include:
- WordPress themes save time and funds: they are professionally made and you won’t start constructing the visuals of your website from the ground up, or pay someone else to do it. You simply select and customize a theme, and then apply it to your site.
- Choices are ample: There are thousands of themes that are instantly available for you. Free and premium, simplistic and feature-rich, you can find the one that makes your website resemble your precise stylistic requirements.
- WordPress themes are customizable. Choosing a theme is only the beginning of the designing process. Each one can be amended in any way possible and still retain its original vibe but with a unique twist.
- WordPress themes are easily manageable: They can quickly and easily be installed, customized, and deleted, with only a few clicks here and there.
In the following section, you will find out how to browse, choose, install, and apply themes, as well as how to customize the one that you have chosen for your site.
Read more about the WordPress themes:
How to Choose the Right Theme for Your Website?
- Choose a theme according to the site’s niche and purpose: Whether you want to create a blog, an online store, a business site, or an online magazine, you should choose a theme according to your final goal. Many themes are specially designed to look good with certain types of sites – blogs, stores, business sites, or anything else. Search for them.
- Match the theme with the vibe of your brand. What should your site look like? Joyful, serious, funny, glamorous? What are your target visitors like? Doctors, art students, mechanics, businessmen, musicians, handymen? Do some research and find out what would make your layout resemble the character of your visitors and the voice of your business brand. This is important because the right design will contribute to positive feedback and satisfy visitors.
- Keep in mind the WordPress updates: you should select a theme that incorporates all of the WordPress latest updates. This ensures that the theme works neatly with WordPress and above all, is safe and reliable.
How to Browse, Install, and Apply a WordPress Theme?
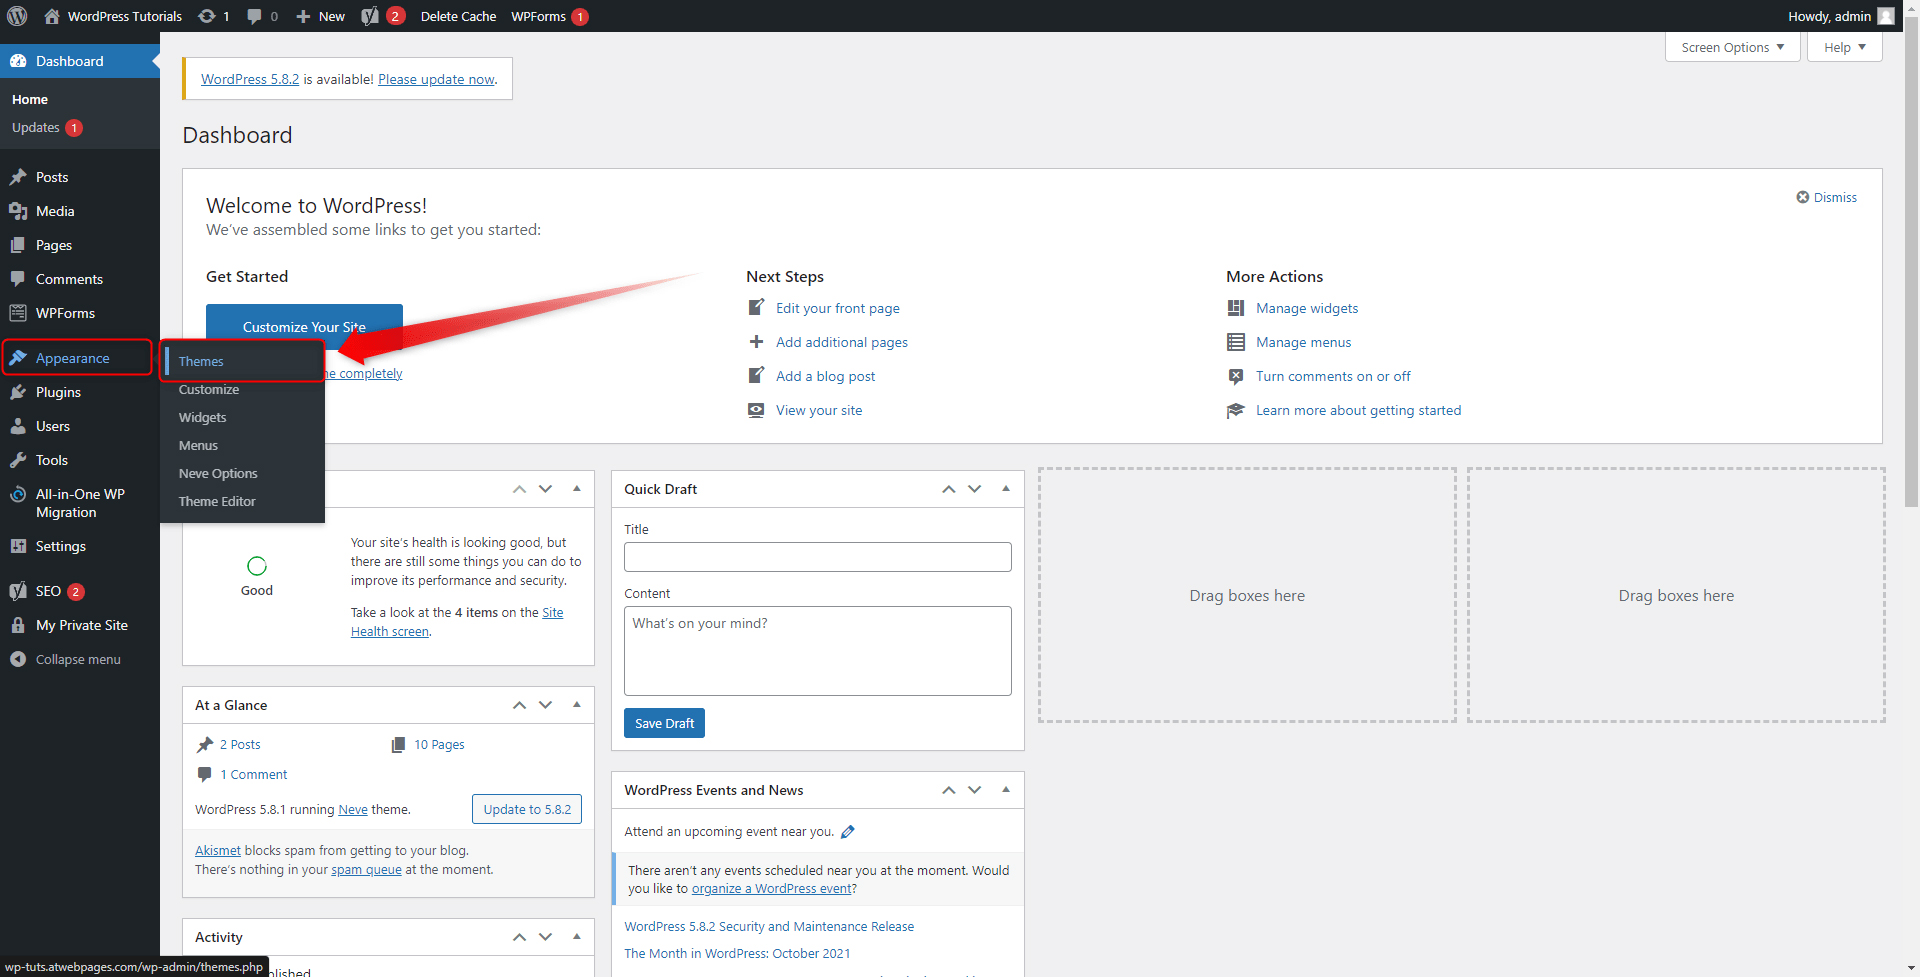
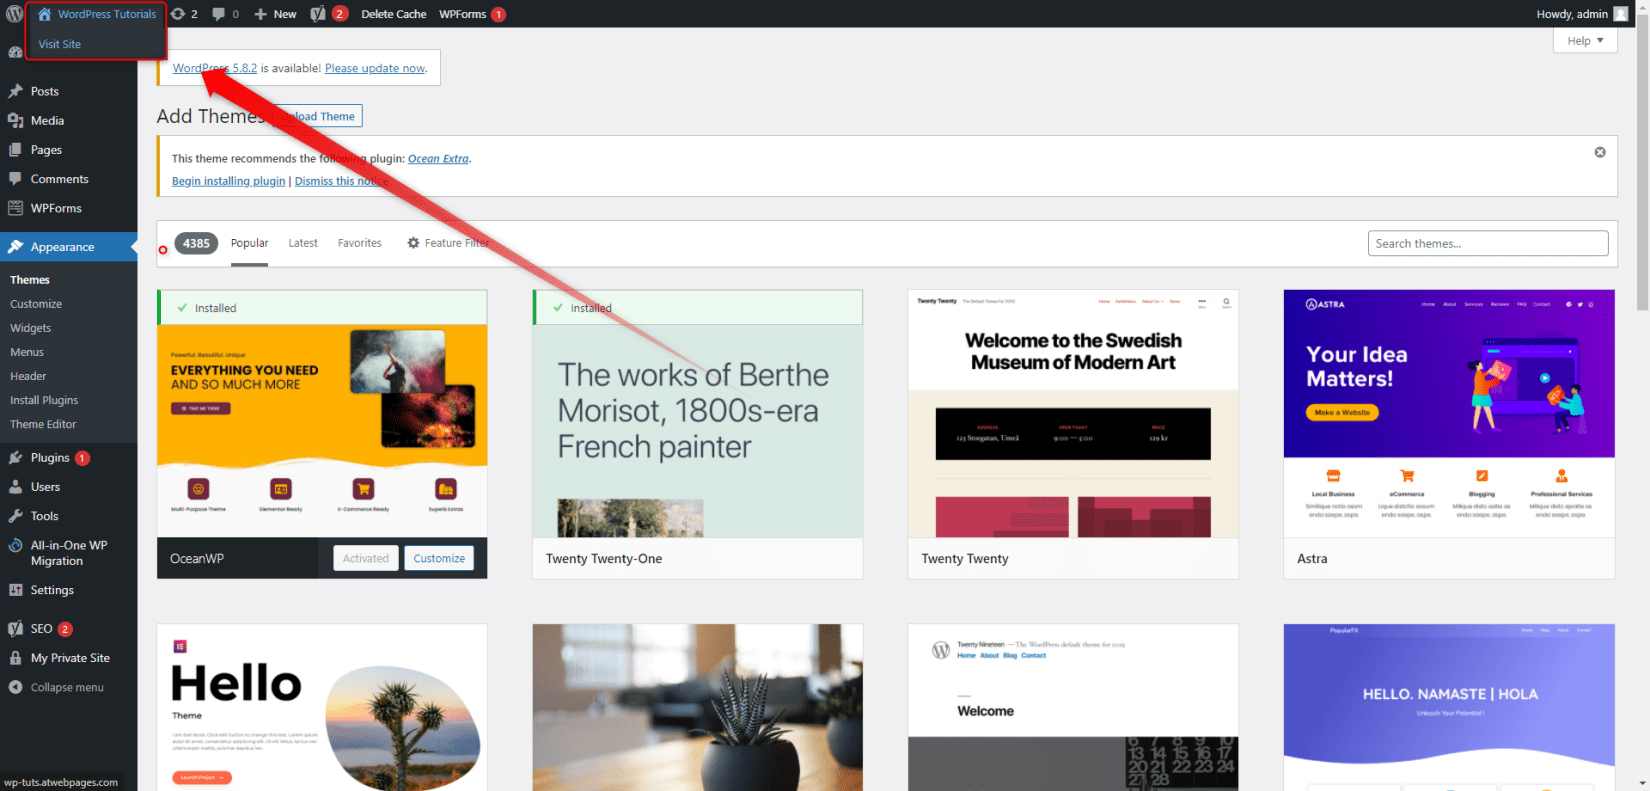
Step 1: Via your WordPress admin panel go to Appearance->Themes:
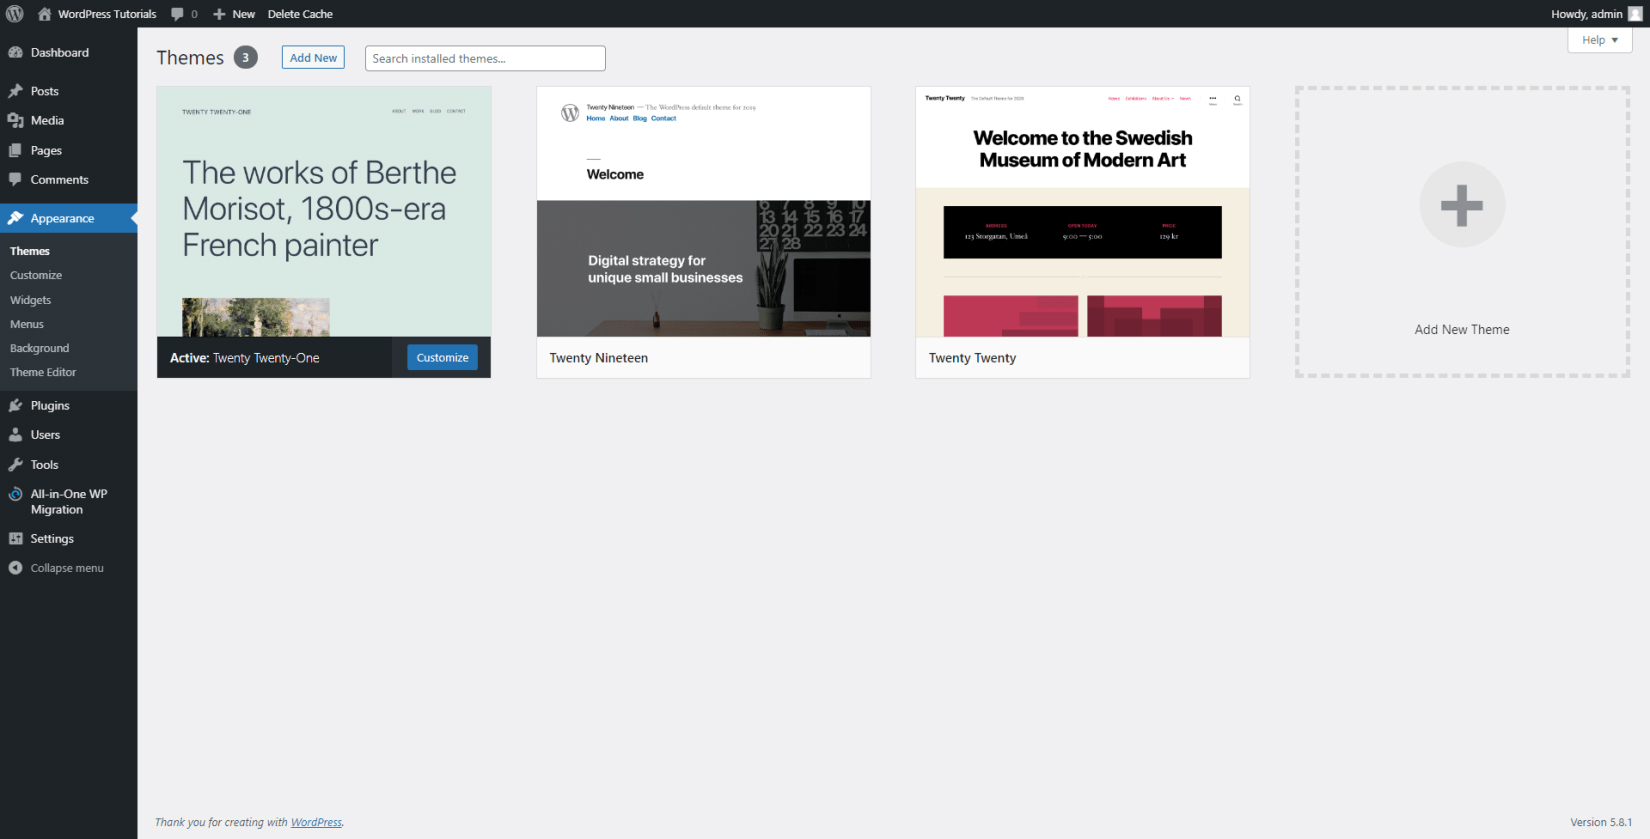
This will open the Themes directory. Notice that there are three pre-installed themes. These are Twenty-Twenty one, Twenty Nineteen, and Twenty Twenty. As mentioned, Twenty Twenty-One is the one that is activated by default:
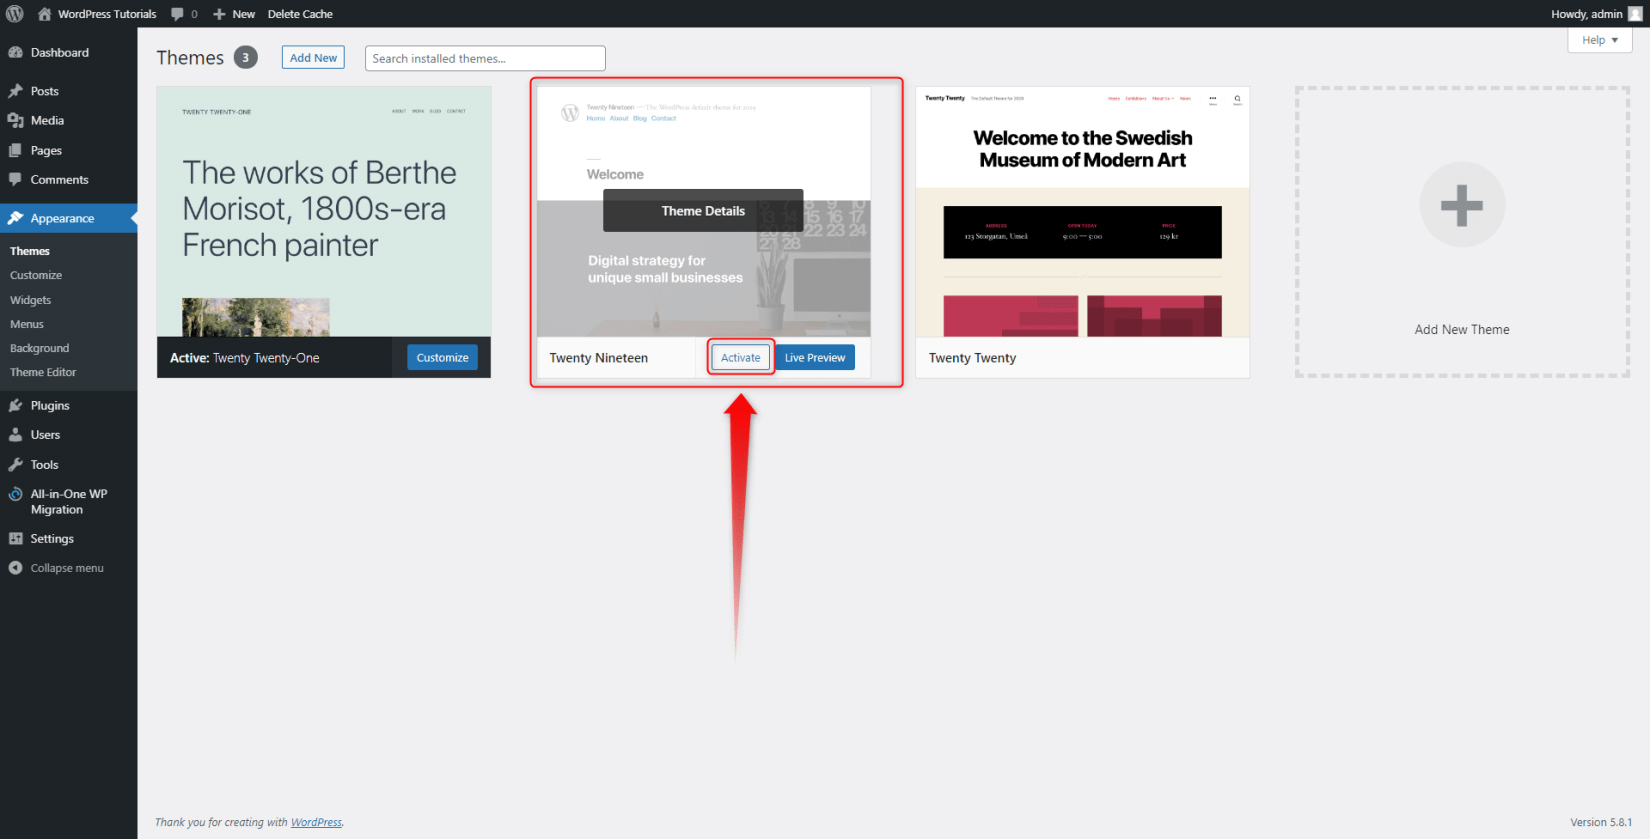
You can quickly apply one of the other two themes by clicking on the Activate button:
You can also search for other themes – WordPress contains a massive library of available ones. Accessing and browsing them is easy. Here’s what to do:
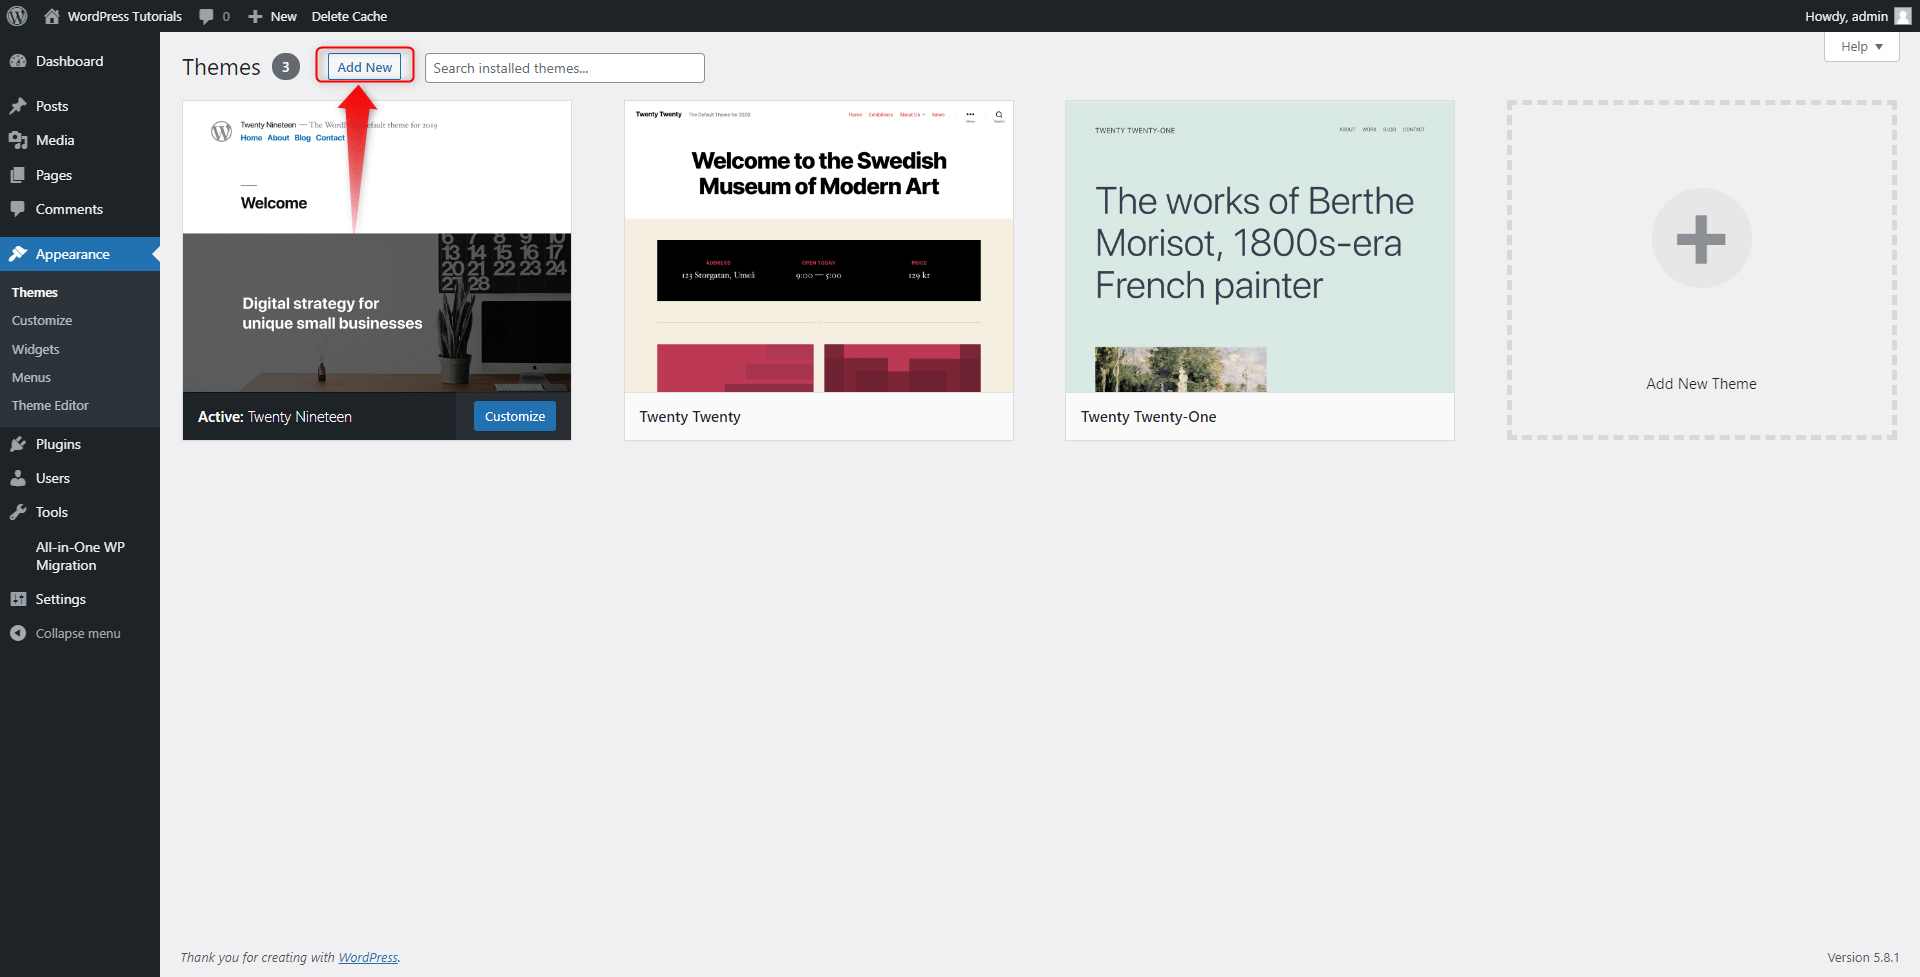
Step 1: In the Themes panel, click on the Add New button, located at the top left of the screen:
This will open the library of all the available WordPress themes:
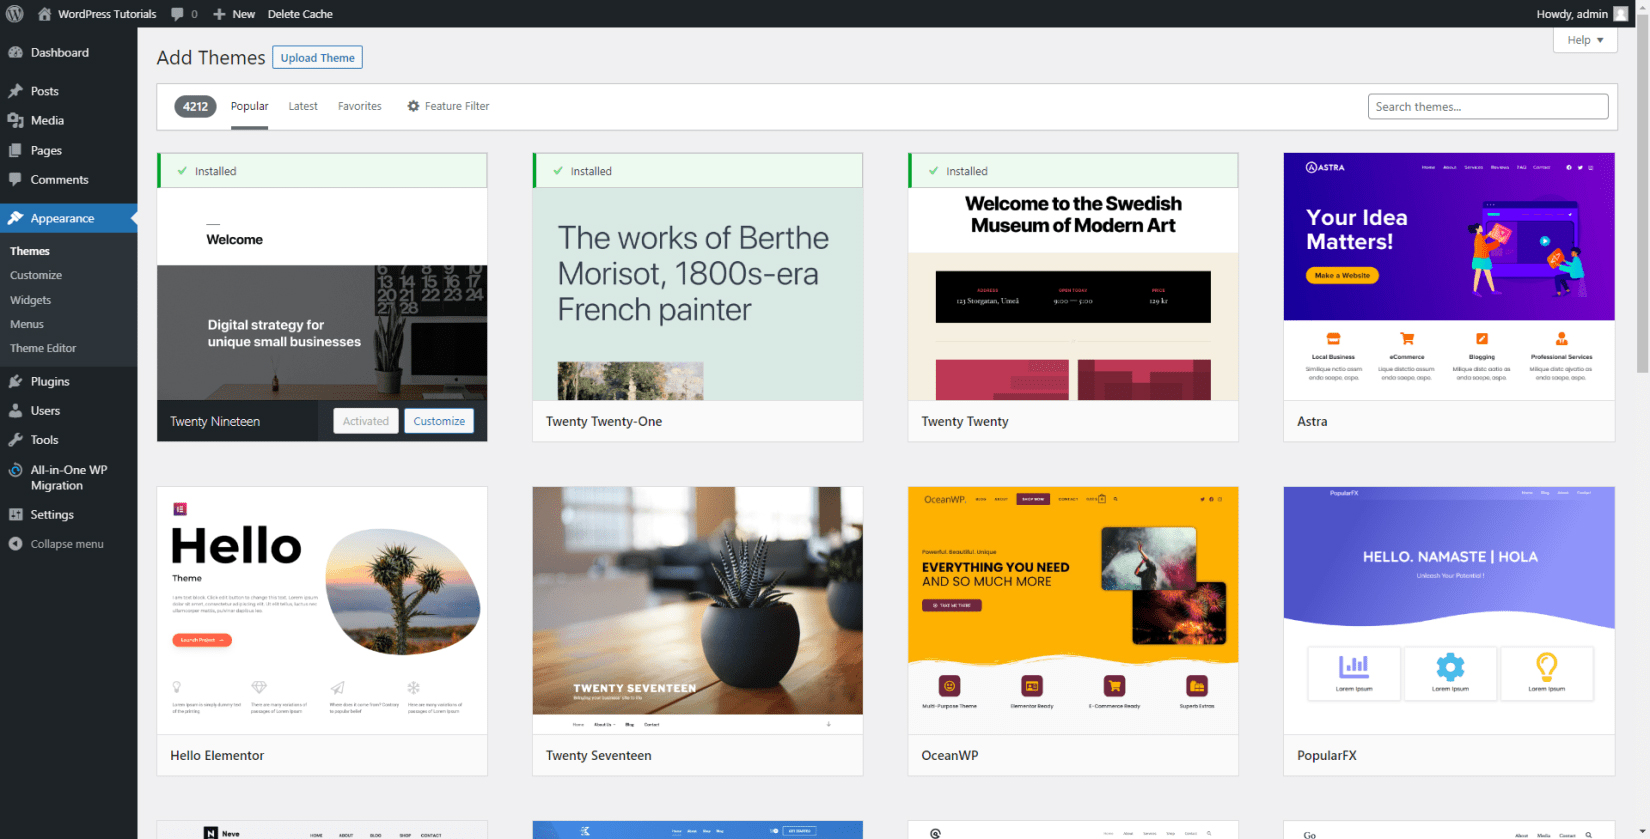
Step 2: Choose and install a new theme.
Take your time and browse the library. When you find the one that fits you, install and activate it. To do so, hover your mouse over the theme’s icon – an Install button will appear. Click it and wait until the setup is completed:

This button will then turn to Activate. Click it in order to apply the theme to your site.
To see the new layout of your site, open it:
Here’s how our site changed:
It does look a bit blunt, but in the process of building our site, we will gradually make it more vibrant and appealing.
After you’ve installed a theme of your choice, it is time to see how to customize your theme.
How to Customize Your WordPress Theme
Although the stock appearance of your chosen theme might well be just fine, it is worth tweaking it a bit.
What does Customization Mean?
This is the process in which you make visual changes to the WordPress theme. Such include, and are not limited to:
- Add content to different areas: you can choose which section of the website will contain headings, images, text, and all other components. You are also able to determine the number of these sections, size, and overall appearance.
- Colors: You can change the color scheme of your theme. Take advantage of such an option – the right colors can enhance the positive user experience.
- Pages and menus: you can add, remove, amend, and reshape the website’s pages and menus in any way possible.
- Changing the fonts: adding a touch of personalization to your text fonts can greatly enhance the appeal of your site.
How to Access the Customization Options of Your WordPress Theme?
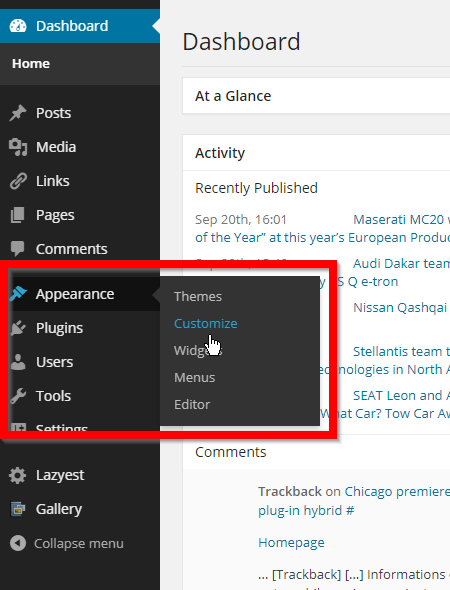
Step 1: Enter the WordPress admin panel and head to the Sidebar. From there locate the Appearance button and hover your mouse over it. This will open a new menu. From there click on Customize:
This will open the customization page:
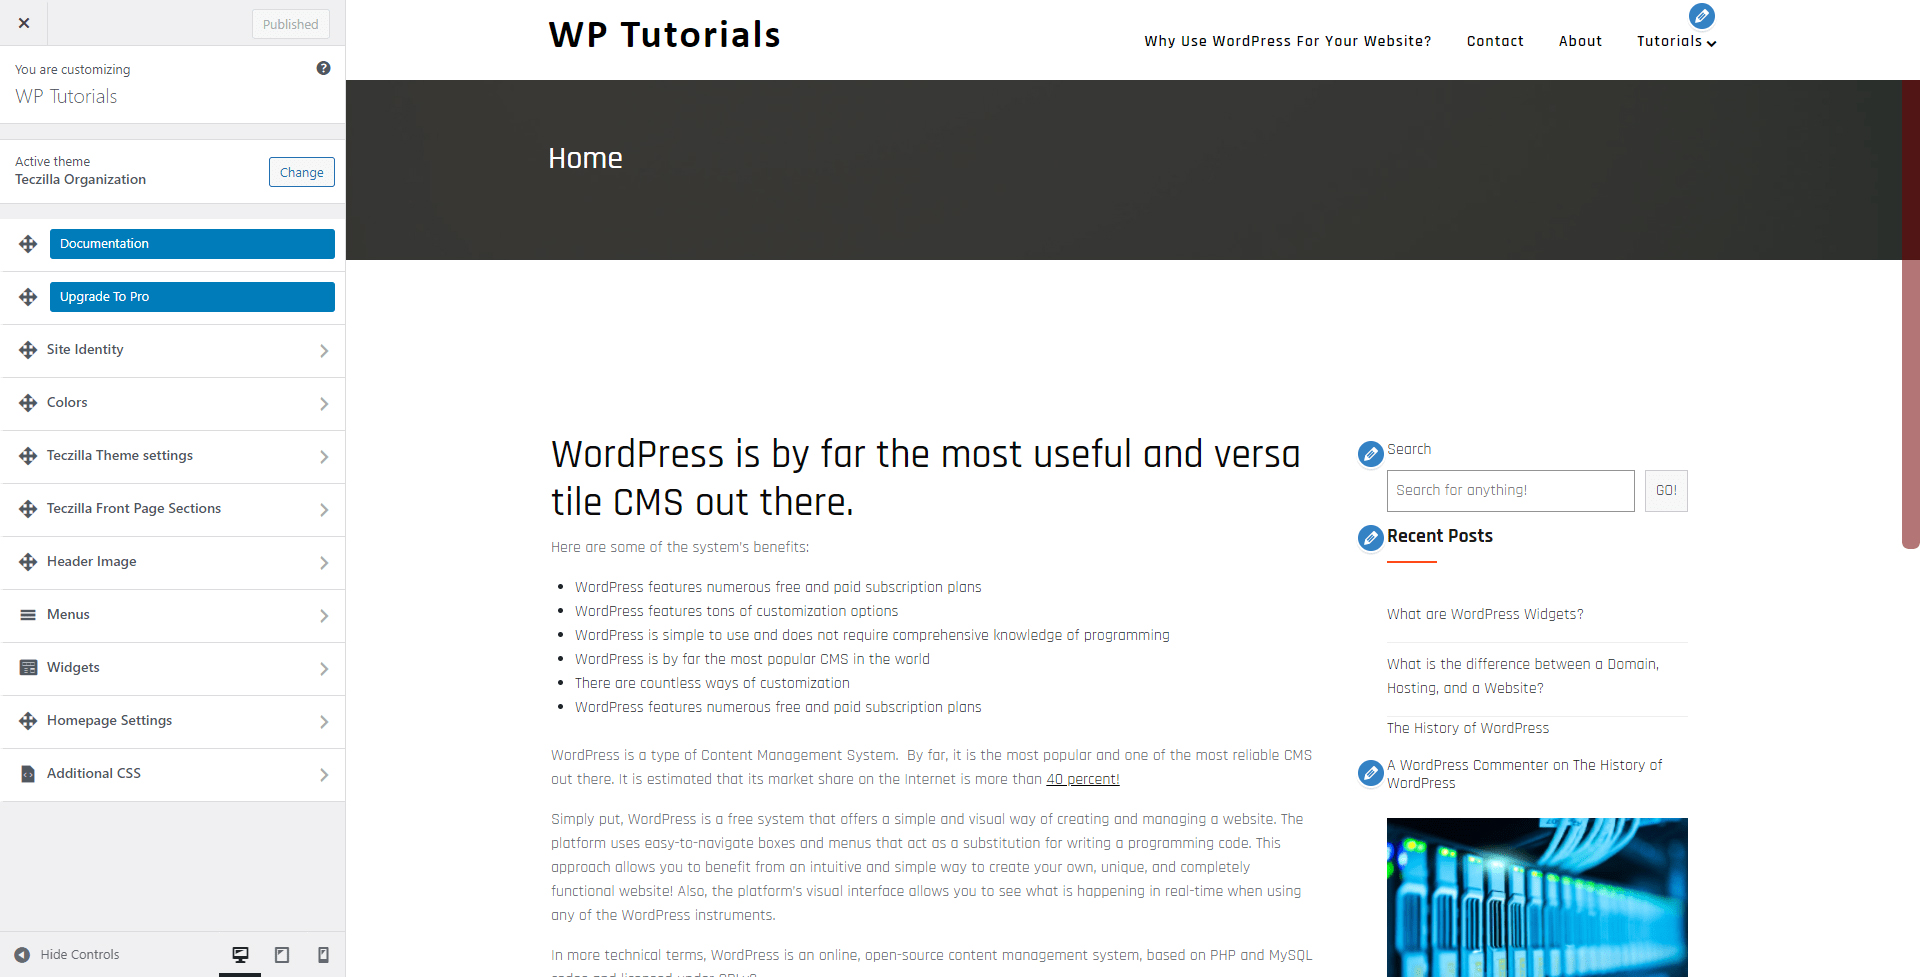
From here, you can change the theme’s images, texts, fonts, menus, and buttons. You can also change their places and overall layout.
- How to Create a WordPress Child Theme
- How to Edit the WordPress Footer
- How to Edit the WordPress Header
What are the WordPress Widgets?
WordPress widgets are small components that provide new ways to include and manage content on your site. Widgets can be seen in many different places on a webpage – depending on the WordPress theme you’ve applied to your site, widgets can be placed in specific areas across the page, known as “widget areas”– headers, footers, below the blog posts, next to the heading, and on all other different places.
Many WordPress themes come with a dedicated set of widgets that can be customized in a certain way. This number of default widgets is oftentimes sufficient for most users, however, WordPress includes the possibility to expand their number and capabilities.
The main function of the WordPress widgets is to show on-page information or enhance the page’s capabilities and usually function beyond the page’s main content. The widgets can contain different navigation tools, menus, calendars, a box with the latest blog articles, an expandable list of recent comments, a shopping cart, login boxes, and additional media items. Furthermore, visitors can quickly see a photo, fill in a signup form, or, for example, see the weather report, all with the help of WordPress widgets. The possibilities are quite abundant.
As with numerous other WordPress, widgets are highly versatile, as their layout and functionality can be greatly customized, so they can fully resemble the design approach and goals of any web page.
Also, installing, tweaking, and incorporating widgets don’t require programming skills – the great idea behind WordPress is to make it easier for non-technical people to create and maintain fully functional websites.
Beginner WordPress users oftentimes confuse widgets with plugins. This is due to their great similarity and related functions. However, there are some vast differences between the two. Generally, WordPress widgets are modular elements that add some precise and focused functionality in a certain area of the webpage, whereas the plugins add wider functionality to the WordPress admin panel and to the website that is not available by default. Such functionality might well include blocking malware, scanning for broken links, helping you improve SEO, and similar.
To get a deeper insight into the differences between the two, in the next section, we will tell you what a WordPress plugin is and how it functions within the entire WordPress platform.
See also:
What is a WordPress Menu?
The WordPress Menu is the primary tool your visitors use to navigate through your site. It is visible on all of your pages and at all times. At their core, menus are hyperlinks that lead to a certain page and area of your site. However, in the case of menus, these hyperlinks are masked with a logical word or phrase, which helps your visitors understand where exactly this hyperlink leads to. As mentioned, the menu section is contained within the header and the footer is to contain a menu.
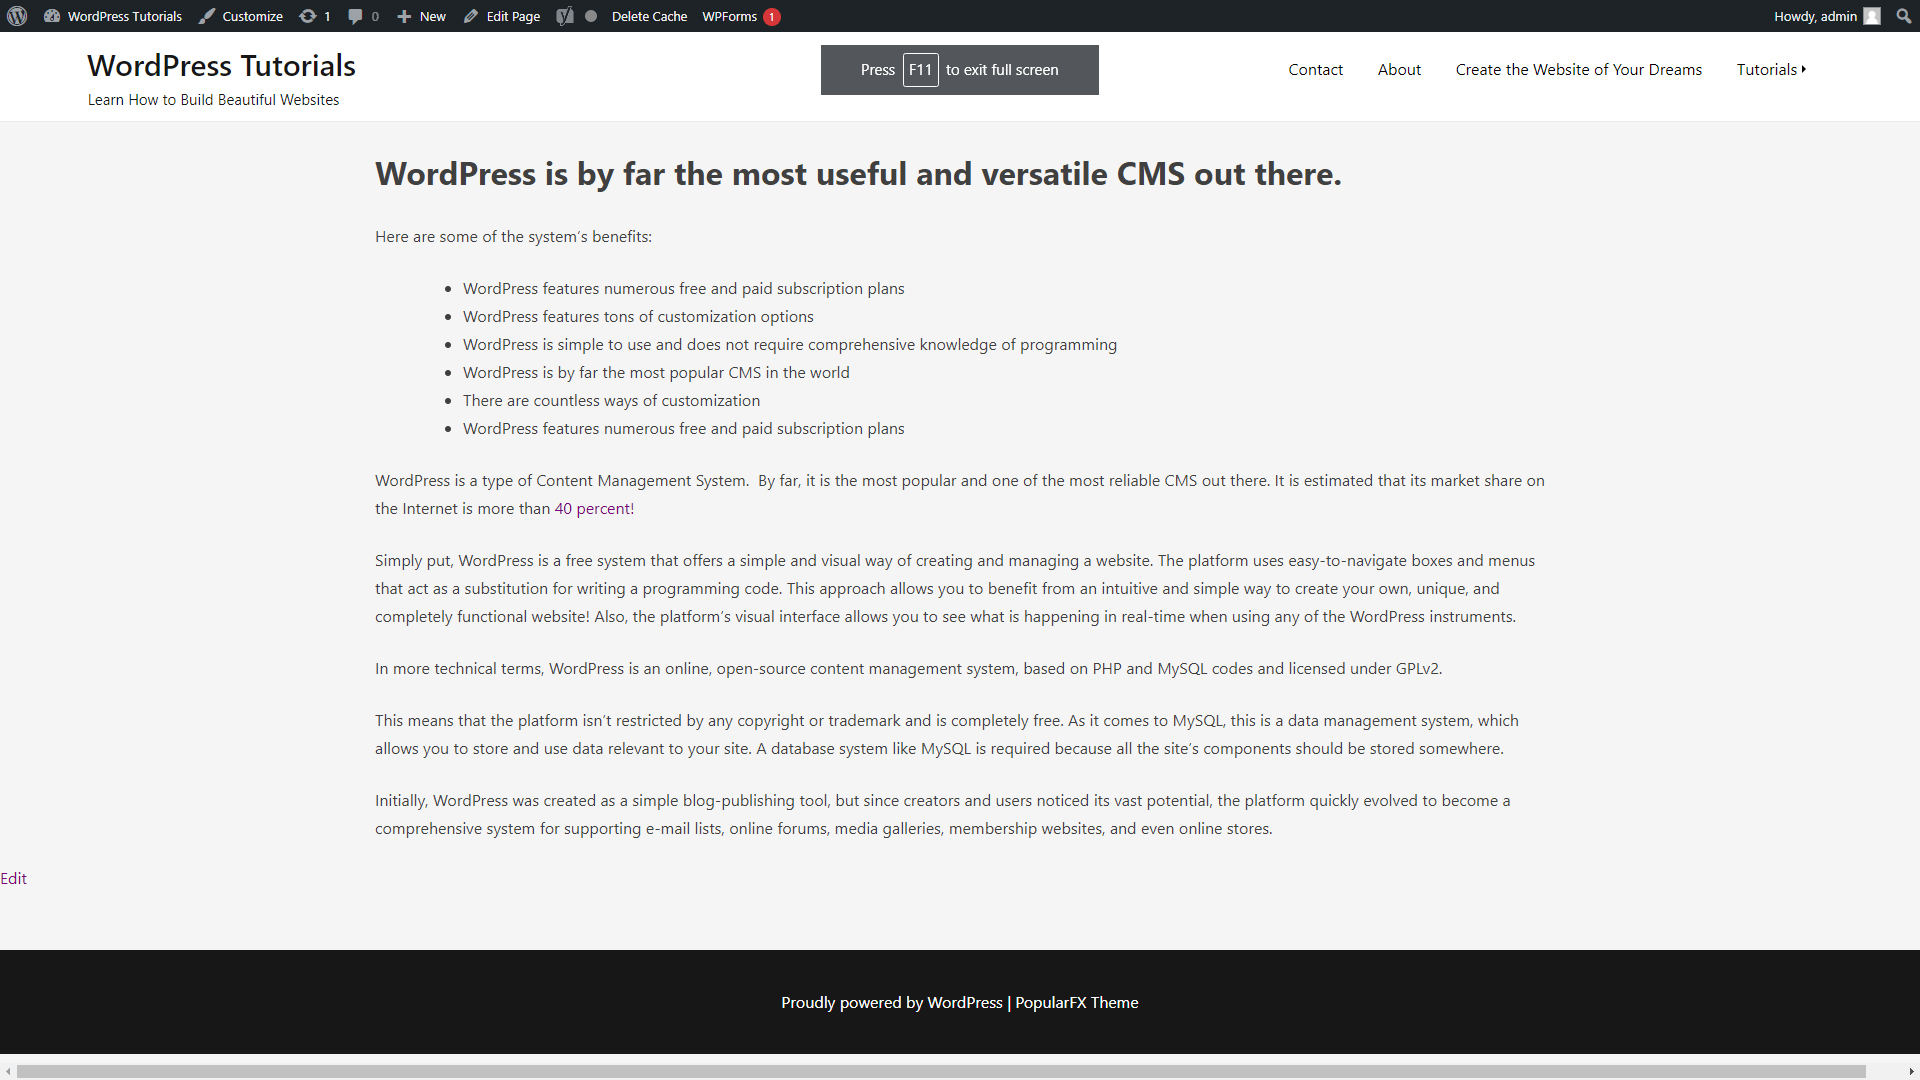
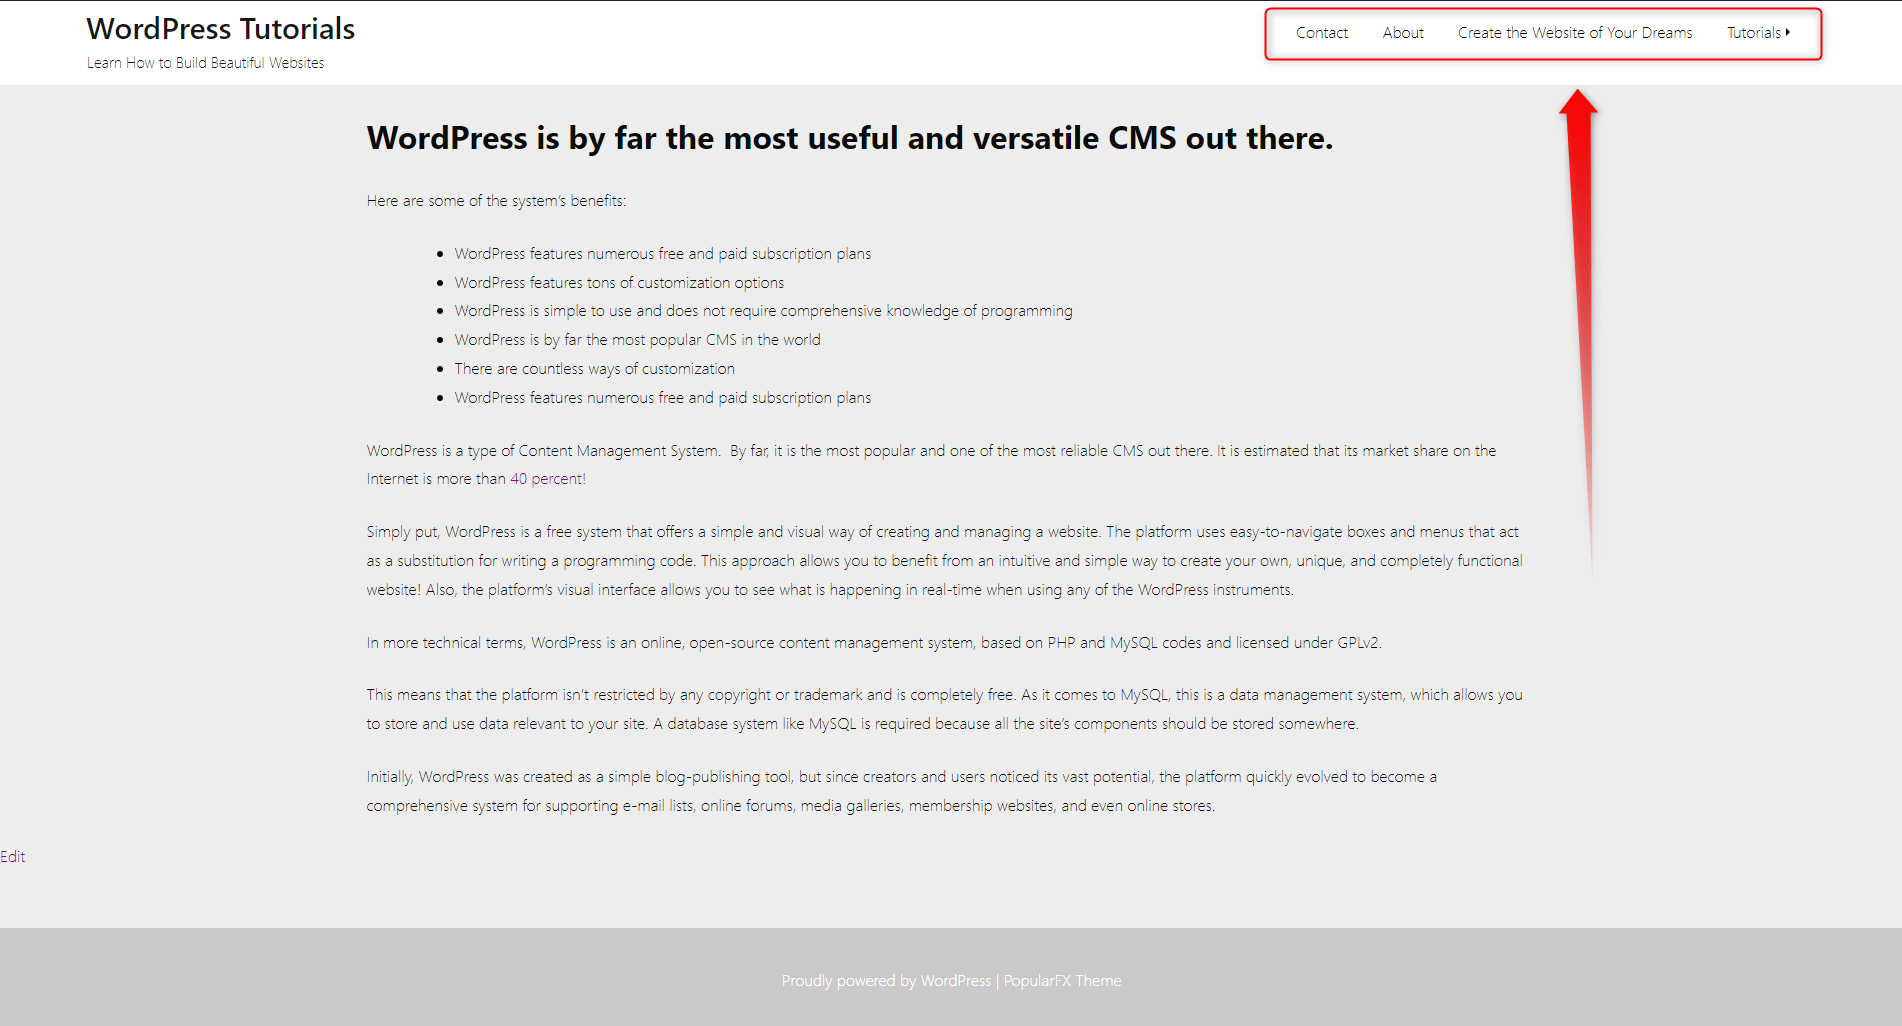
As a general rule of thumb, the menus contain the names of the pages they lead to. In our case, these are: Contact, About, Create the Website of Your Dreams, Create the Website of Your Dreams, and Tutorials:
In this section, you will understand how to create and include a menu in different sections of your site.
The process is divided into two main segments:
- Creation of a menu
- Include this menu in a particular section of your site.
We will start with the first phase and create a menu. To do so, you should first open your Menus panel.
How to Create a New WordPress Menu?
Step 1: To access the Menus panel, enter your Admin Panel head towards the Appearance menu located in the Sidebar, and then choose the Menus option:
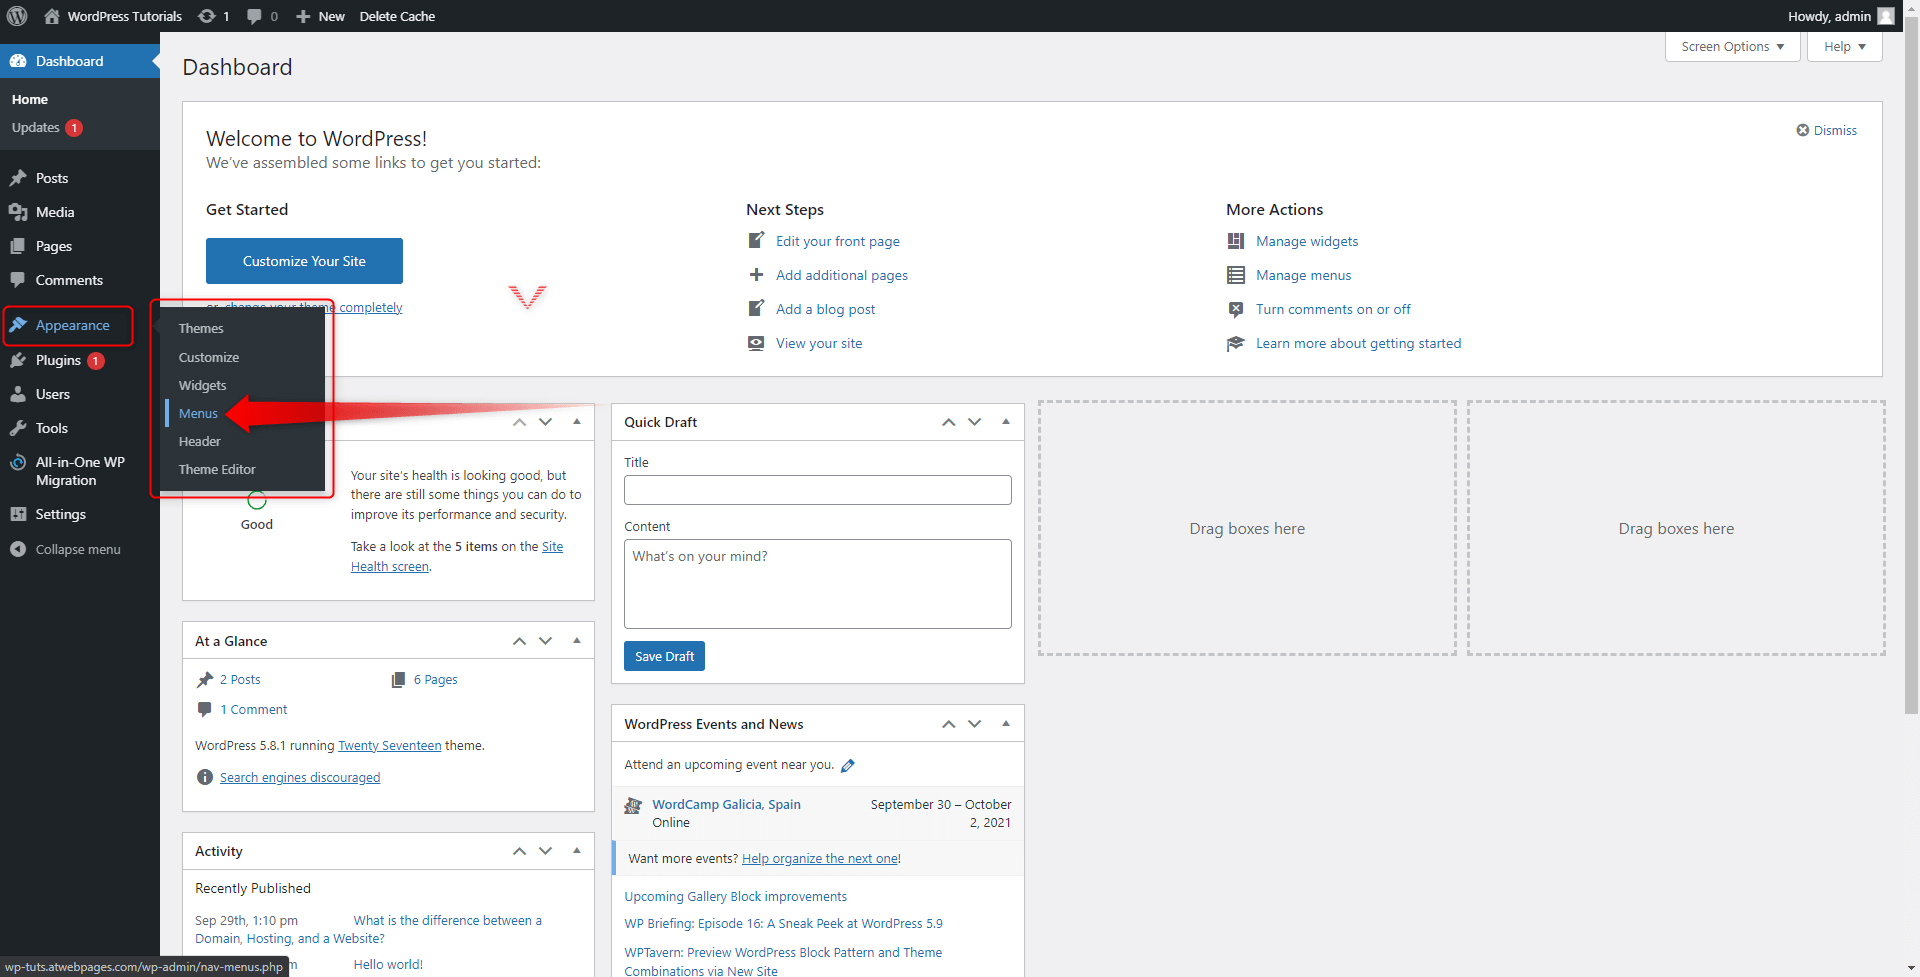
This will open the Menus page:
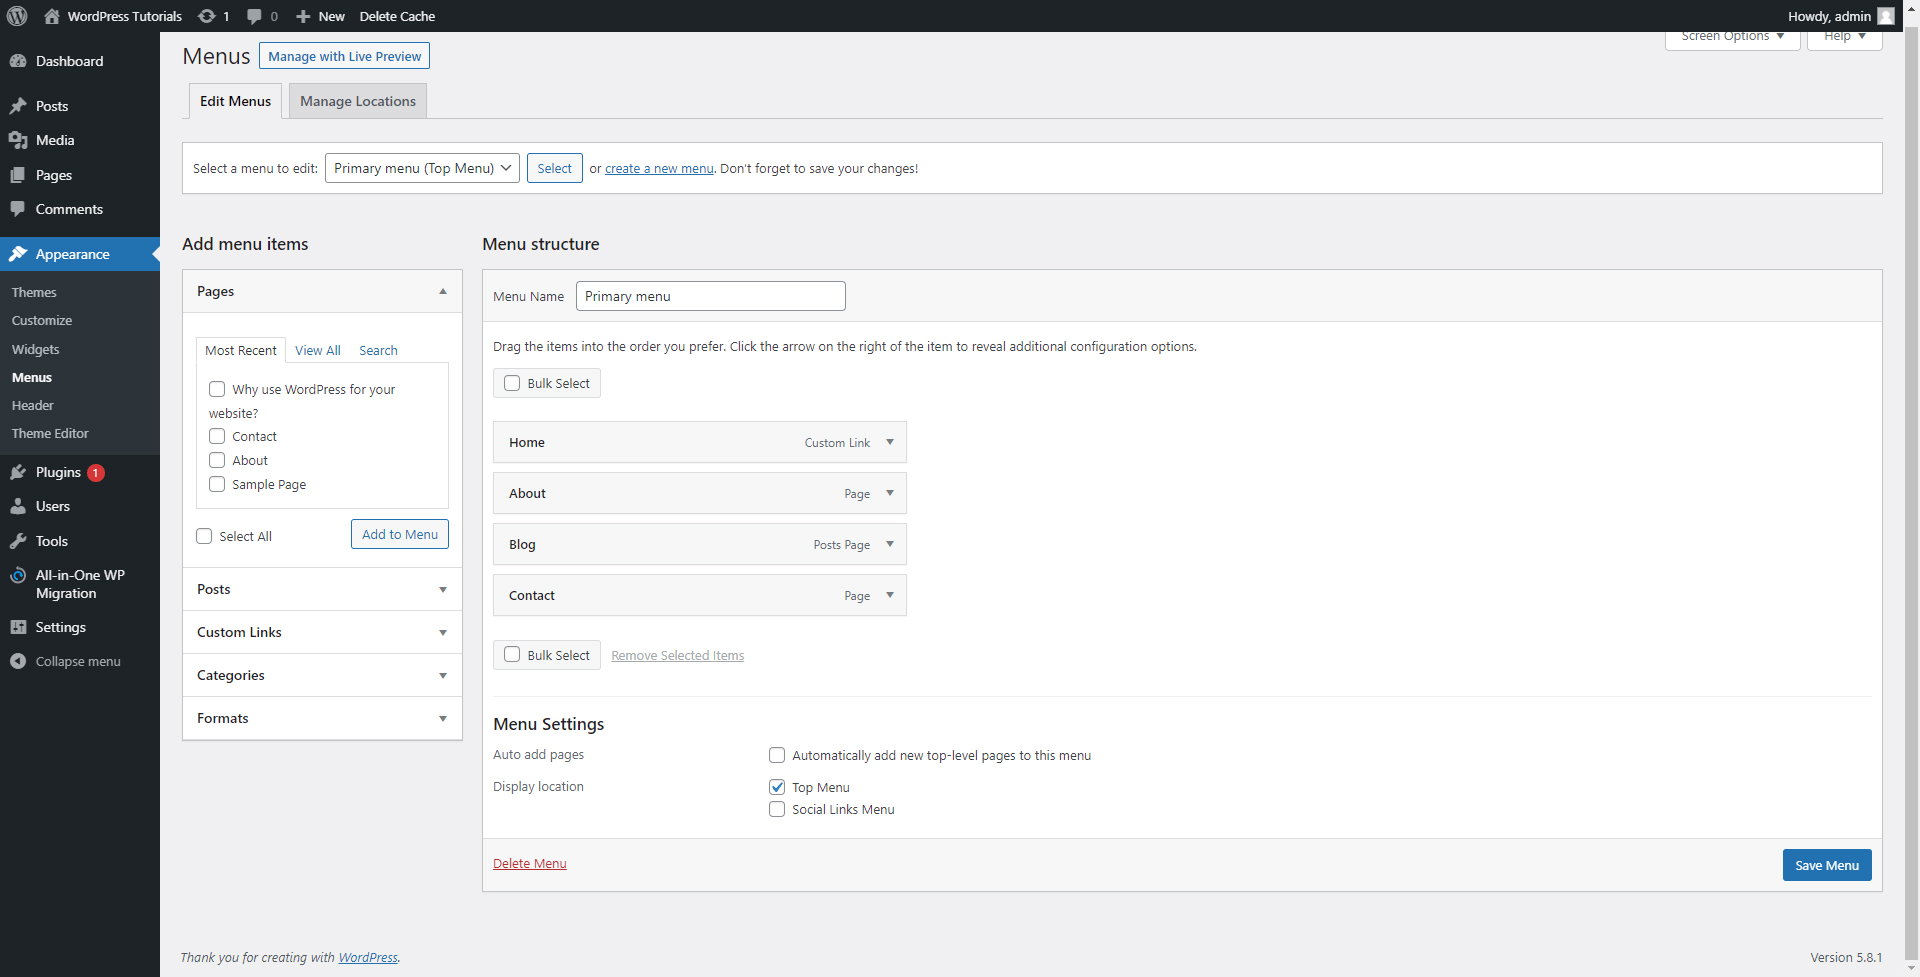
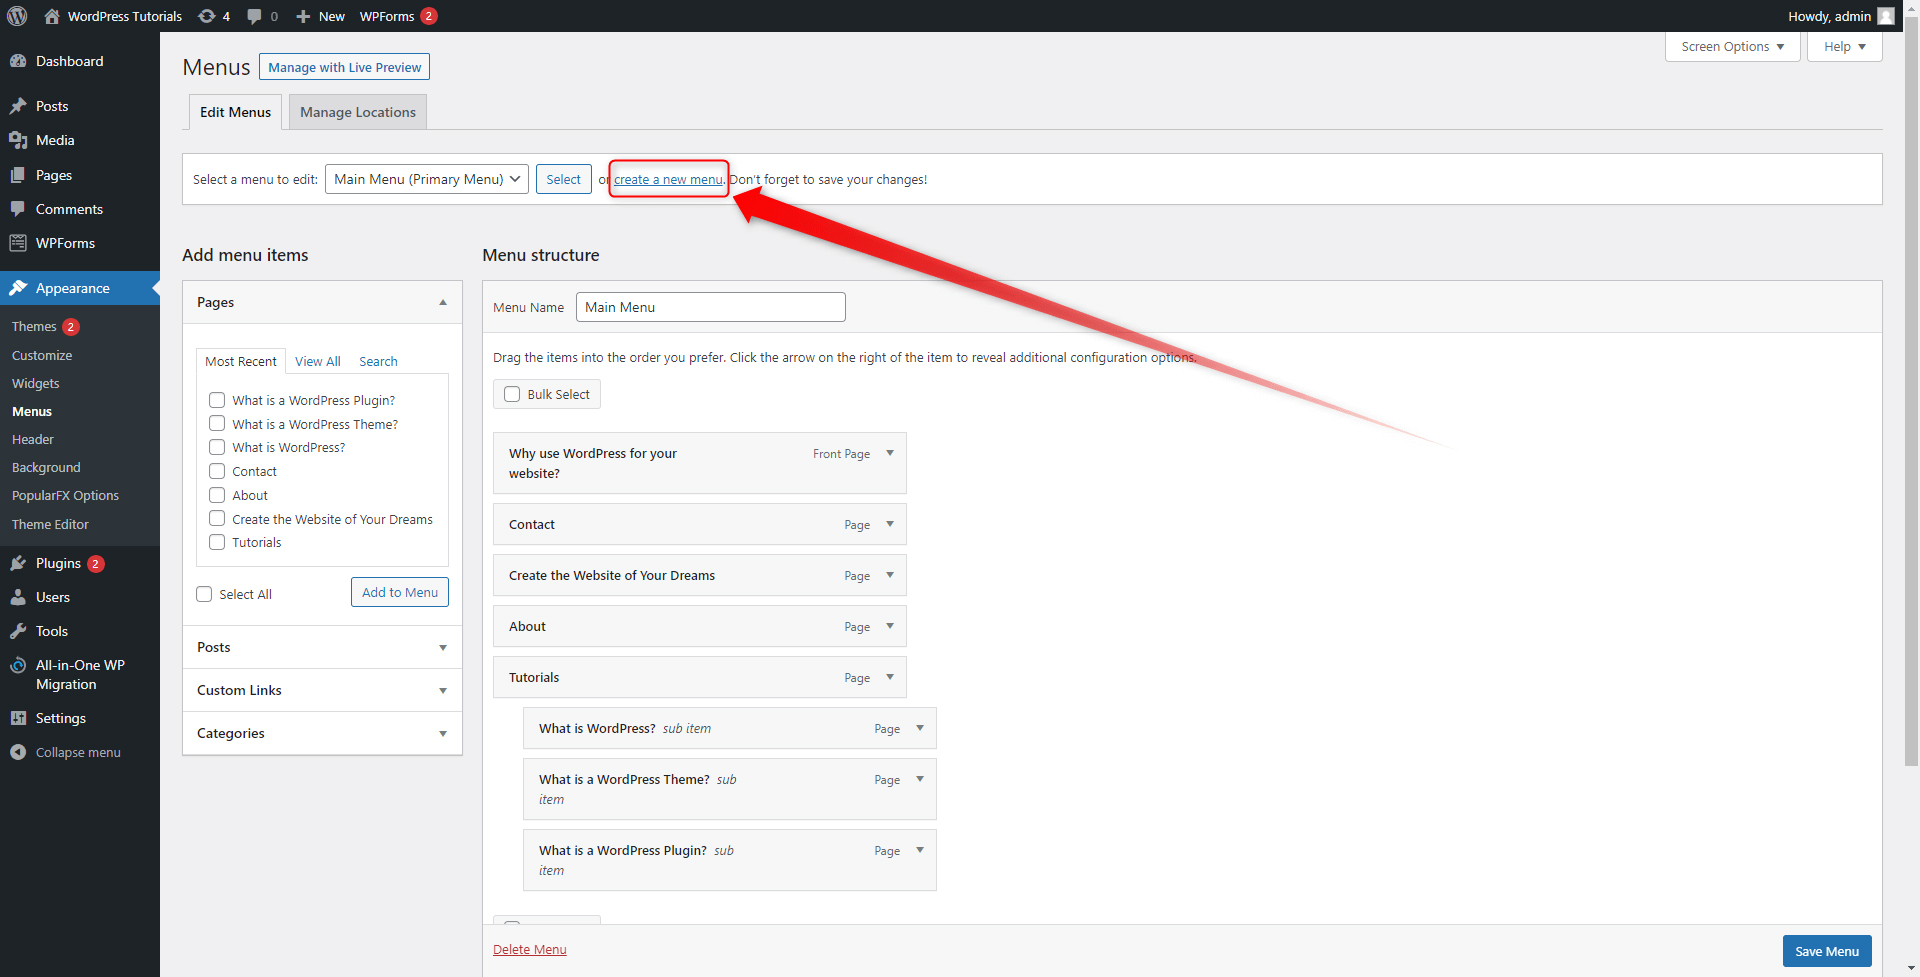
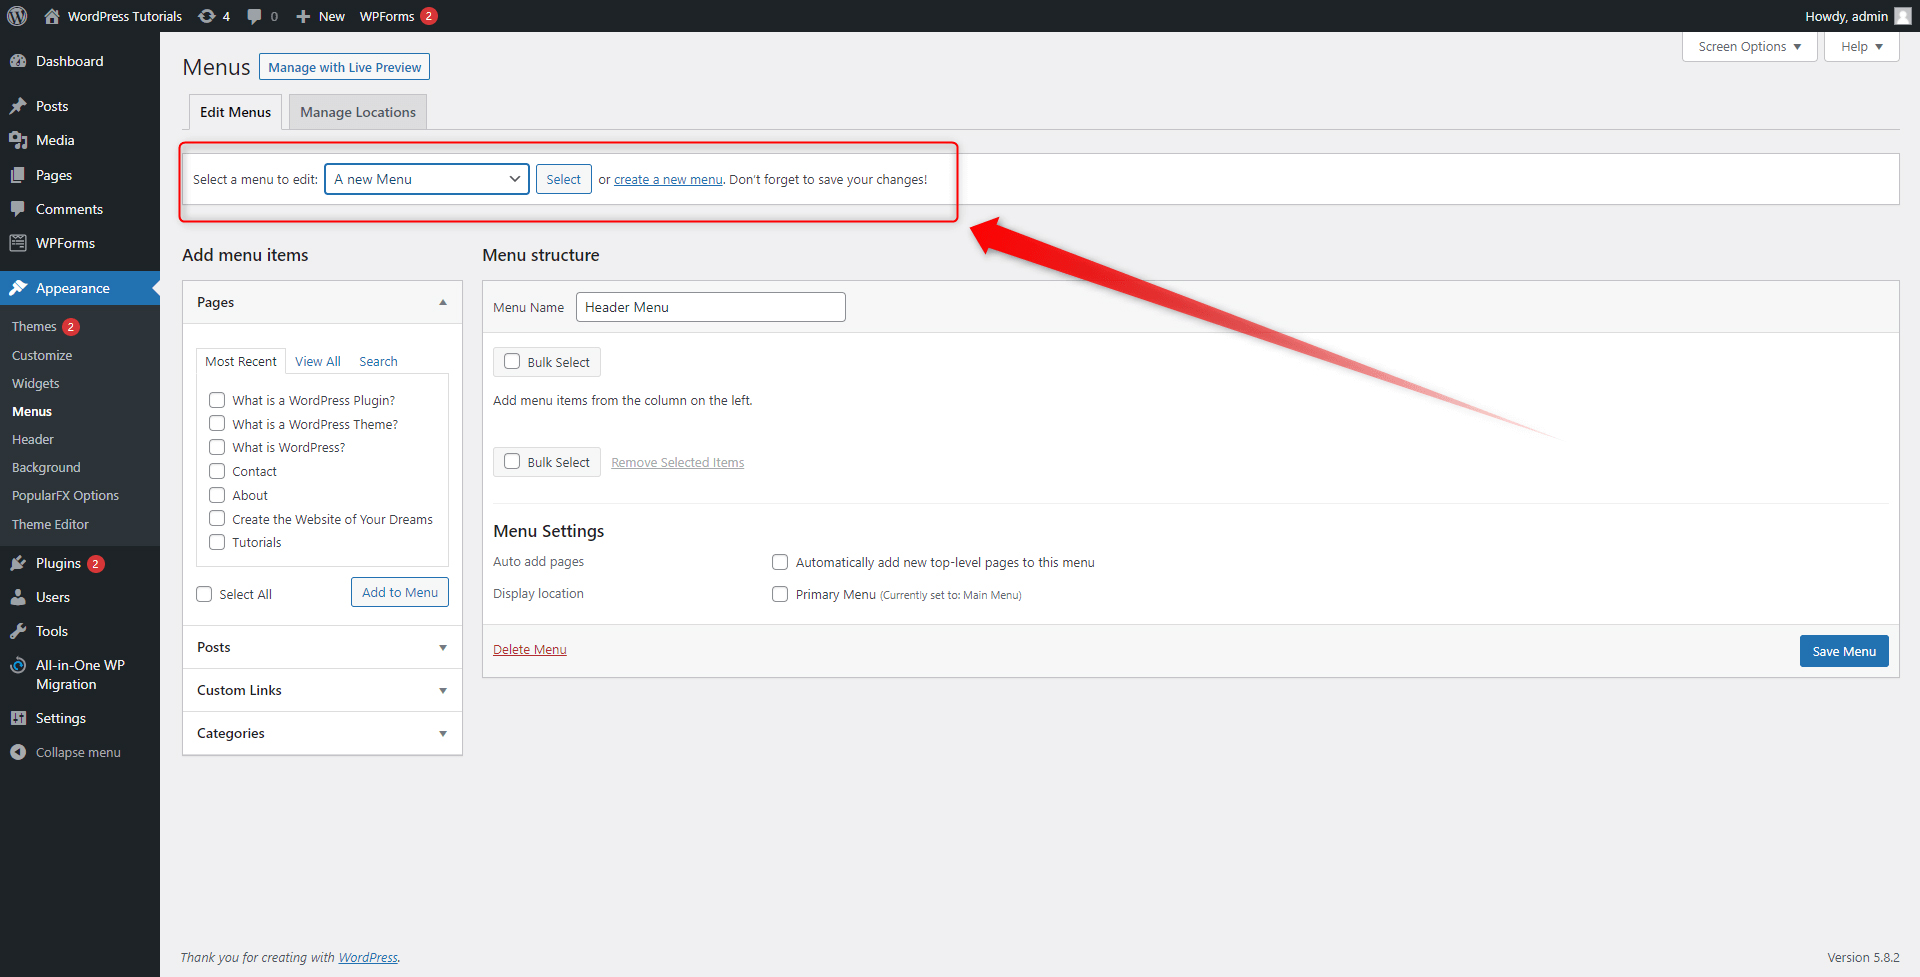
First, notice the button that allows you to choose whether you wish to edit an already existing menu, or you wish to create a new one from scratch:
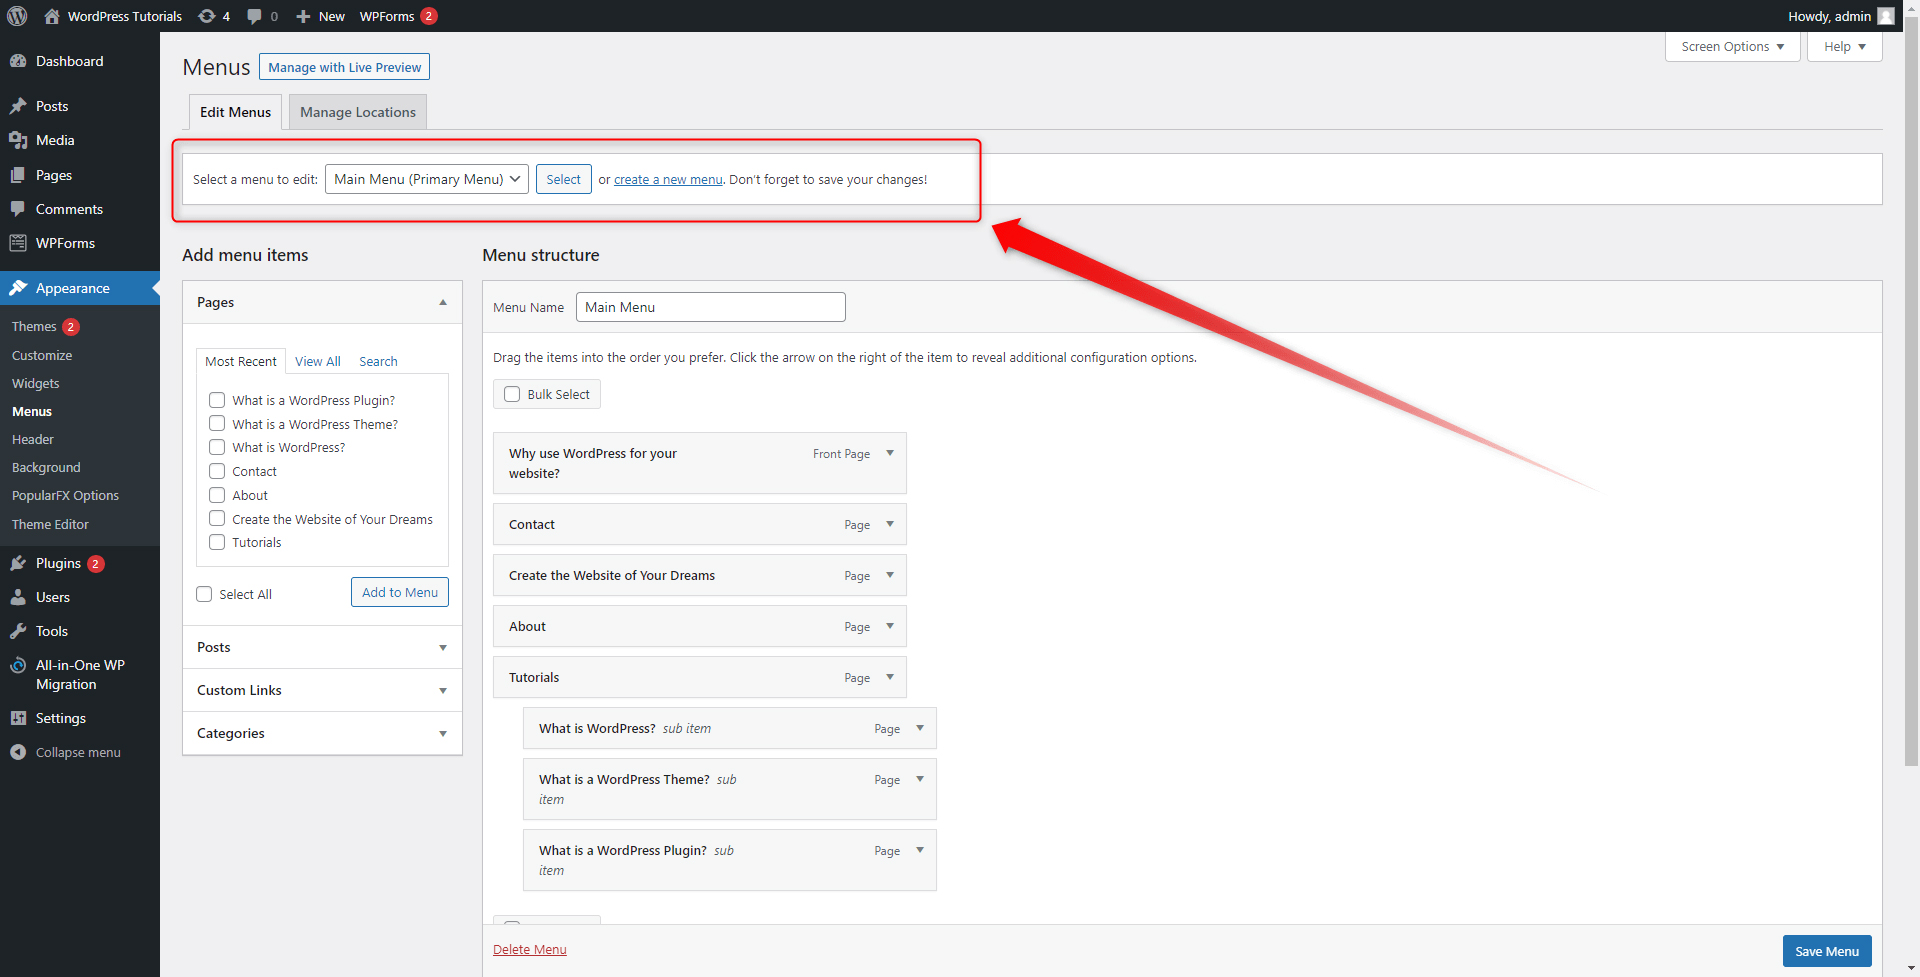
Since we are aiming to create a new menu, click on the blue “create a new menu” text:
This will open the tab via which you will start the creation process:
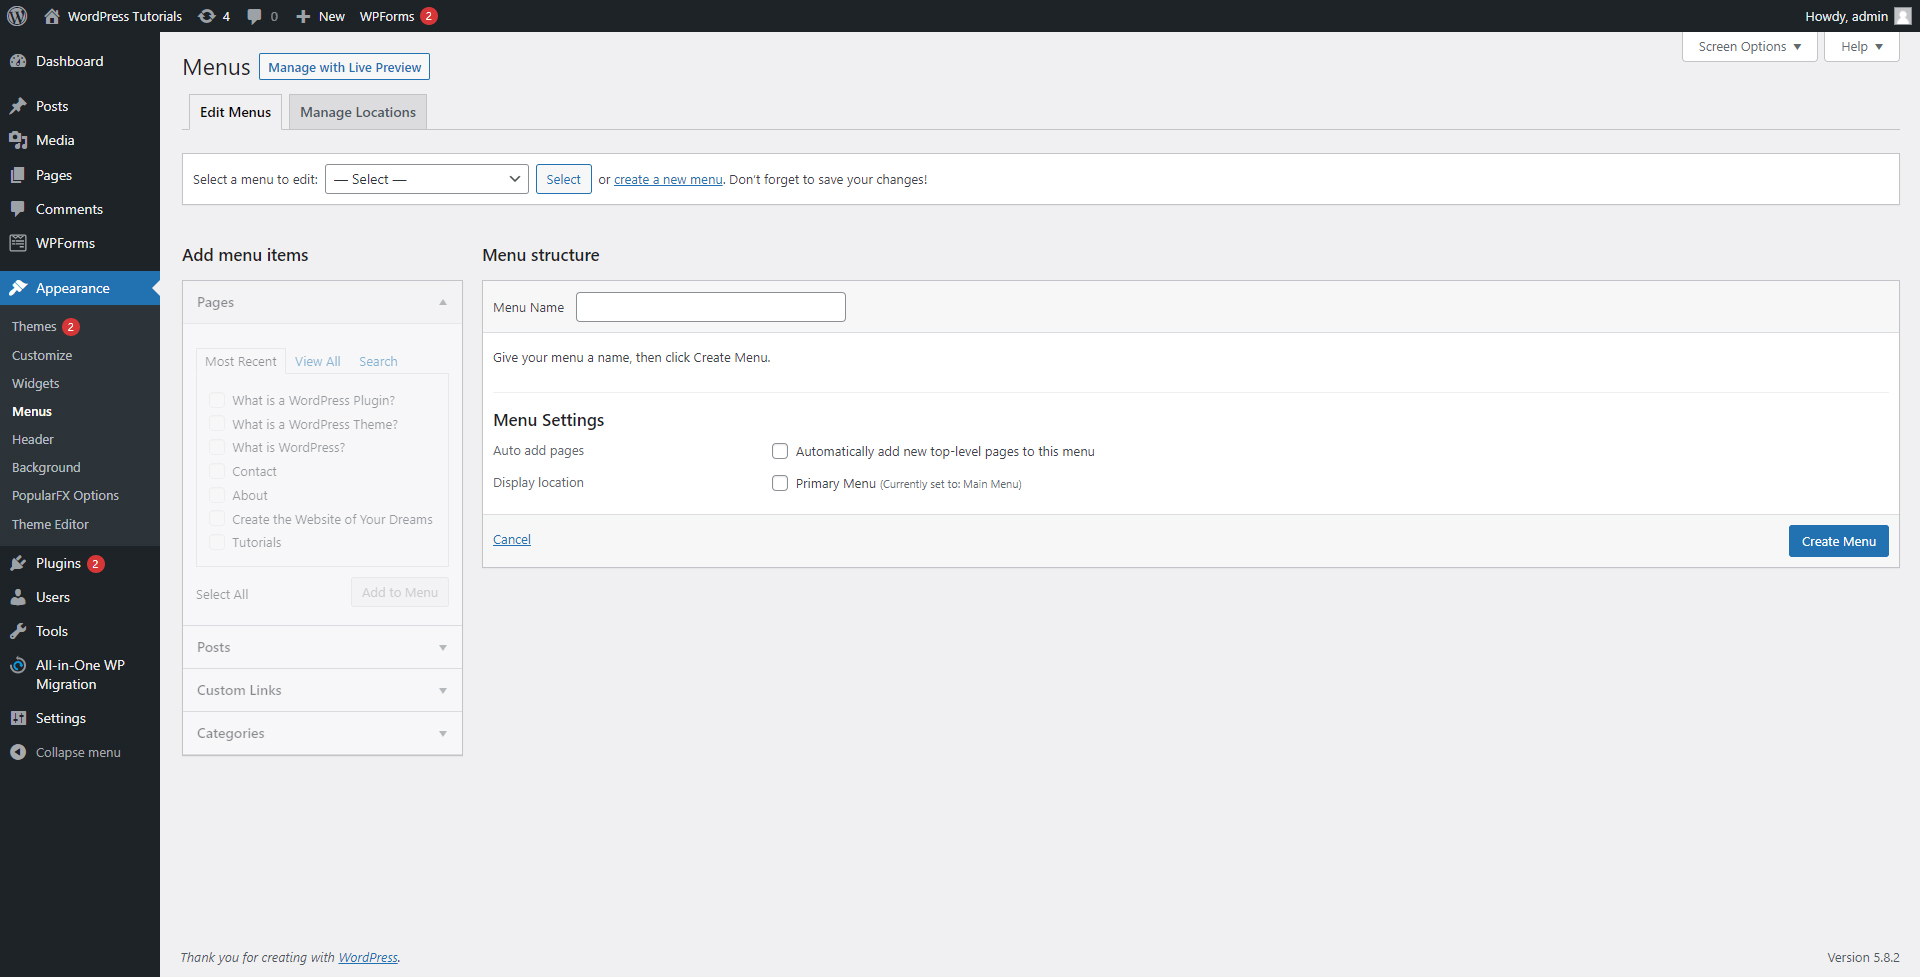
To be able to use all the options, think of a name for your menu. As a rule of thumb, name it after the section in which you wish to place it – for example, a “Header Menu”, or “Footer Menu”:
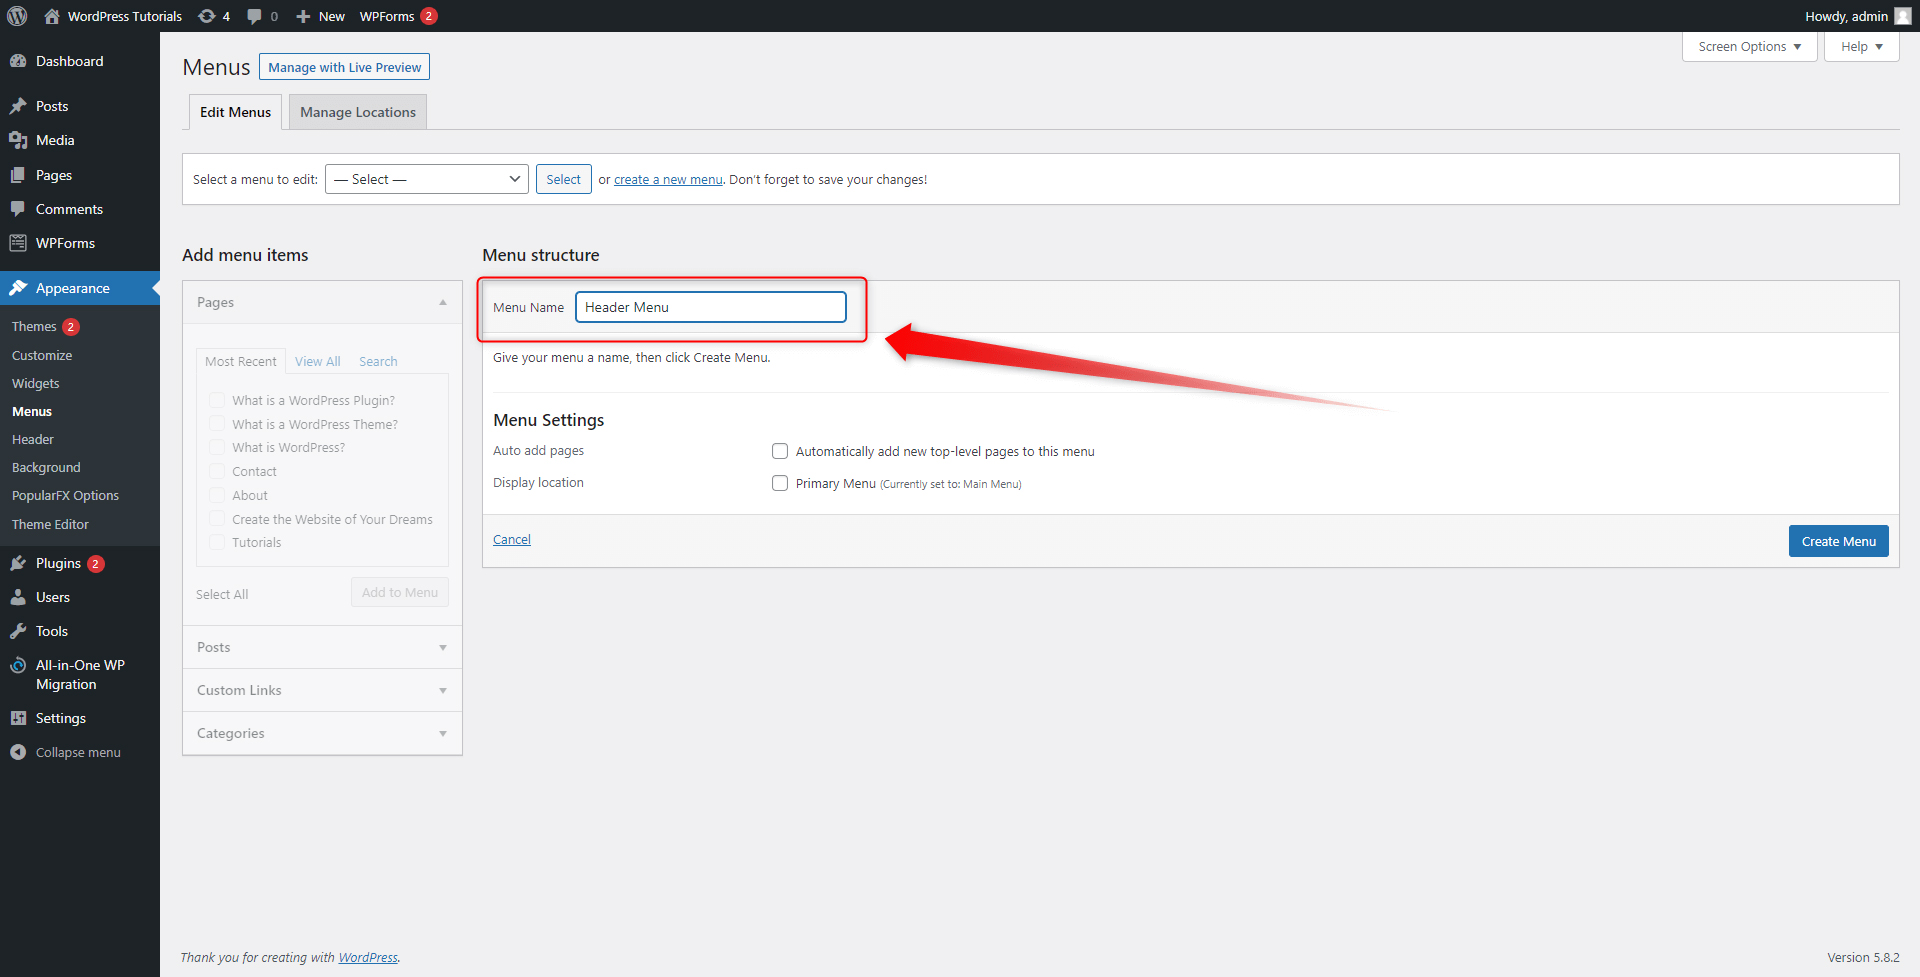
Now, click on Create Menu on the bottom right. This will create and save your new menu:
Once you’ve created the new menu, you will be able to make all kinds of changes. To do so, first, select which menu you wish to edit, and click select. Since you will be editing your new menu, choose this particular one from the Select a Menu tab:
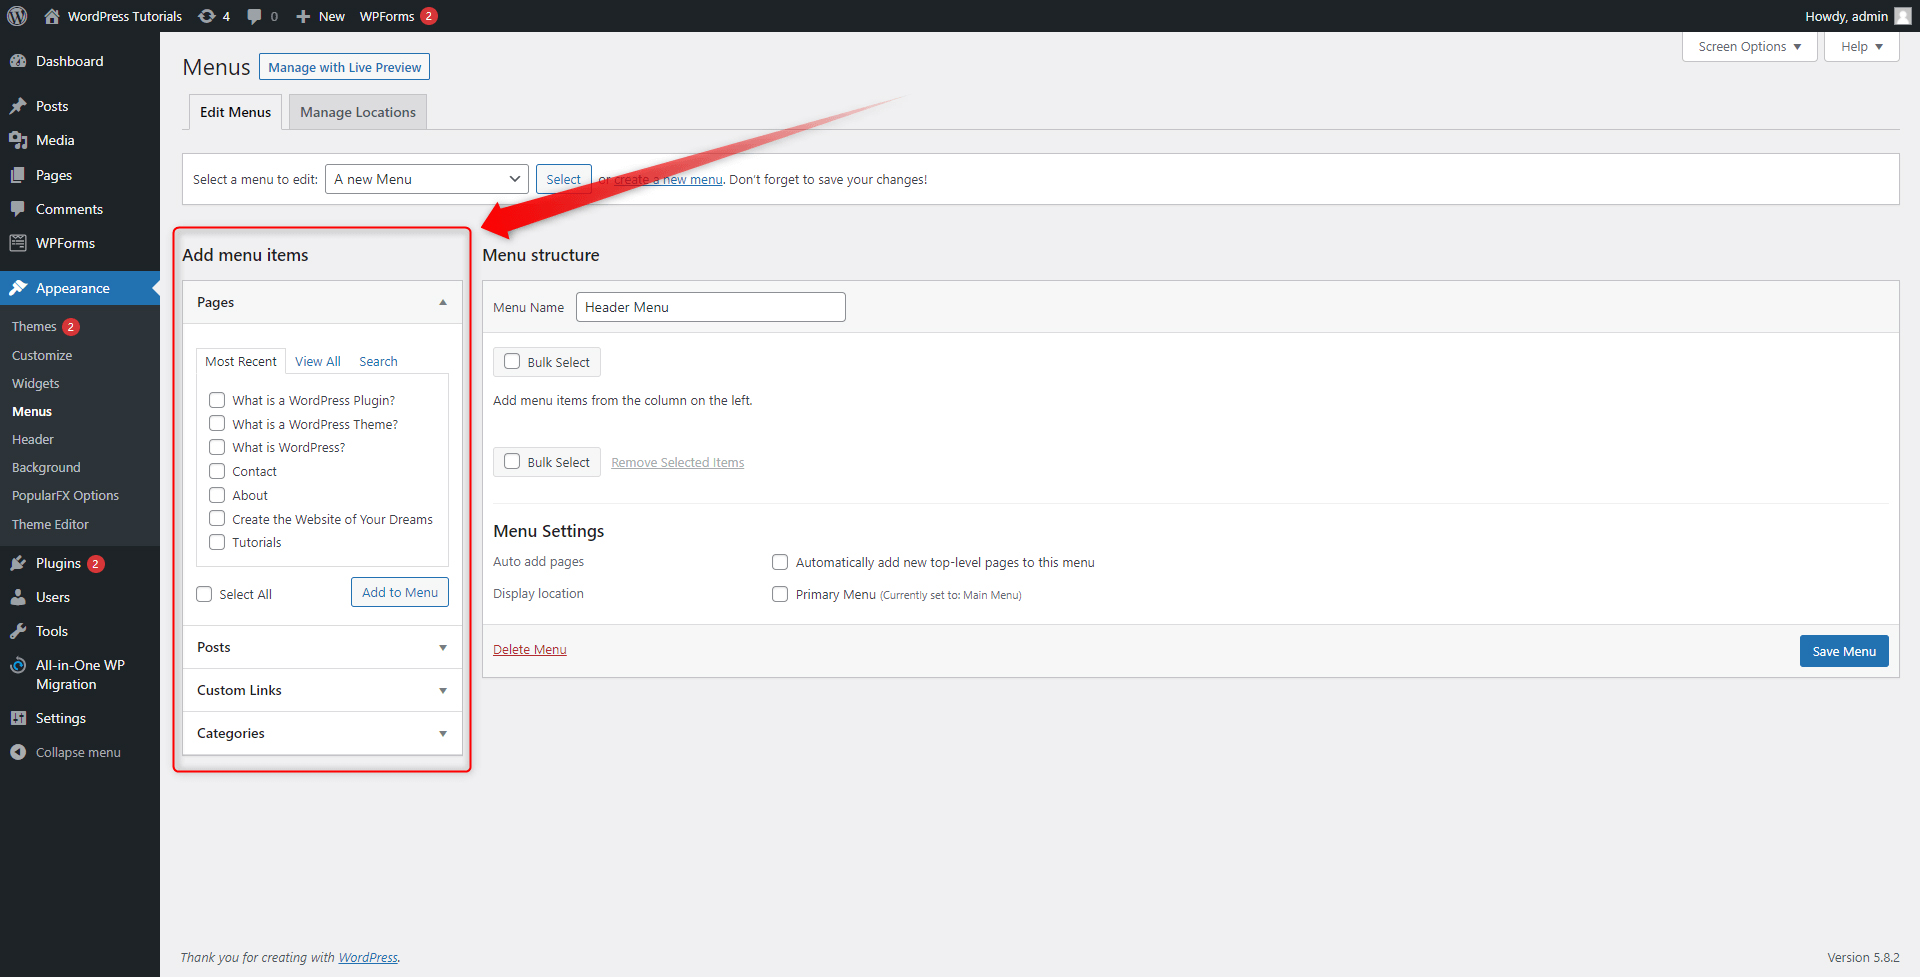
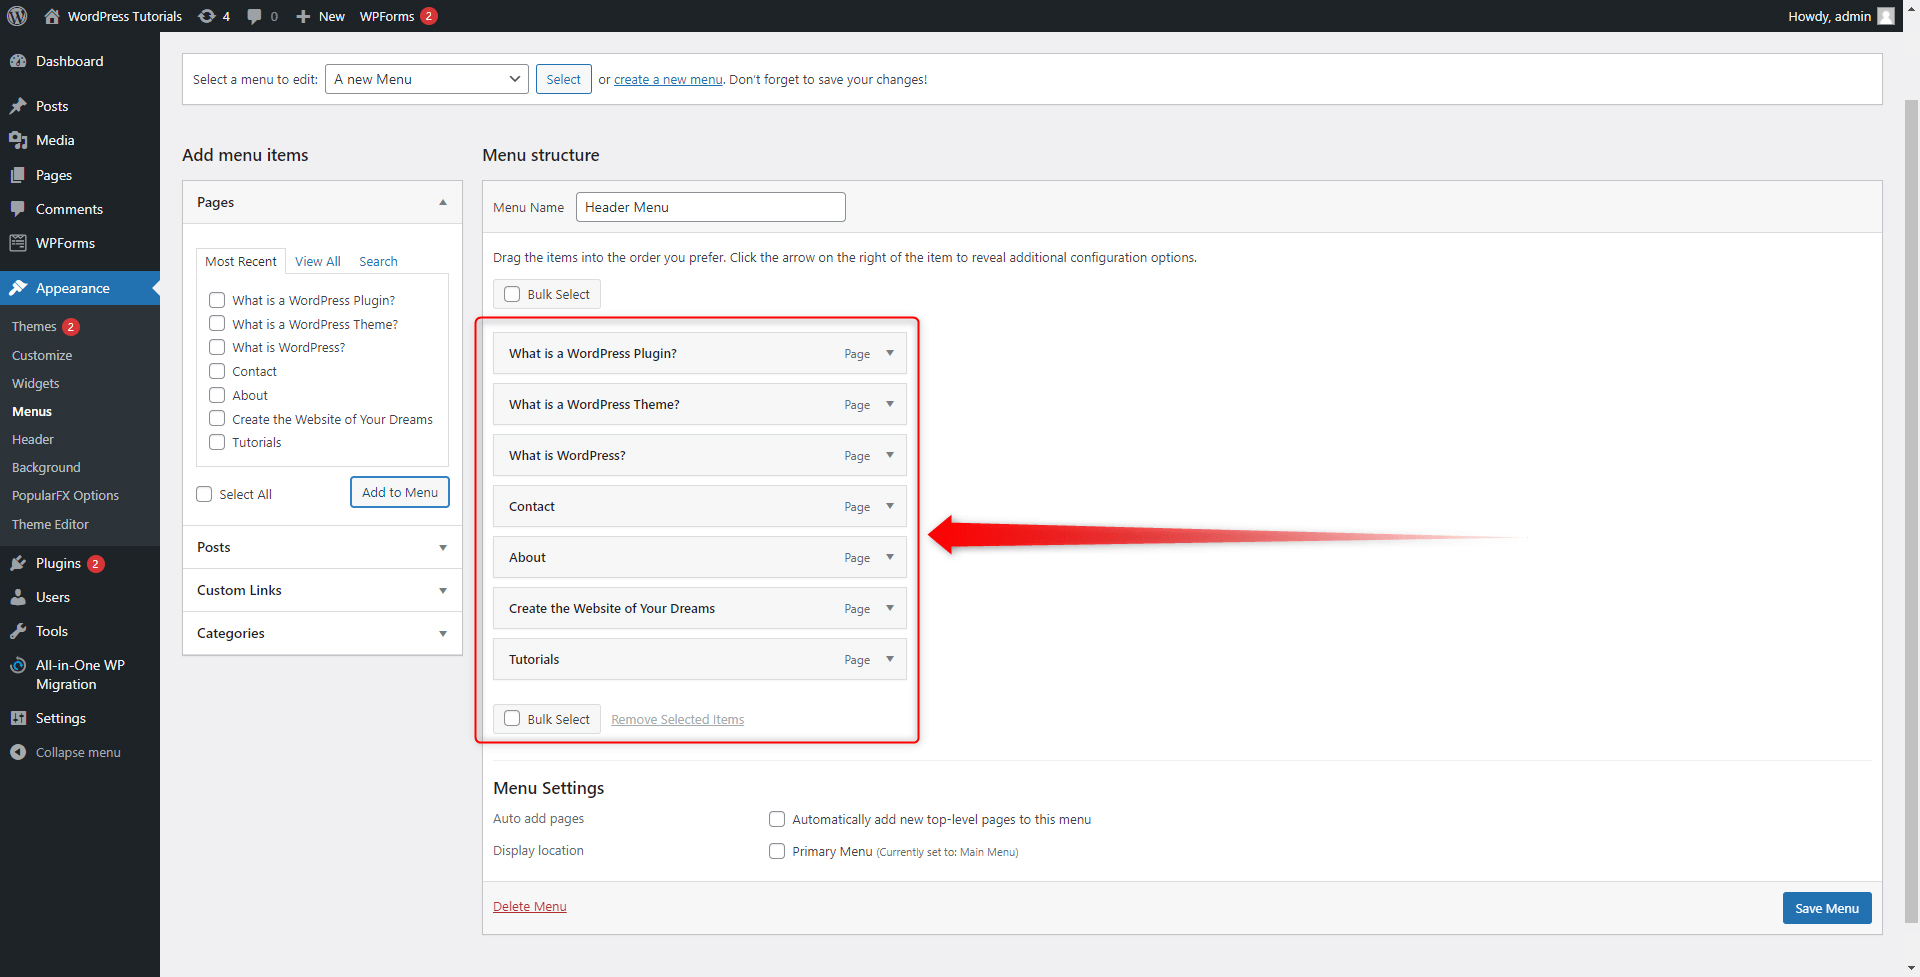
On the left of the screen, you will see the Add Menu Items box. This section contains a list of all your website pages, posts, categories, and custom links, and via the tick boxes, you can decide which components will be included in the new menu section. For this demonstration, we will include only redirections to our pages:
Step 2: Tick the page that you wish to be included in the new menu. You can include as many pages as you wish. Then click on Add to Menu:
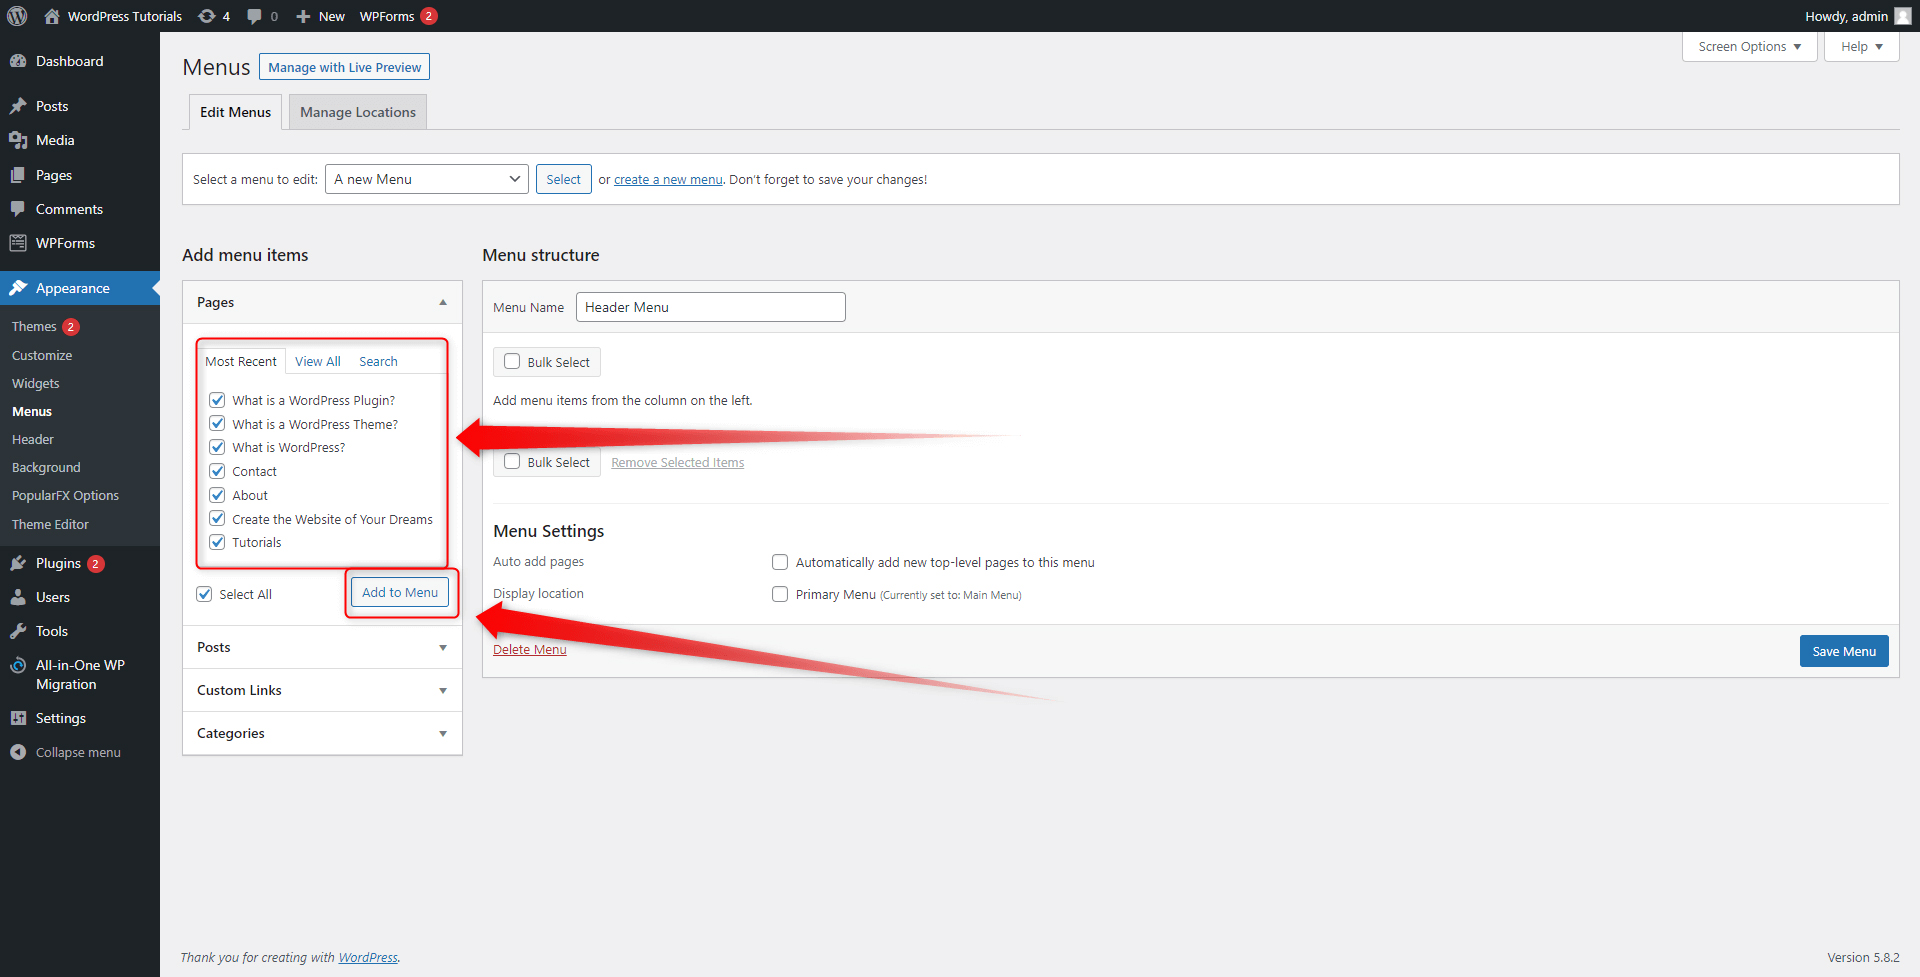
Once you’ve selected which pages to include in the menu section and click Add to Menu, they will appear on the right side of the screen. This is the panel that shows the list of pages, posts, categories, and custom components that are included in the menu section:
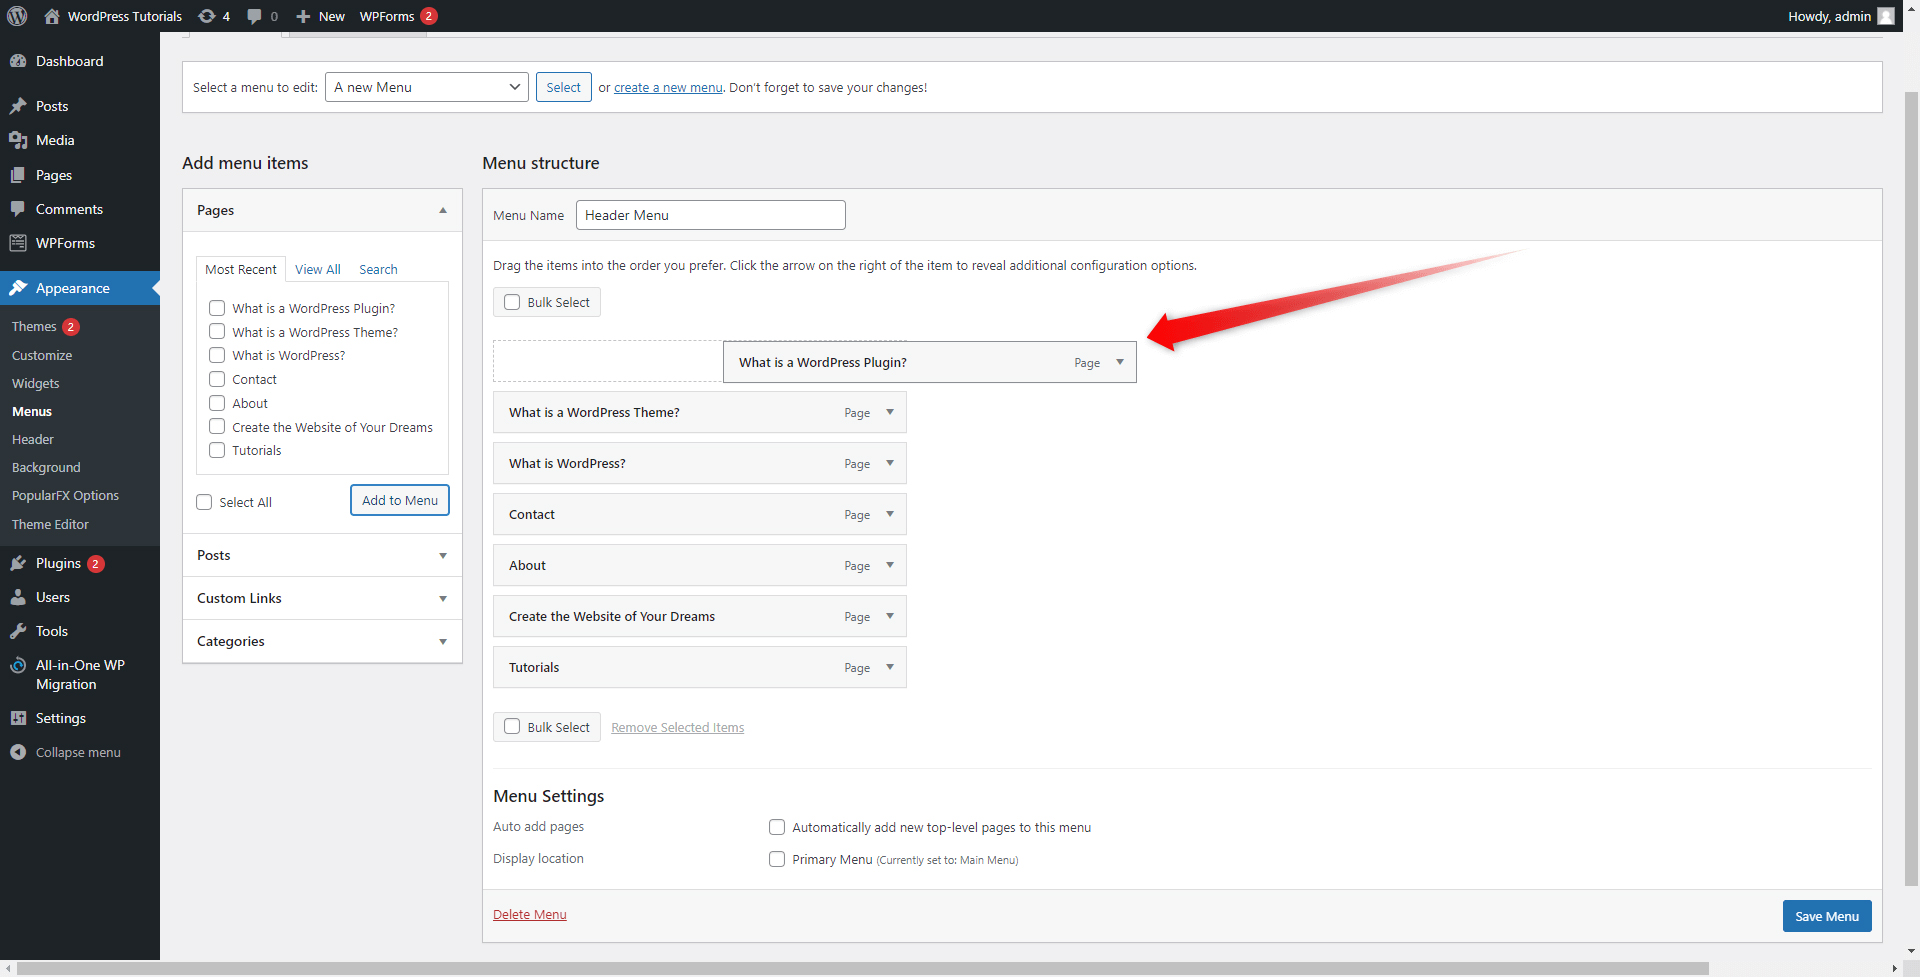
You can change the order of your boxes in any way by simply clicking and dragging a particular box:
Step 4: Keep in mind that you can also create sub-menus. This means that a menu section can contain another section. For example, we have created a main Tutorials menu section and within it, we included more menus as follows: What is WordPress, What is a WordPress Theme and What is a WordPress Plugin:

To do so, simply click and drag the menu section that you want to make a sub-menu and place it below the one that would become the main menu section. However, move the box a bit to the right of the screen. This will indicate that you have created a sub-menu.
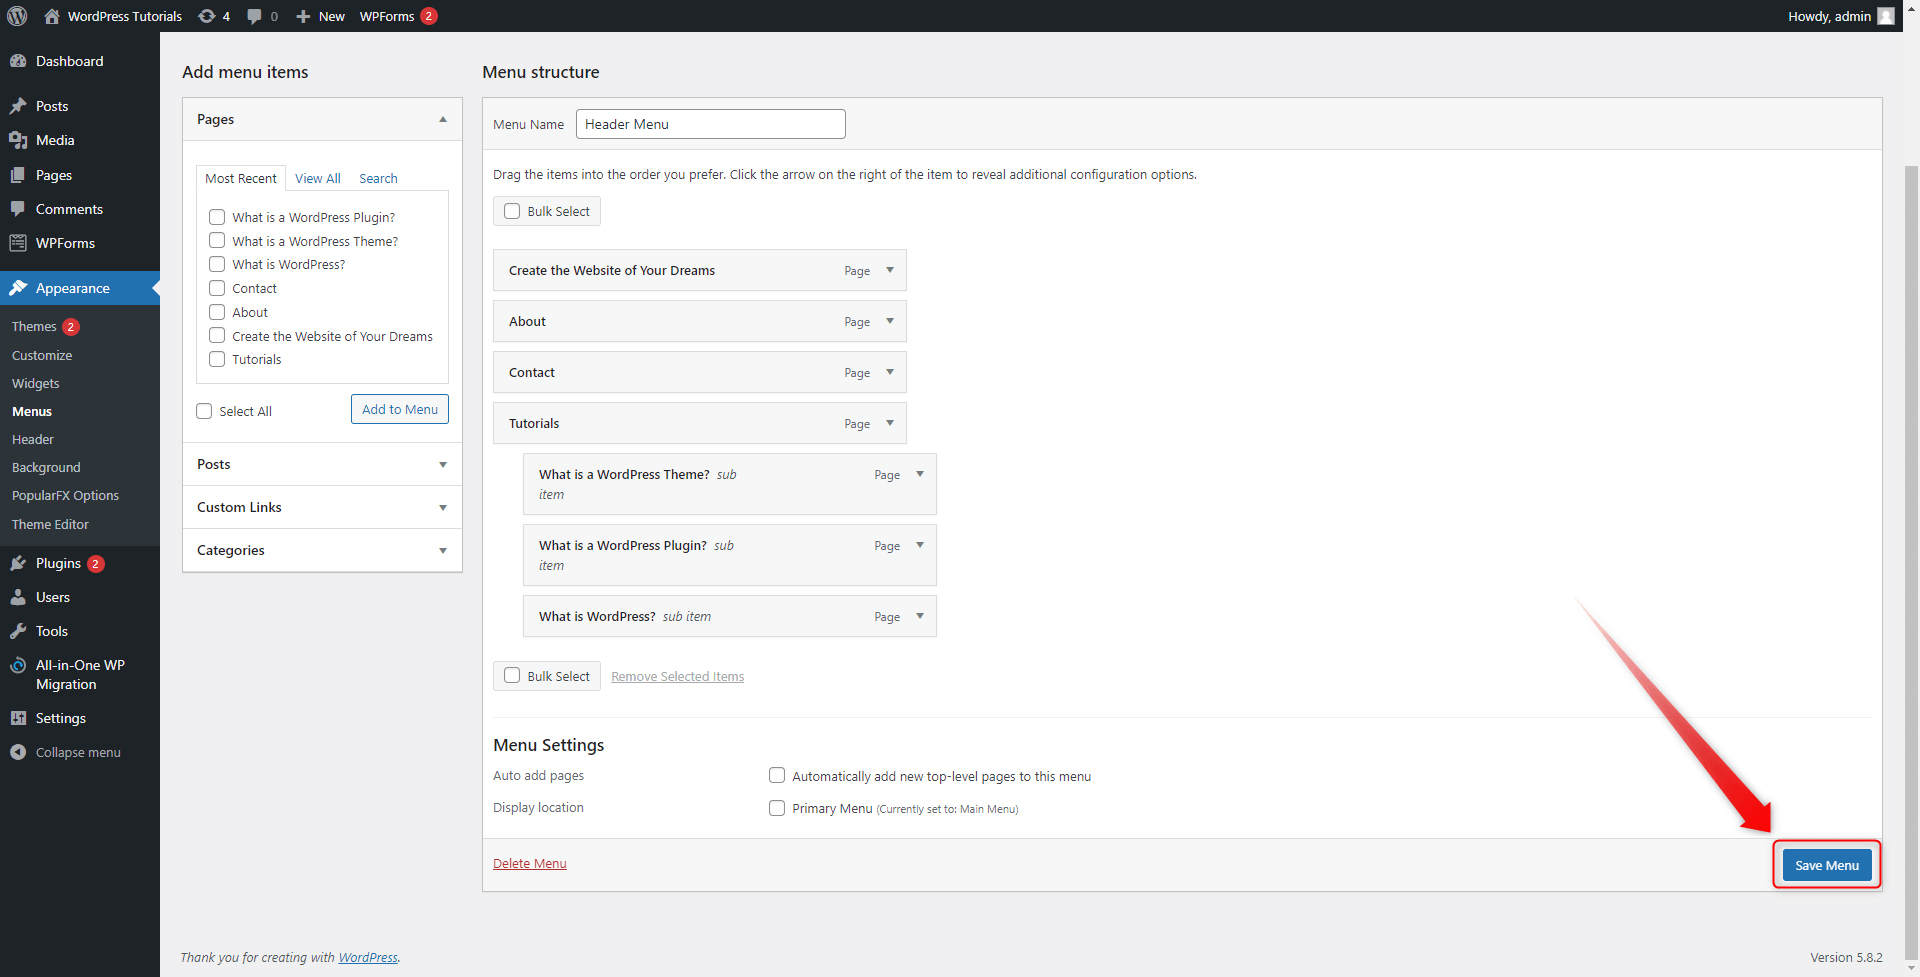
The Menu section is a powerful tool that can make your website not only tidier but also more functional. Spend some time tweaking it and find out for yourself which final result best fits your needs! When you have finished editing, click on Save Menu.
This will apply and save all the changes that you’ve just made:
How to Add the New Menu to Your Pages
Now that you have created a custom menu section, let’s see how to include it within your header or footer. Later in this guide, you will understand how to add even more menu sections across your web pages.
First, enter your Customization tab from the Appearance via the Dashboard:
Within the Customization tab, take a look at the blue pencil icon within the Header at the top right of the screen:
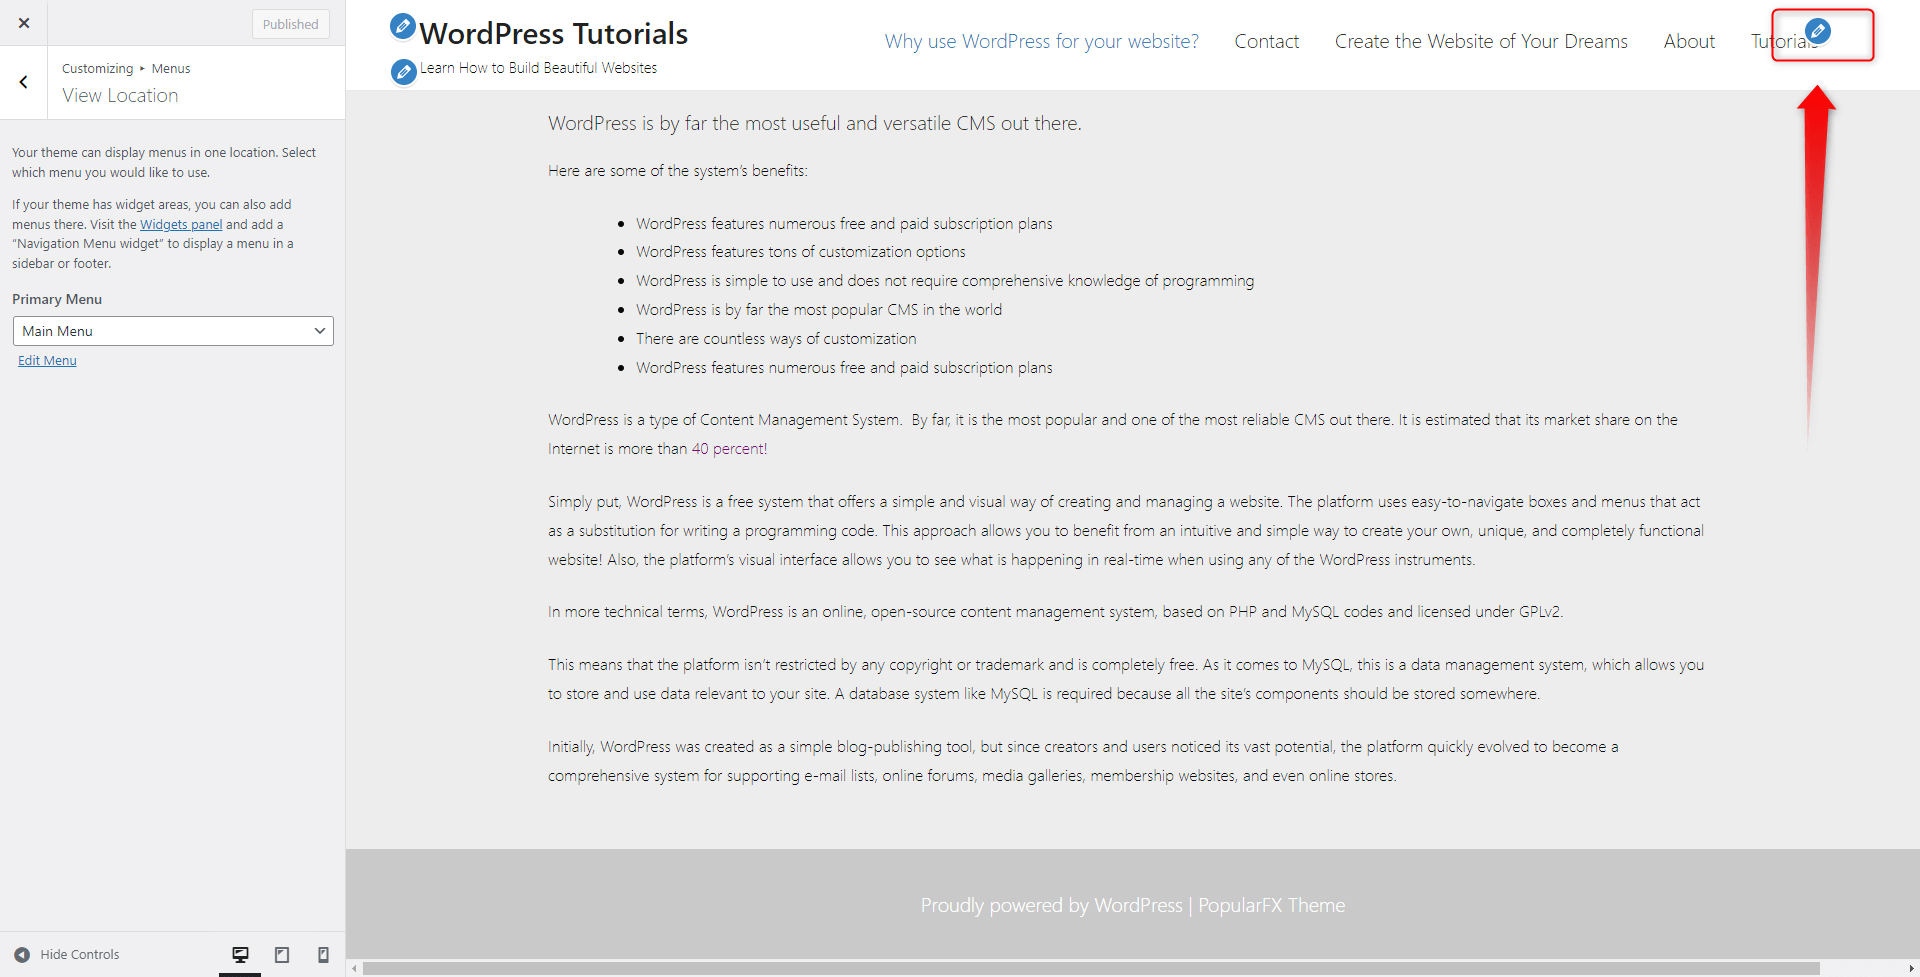
This icon allows you to customize what the header contains or in other words, the menu section that will be contained within the header. WordPress has already included a default menu for you, however, it is always a good idea to add a customized section, just like the one you’ve just created.
Click on the pencil and have a look at the new options:
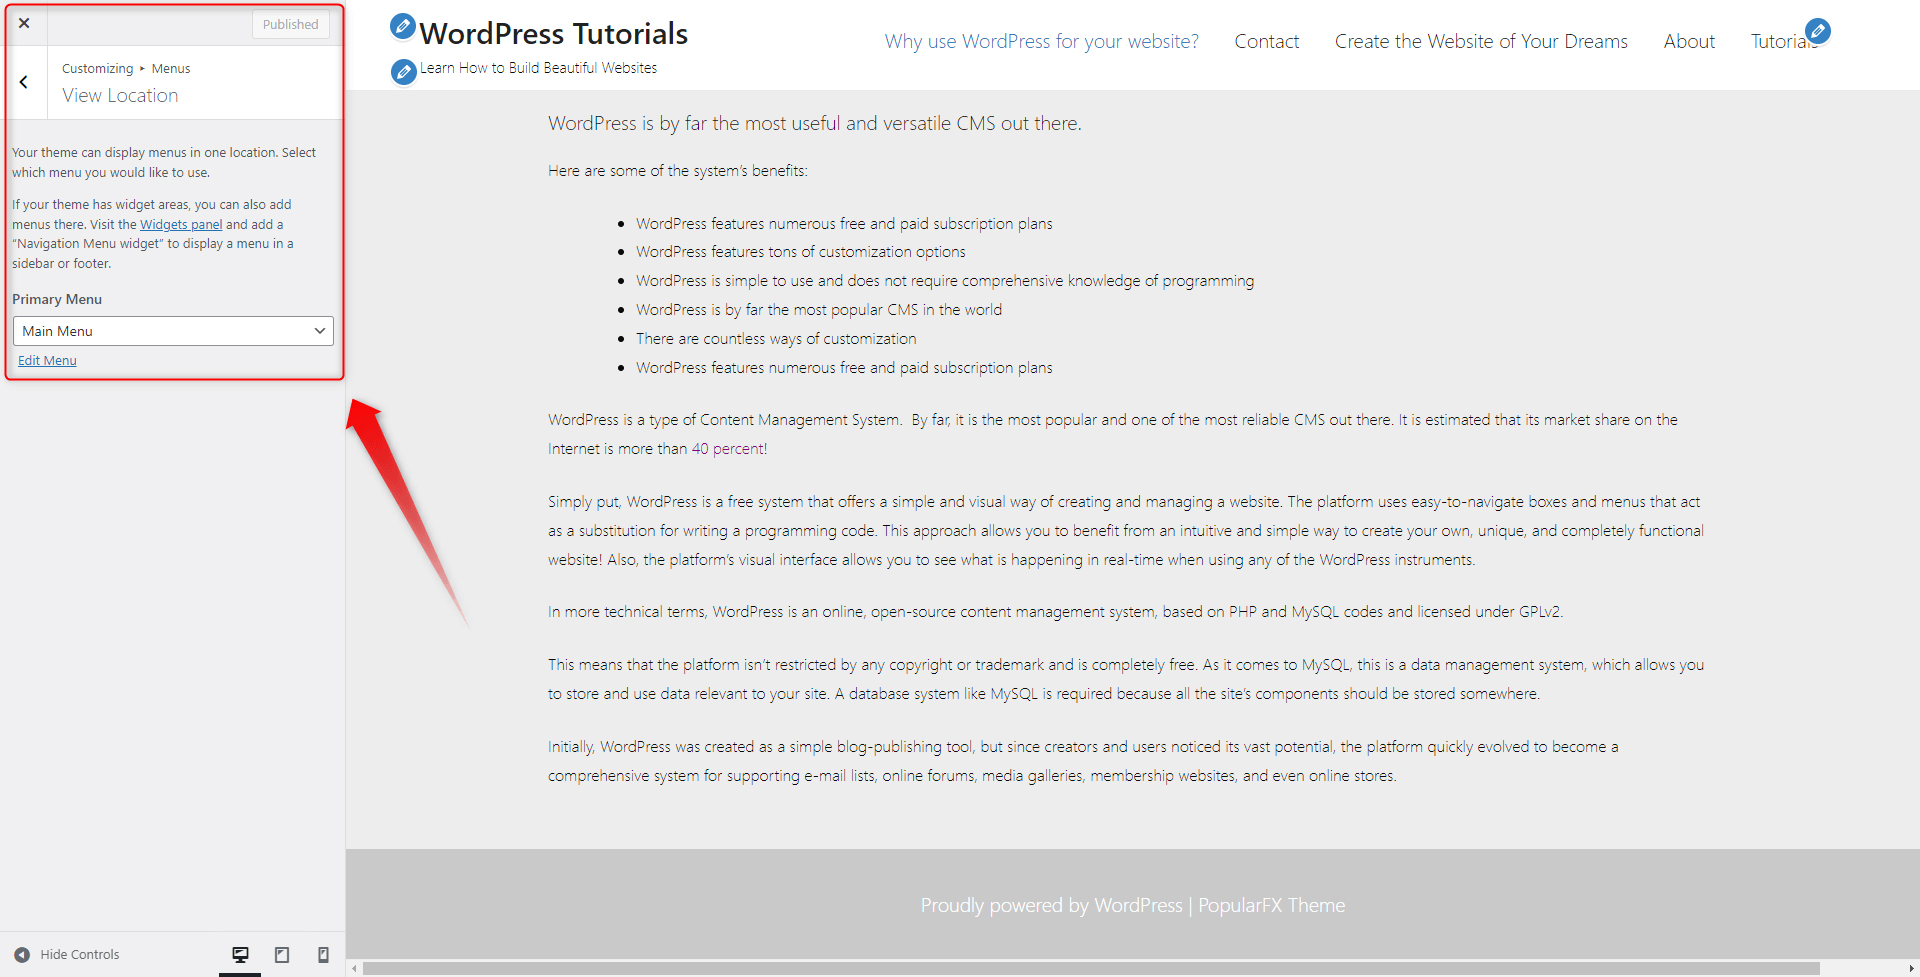
Within this box, you can find a list with all existing menus and an Edit Menu option. Before we apply a different menu in the header section, let’s have a quick look at the Edit Menu option. When you click it, a new section appears. This is a dedicated instrument that allows you to quickly make changes to your menus:

This section completely mimics the Menus tab in your Dashboard, so you can make changes via a familiar interface.
As it comes to changing the menu in the header, go back to the Menu selection segment, and via the Primary Menu list, choose a menu you wish to include in the header:
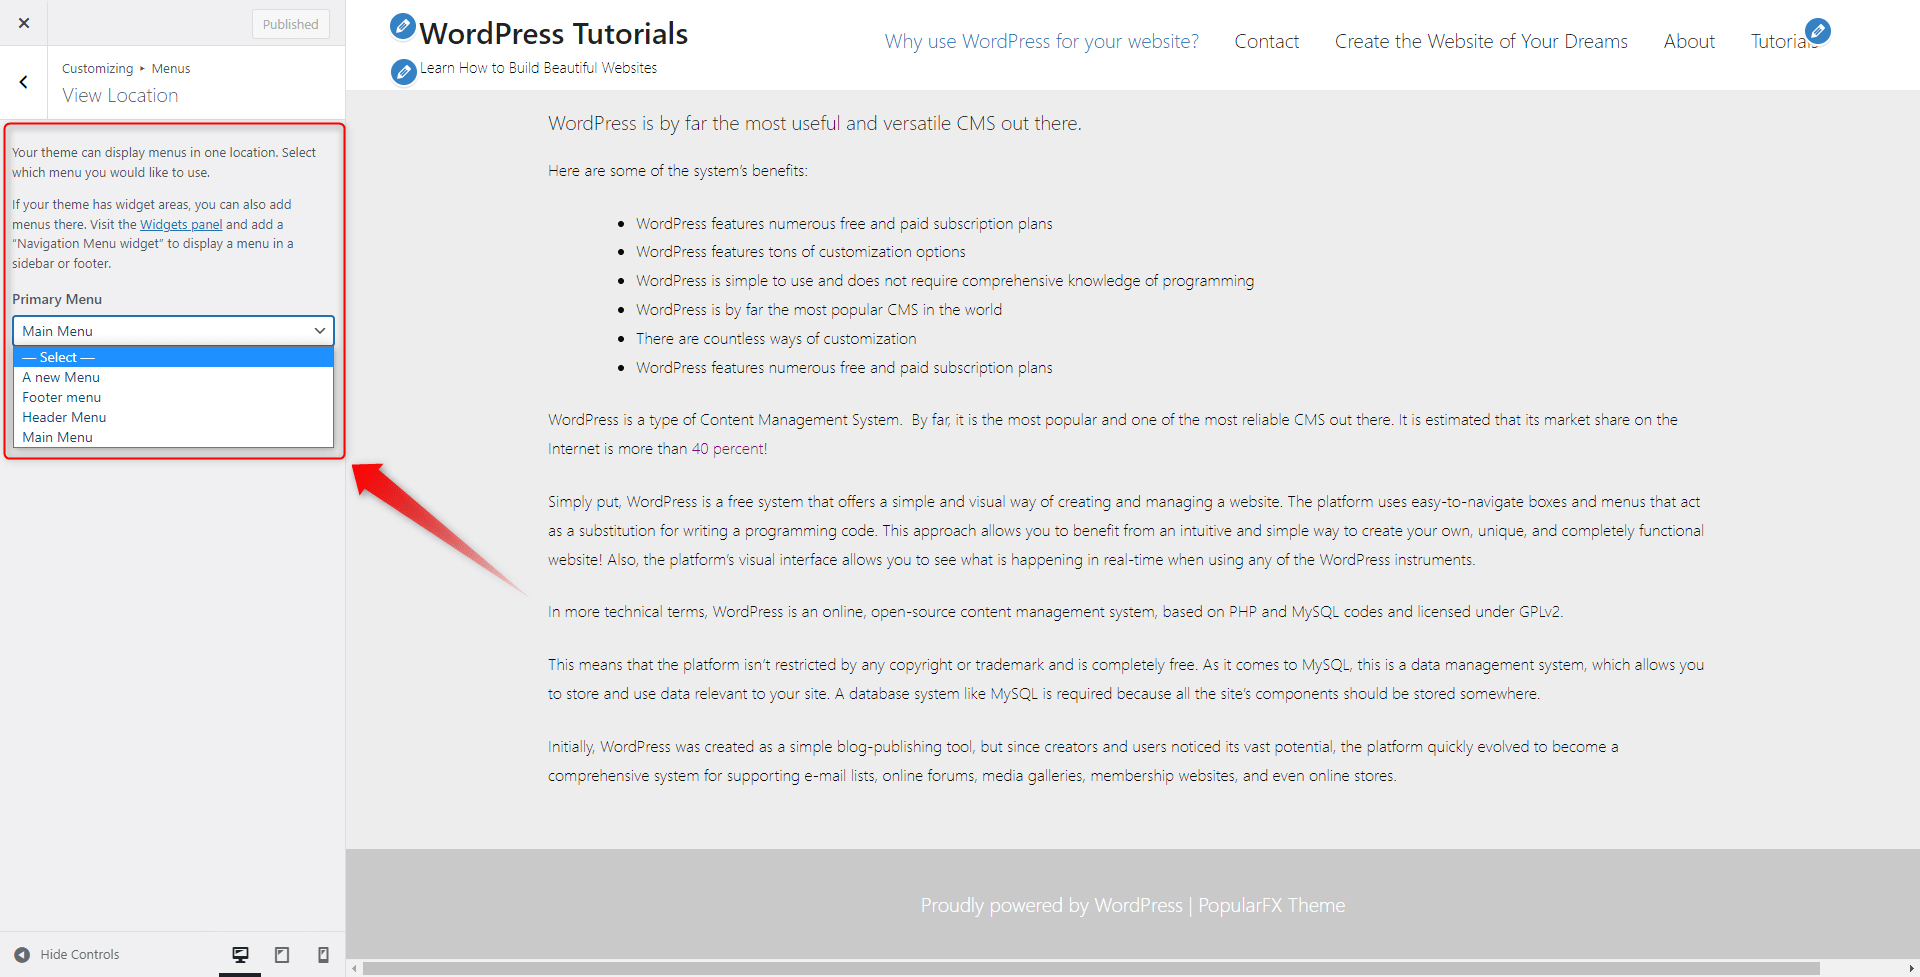
We will select the menu we simply named “A new Menu”.
When you’ve made your choice, click on the blue Publish button at the top left of the page:
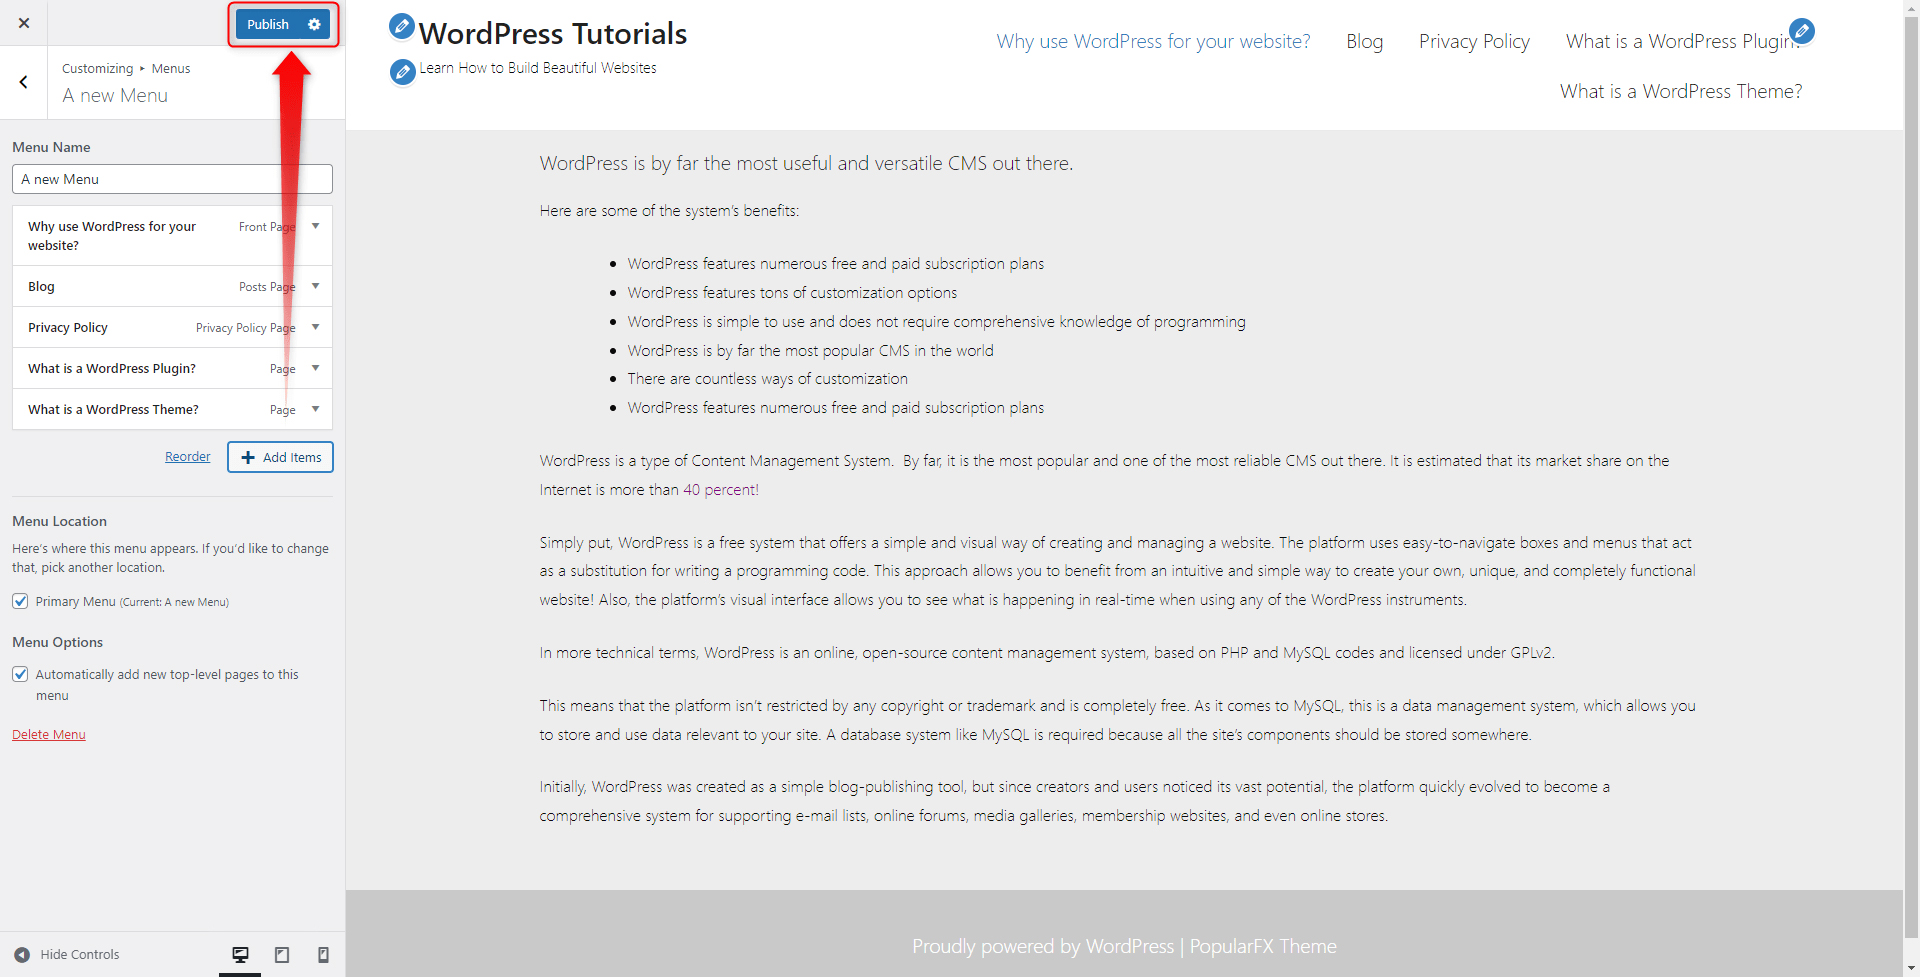
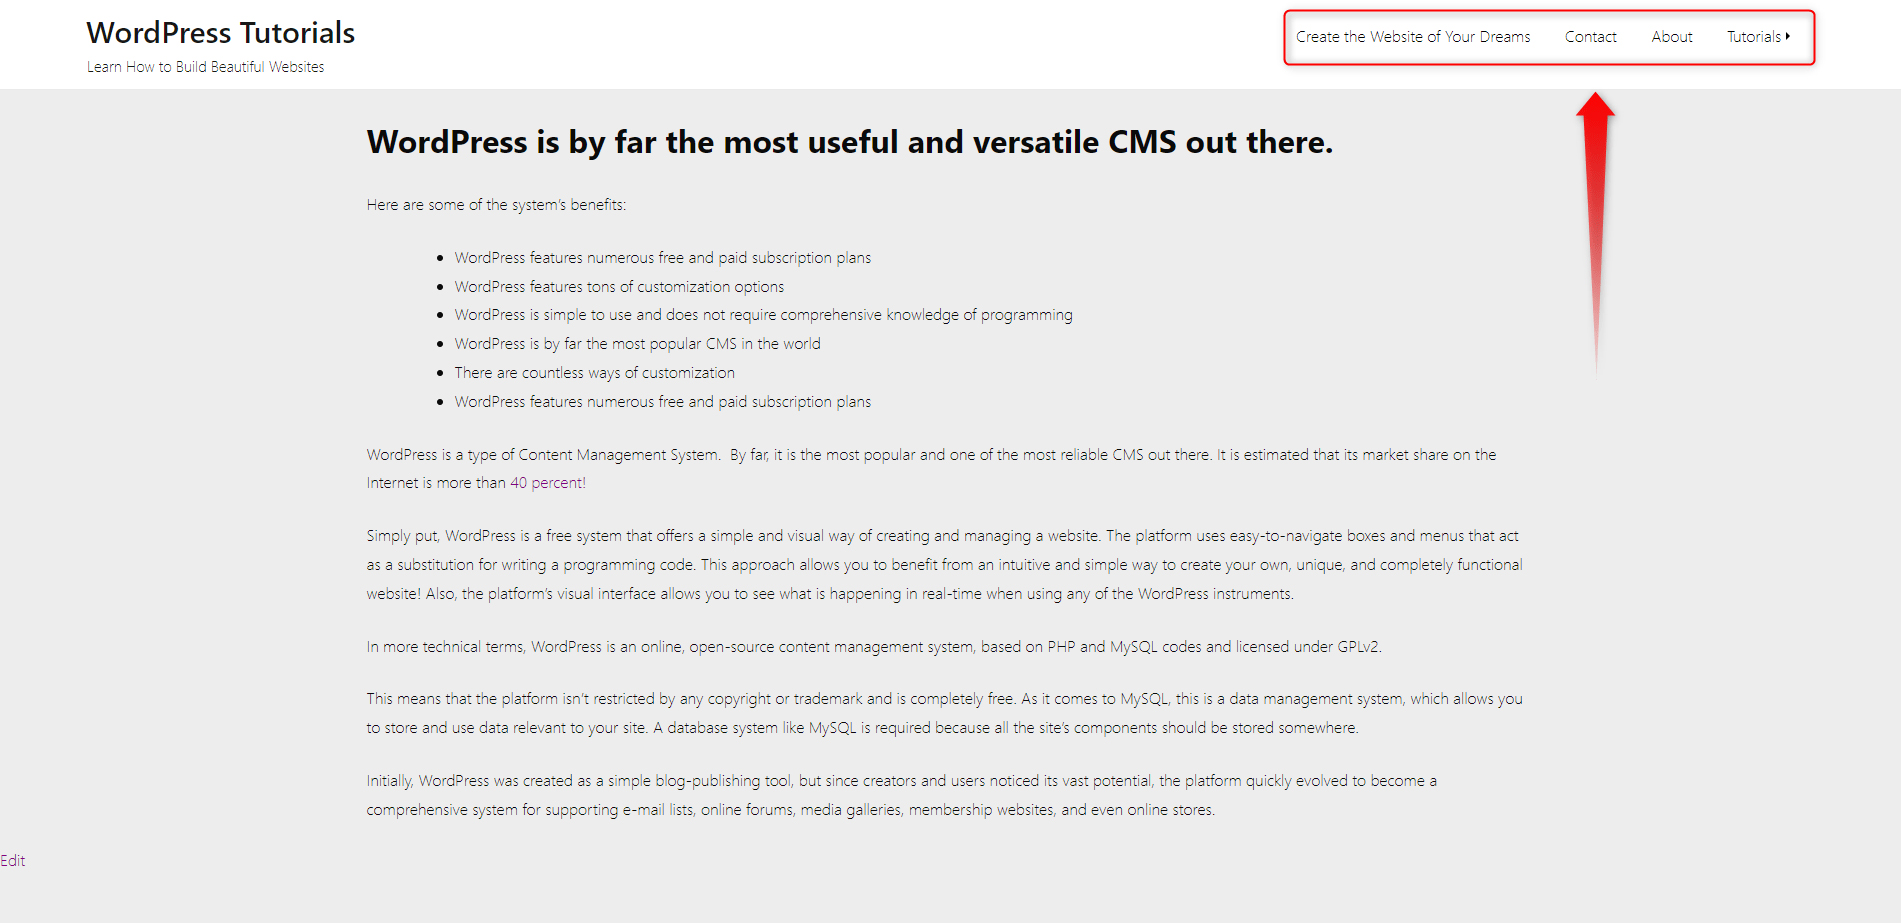
Now, all the changes will be applied to your site. Here’s how ours turned out to be:
How to Edit Your Menus via the Customize Page?
While in the Menu selection tab, have a look at the Add Items button. By clicking it, you will open a box that contains all the components you wish to add to your menu – pages, categories, and similar:
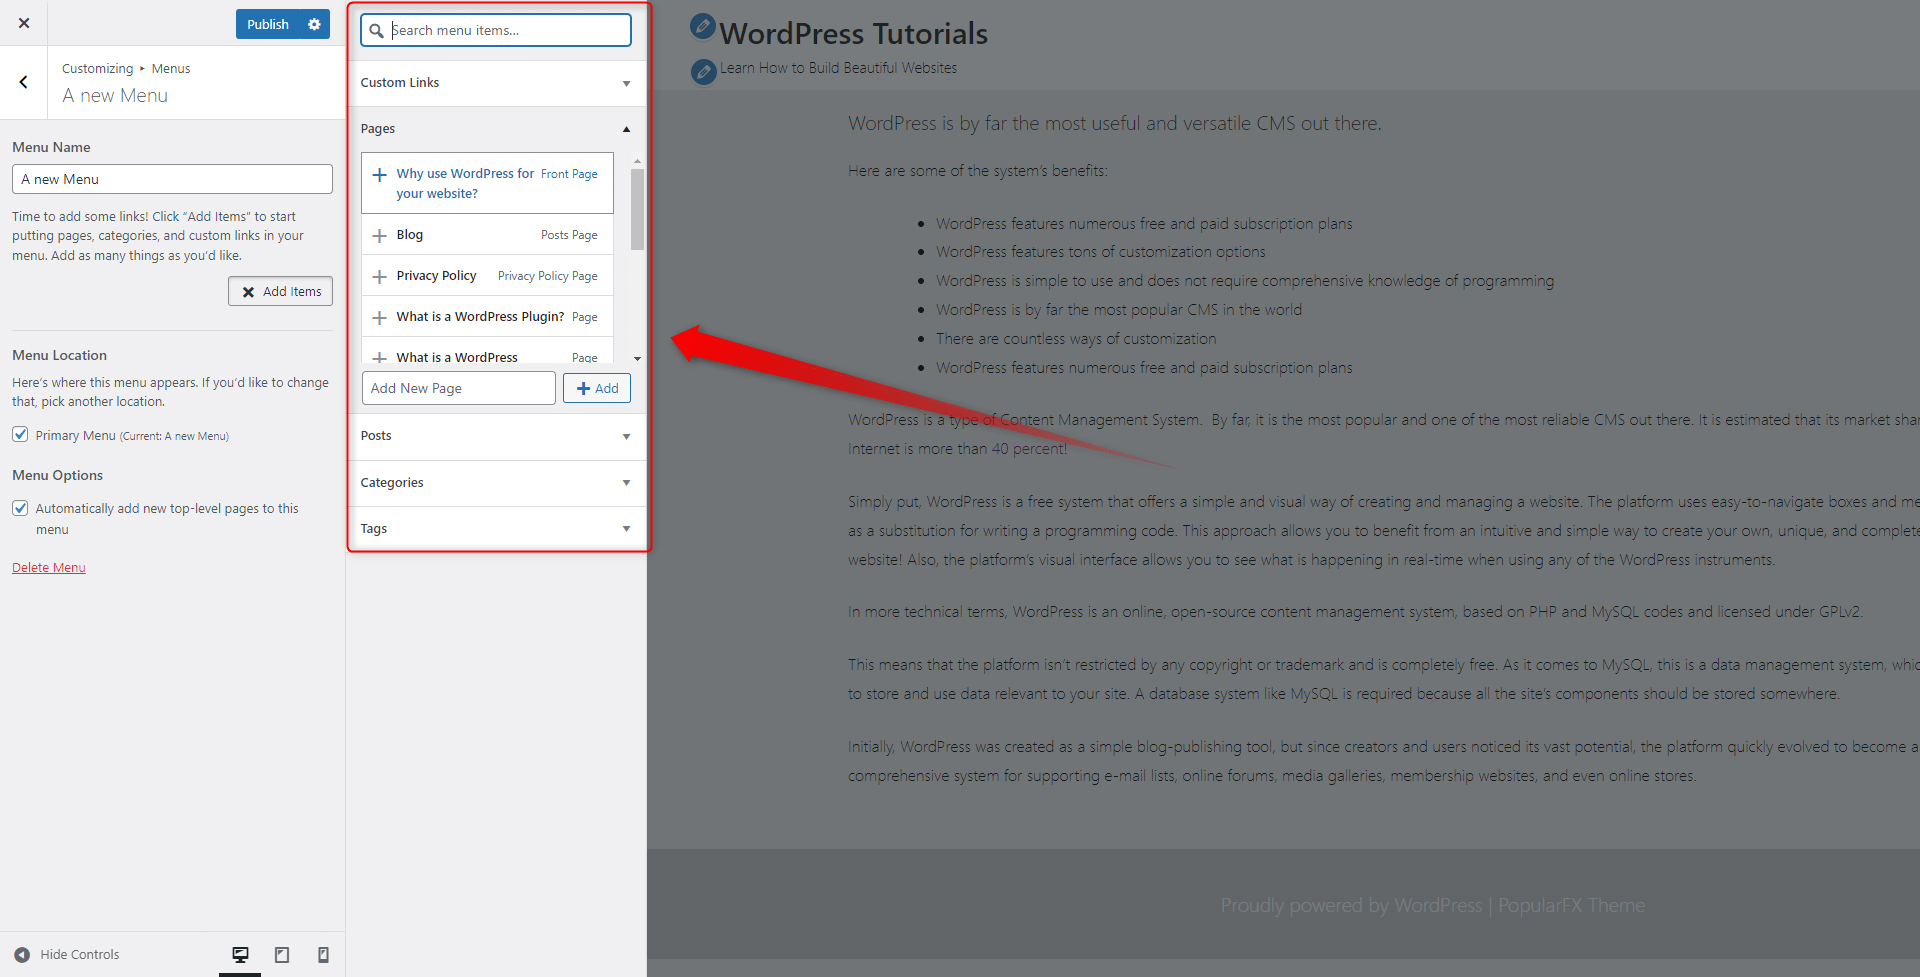
Add elements by simply clicking the “+” button located at the left of each component. When you’ve added the ones that you need, click on the blue Publish button located at the top left of the screen. This will apply and save all the changes you have just made:
You can apply this process for every segment which can contain a menu – footers, sidebars, and widgets.
How to Browse the WordPress Settings Menu
The Settings menu gives access to different options and personalization preferences. To access them, go to the Settings menu via the Dashboard:
Step 1: In your Dashboard, have a look at the Sidebar and search for Settings:
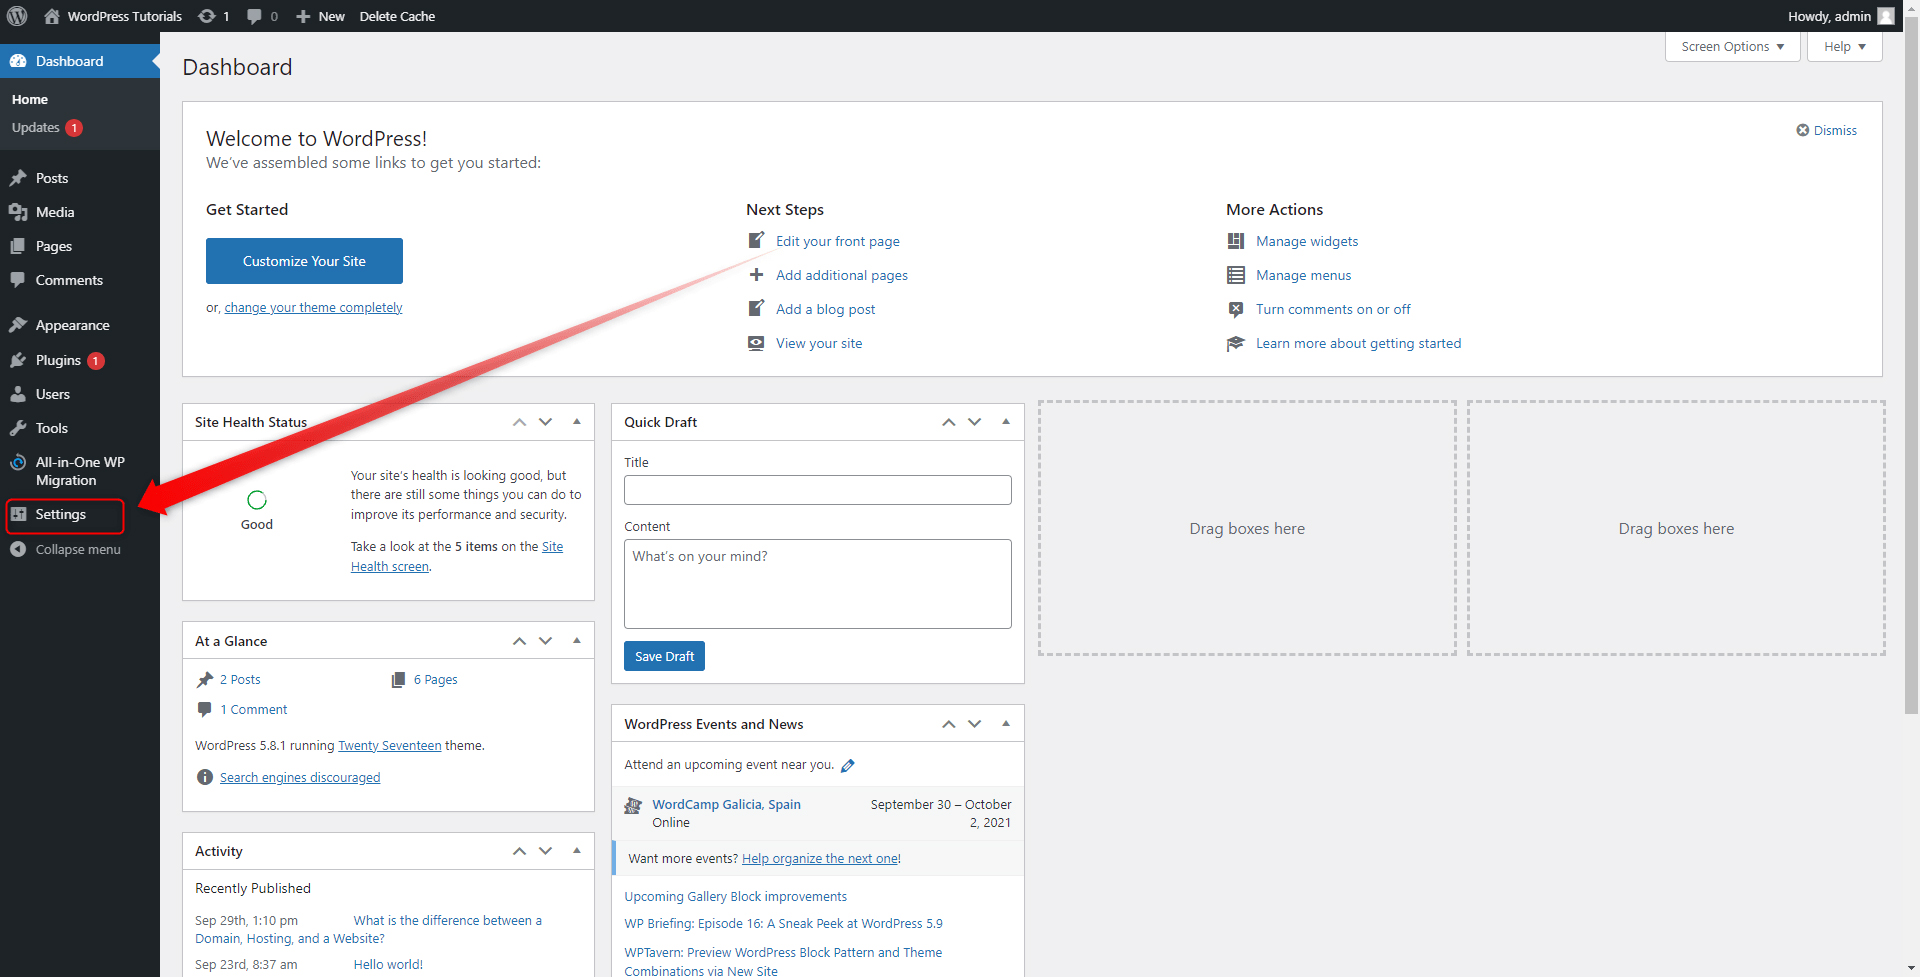
Step 2: Open the panel and have a look at all the pages:
- General:
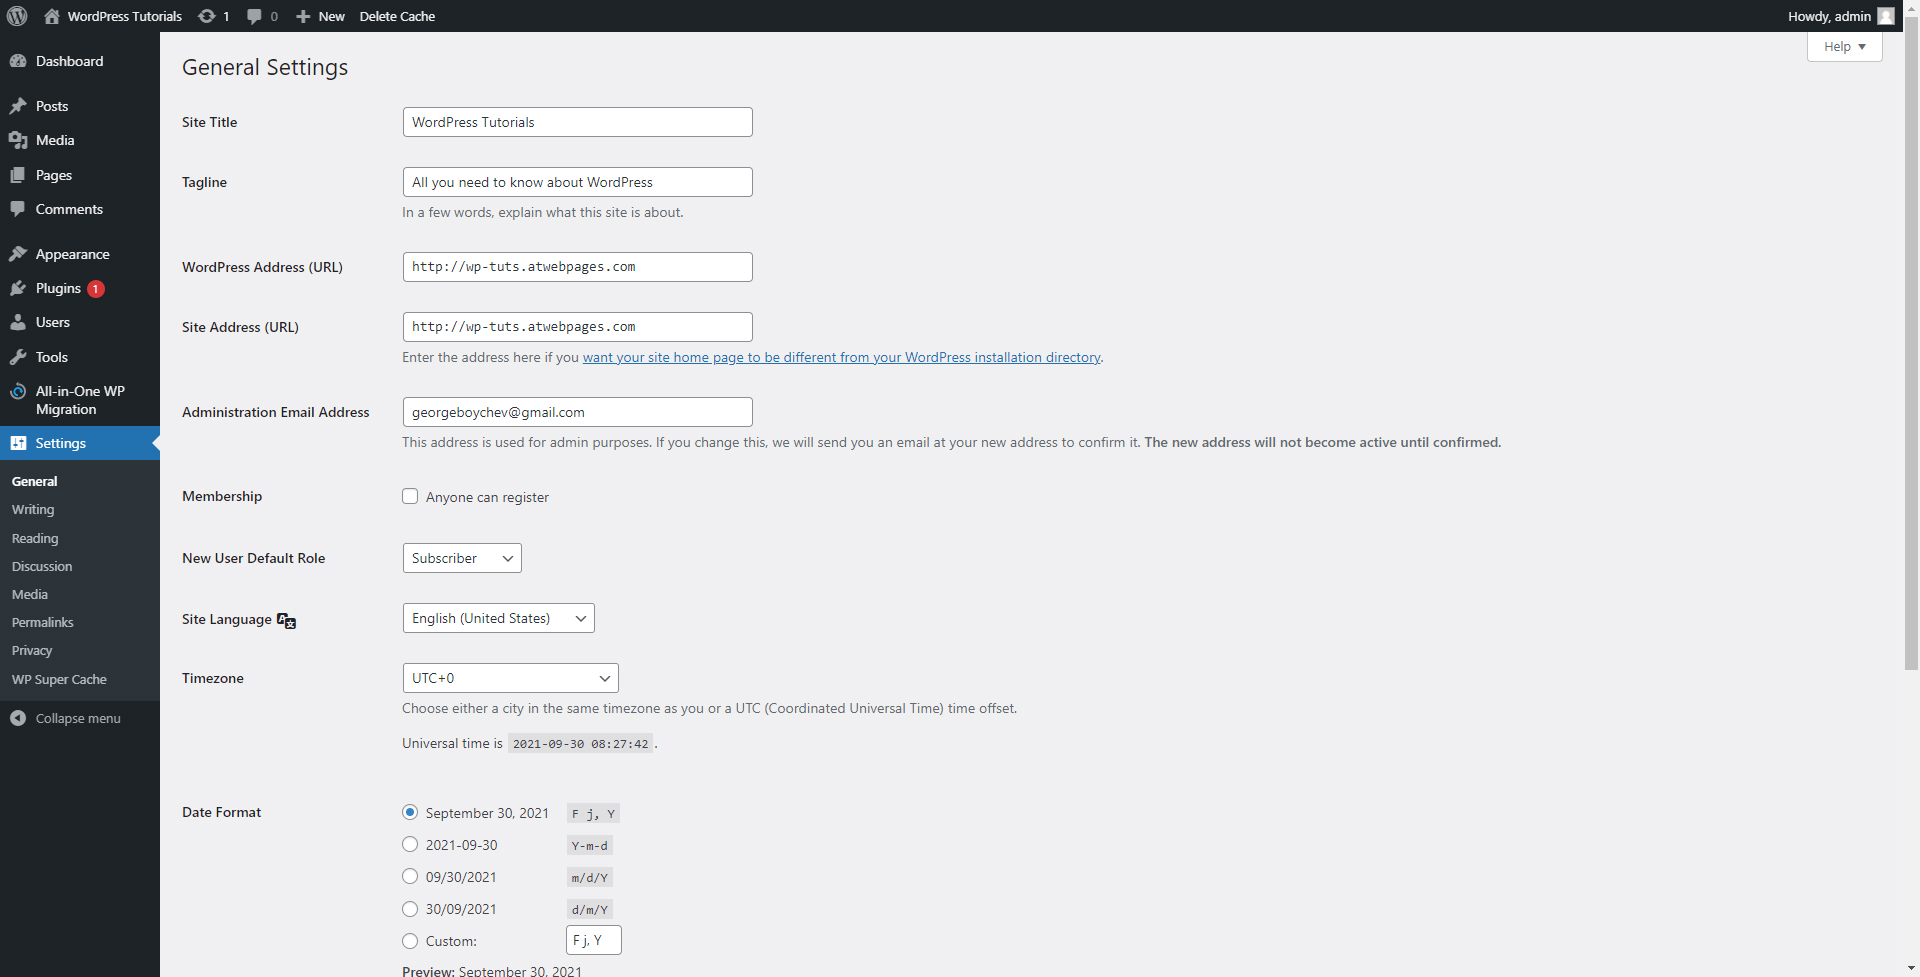
This panel allows you to change the site’s title, and tagline, add time formats, administration email, and more.
- Writing:
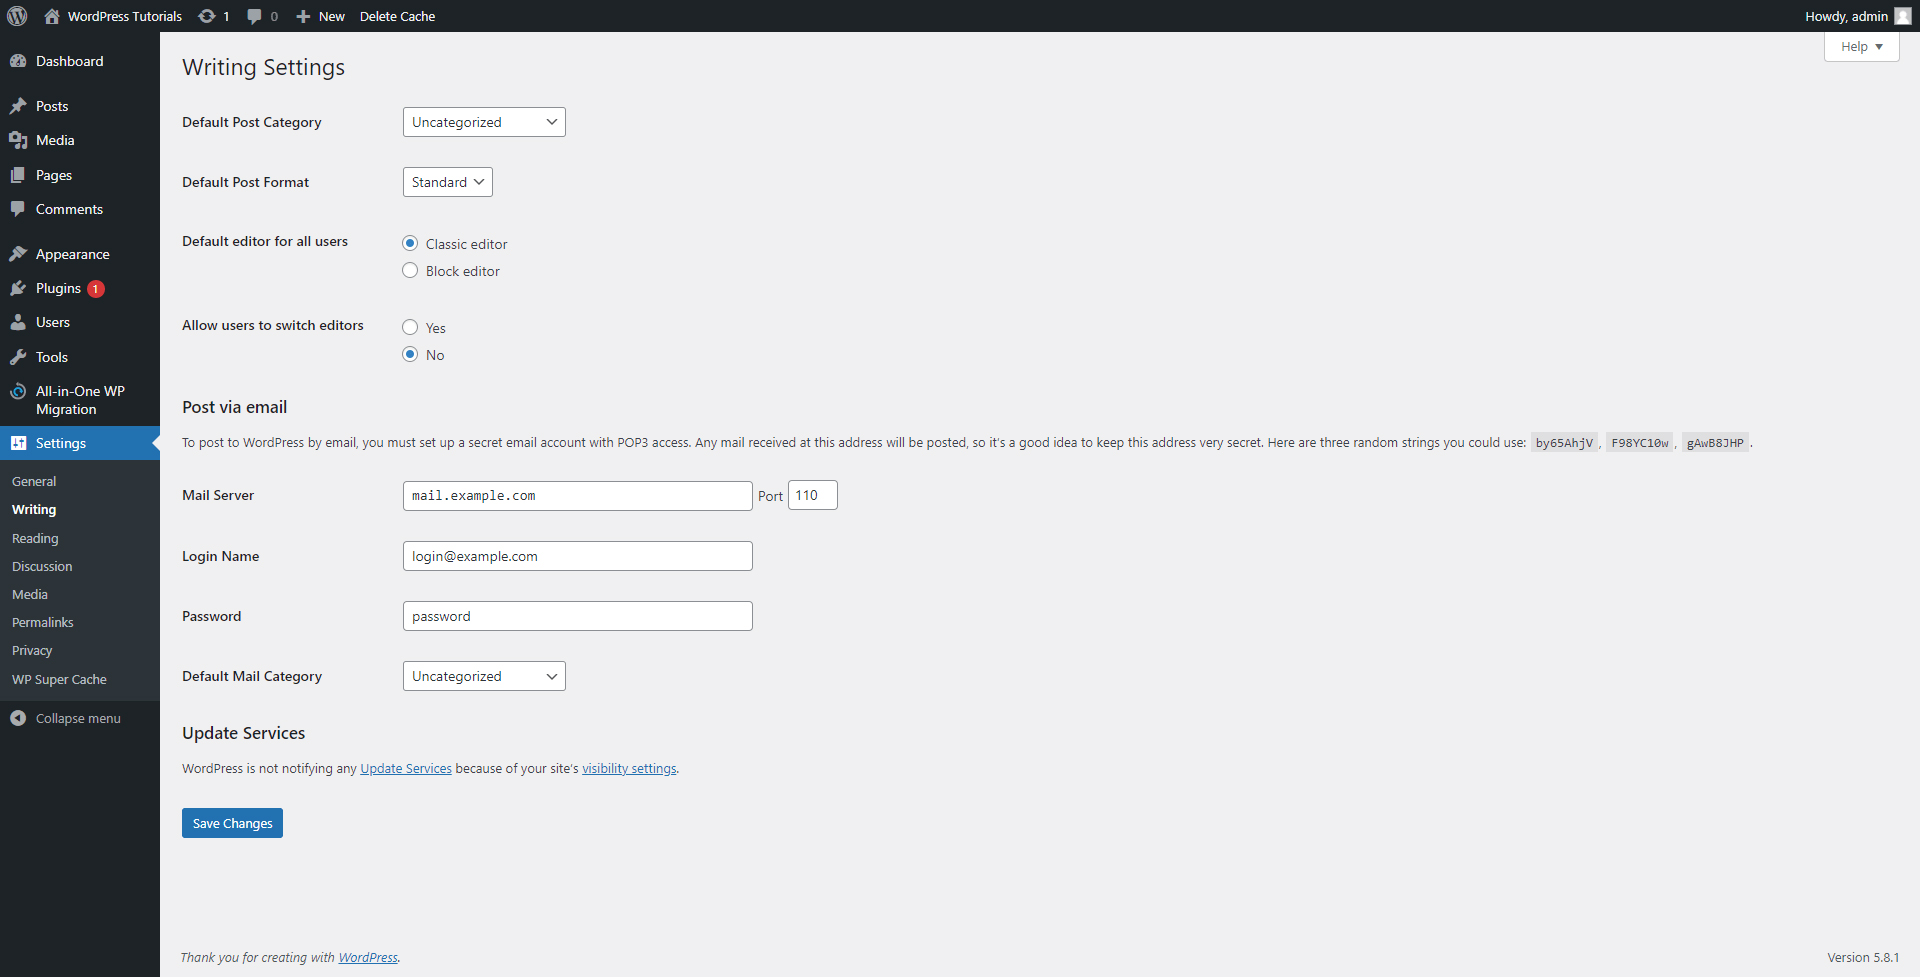
Via this panel, you can add changes to the Blog section of your site – default categories, formats, editors, and similar.
- Reading
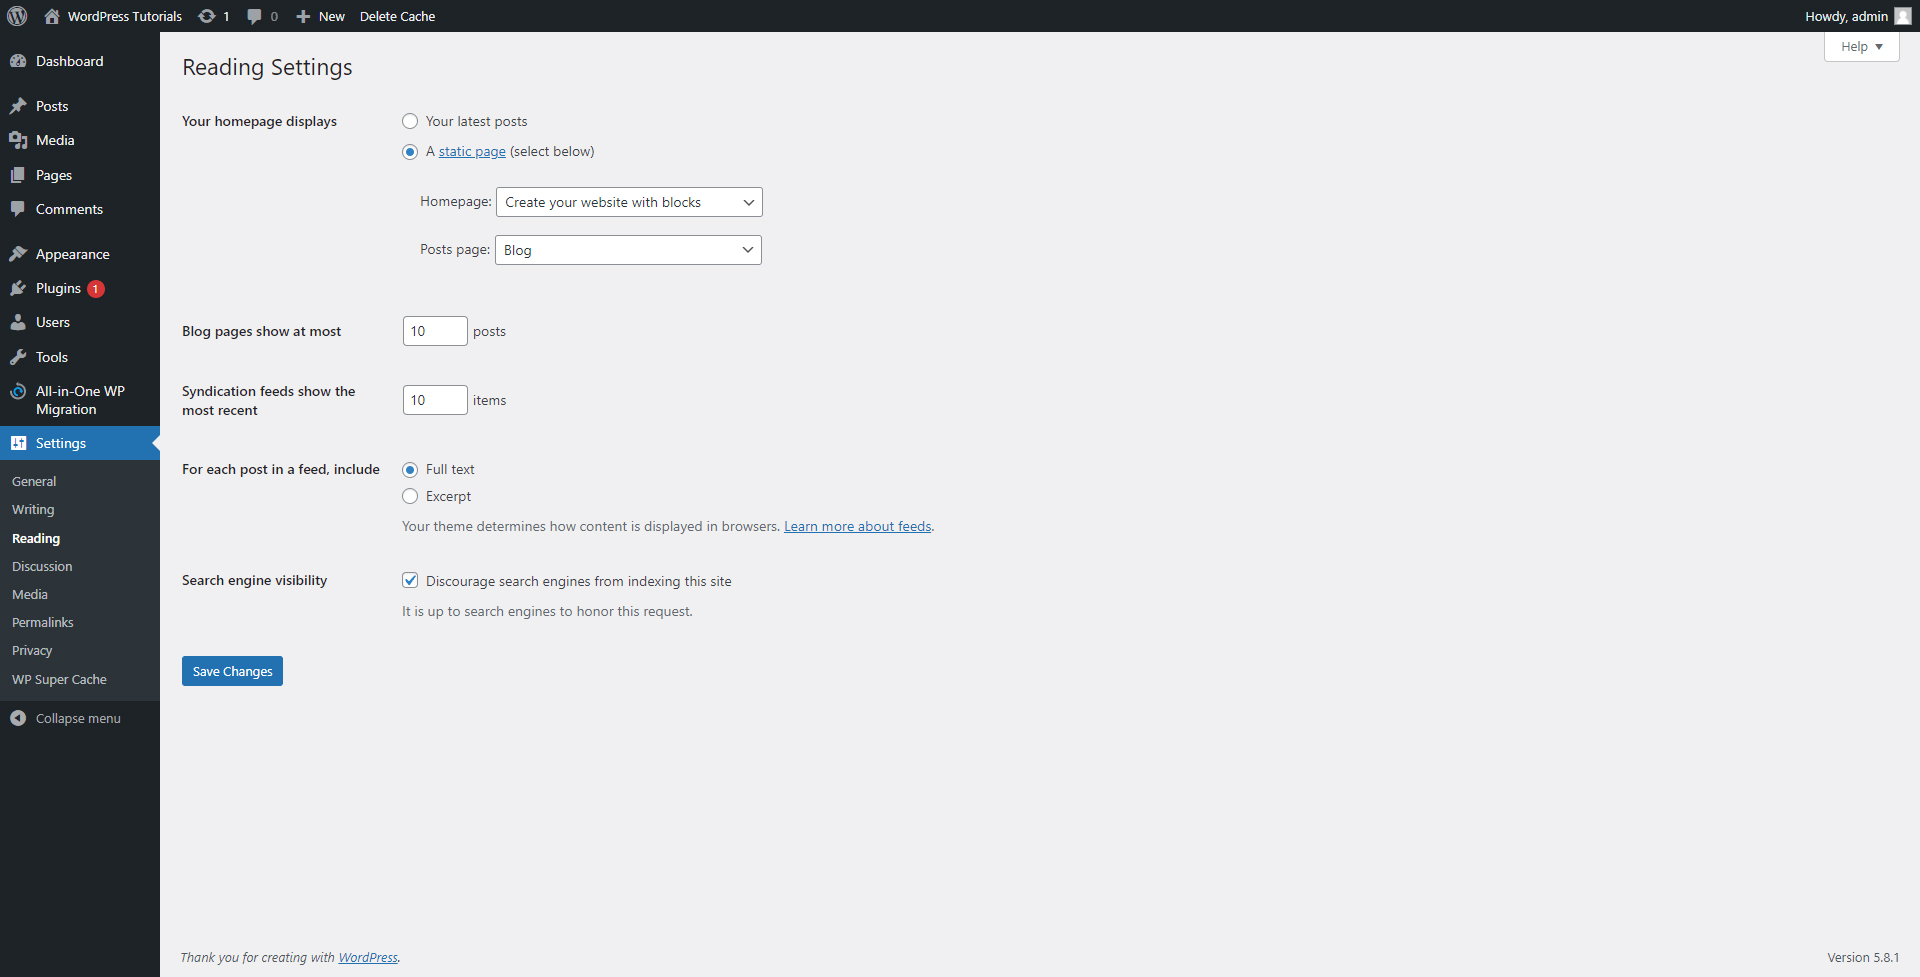
Here you can make some changes to the front-end section of your site – the one that your visitors see.
- Discussion
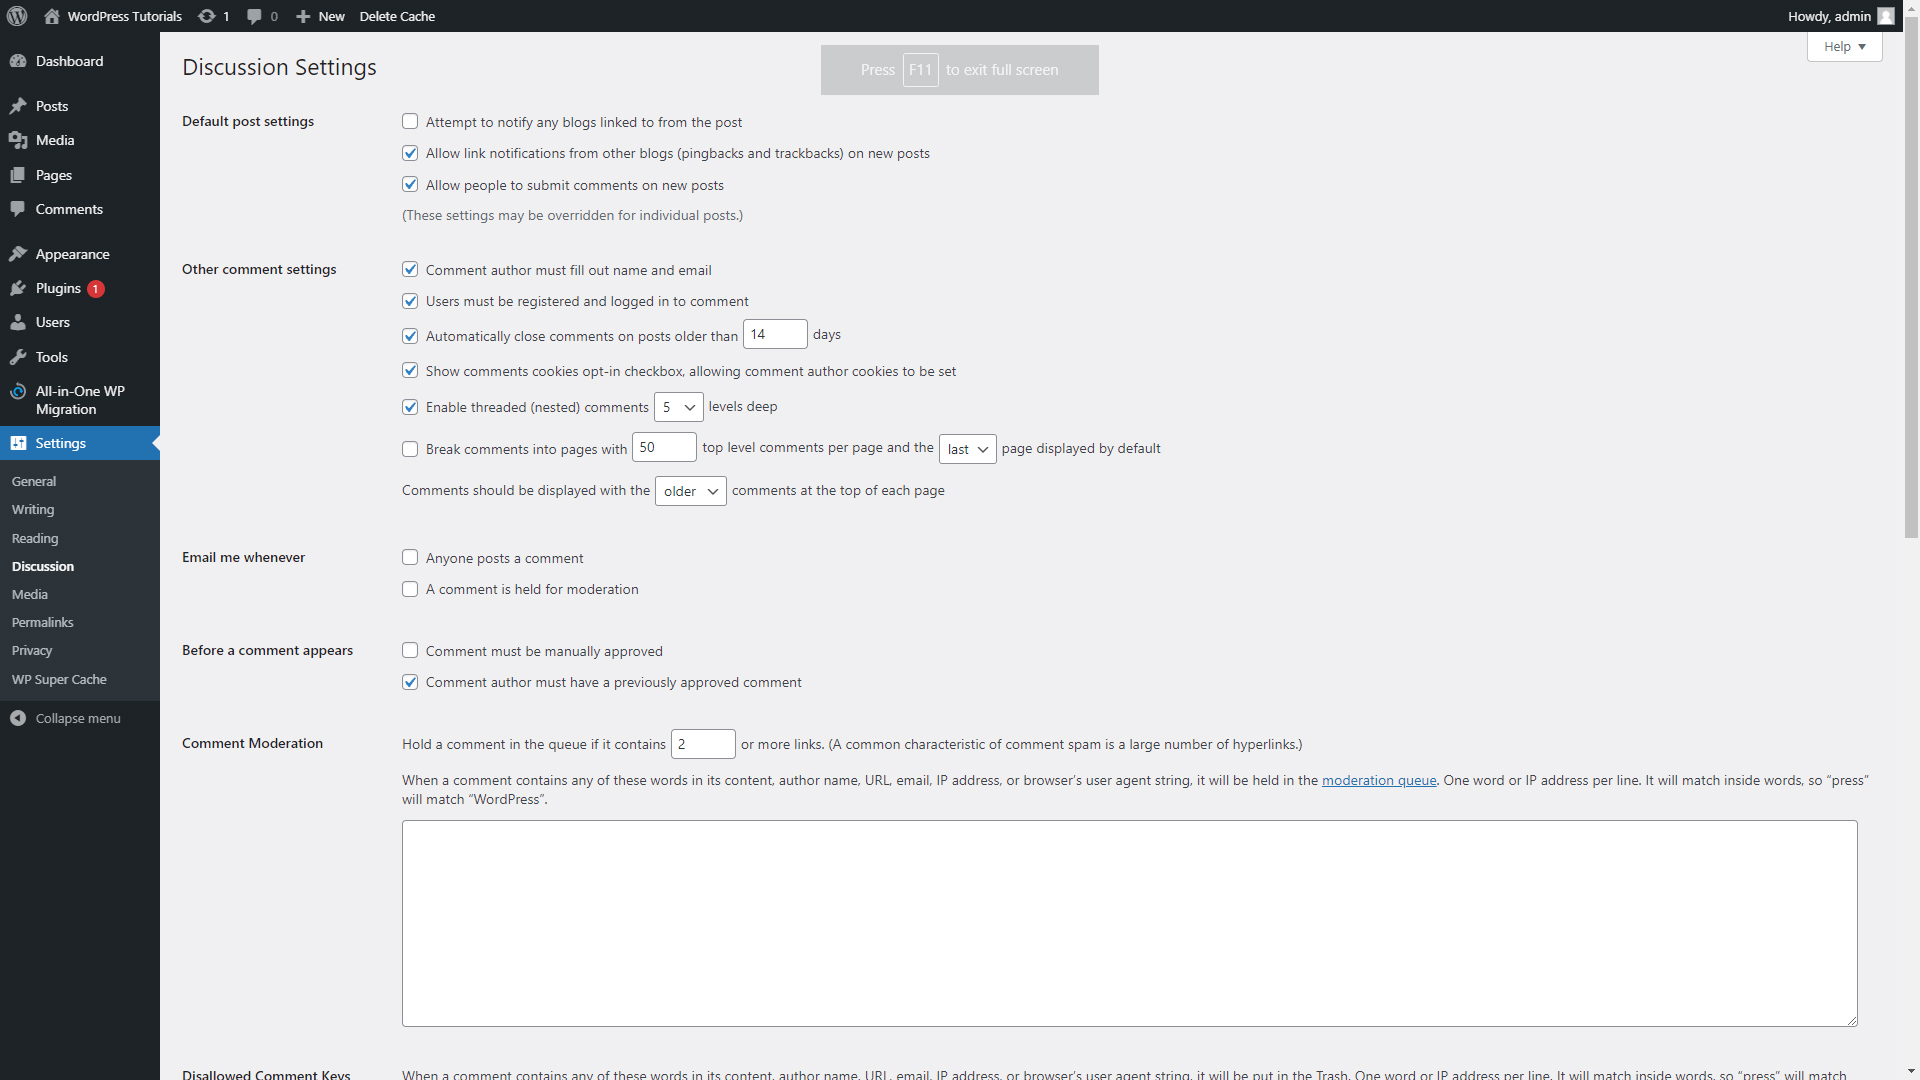
From here you can make any change regarding the comment section of your site – notifications, administrative rules, access to the Comment section, and more.
- Media
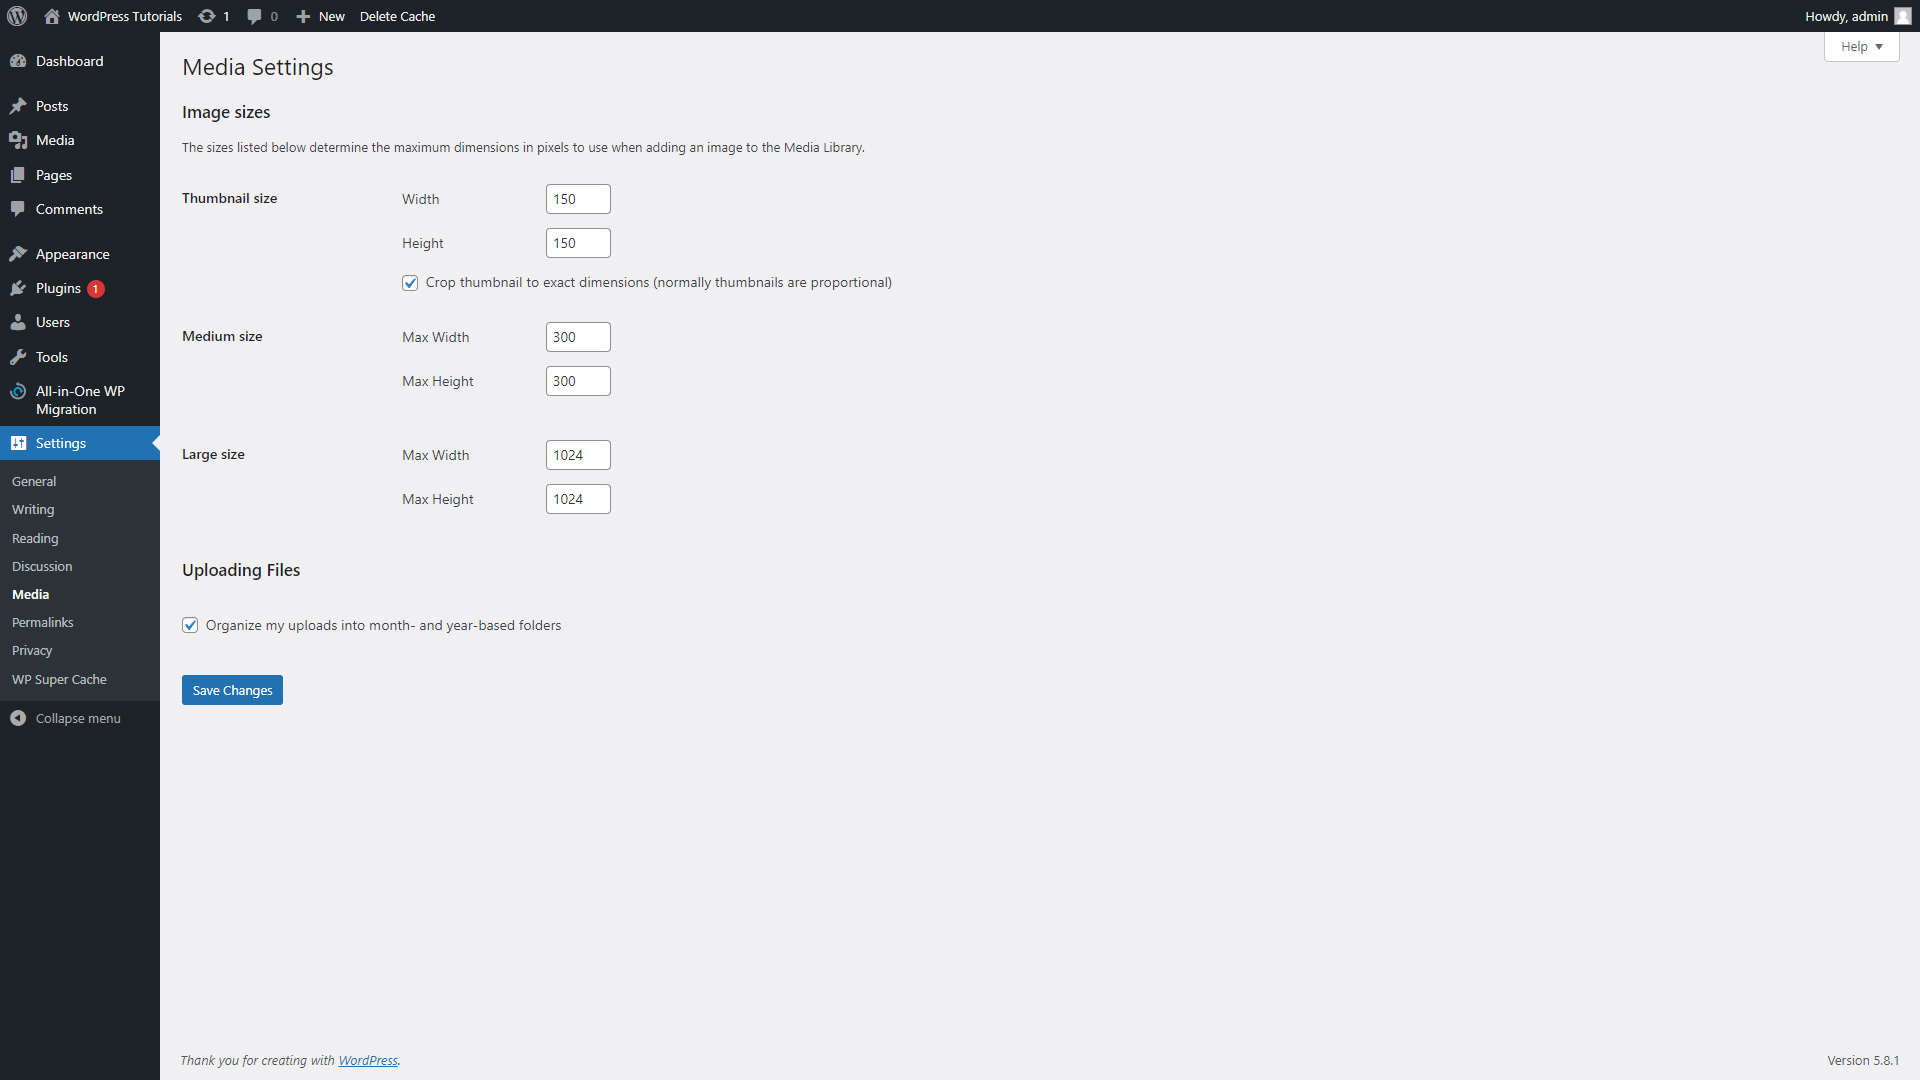
This is the tab that allows tweaking the size of the images you include in your posts and pages.
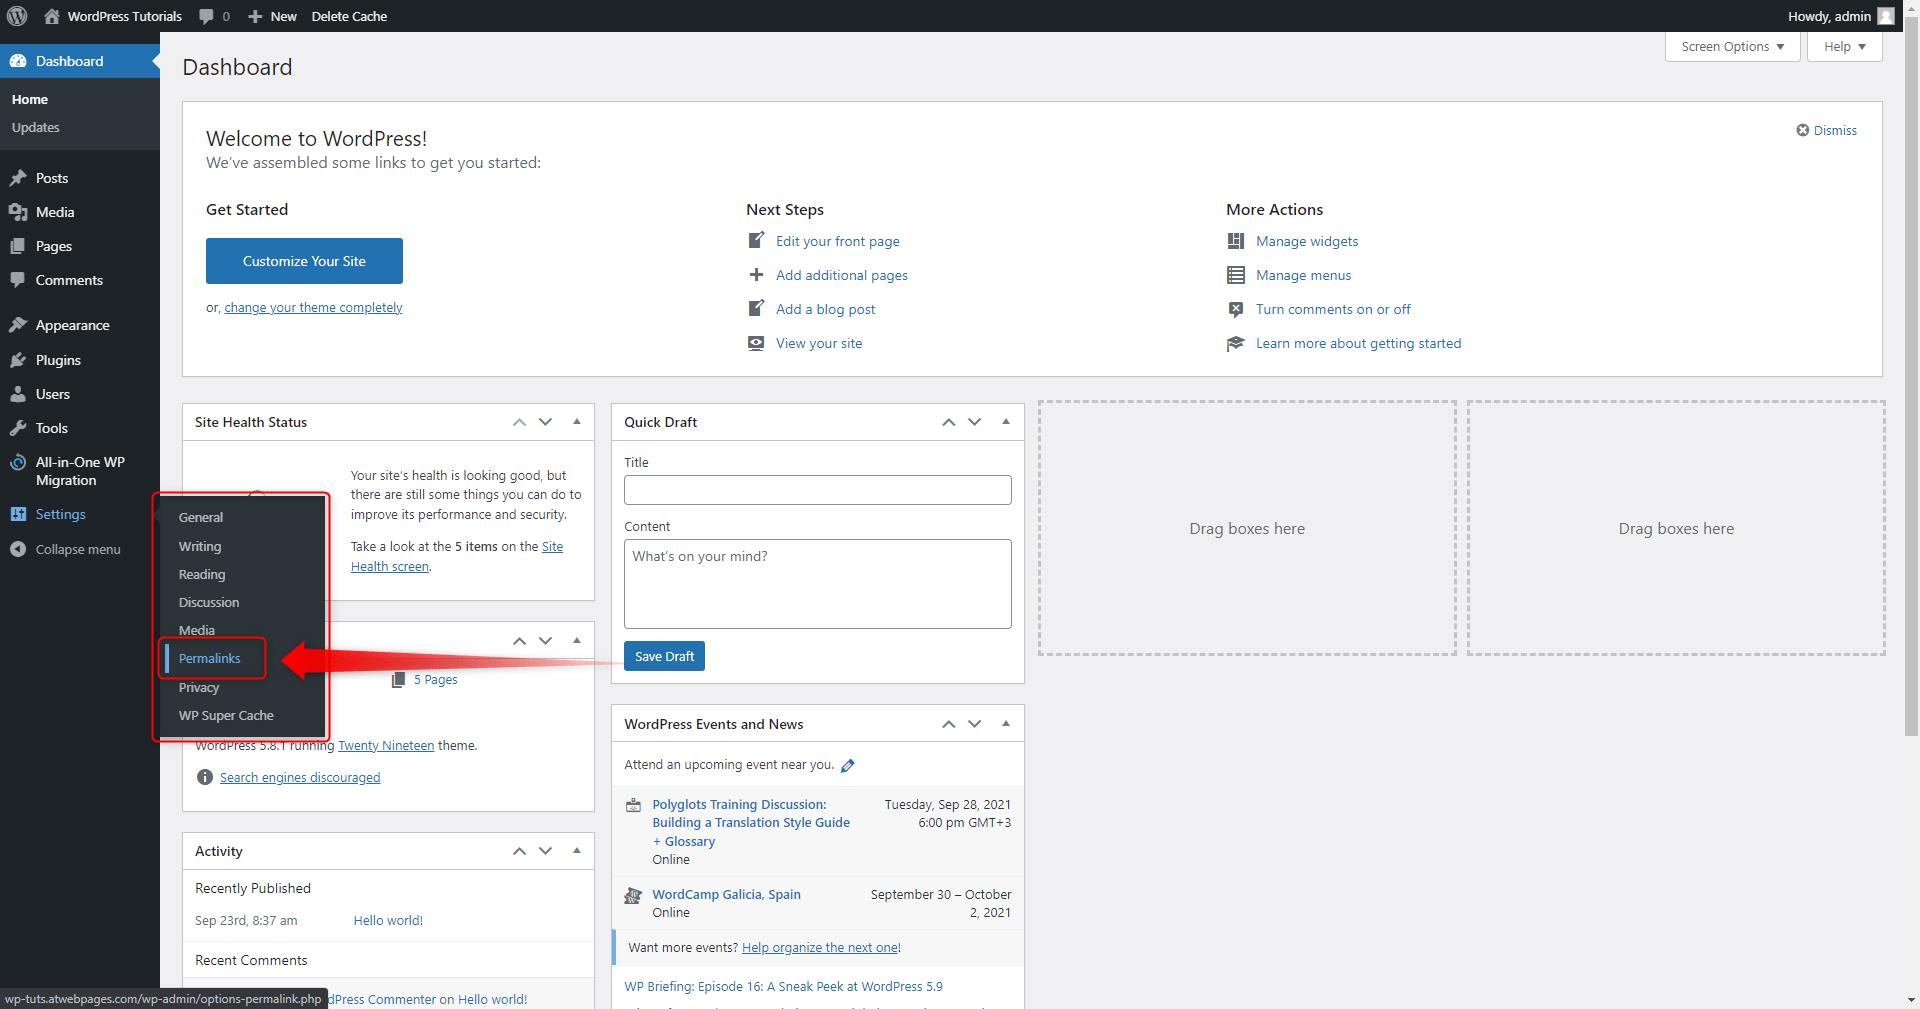
- Permalinks
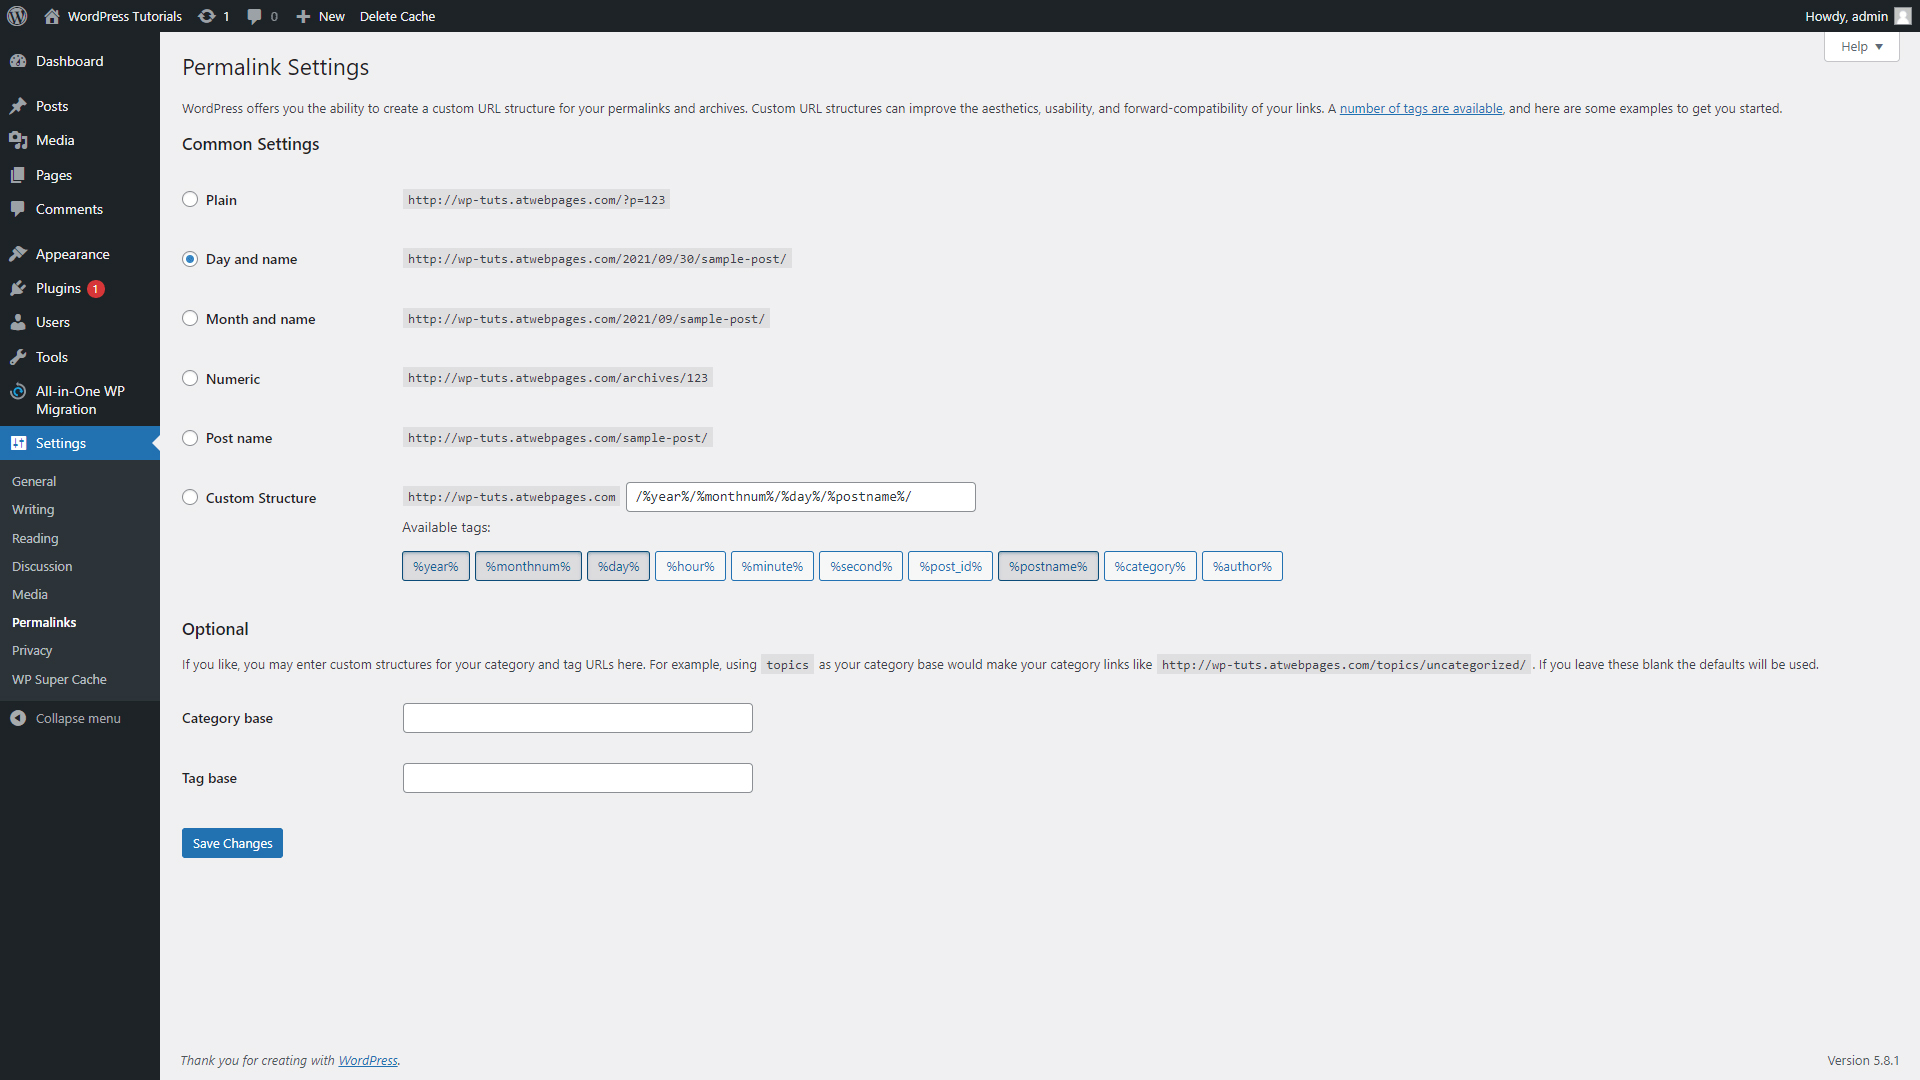
From this panel, you can customize your permalinks in any way possible. In the next section, we will have a closer look at what URLs, Permalinks, and Slugs are and how their proper use can be greatly beneficial for your site.
- Privacy
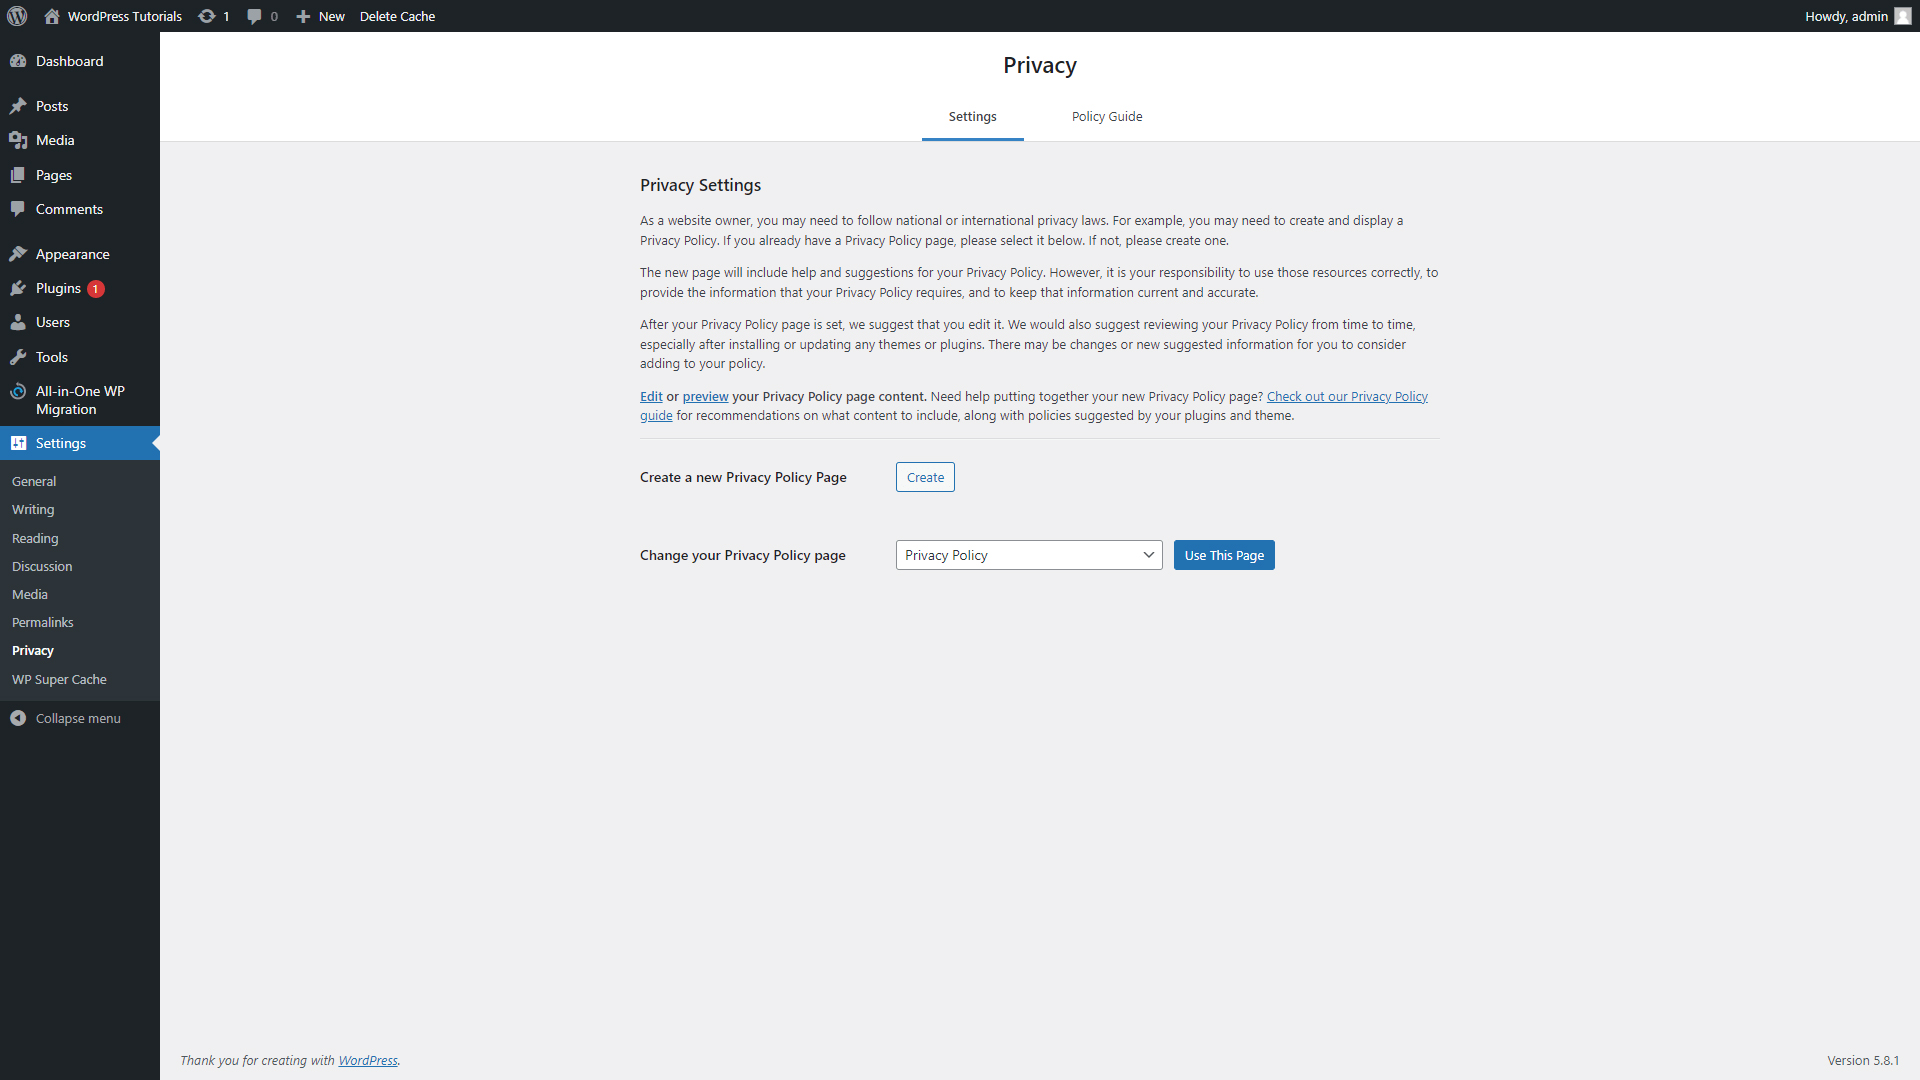
From this panel, you can add and manage all the Privacy Settings and Policy Guides of your page. Also, here’s the place to include some legal information.
- WP Super Cache Tab
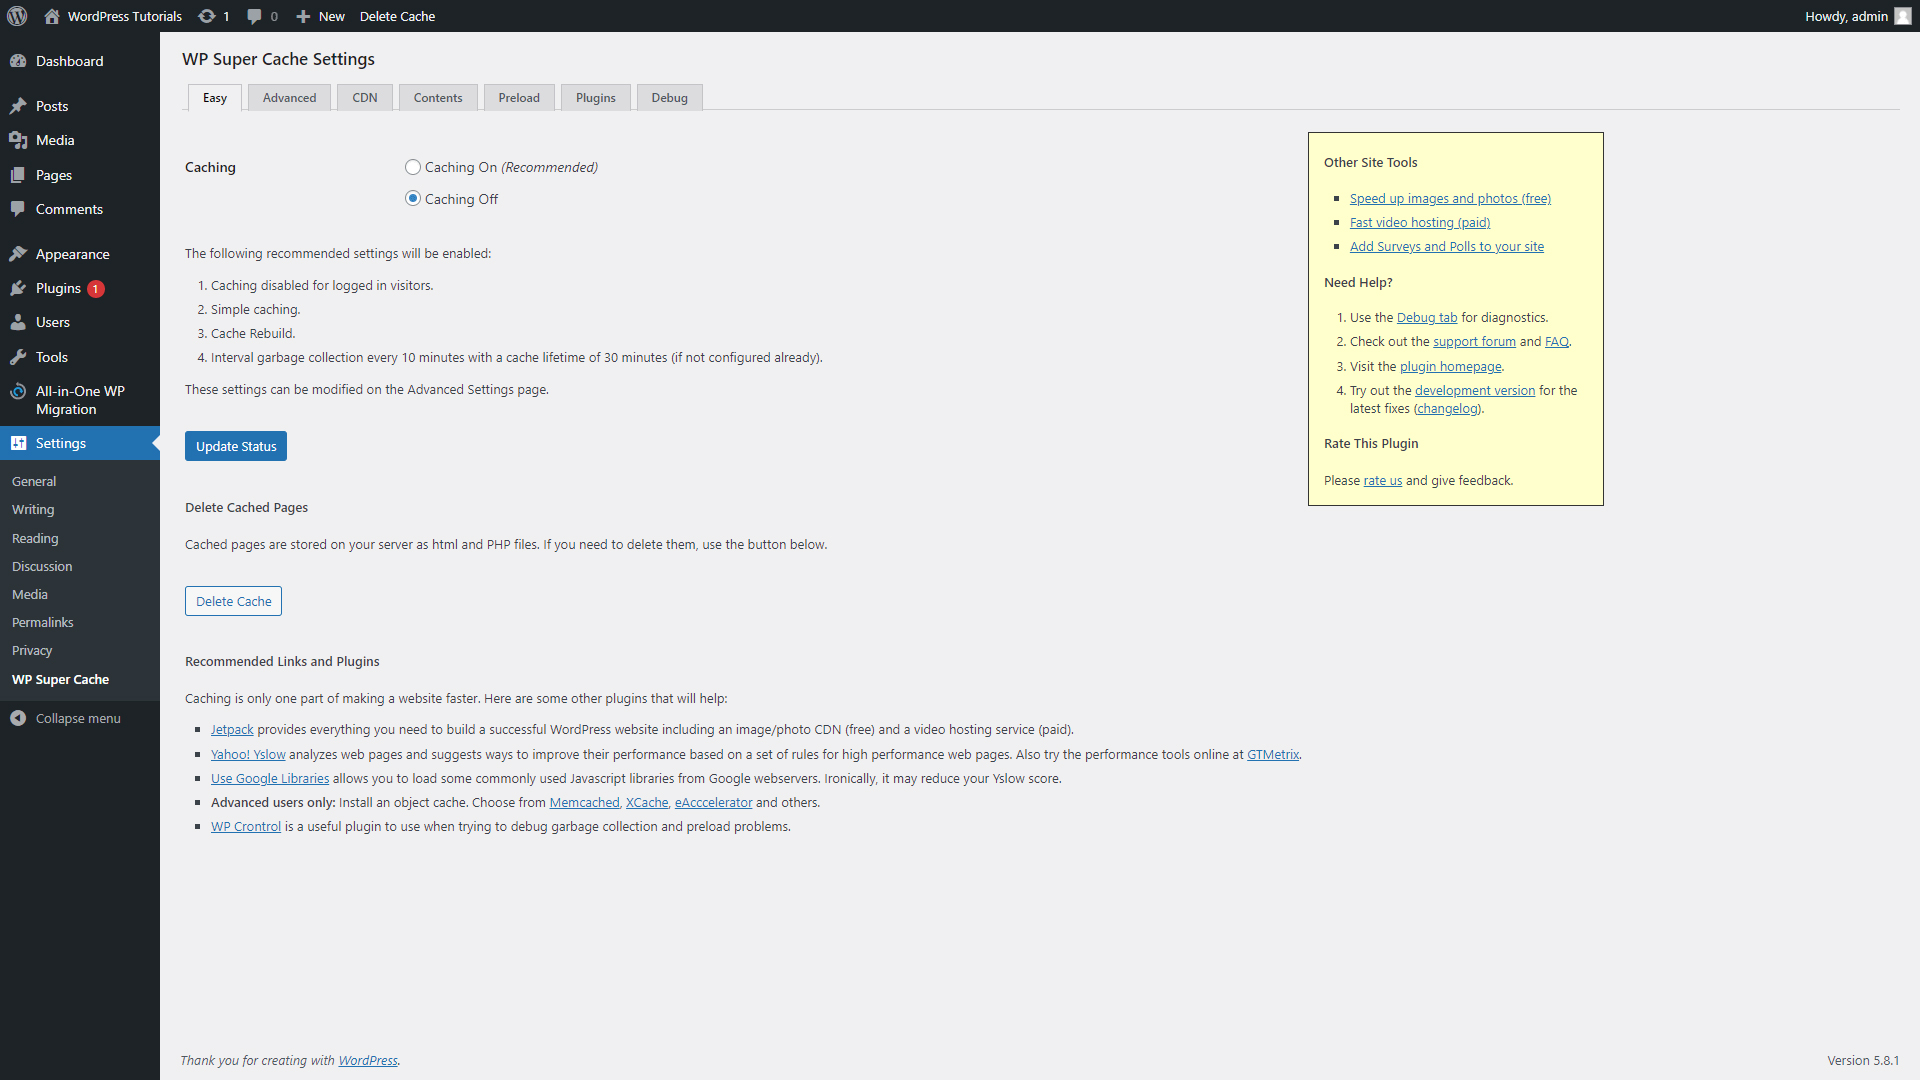
This is a comprehensive tab with tons of information and customization options for your website’s Cache options.
What are URLs, Permalinks, and Slugs?
What is a URL?
URL is an abbreviation for Uniform Resource Locator, a unique system, which uses browsers to find information on the Internet. It manages to point at a precise item within the ocean of information that the Internet is. Such an item might well be an HTML page, a CSS document, an image, or anything else.
URLs are quite prevalent and every Internet user has used at least one, even though they might not be aware. Needless to say, URLs are an important concept, and knowing more about it, will give you a deeper insight into how to make your website more functional.
What is a Permalink?
The Permalink is a type of URL that leads to a certain web page and, as the name suggests, is always the same. Permalinks in WordPress can be customized, but once you choose a structure, you can’t change it. We will tell you more about the Permalink structures a bit further in this guide.
In short, only one unique and never-changing link will lead to a particular web page out of the hundreds of billions of web pages there are on the World Wide Web.
Let’s take a look at an example, shall we?
http://wp-tuts.atwebpages.com/contact/ – This entire set of symbols and words is a Permalink. This particular Permalink leads to one unique internet page within the system of websites.
Should you change the string of symbols even the slightest, your browser will redirect you to a different place on the web, or nowhere, if the search engine fails to find a website with this particular name.
To make it even easier for your visitors to read quicker your quickly, you can change their structure. WordPress features such capabilities. However, it is up to you to choose the precise structure for your website. Let’s see where the options for that are:
Step 1. Open your WordPress Admin Panel and head toward the Settings menu located in the Sidebar:
The Permalink Settings menu will appear:
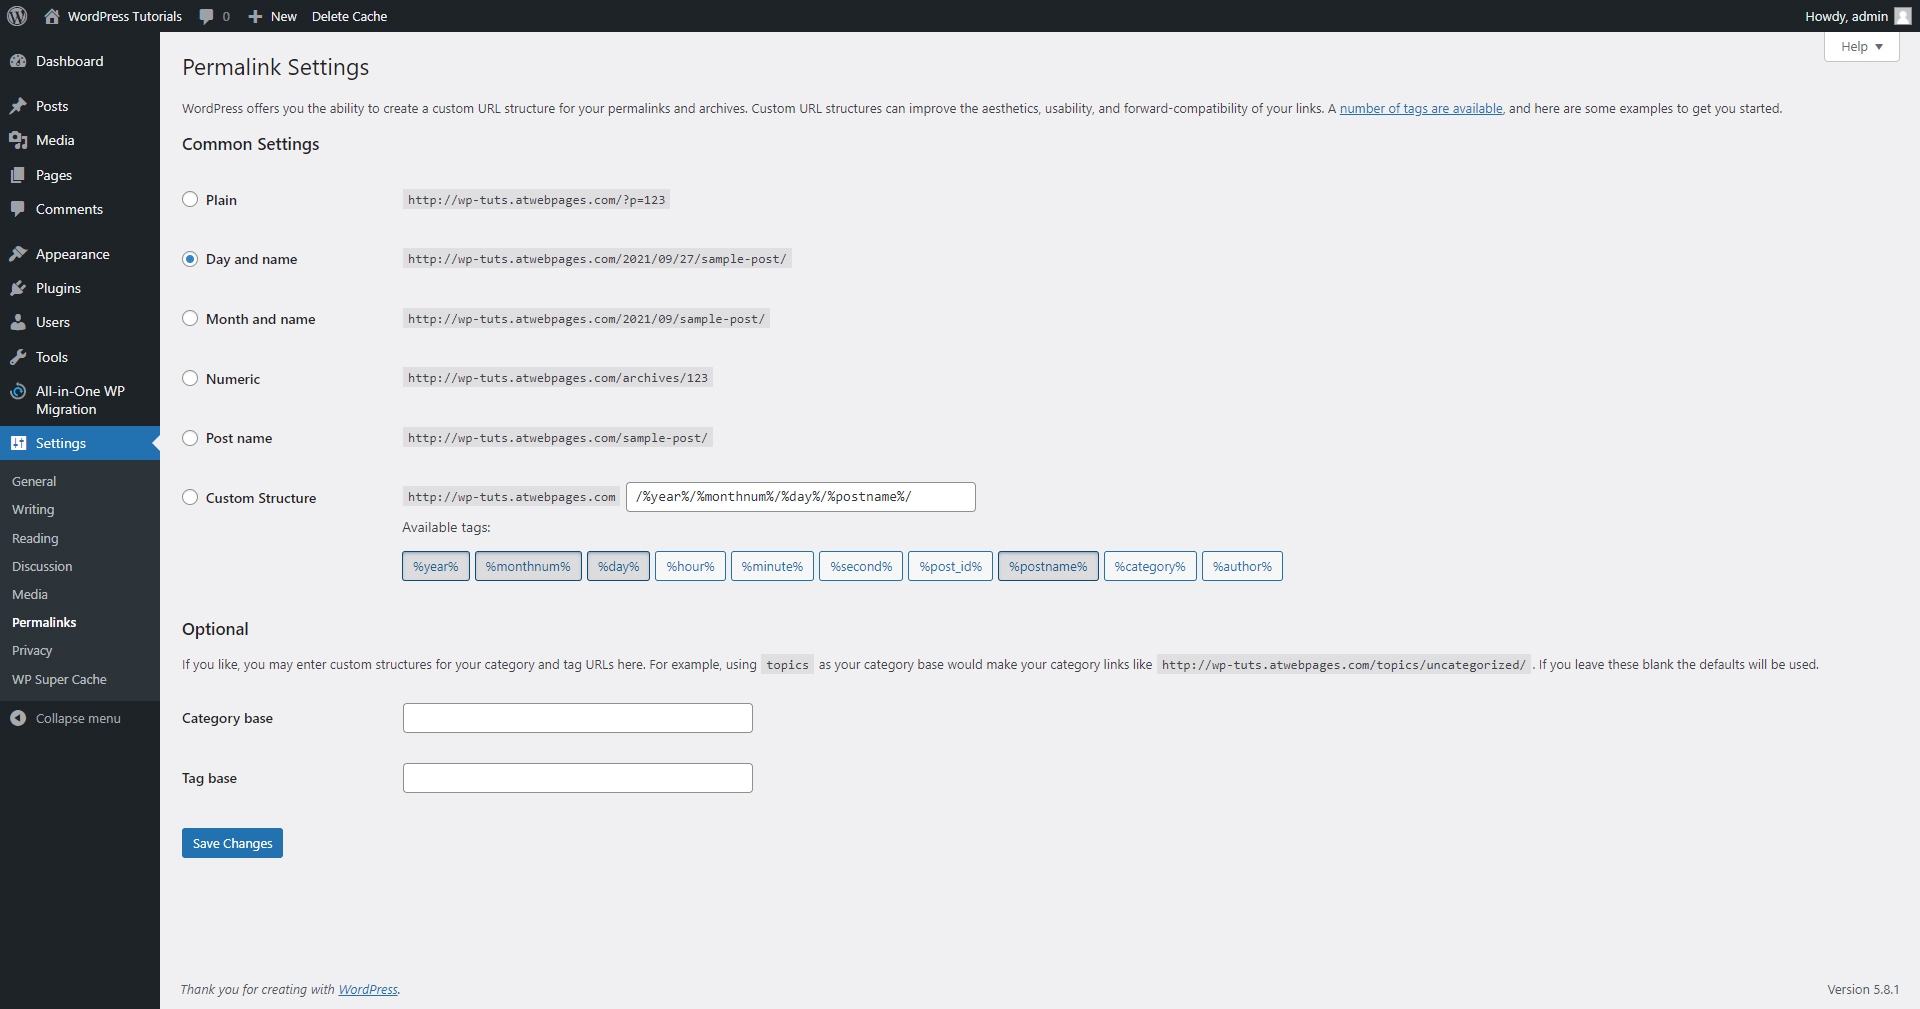
You can either choose a structure from the suggested ones, or you can create a fully customized one via the Custom Structure area:
What is a Permalink Slug?
The slug is the part of the link that describes a certain page within a website. It always appears after the domain name. The slug not only redirects to that particular page but also serves as a quick description of its content. This aids both Internet surfers and search engines in what the content of a web page might be about.
Let’s have an example, shall we?
In this particular case, the slug is “/about” and leads to the page that consists of such information. Should a website consist of some sub-pages, the slug might look something like this:
http://wp-tuts.atwebpages.com/about/authors
The WordPress slugs are quite useful for numerous reasons:
- Slugs are important for SEO – you can give your slugs names that match a particular keyword. This approach ensures a massive boost in your page’s search result rankings.
- They contribute to easier browsing by your visitors – the slug appears in the search results of the search engines. As mentioned, they give an overview of what the page is all about. A properly named slug can greatly boost the visits to your website, so choose your slug names carefully!
How to create a good WordPress Slug?
- Keep them short- this makes links easier to read. This means that adding a short Slug will cut down the overall length of the link.
- Make them descriptive – let the slug give a brief explanation about the page it redirects towards.
- Don’t forget to include a keyword as a Slug. This adds a neat boost to your website’s system engine optimization. If you are not sure what System Engine Optimization is, have a look at our free guide here. Among everything you will need to know about SEO, you will also understand how links, permalinks, and slugs can greatly boost the popularity of your site.
What Are WordPress Plugins?
Incorporating plugins is an important step in your site-building process. After you have found and installed the ones you need, you will eventually start adding and managing your web content.
Plugins are small sets of code that incorporate into WordPress and expand the capabilities of the platform.
Some of them make it easier for you to manage your images, others your texts, third ones aid you with system engine optimization, and yet other ones enhance the security of your website. Some plugins make grammar checks on your writings, others make complex weather reports, analyze the website’s visitors, and their behavior on your site, improve loading speed, add a payment gateway, translate, and many, many more.
You can think of the plugins as an expansion or an add-on to every function there is in WordPress. They are the secret ingredient that makes WordPress so flexible and versatile.
The best of all is that, similarly to the themes, finding, installing, and using plugins doesn’t require coding skills, nor some comprehensive programming knowledge – remember that WordPress makes it easier for all users to create and manage websites.
There are about 55,000 available plugins. They all can be sorted and categorized in different ways. However, the most general and important types are:
- Security Plugins – it is advisable to secure your website as strongly as possible. Usually, sites are vulnerable to different kinds of different attacks – data theft, malware, funds loss, and more. When you search for plugins, definitely start with installing some security ones.
- Site Optimization Plugins – such tools improve the performance and loading speed of your site, so your visitors don’t get annoyed by long loading times and poor site performance.
- Contact Form Plugins – a contact form is one of the most convenient ways to communicate with your visitors. A properly created contact form can greatly improve the user experience, so don’t hesitate to install a suitable one.
- SEO Plugins – System Engine Optimization is vital for the popularity of your site and the traffic toward your pages. So, you should always know whether your site construction and maintenance are SEO-friendly. This is possible with all the different plugins that help you with this task.
- Caching Plugins – such instruments reduce the site’s loading speeds even further, so you should use such a plugin.
How to Search for and Install a WordPress Plugin?
In this part of the guide, you will learn how to search for and install WordPress plugins.
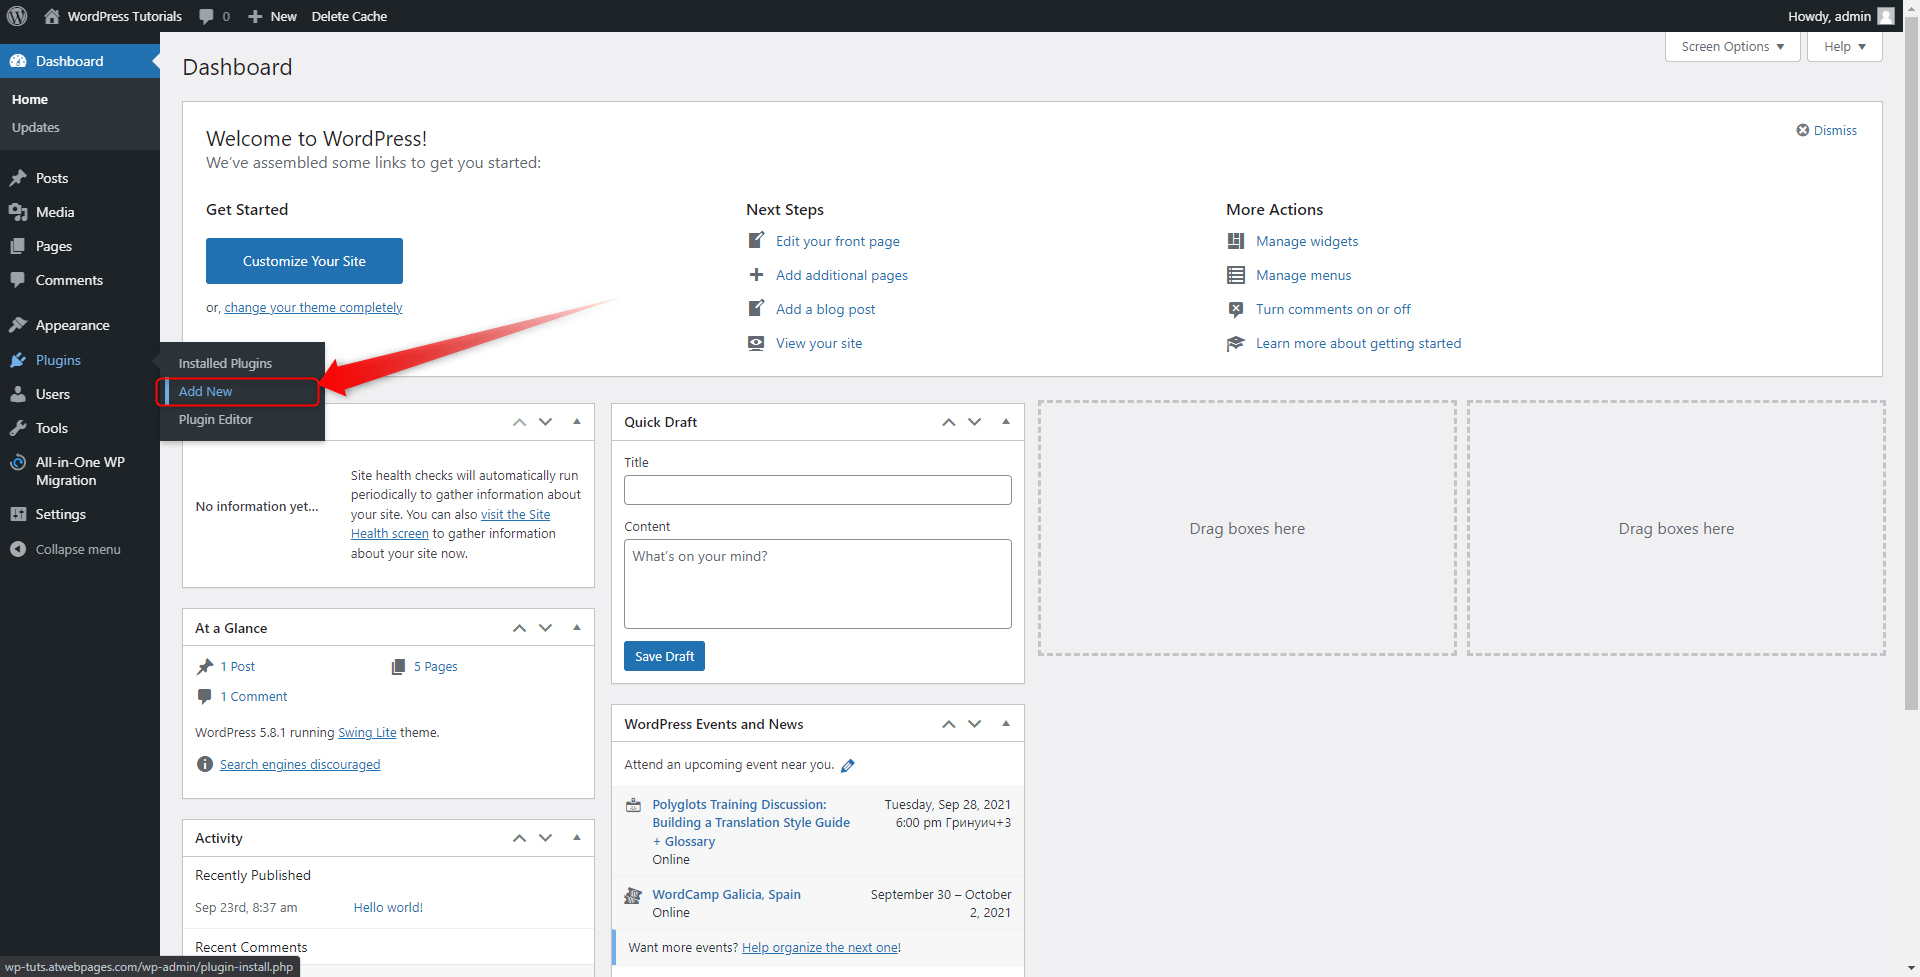
Step 1: Enter your WordPress Admin Panel. Then hover over the Plugins button within the Sidebar, at the far left of the screen. When you do so, a drop-down menu with different options should appear. Click the Add New button:
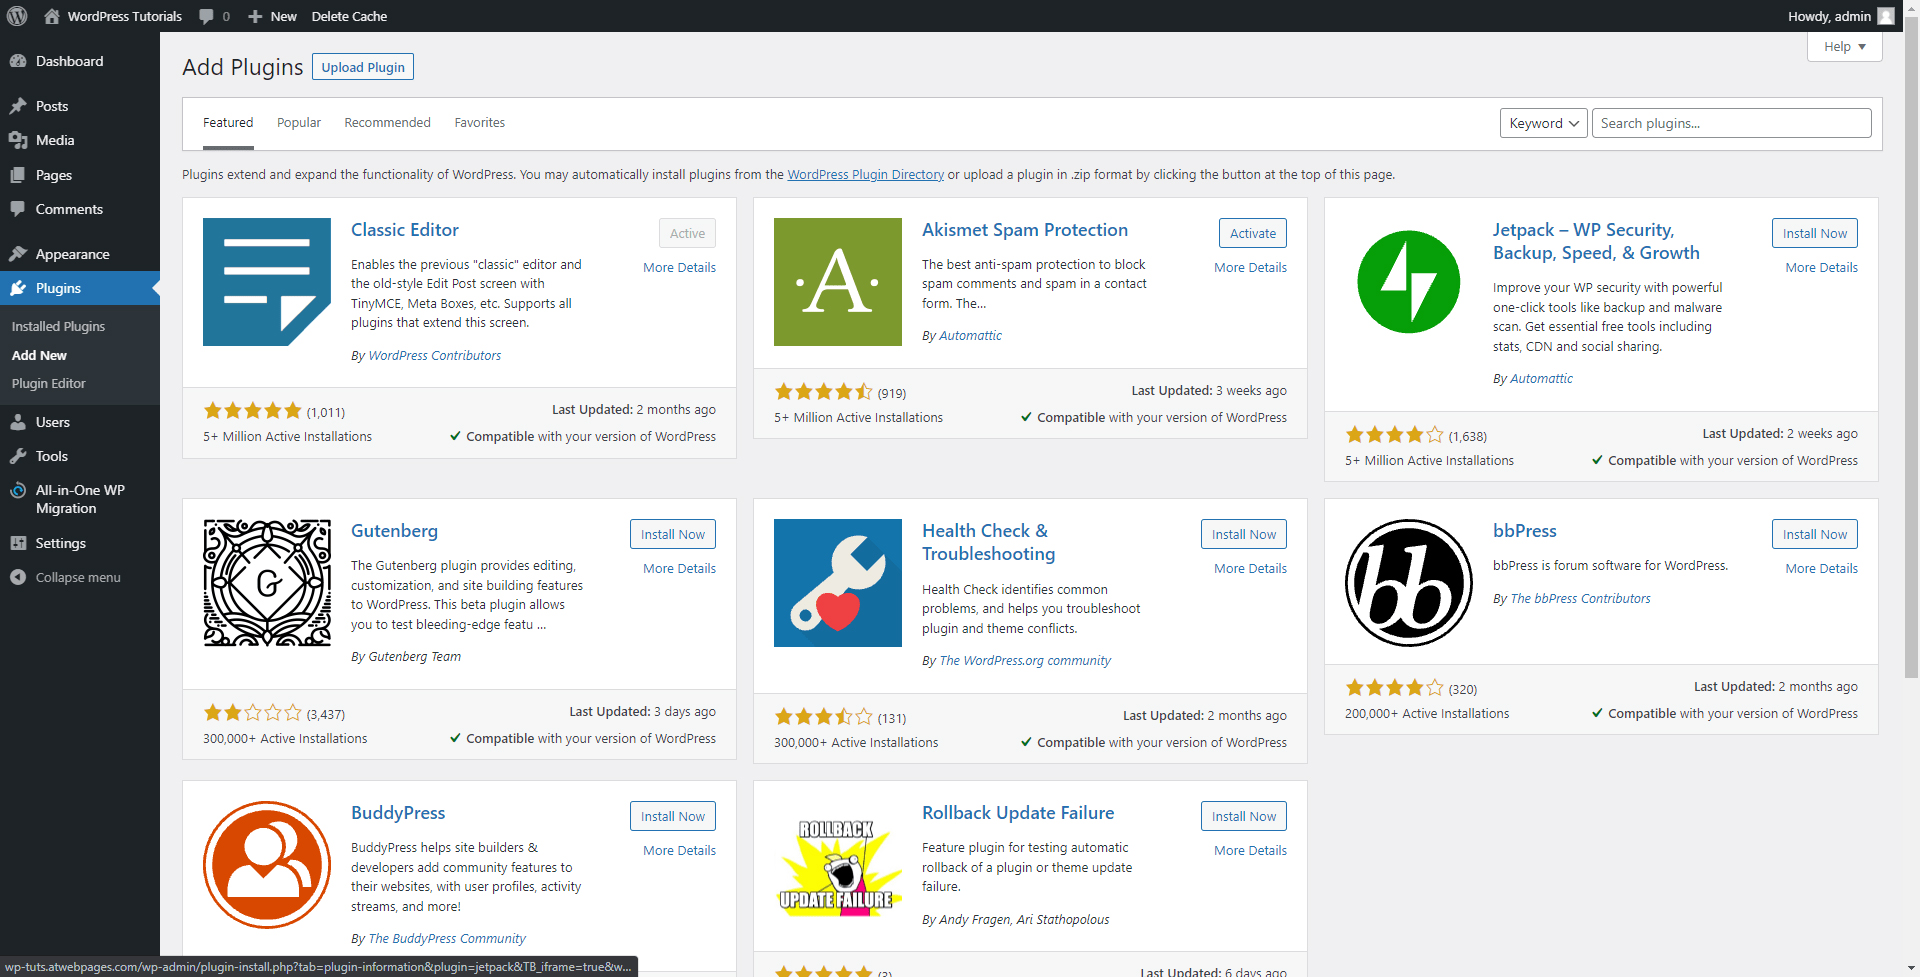
A new page will open. This is the Plugins search tab. From here you can browse the entire collection of available plugins and sort them in any way possible:
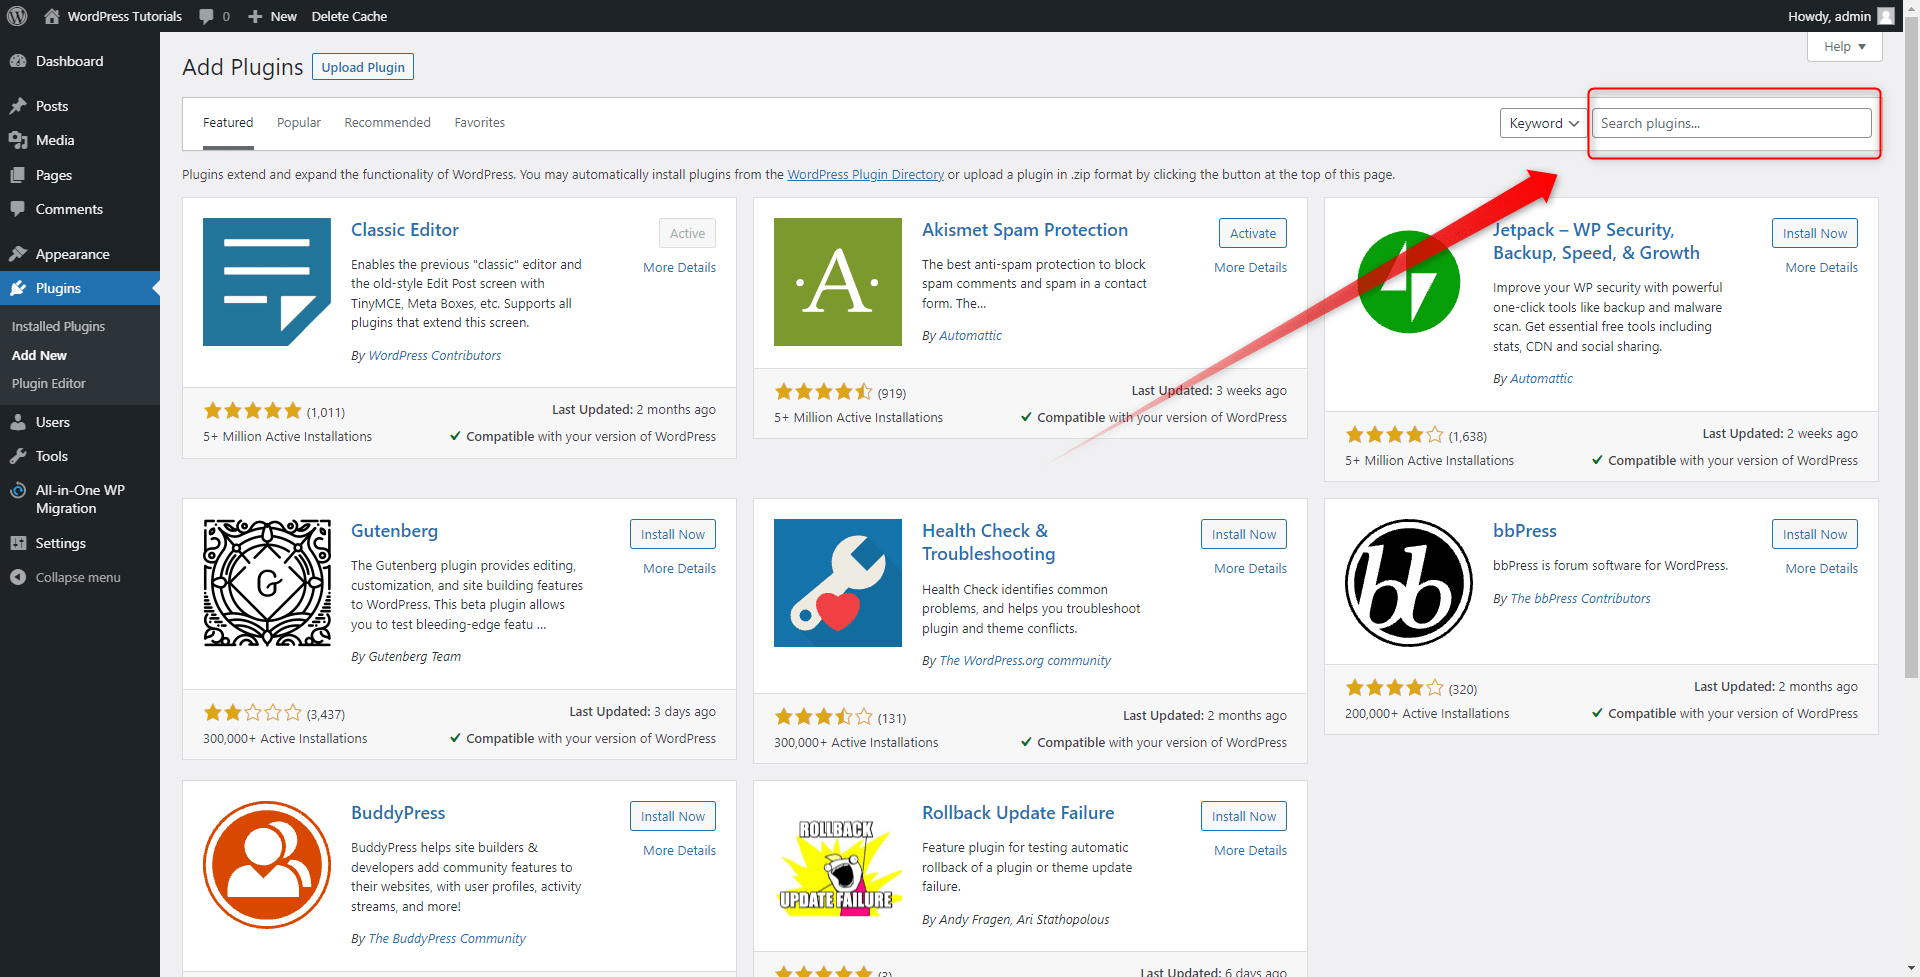
You can also search for a particular tool by name – simply type in the plugin’s name in the search box at the top right corner, and let the system find it for you:
Browse the list of plugins, and choose one that you find useful:
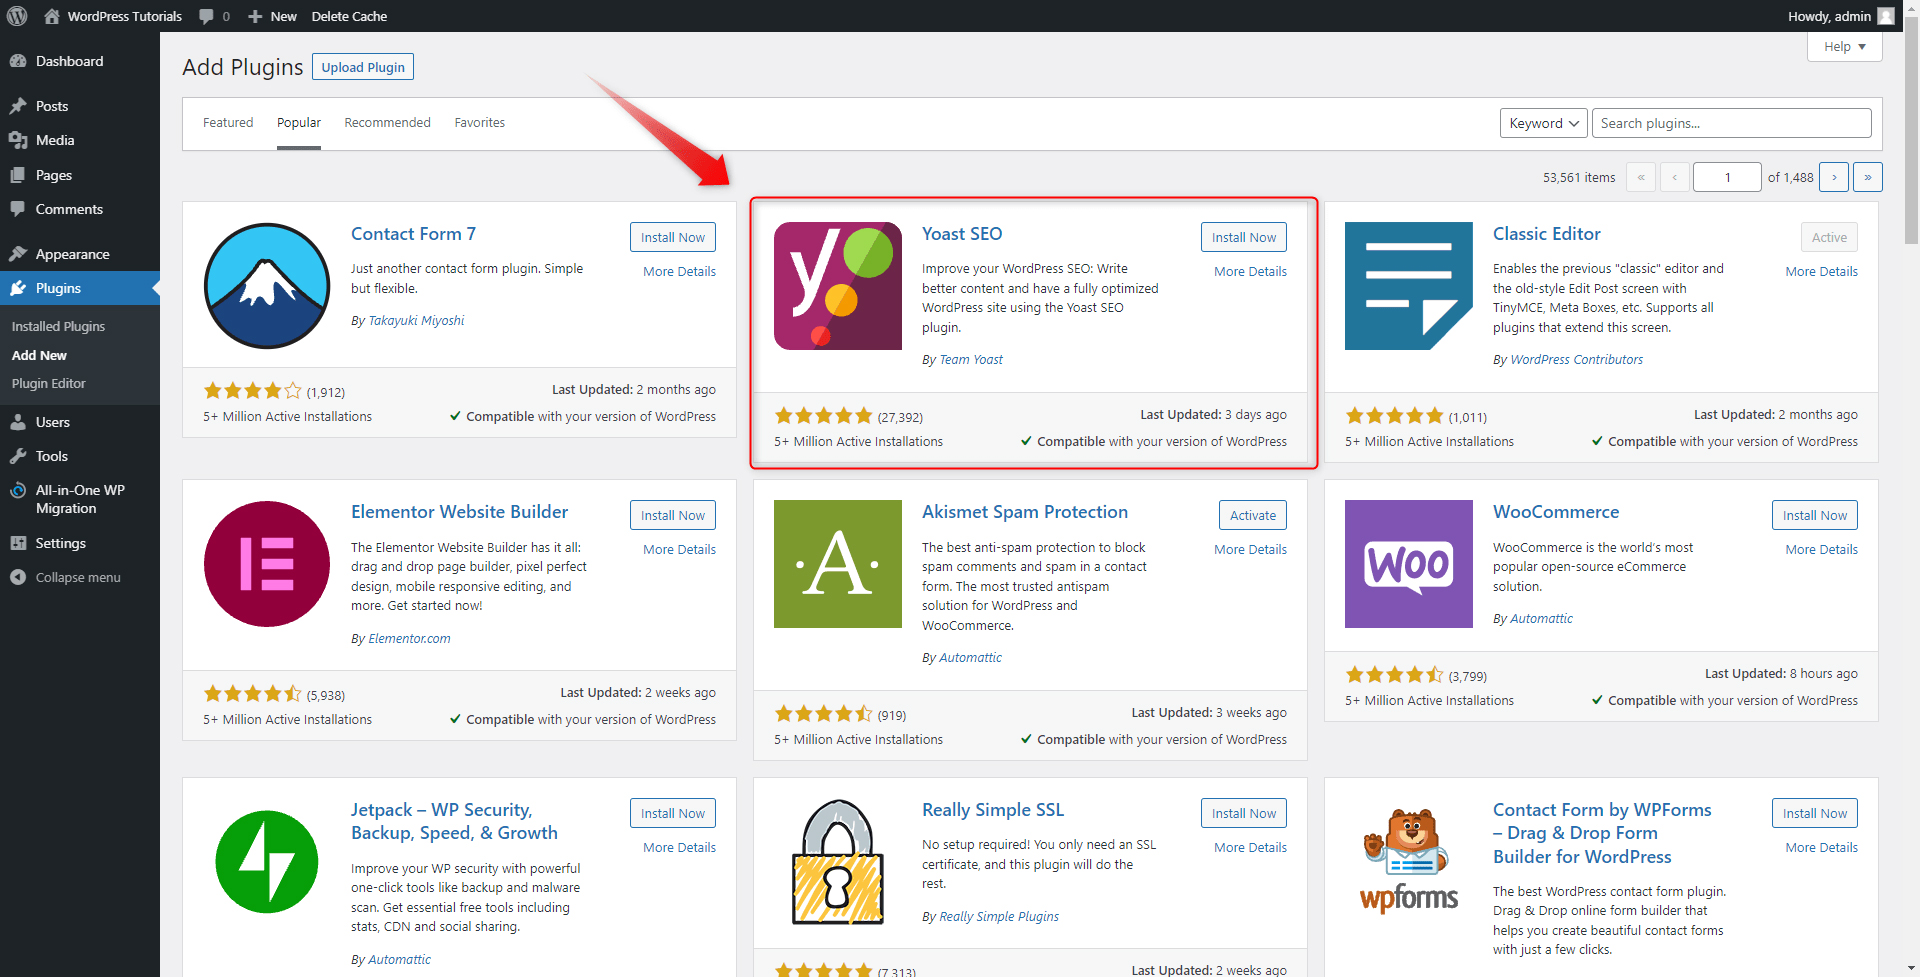
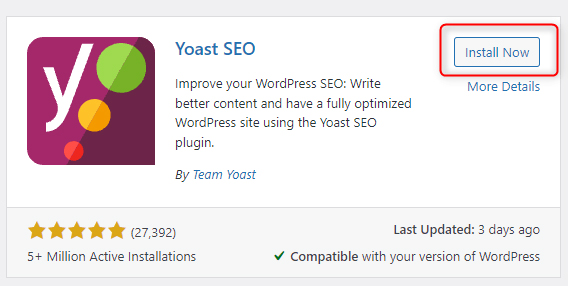
The list of available plugins is sorted in boxes that contain an icon, short description, rating, and installation button. To install a particular plugin, click on the Install Now button, located at the top right of the Plugin’s presentation image:
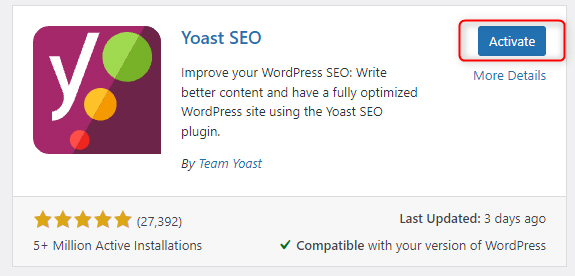
Once the tool is installed, a new button will appear – Activate. Once you see it, click it – it will incorporate the tool in WordPress and you will be able to use it.
Once the activation process is completed, you will be automatically redirected to the Installed Plugins tab of the WordPress Dashboard:
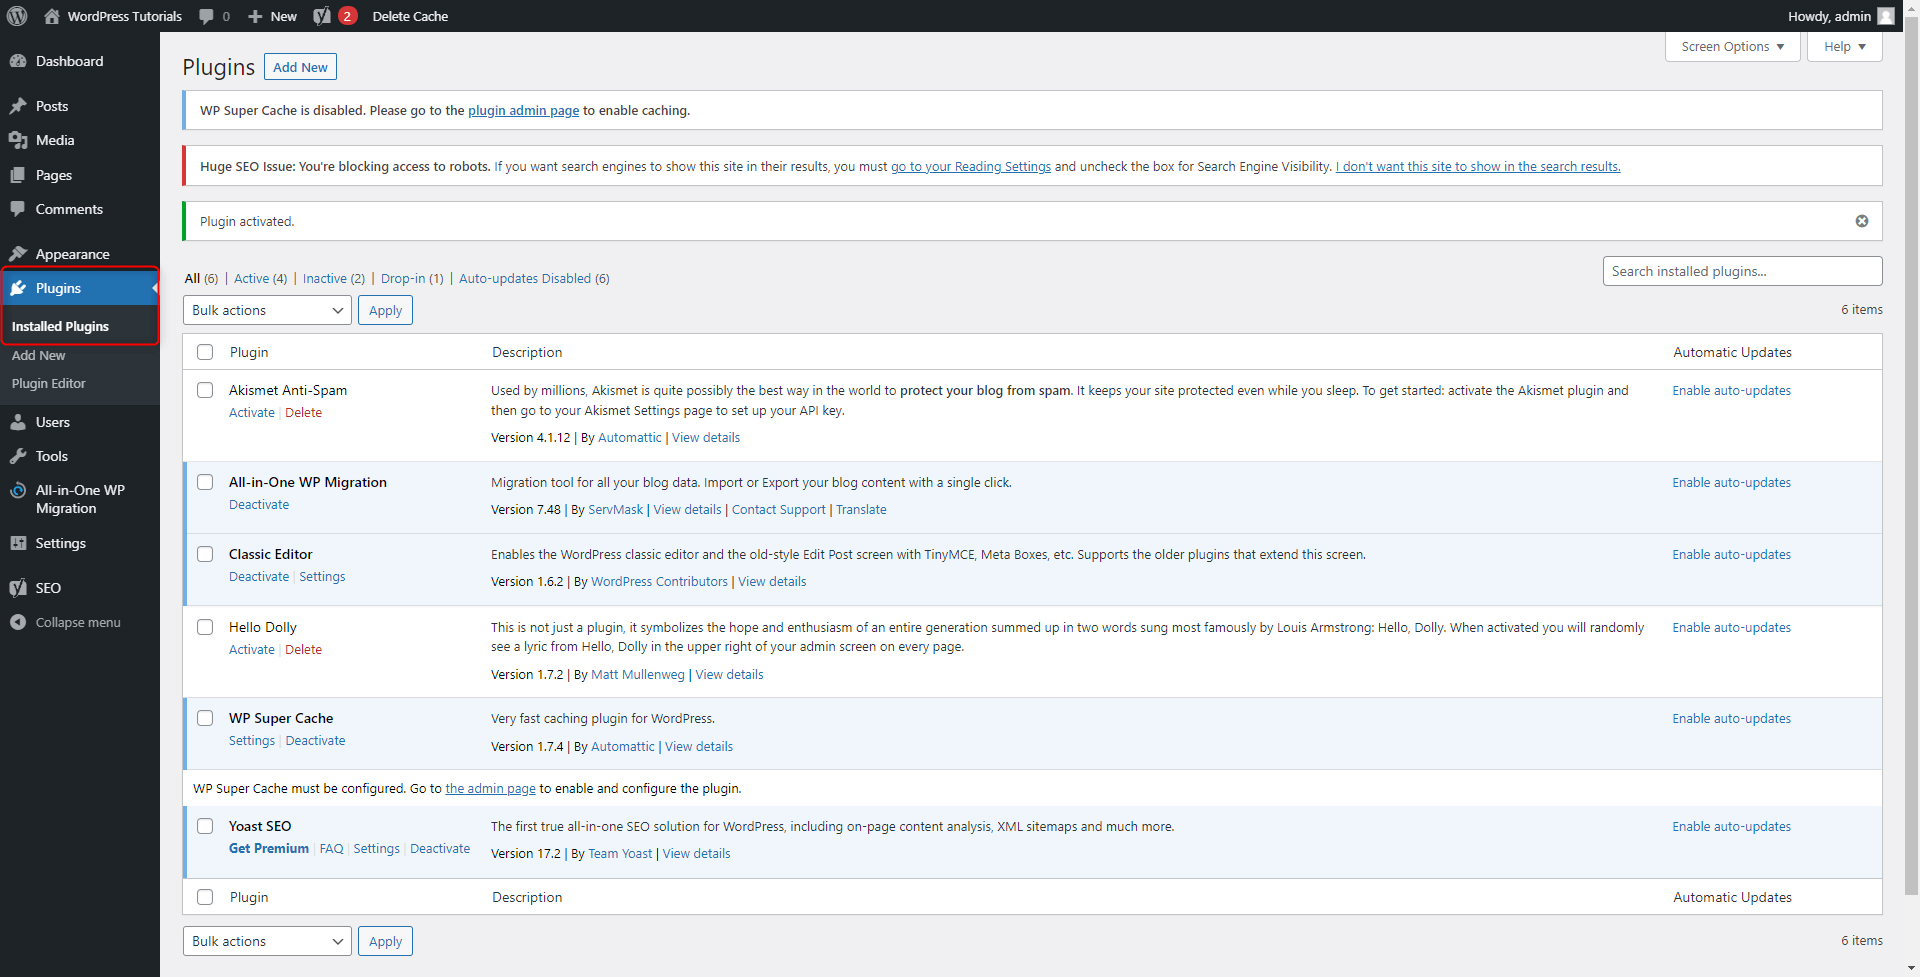
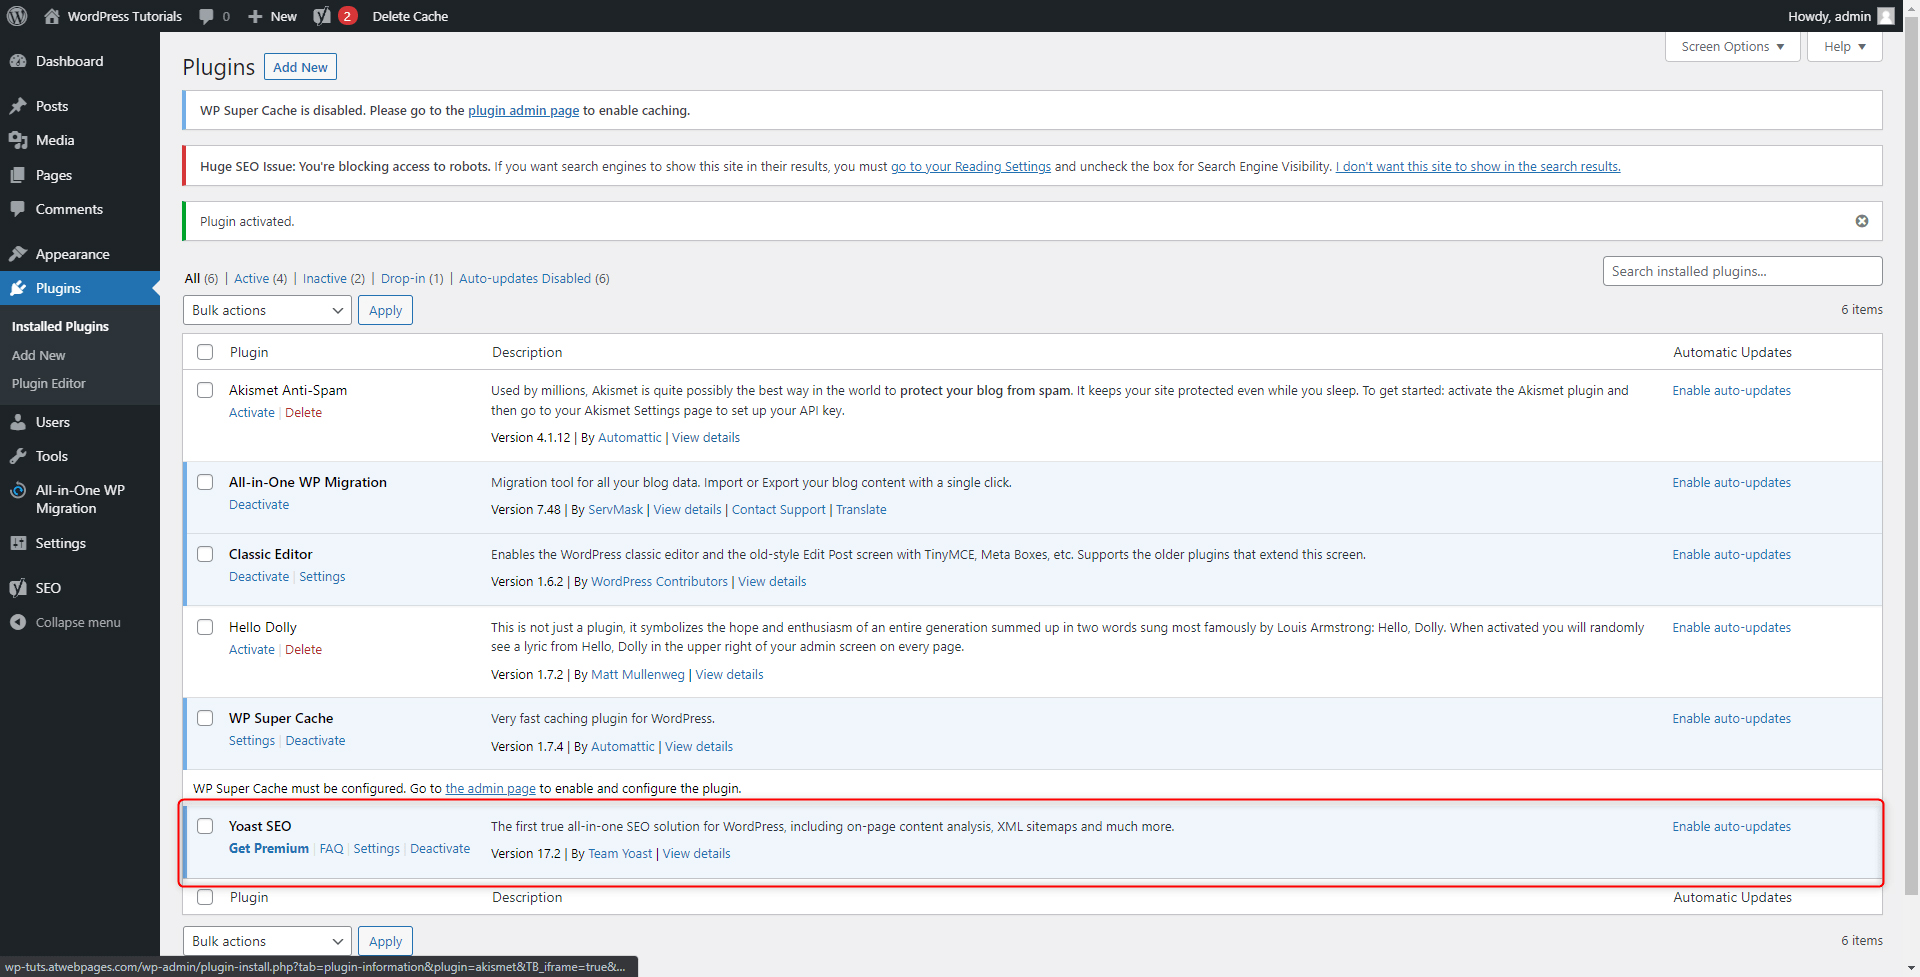
This is the tab with your full list of installed and incorporated plugins. As you will notice, there are some already installed tools. You will see the recently installed one at the bottom of the page:
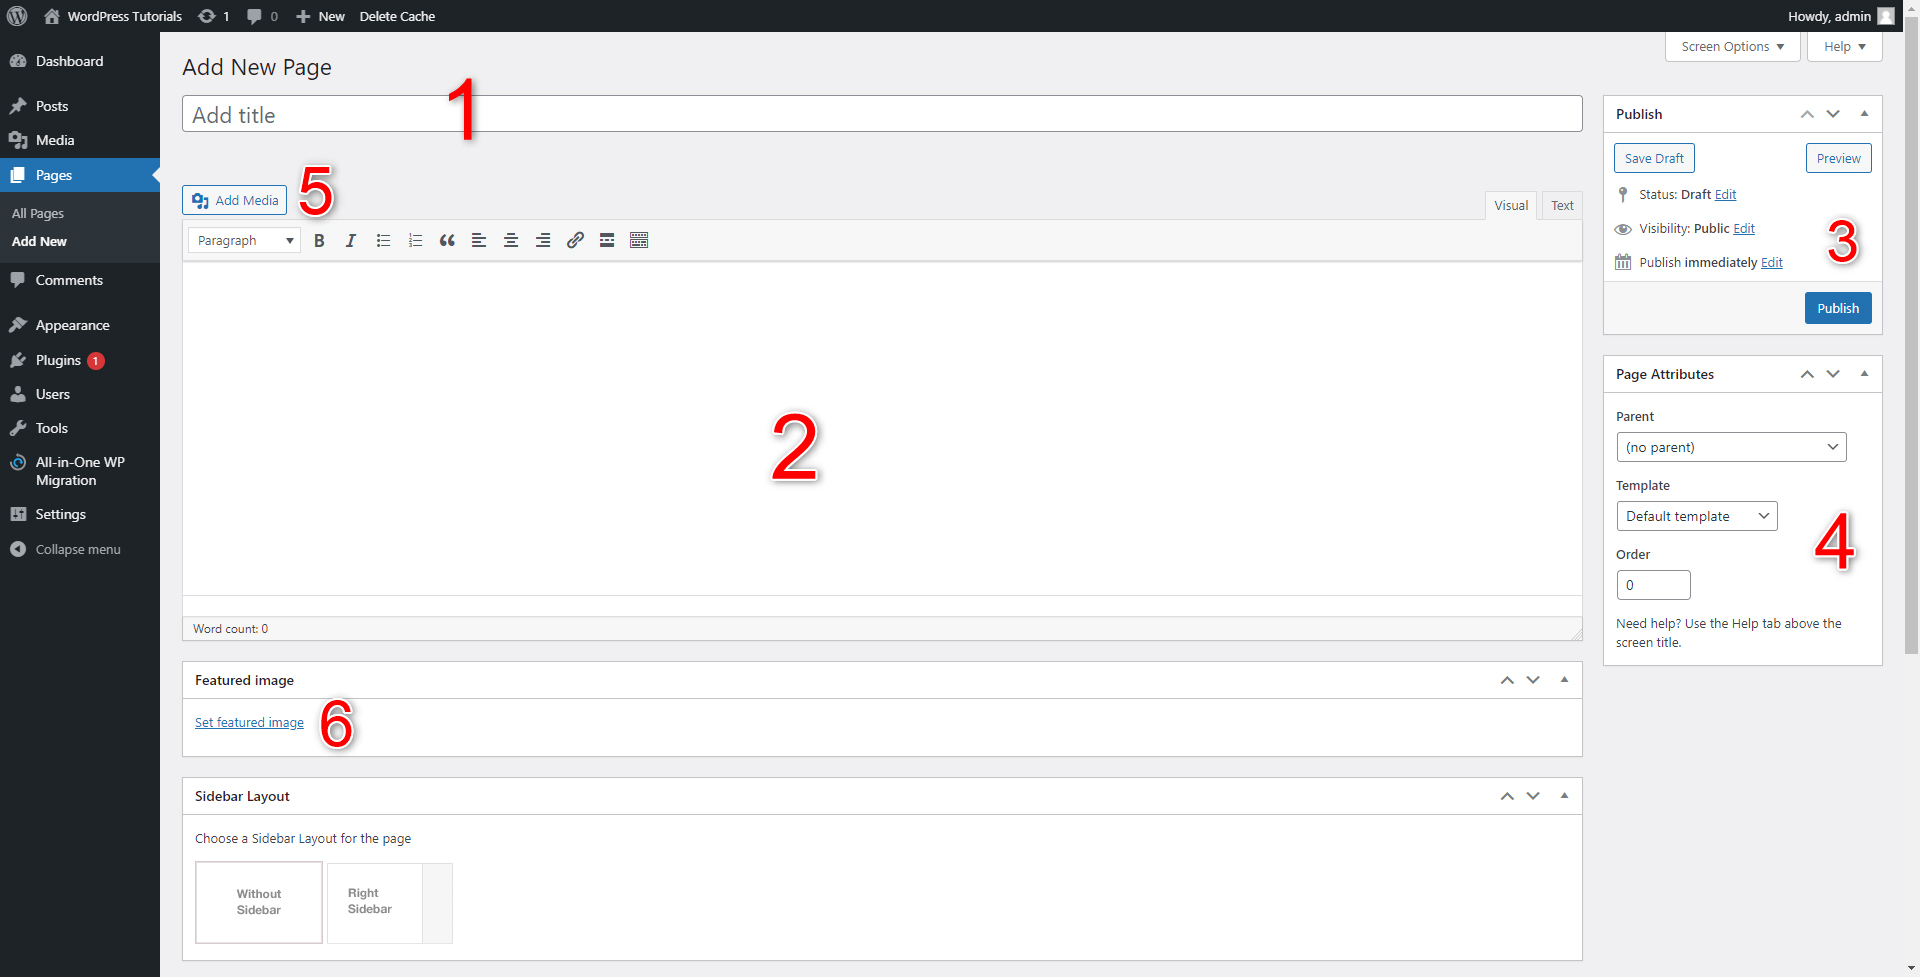
How To Add New Pages to Your WordPress Site
By default, your WordPress site features six pre-made pages. These are the Home Page, About, Blog, Contacts, Privacy Policy, and Sample Page. You can customize each one in any way possible and change their names, text, pictures, structure, and overall layout.
Oftentimes the premade pages are simply not enough for everything you might want to share on the Web.
Depending on your niche and goals, you might well want to share your art, add some more details about your services, or, for example, give some comprehensive explanation about your online lessons and courses, all sorted and neatly presented in a dedicated web page.
WordPress offers a quick and easy way to create new web pages and sort them in any way you find convenient. So, let’s not hesitate and see how to add a new page to our site!
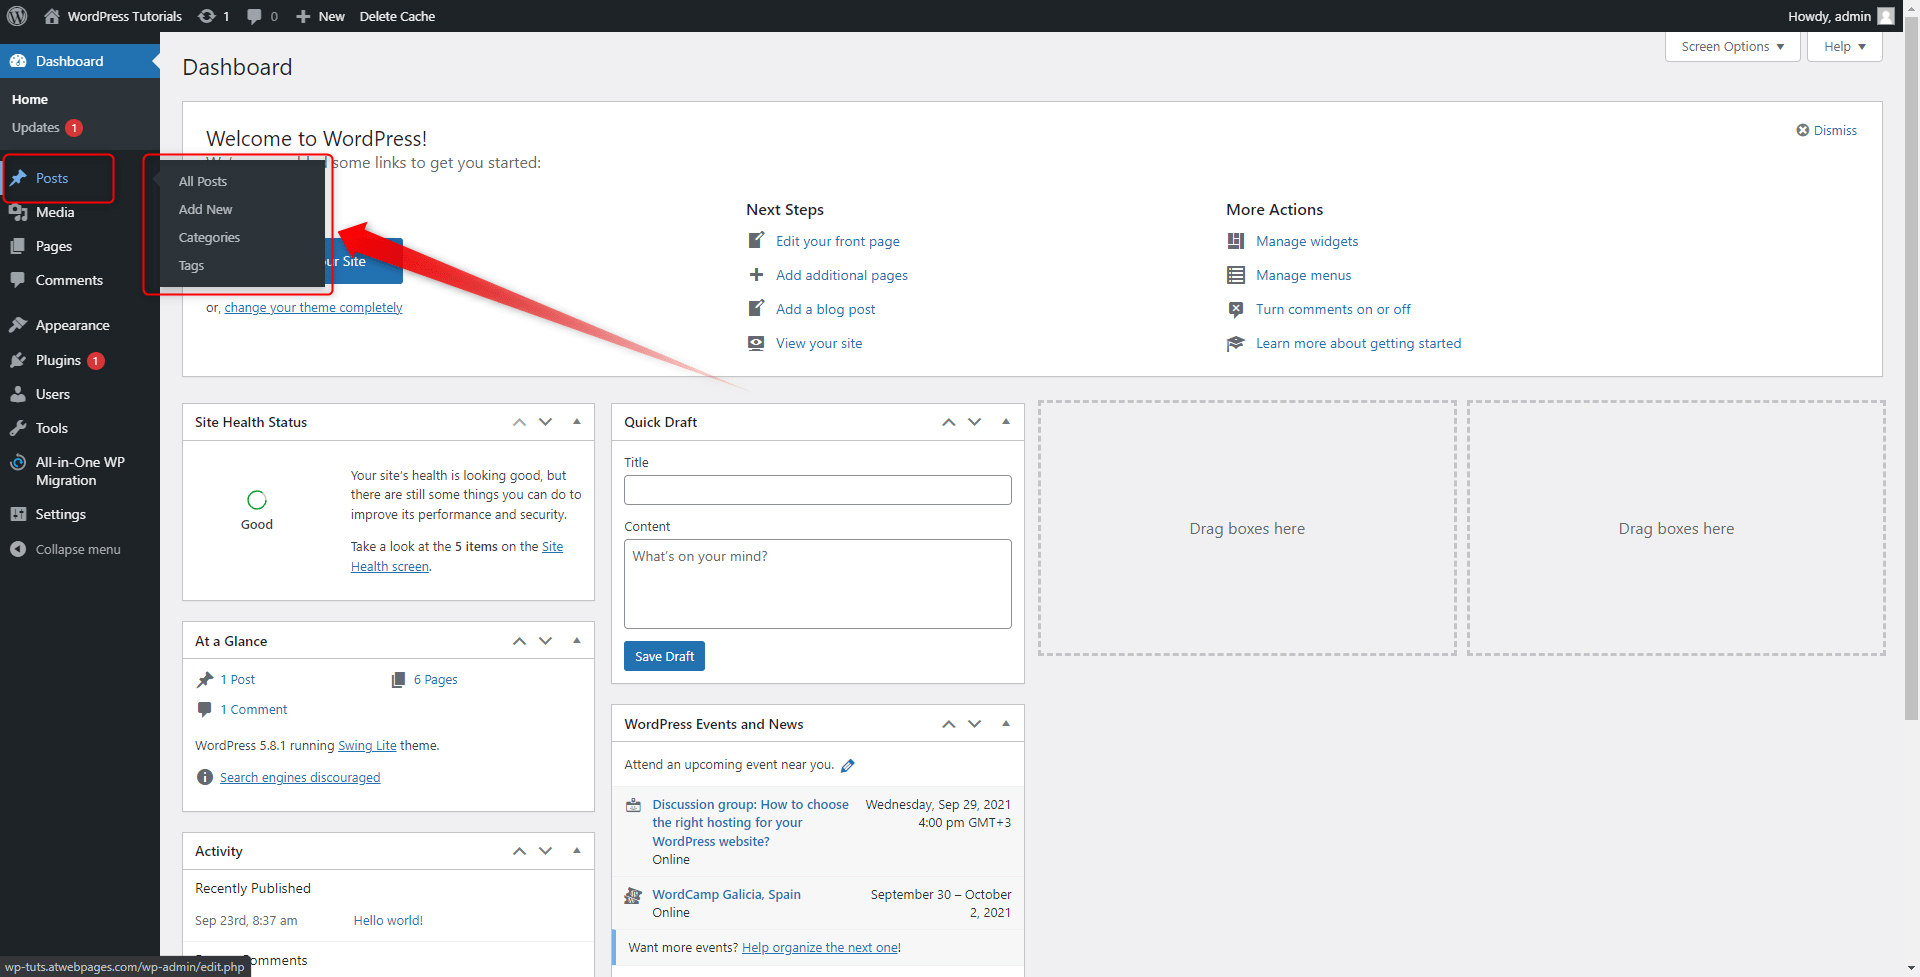
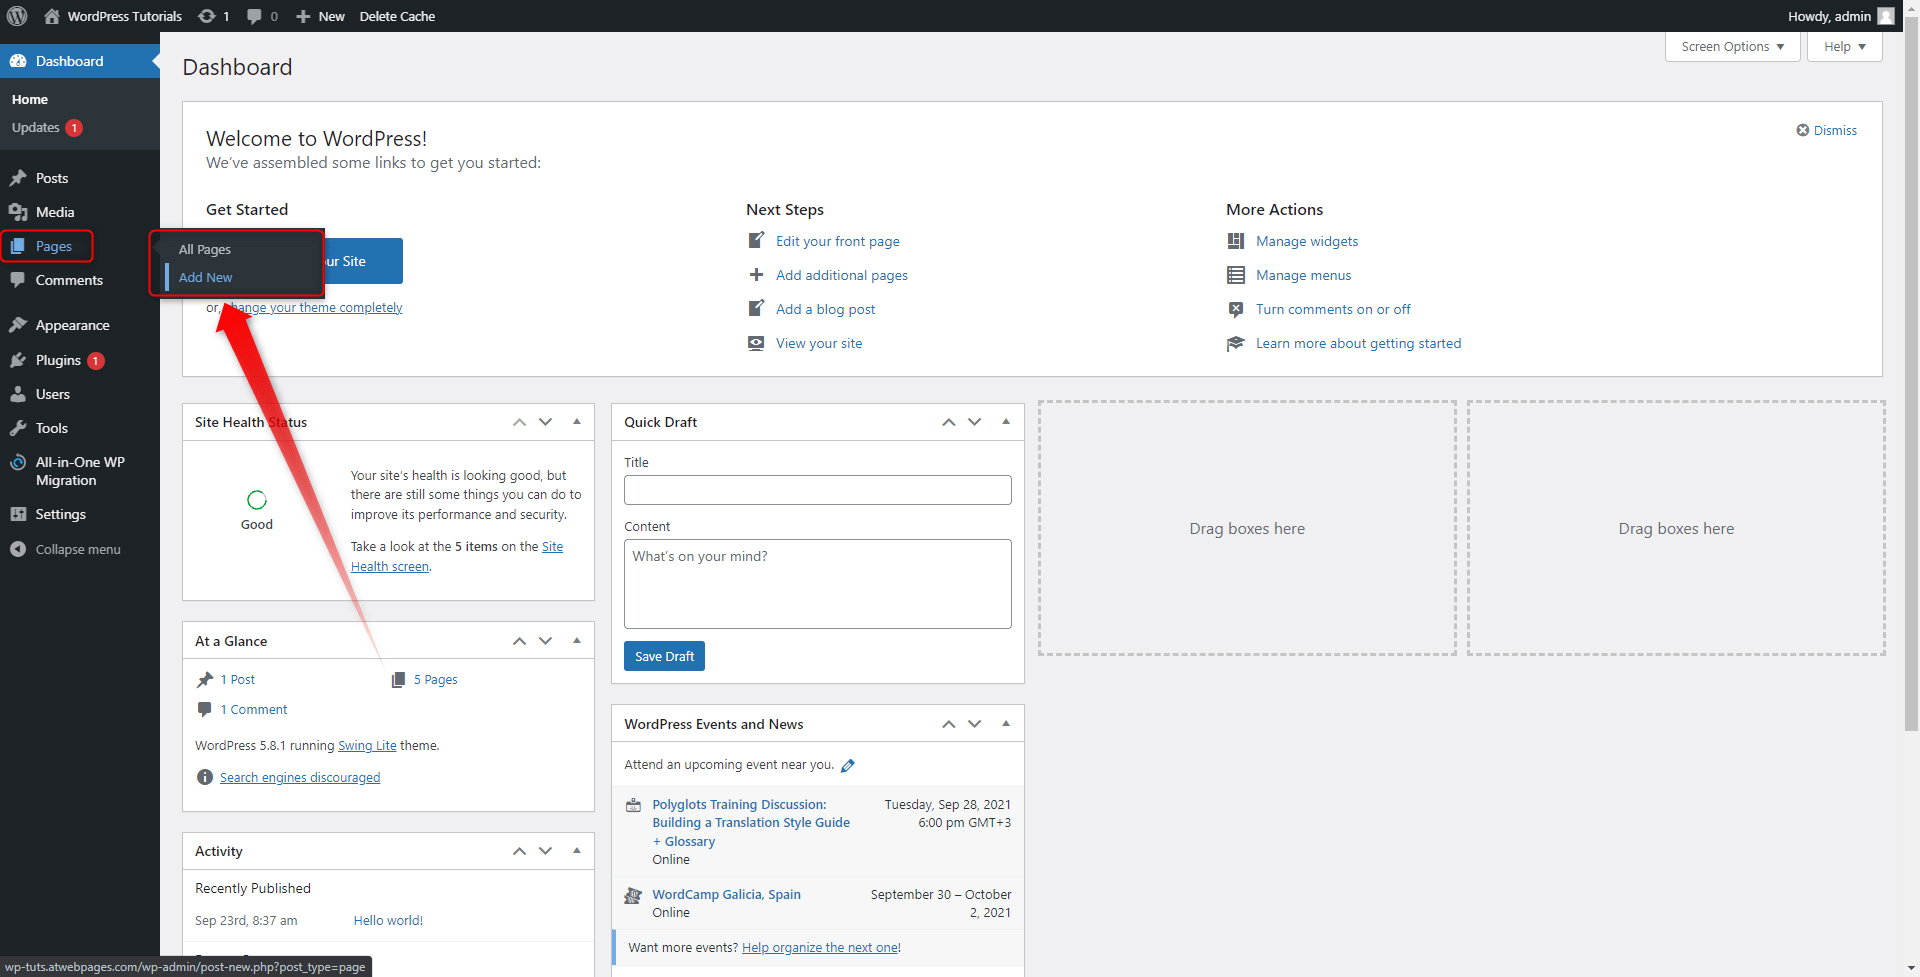
Step 1: Enter your WordPress Admin Panel and head to the Pages menu located in the Sidebar:
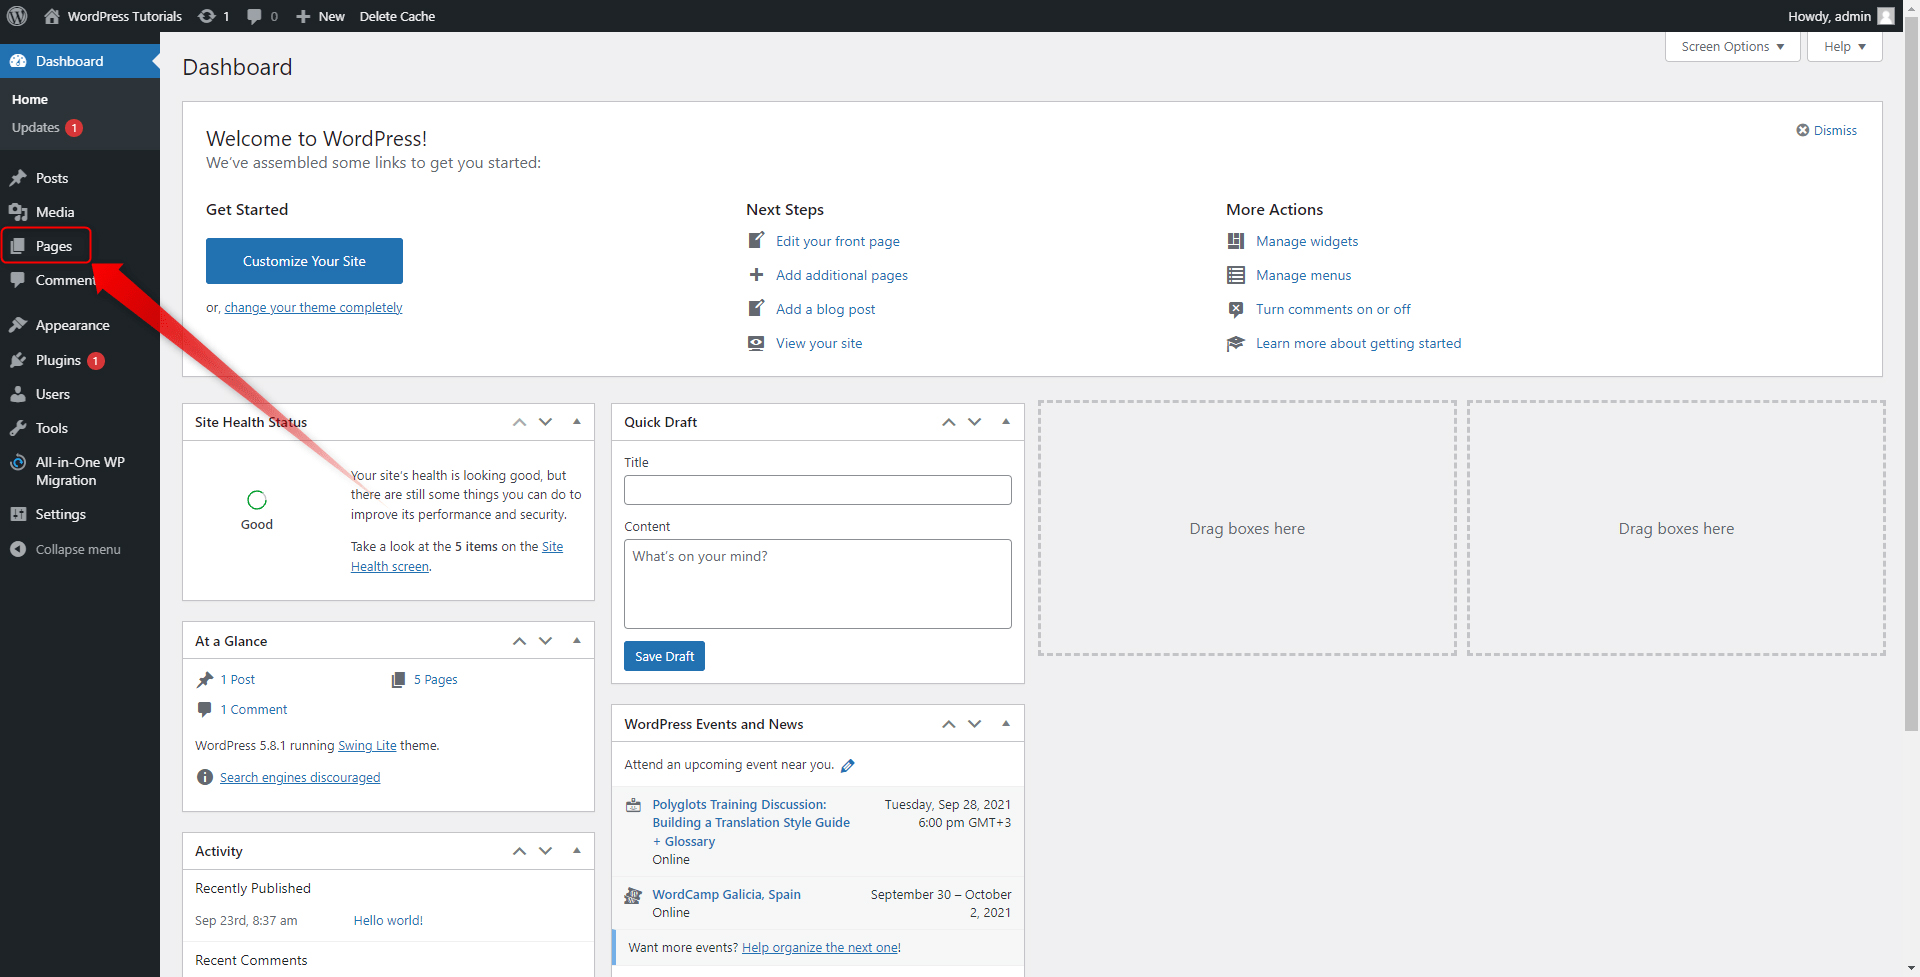
When you hover your mouse over the button, a menu with two options will appear – All Pages and Add New. Click on Add New:
This will open the New Page creation menu:
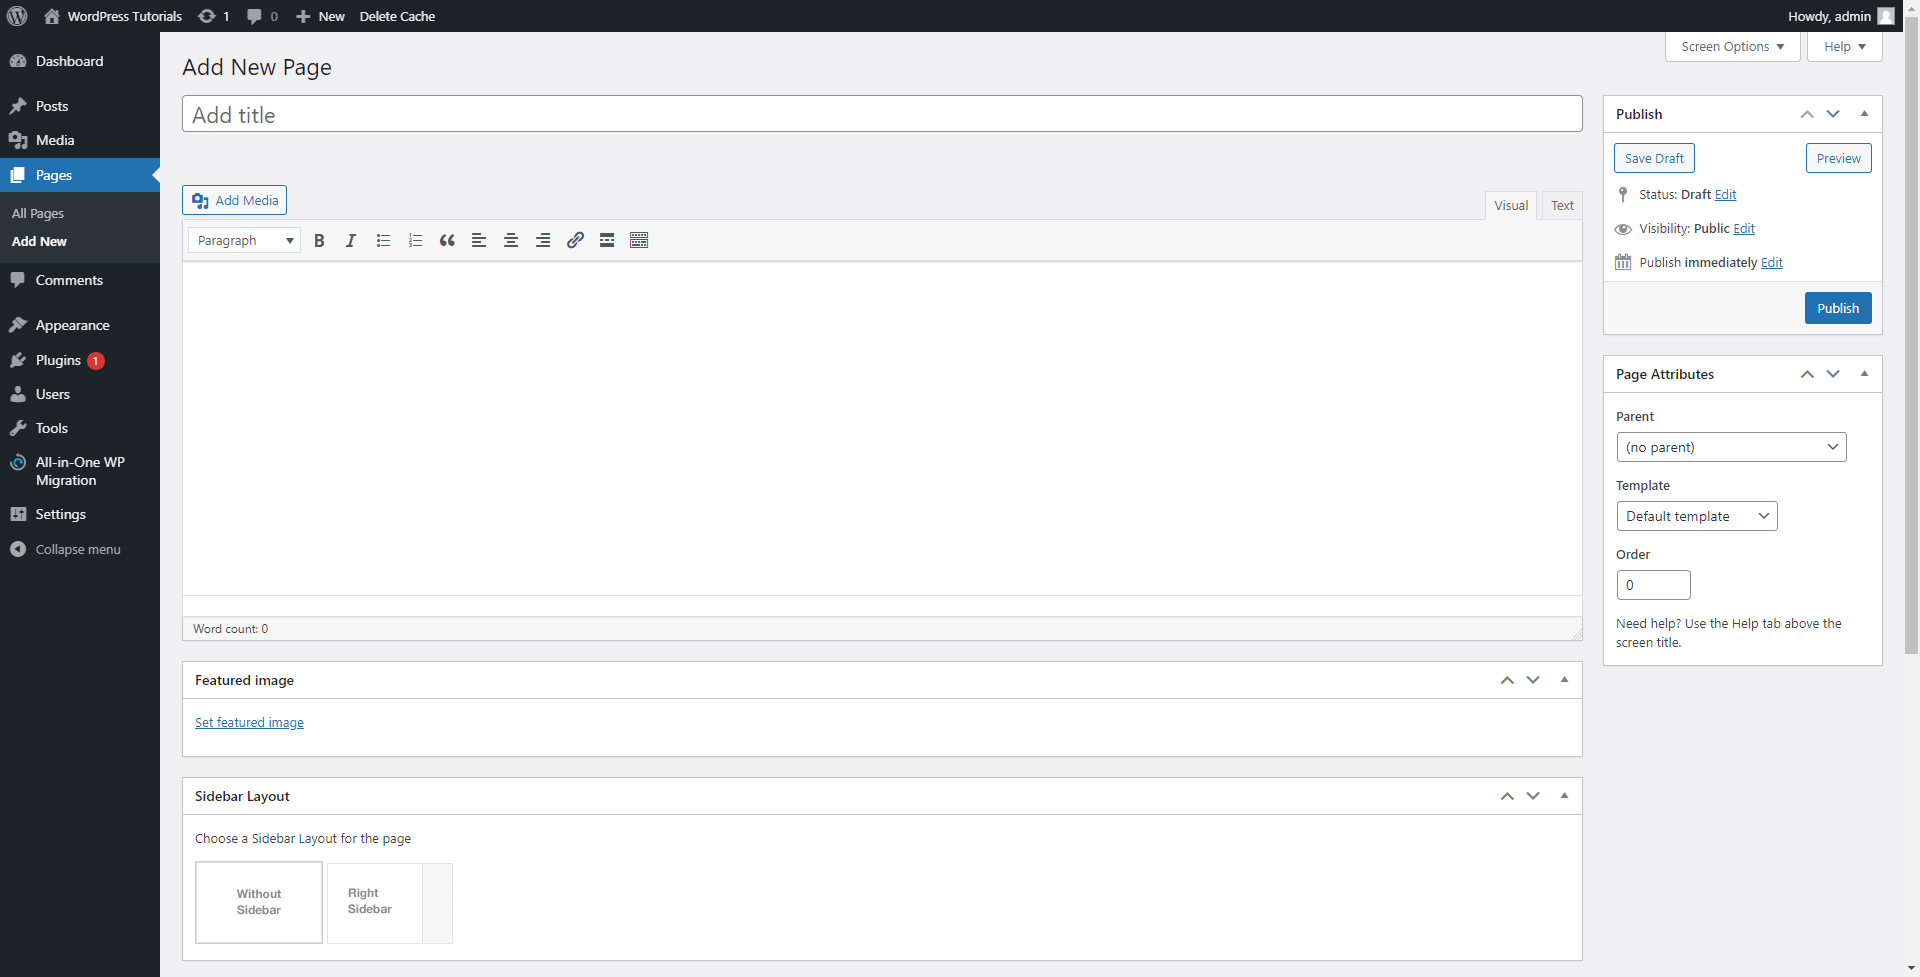
So, let’s see what is what:
- Add Title – This is the place where your web page’s new name is written. This title will also appear on the site.
- Text field – here’s where you type down your webpage’s main content.
- This menu offers some either saving the draft or publishing the page.
- Here you can decide whether your page will be a subpage of another main one or completely independent. Also, you can quickly choose a template.
- Add Media allows you to add images to your page.
- Featured Image – the button adds a thumbnail for the page.
Step 2: Add content to the new page
Start filling up the blank spaces with text and images according to your preferences.
We quickly added the content we believe is sufficient for this page. Remember that you can add as much or less information as you please.
A general rule of thumb is that you should add information that is directly related to the topic of the page and do not add way too much text – today’s Internet surfers rely on that the content on the Web is straightforward and to the point.
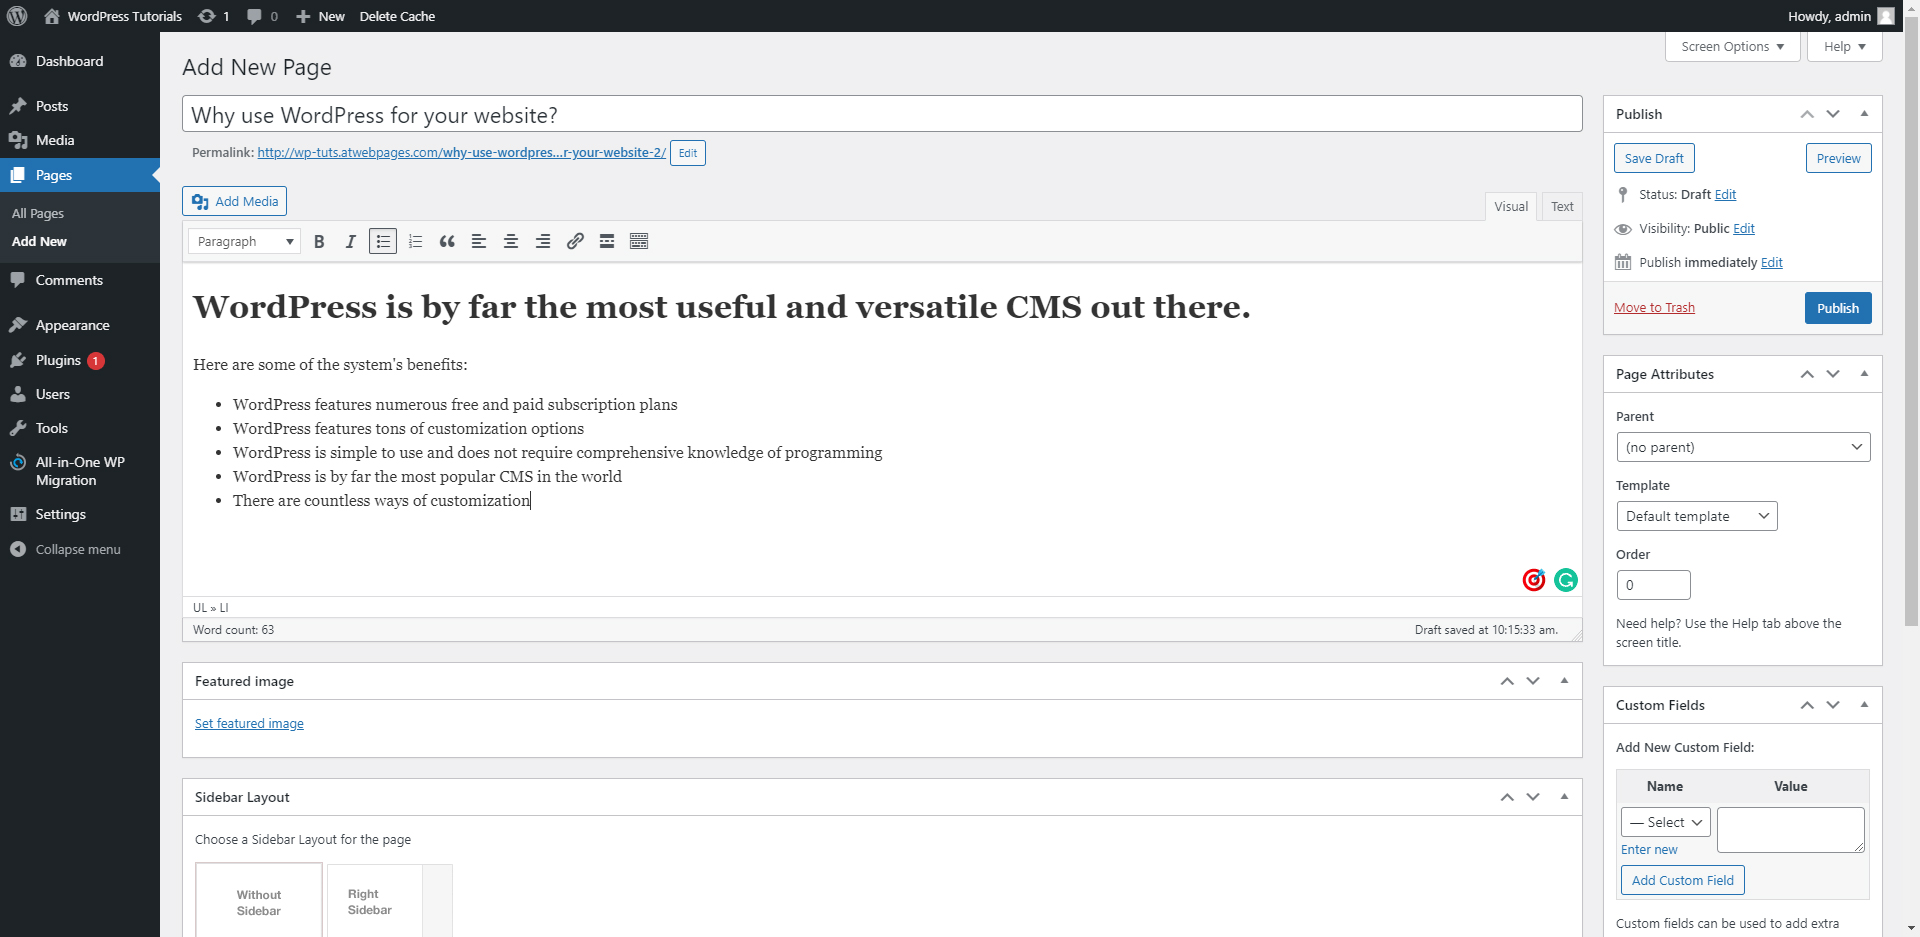
Step 3: publish the page.
Once you are convinced everything looks right, click it. After a few moments, the page will refresh itself and your new page will be live!
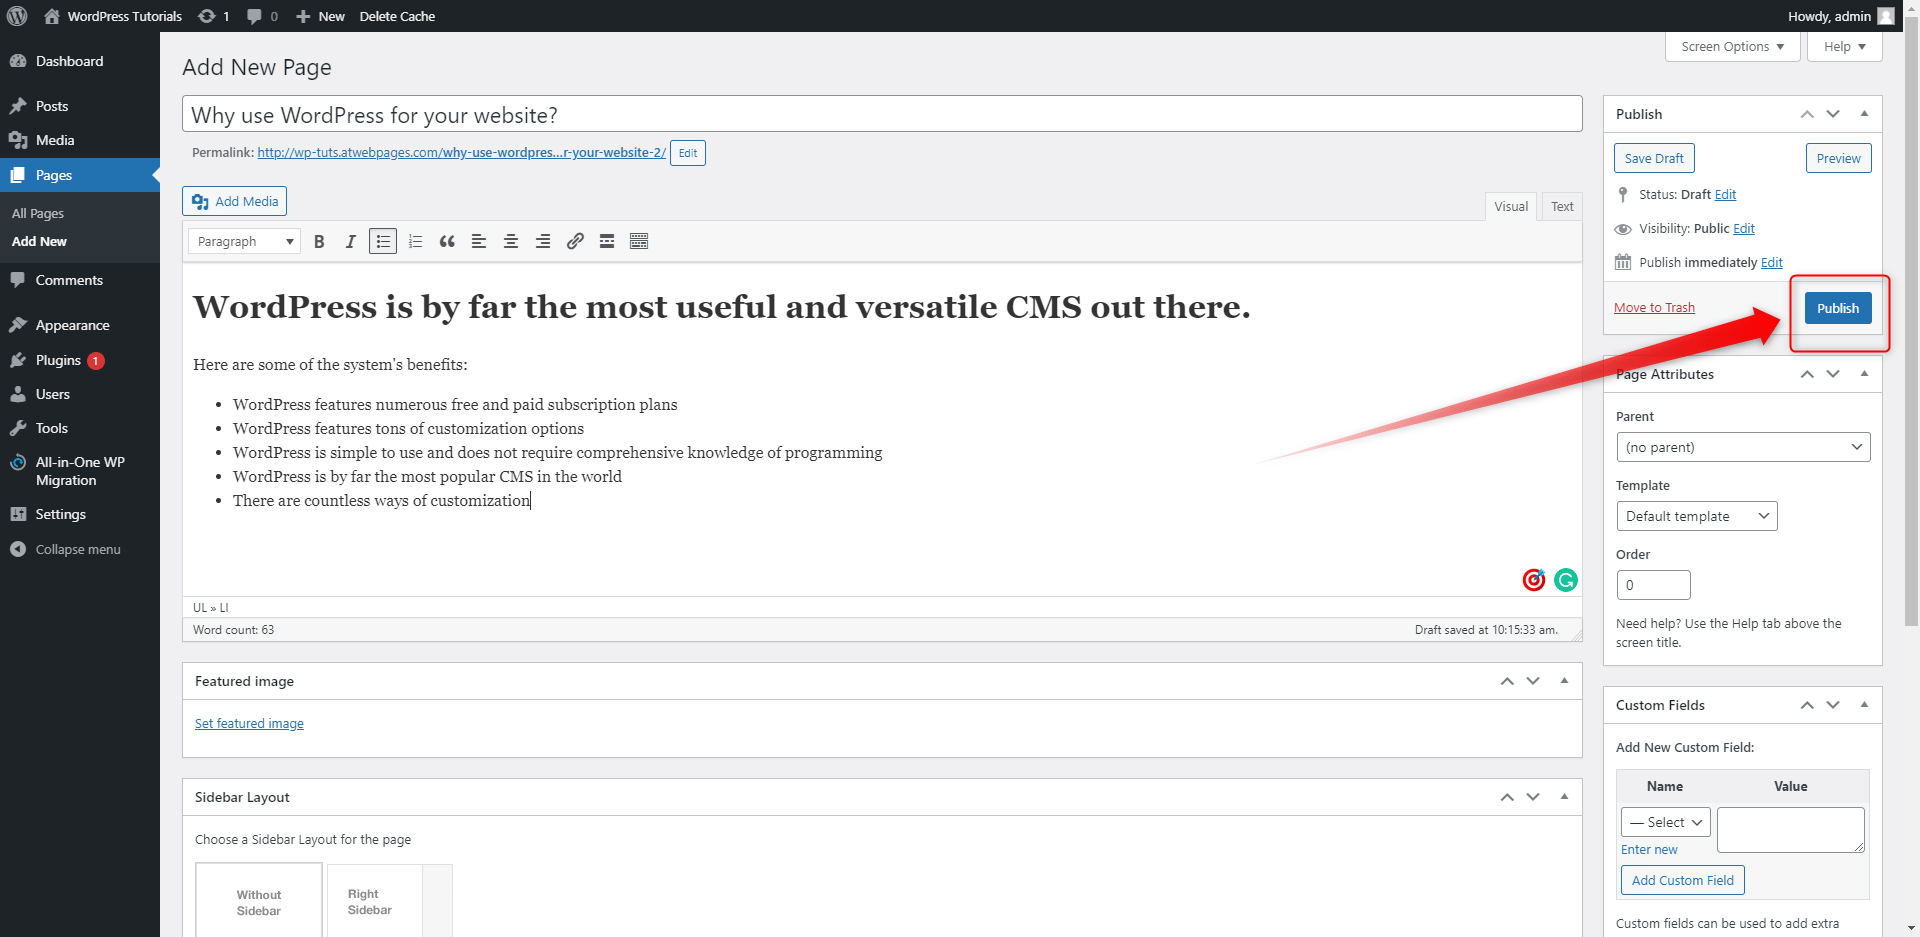
Now, let’s see what it looks like!
Simply click on the white Preview Changes button, located above the blue Publish one:
How to Add Content to Your Web Pages
In this chapter, you will read how to customize your pages and add the content you wish your visitors to see.
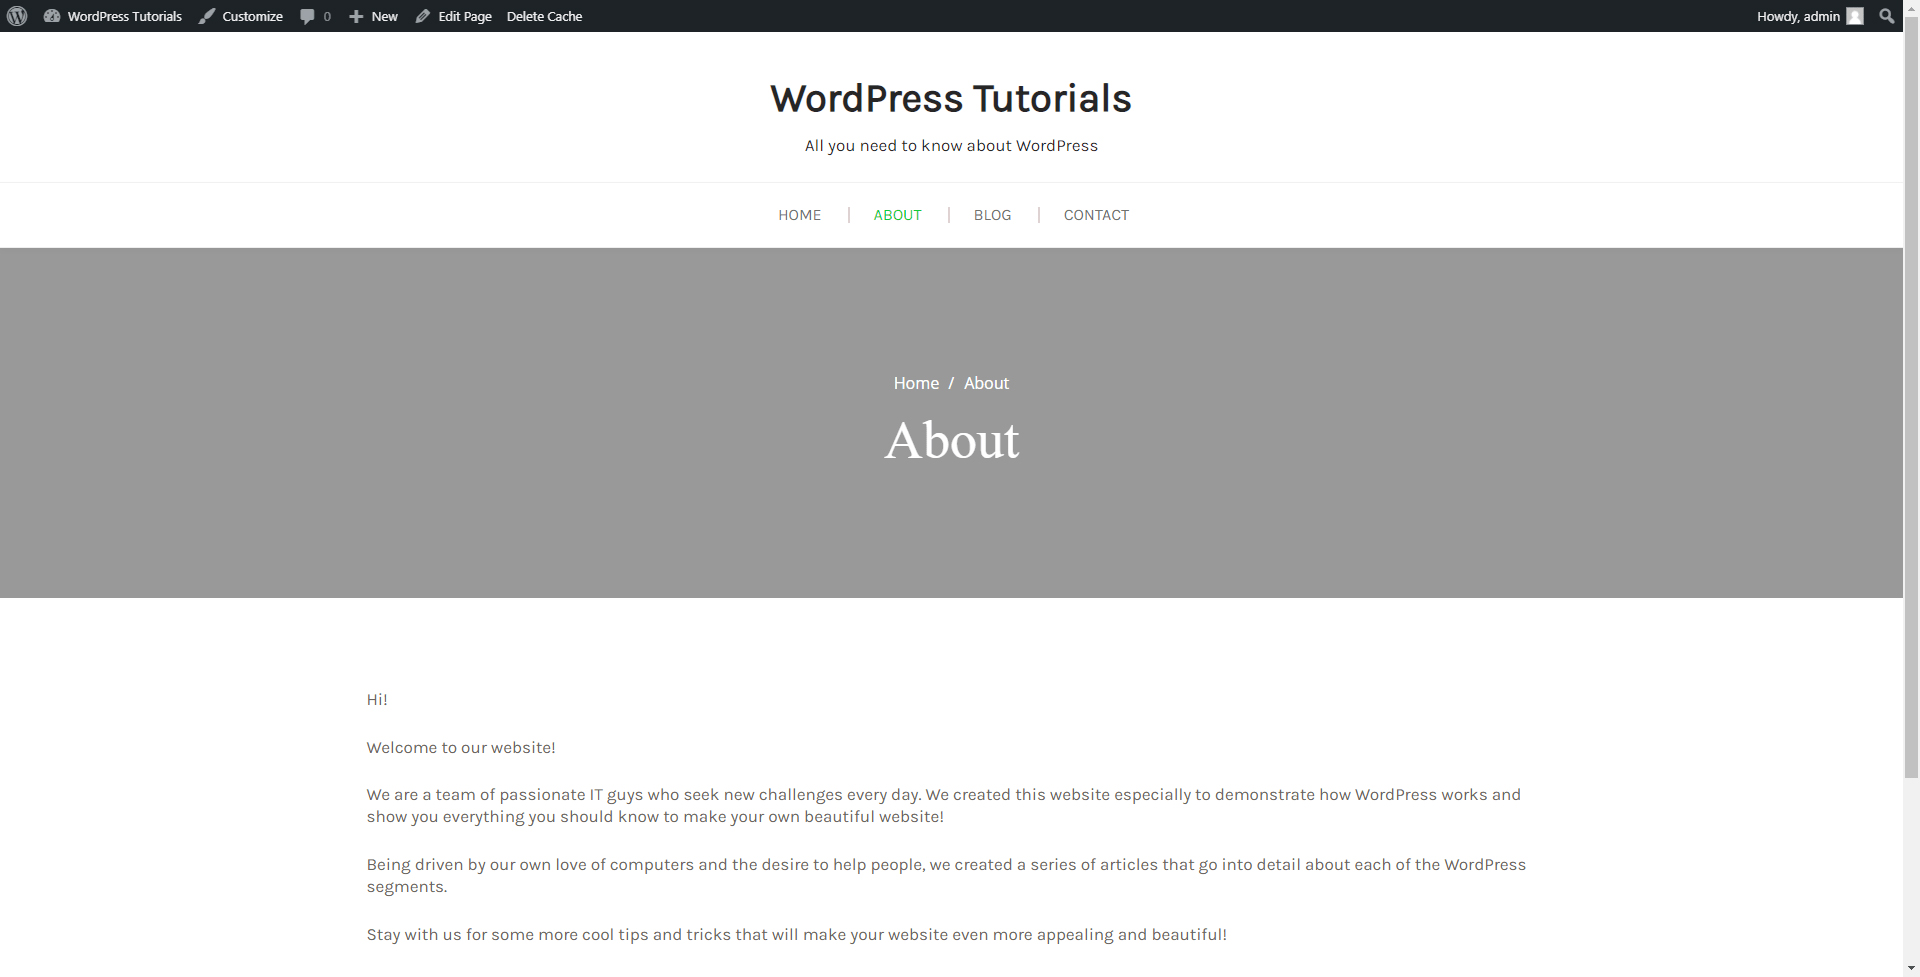
Let’s open a random page on our site, shall we? For this particular example, this happens to be our About page (keep in mind that we have applied the Swing Lite theme for this site):
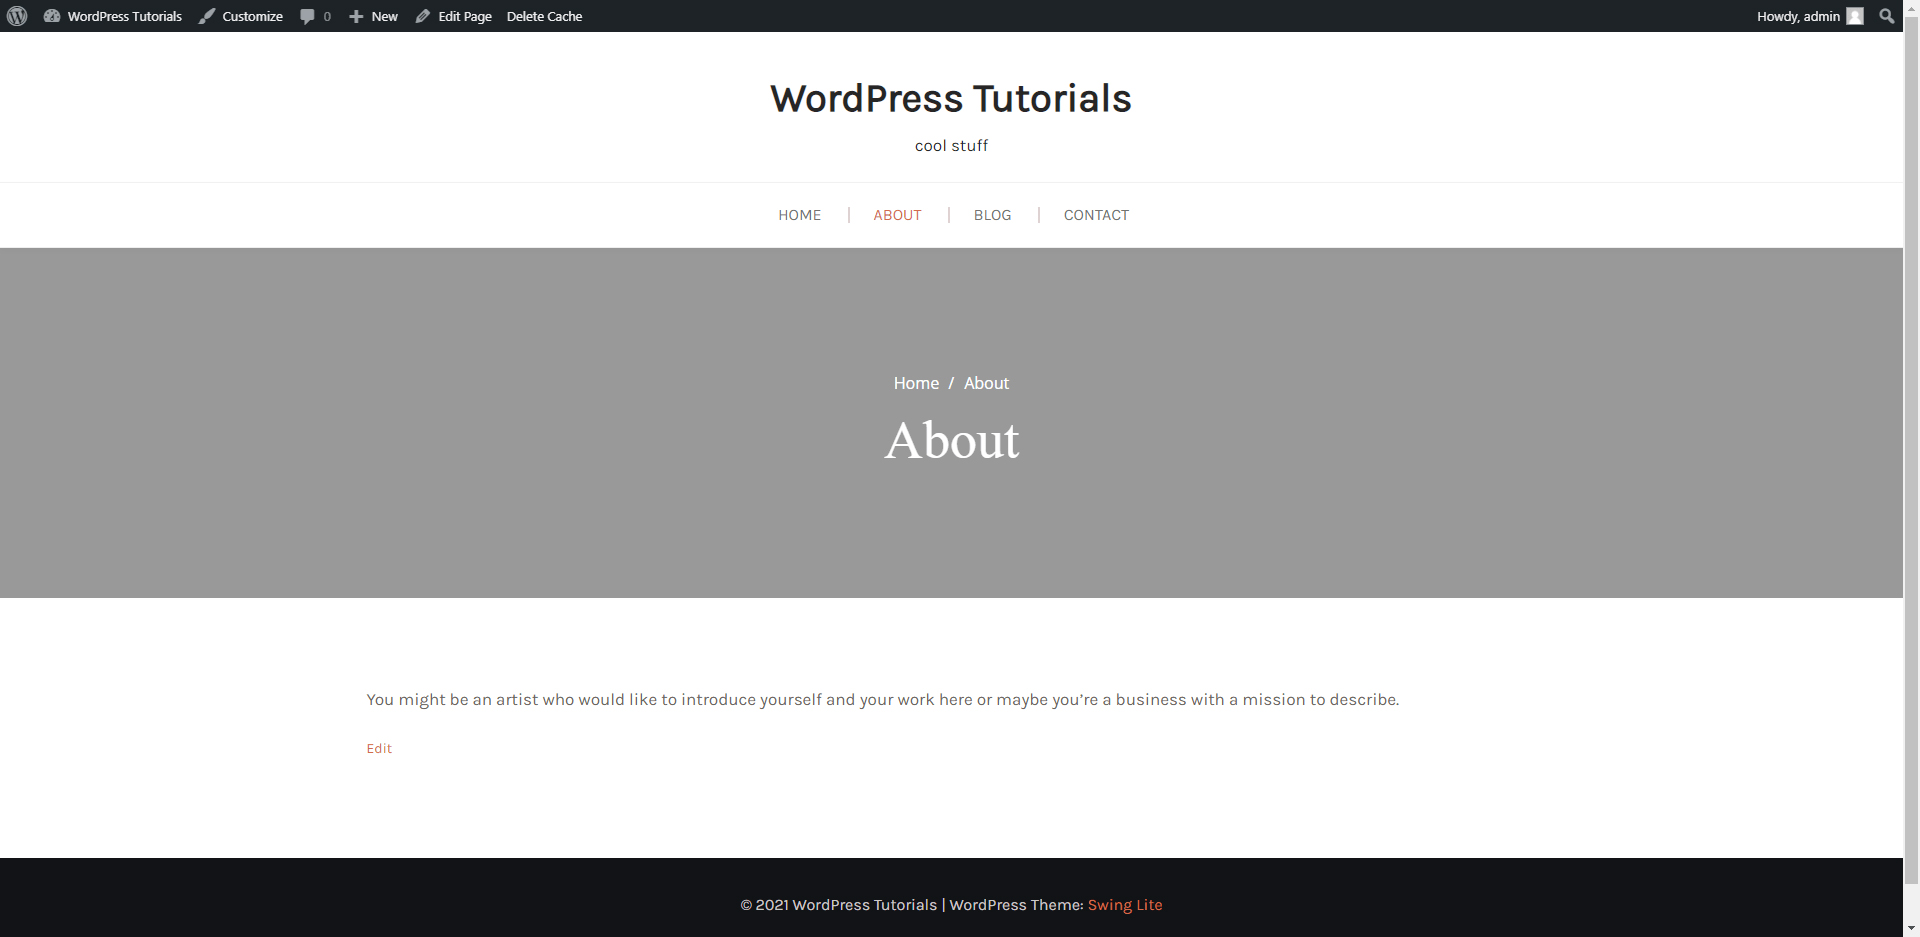
It does look blank, but don’t worry, we will show you how to add catchy text and photos.
First, you should enter the Pages menu via the WordPress Control Panel.
Step 1: In the Control Panel, look for the Pages button in the Sidebar on the left:

Step 2: When you hover your mouse over the button, two buttons will appear: All Pages and Add New. Click on the All Pages button:

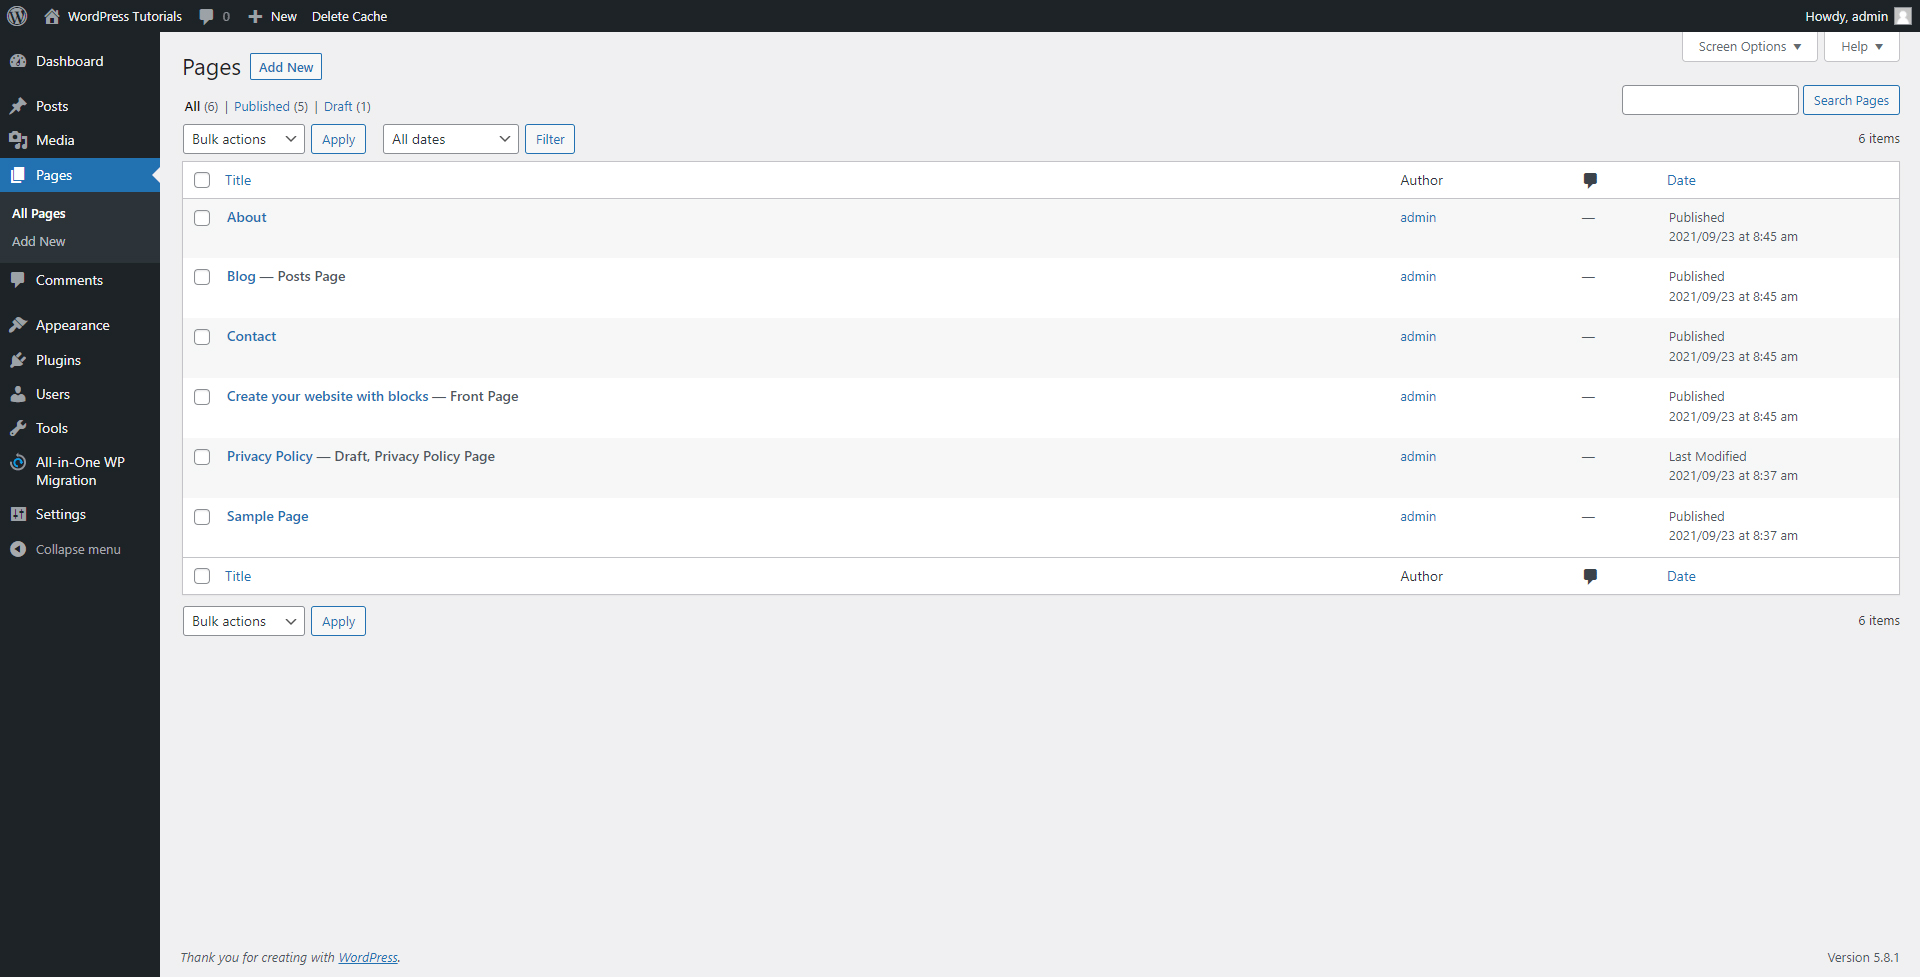
This will open the Pages menu. This is the place from where you will manage your pages – their number, styling, content, and everything else. The menu looks like this:
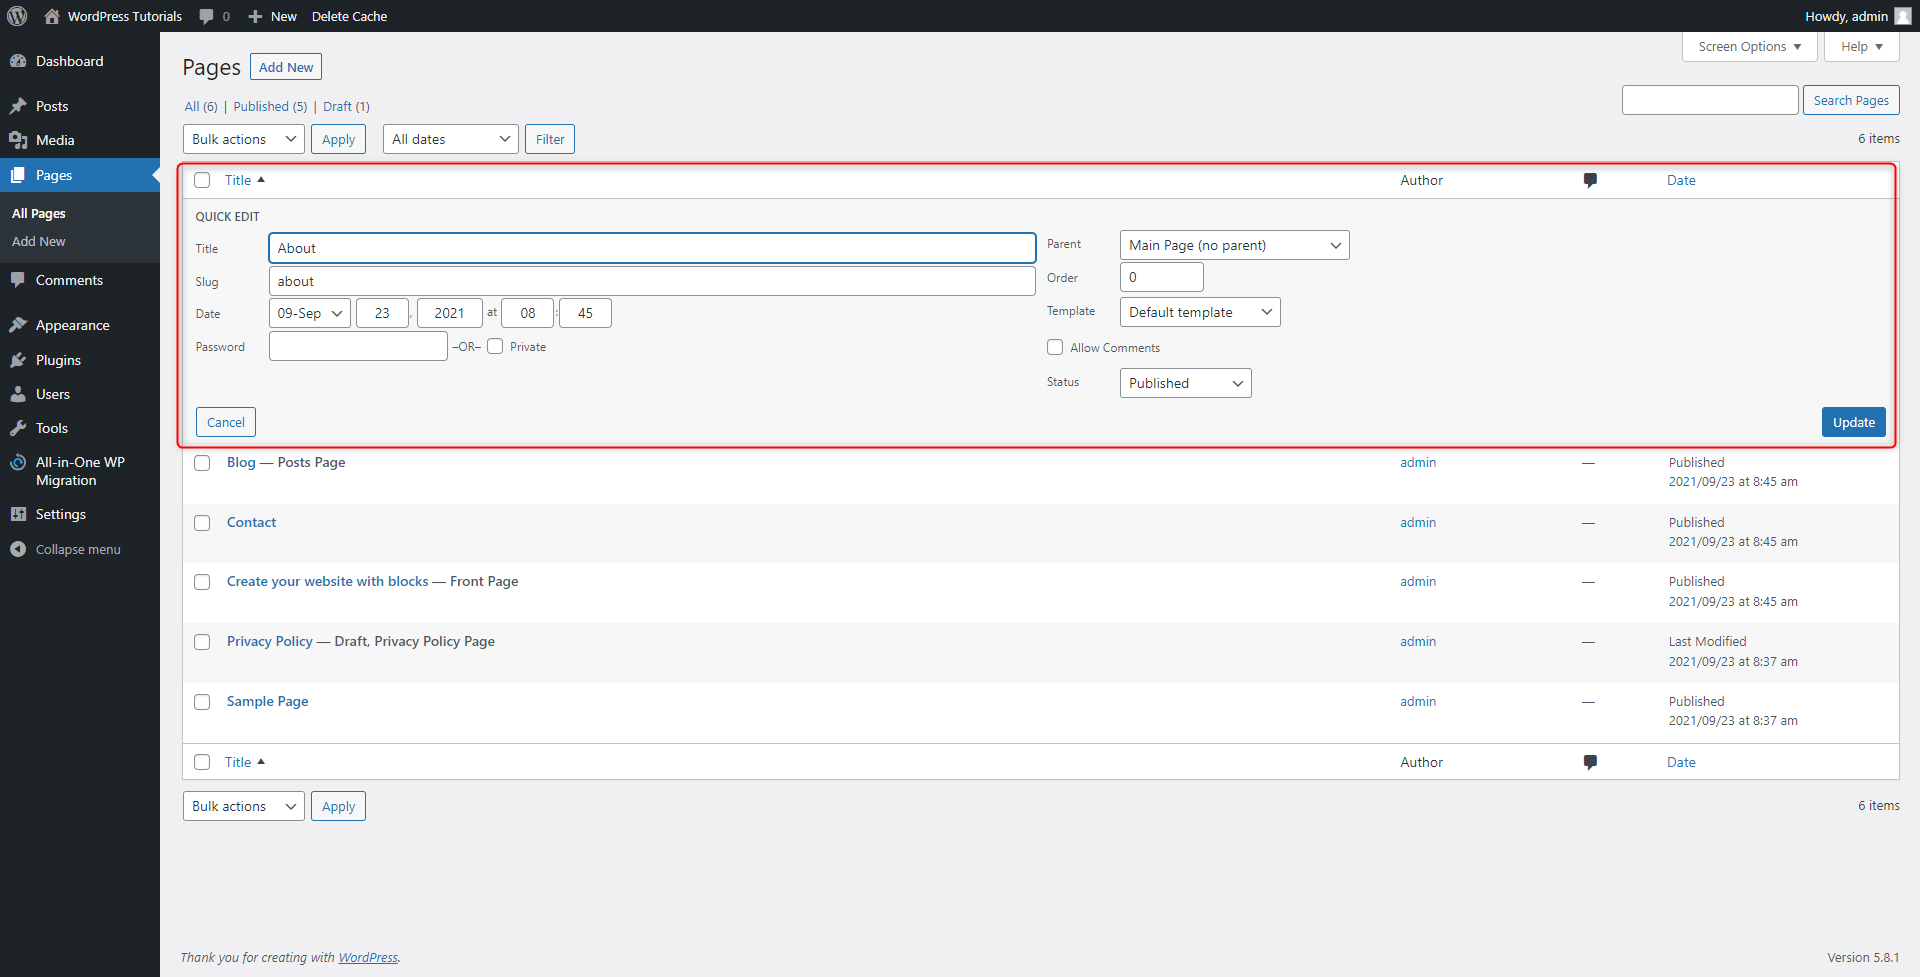
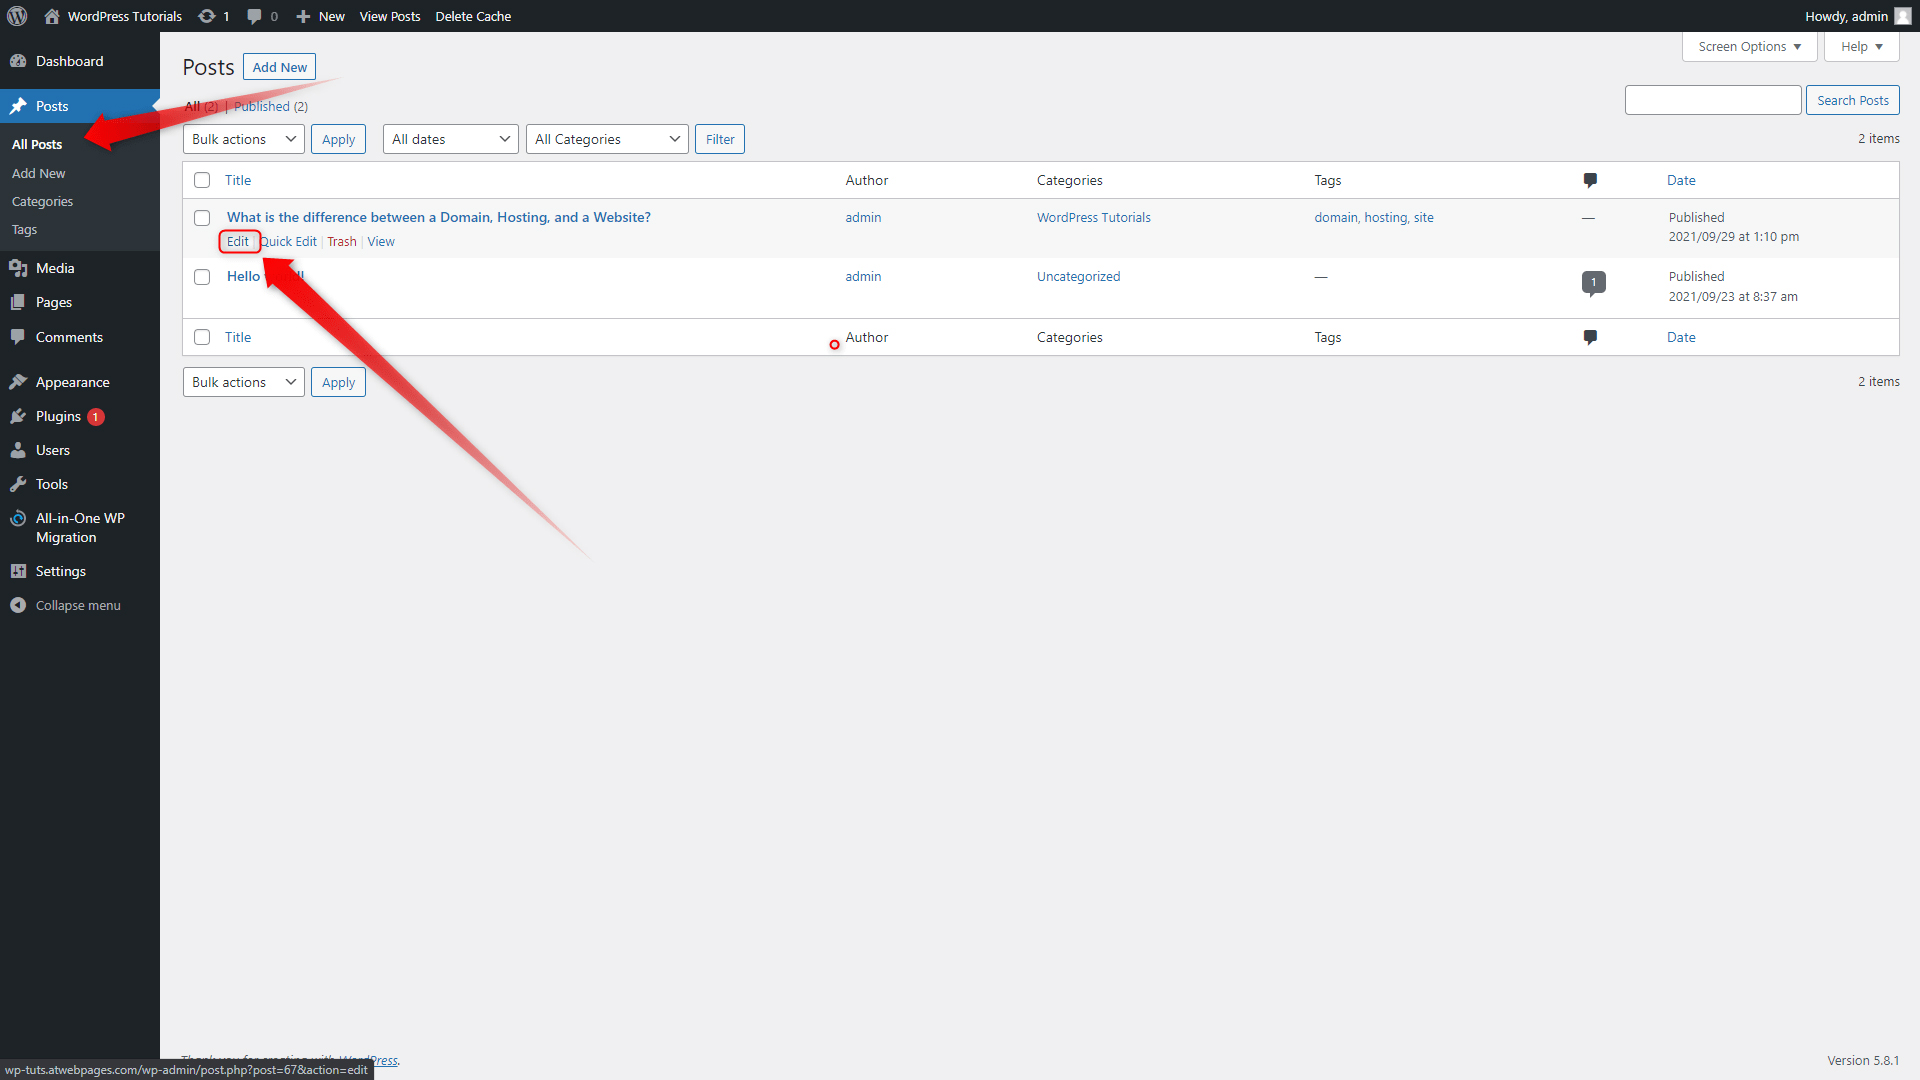
Step 3: Since we will be editing the About page, search for it and hover your cursor over the name of the page. When you do so, a small menu with options will appear. These are Edit, Quick Edit, Trash, and View:
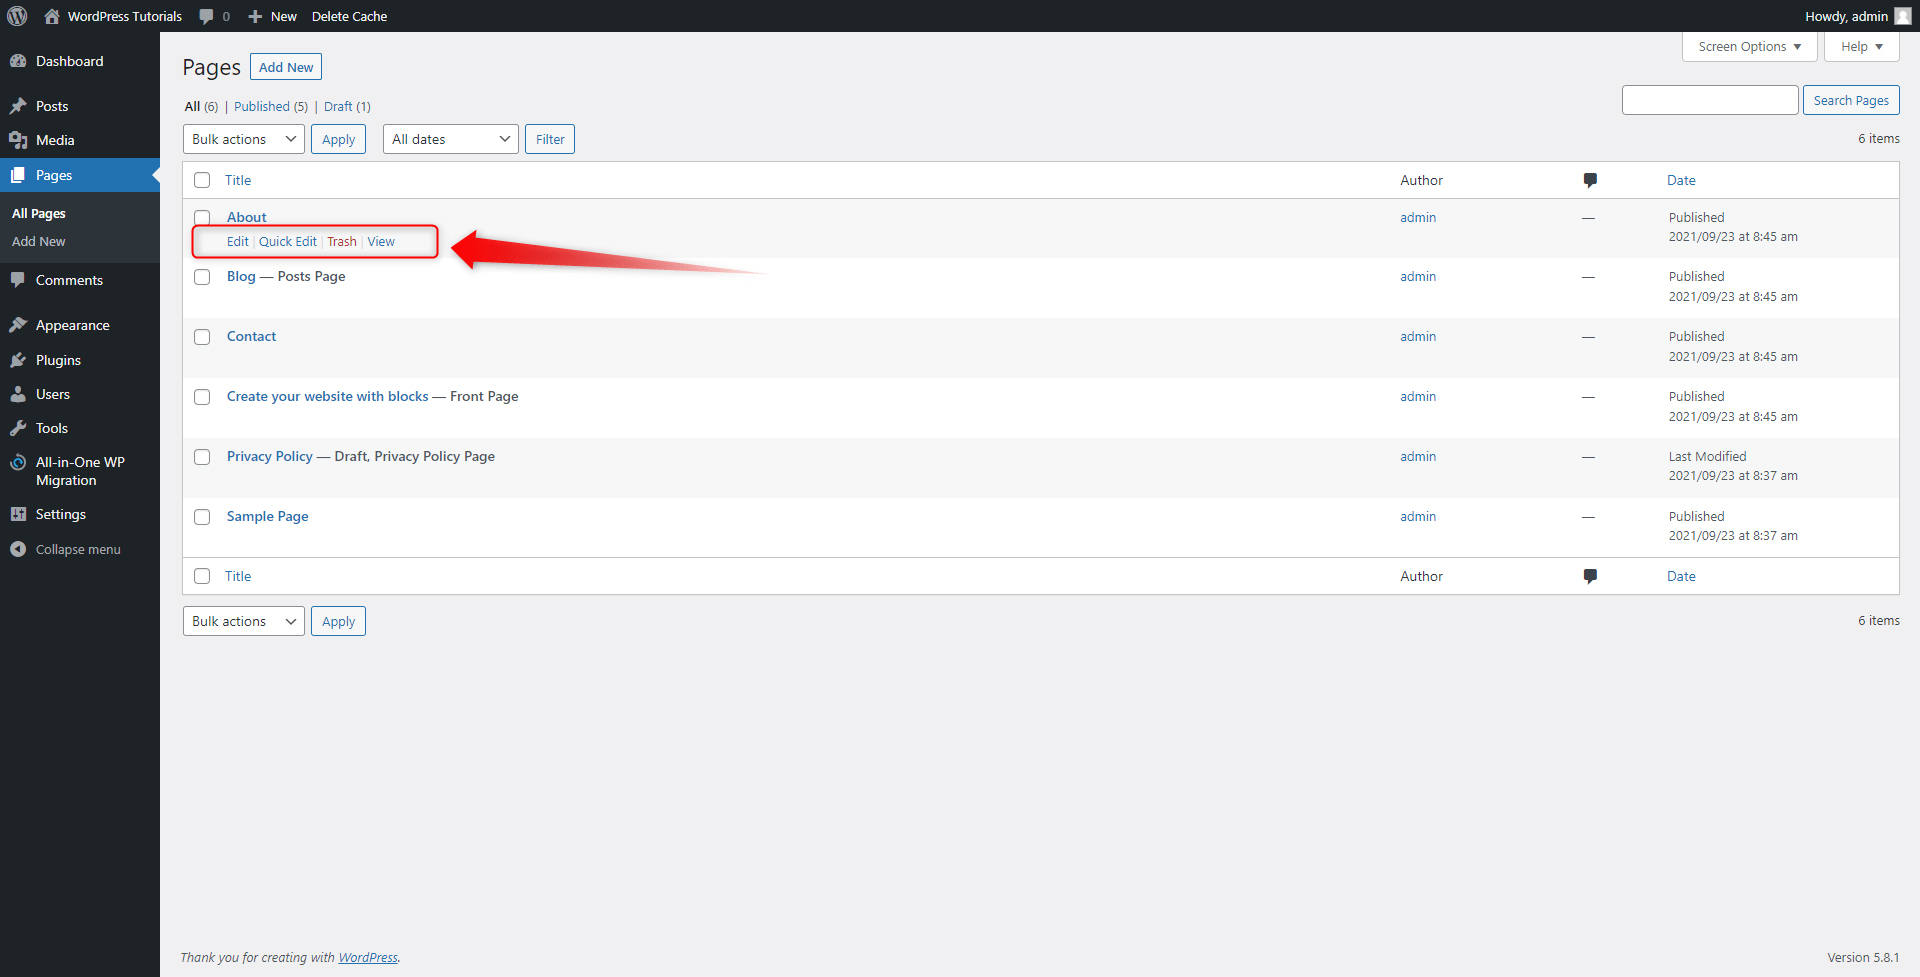
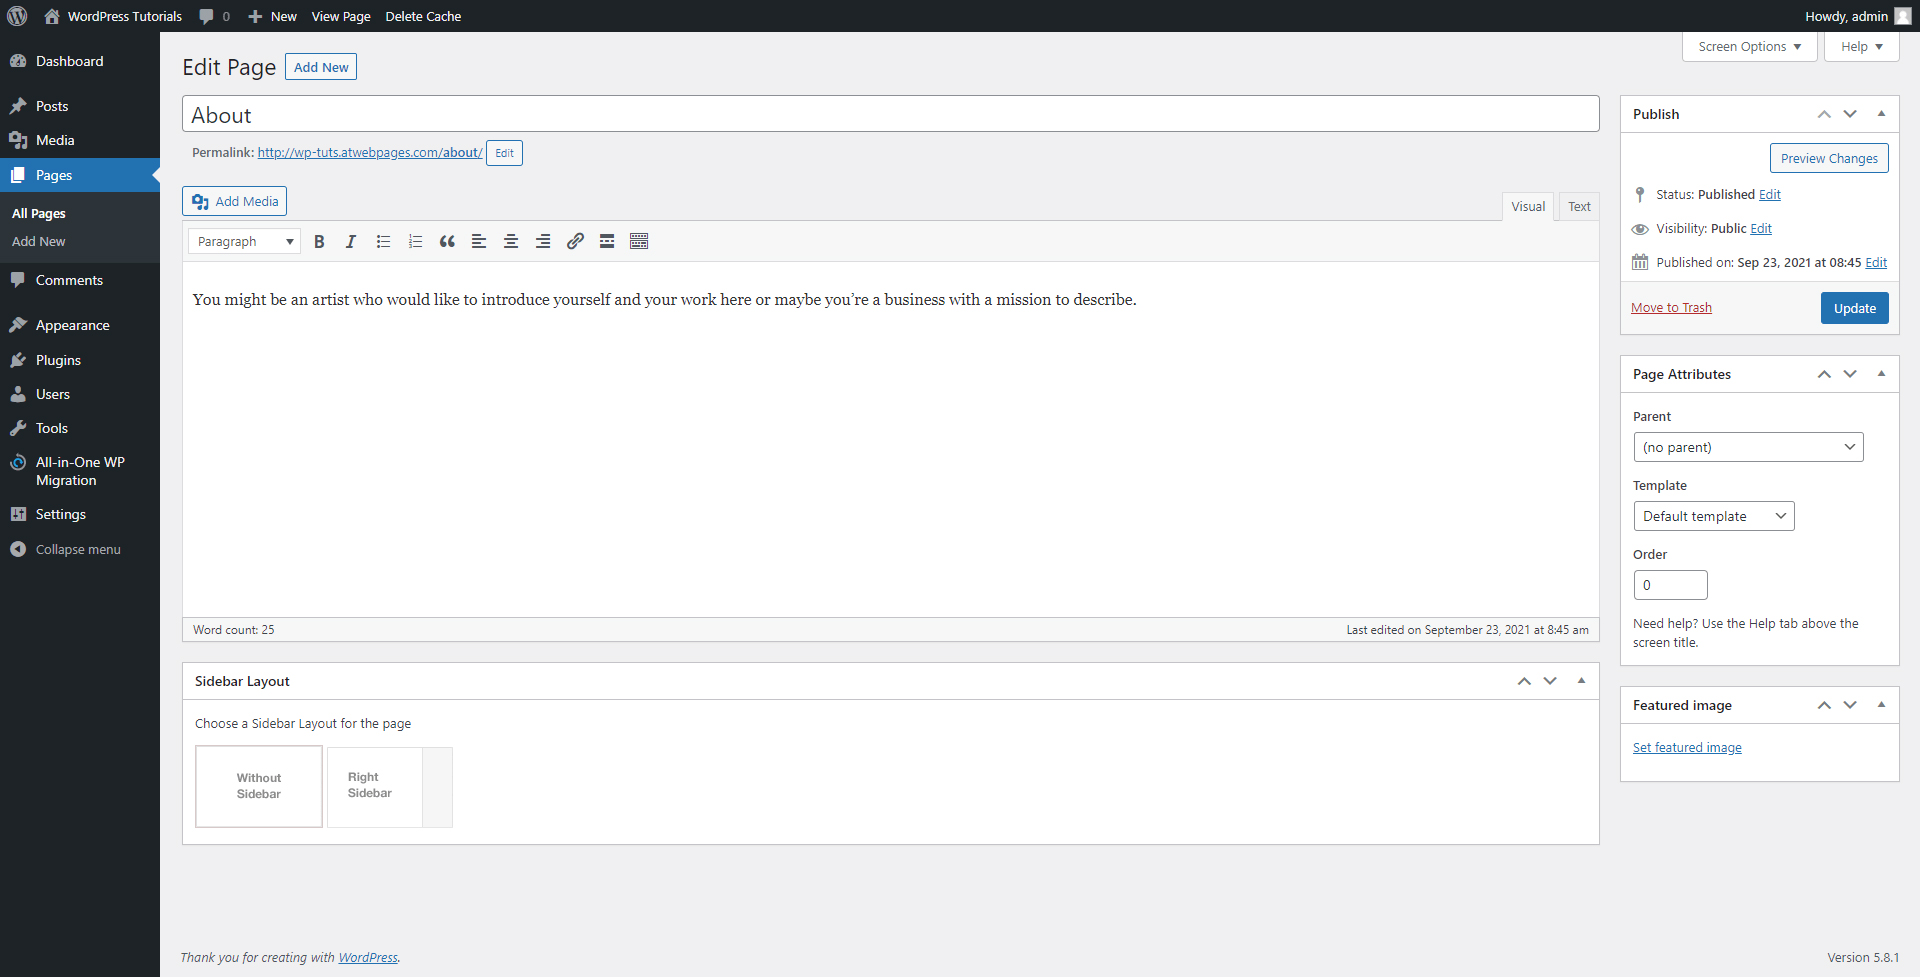
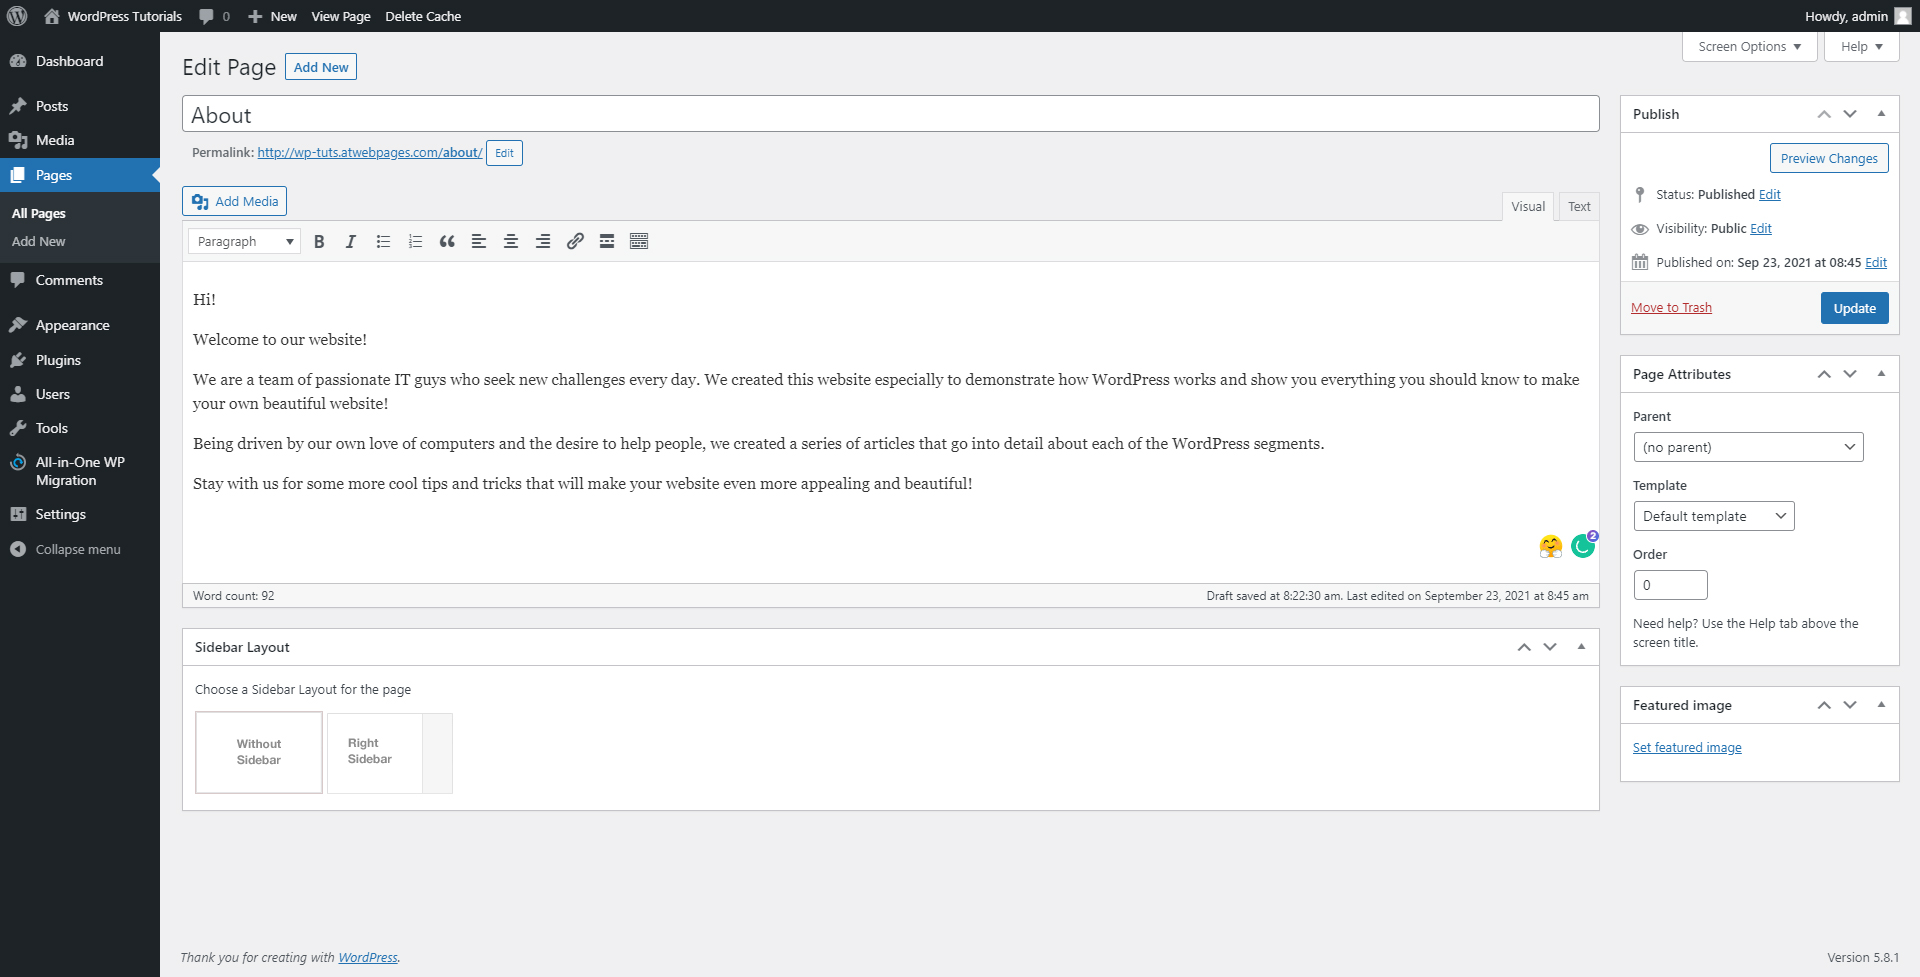
The Edit button will open a new page with all the options available for you to customize the given page. It looks like this:
Quick Edit enables you to make some slight changes without opening a new tab. When you click it, a new menu with options pops up:
Clicking the Thrash button will send the entire page with all of its content to the bin. Once you do so, the page won’t be available for access – your visitors won’t be able to see it.
The View button will open a new tab with the online page, so you can see it as your visitors do. We have already seen what this page looks like:
So, let’s finally start spicing things up, shall we?
Step 4: In the Pages menu, find the About page and click on the Edit button:
This will open the editorial menu of this particular page:
Before we proceed with the process, take your time and make yourself comfortable with the layout of the page. Also, have a look at all menus and buttons before you continue with the next steps.
Step 5: Add some text!
Not sure what to write down? Here are a few ideas!
As a rule of thumb, the About page is the place where website owners share information about themselves. Think of this as a presentation of yourself. You can add as much or as few details about yourself as you wish. Usually, people add what made them create their own site, what their passions are, and everything else about the site’s content.
The About page can also serve as the place which explains what the site is all about in detail. For example, if you wish to advertise your products via your website, the About page is a good place to tell your potential customers more about them. You can share what makes them special, what the production process looks like, share a bit of info about your colleagues and team, and much more.
Adding content to this page is important because sharing a bit about yourself makes website visitors more comfortable with browsing your pages, and eventually becoming paying customers.
In this particular example, we will share some things about ourselves:
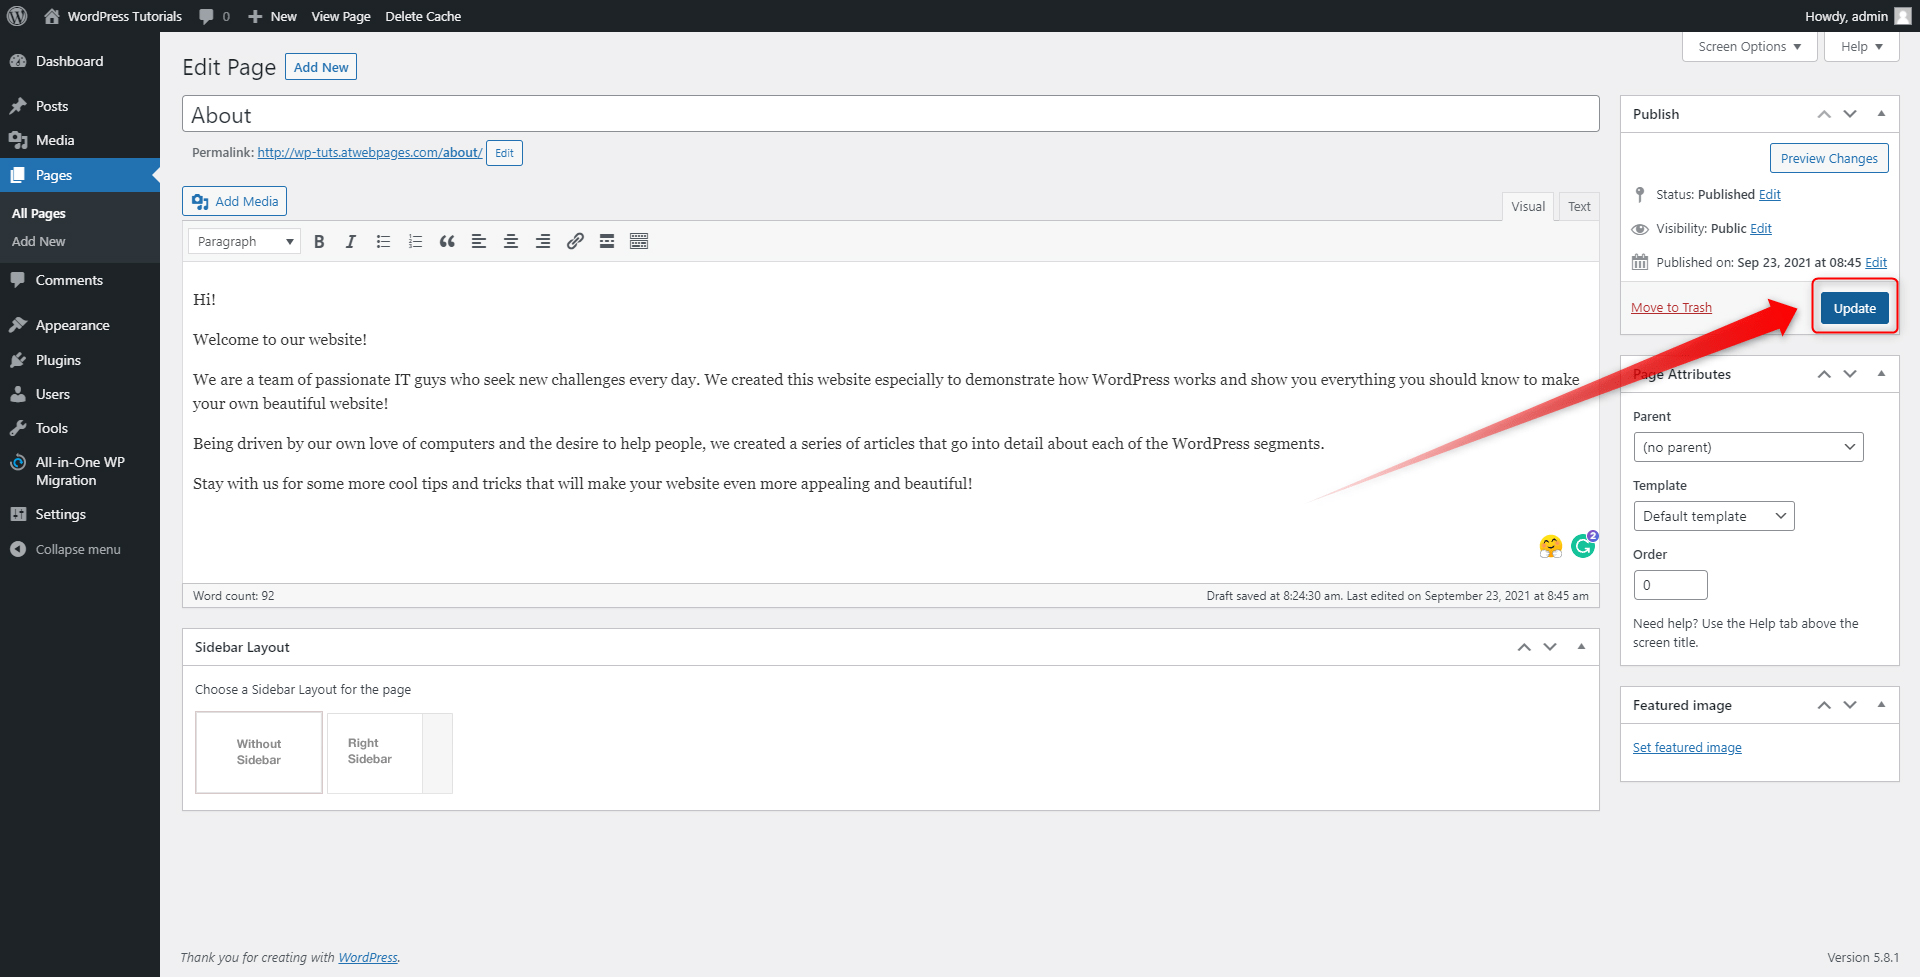
Once you’ve finished writing and editing the content, it is time to update the page, so this text appears on the About page.
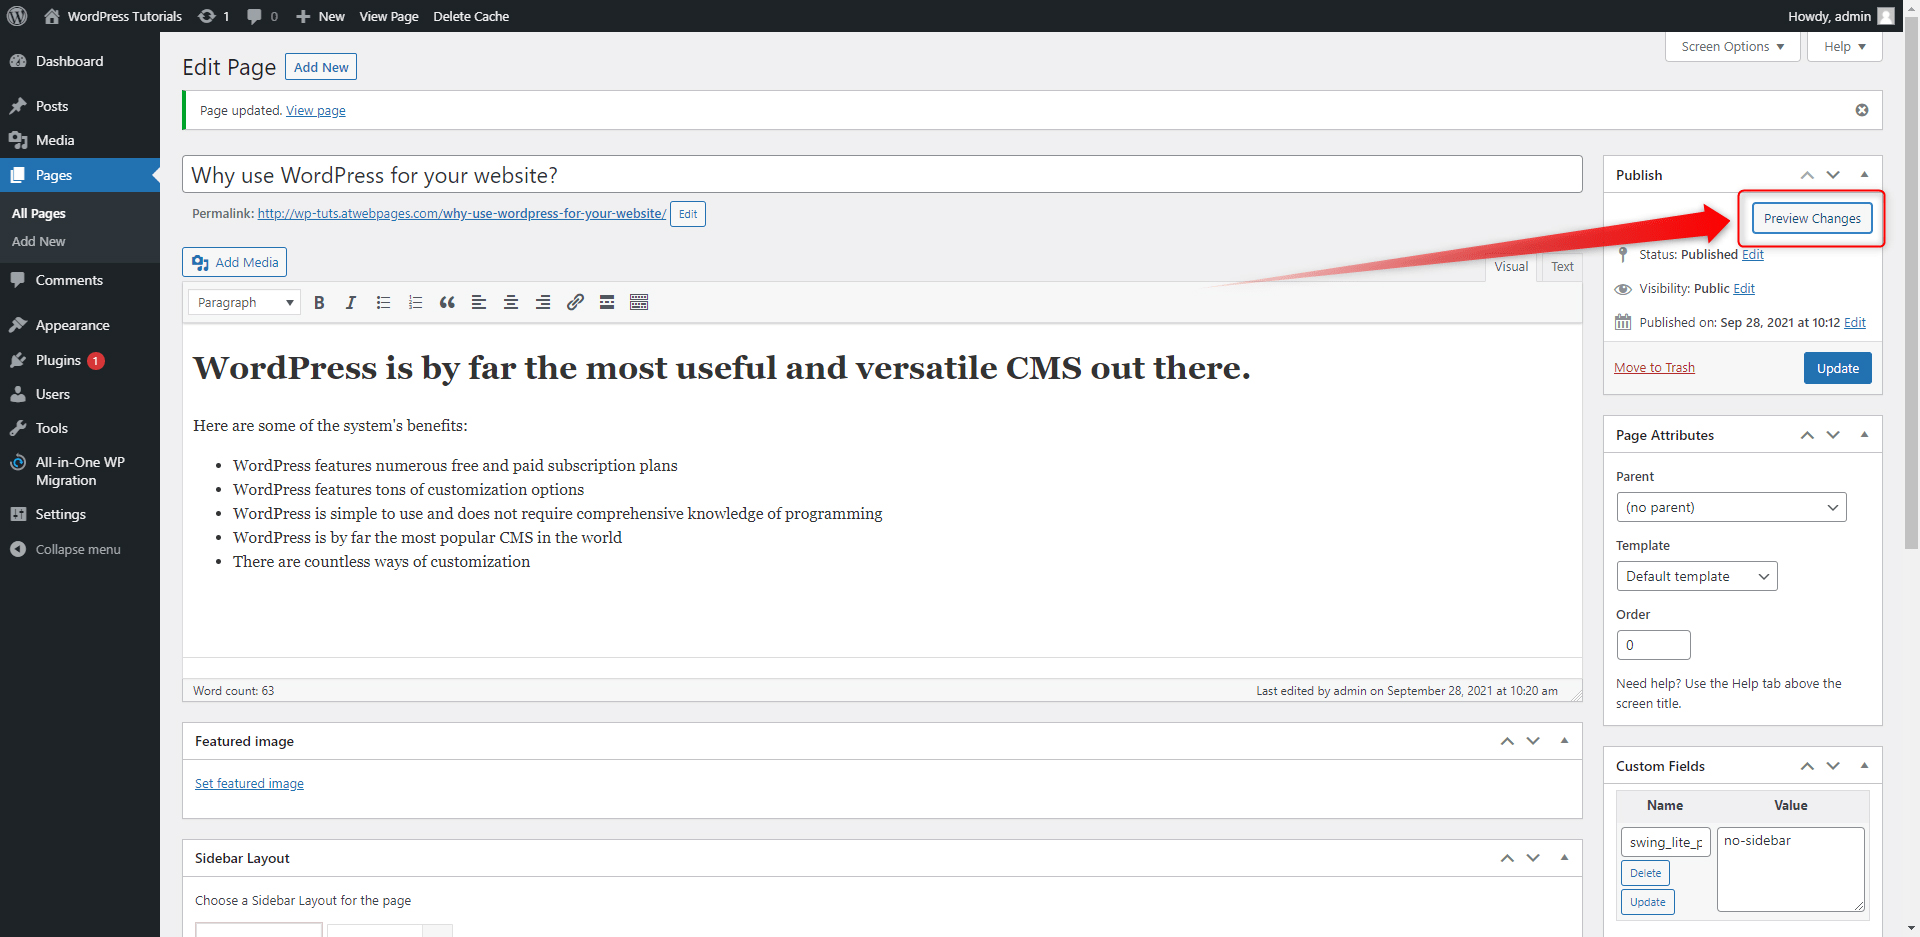
Step 6: Update the page, so the system can apply all the changes you’ve made. To do so, simply click the blue Update button on the right of the screen once you’ve finished editing the page:
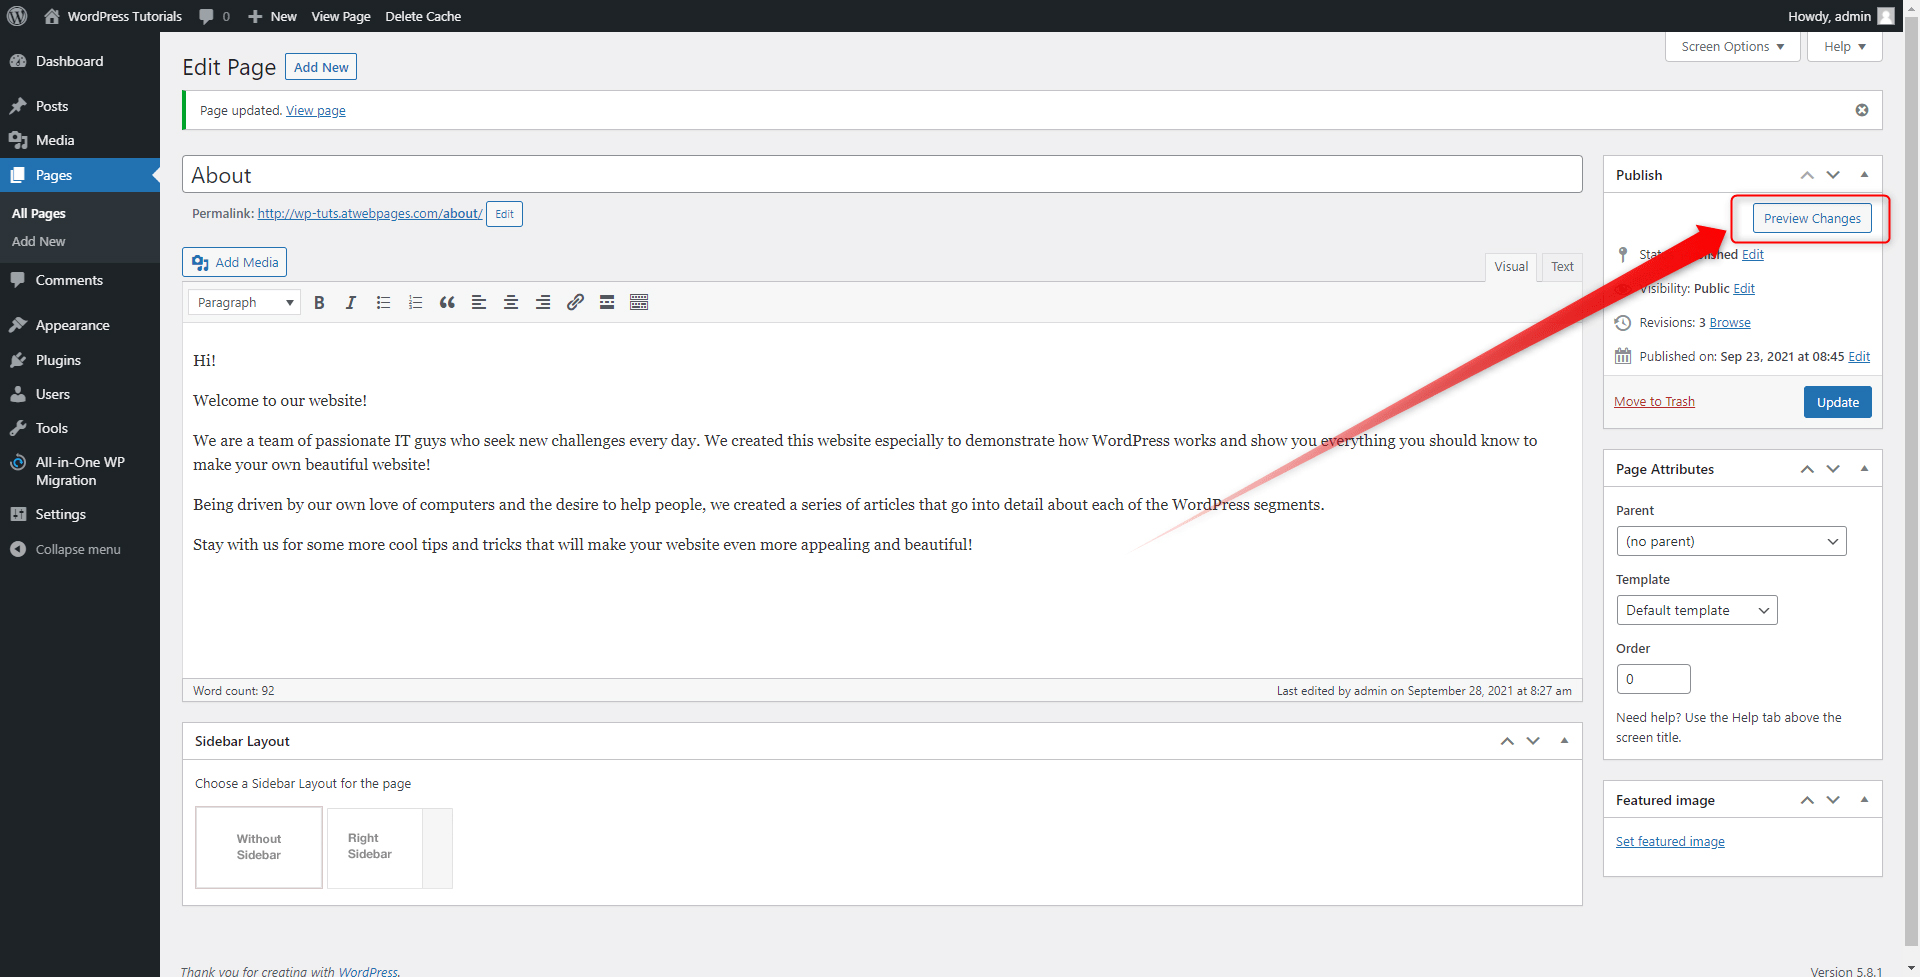
Step 7: Click on Preview Changes. This will automatically open the page you’ve just edited:
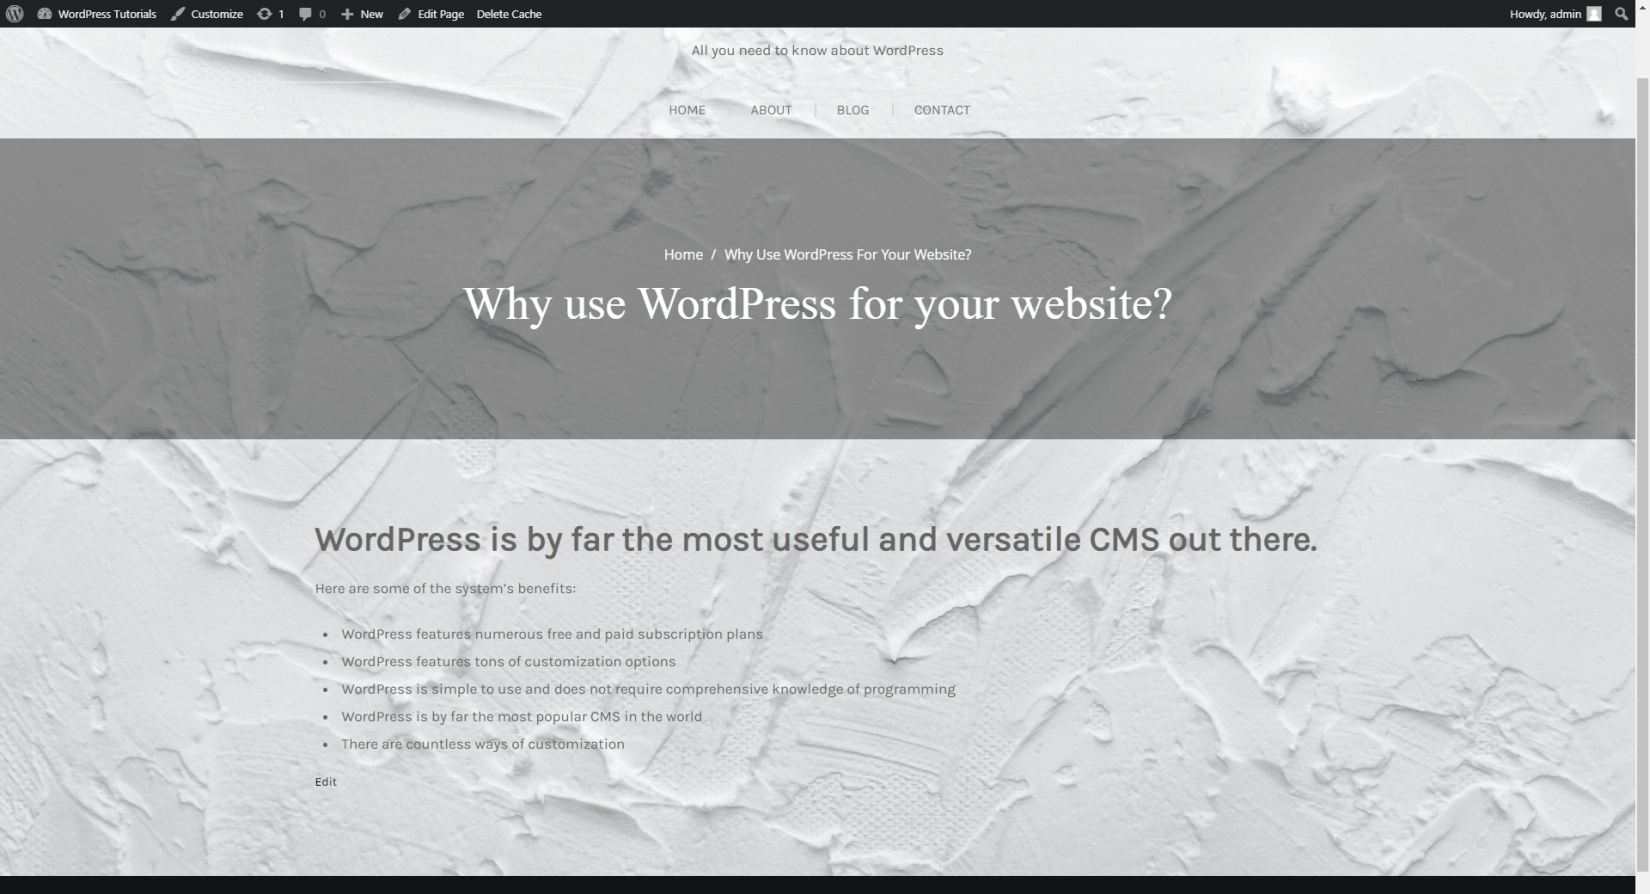
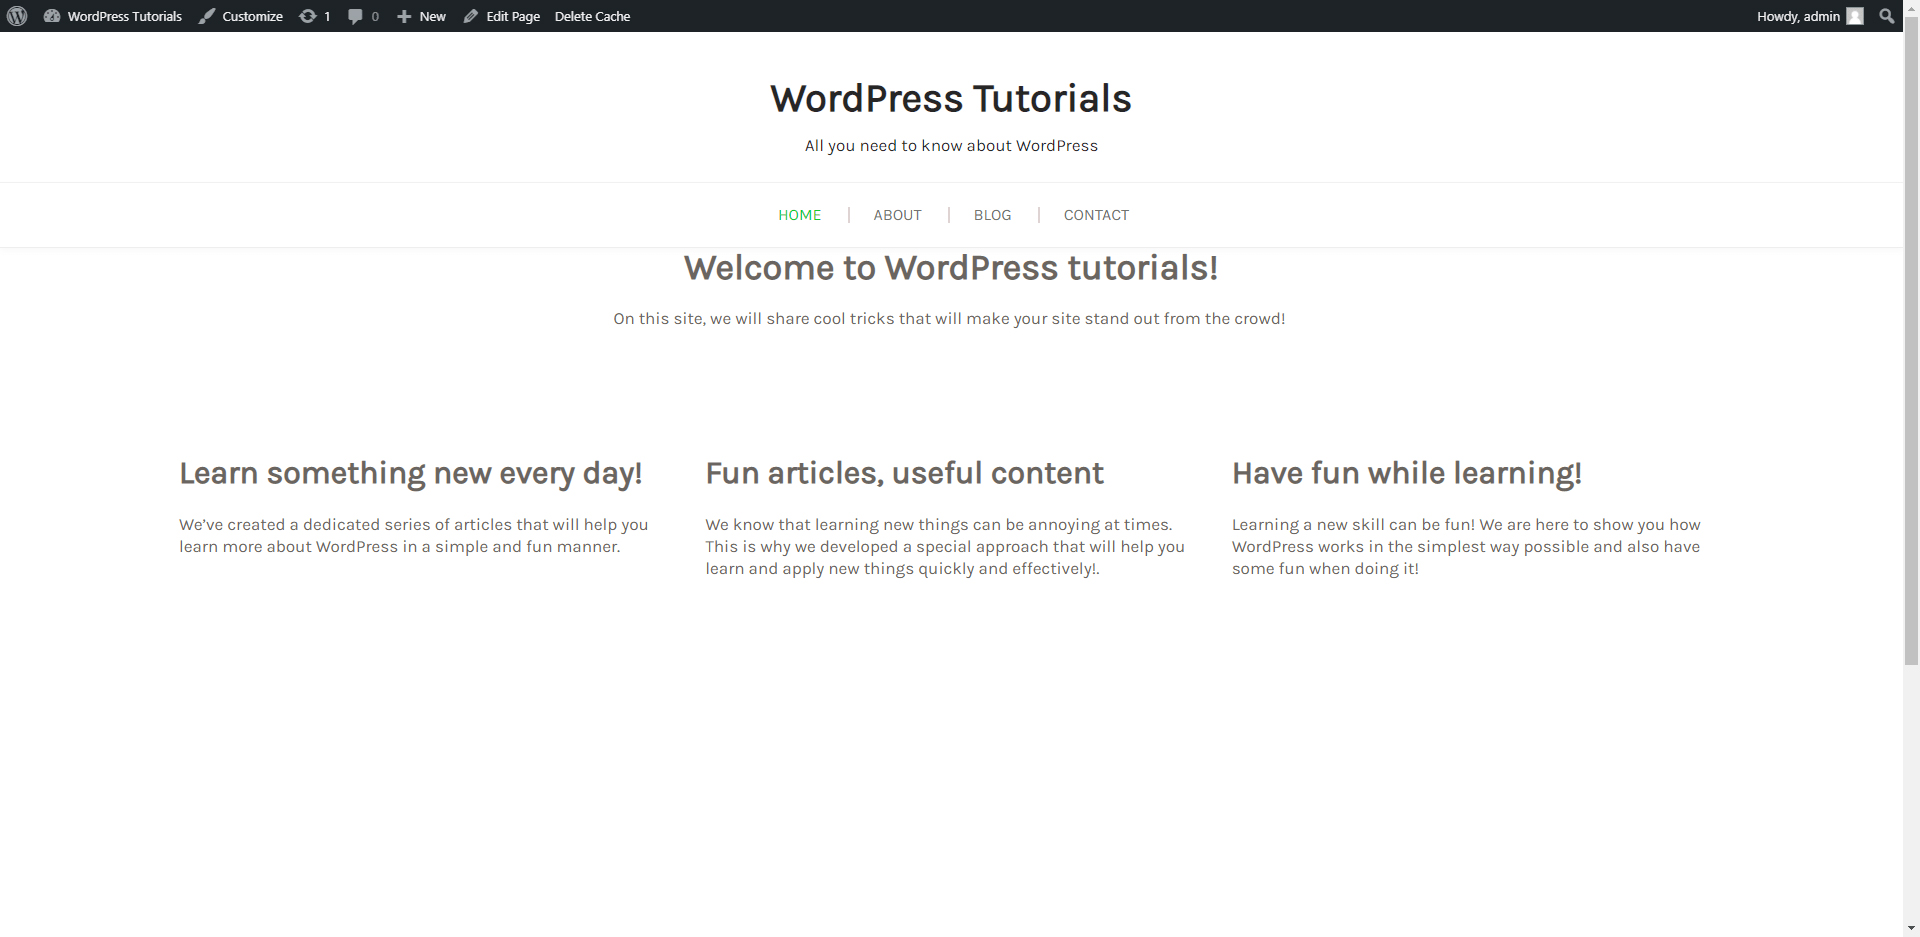
Here’s how we edited the content on the Home Page:
Follow this process and add the content that you wish your visitors to see for all of your pages. In the next chapters, we will show you how to create new pages and modify them visually.
How to Create a WordPress Blog Section
A well-maintained blog section becomes a powerful tool for any WordPress website. Start a WordPress blog and you will benefit from increased traffic, more purchases, and numerous satisfied visitors and clients!
Depending on the goal of your website, the blog section (also known as the Post section, or simply Blog Posting) can contain some of your personal thoughts about a certain topic, a detailed description of your products, or extensive tips and tricks about a subject you are proficient in.
Also, maintaining a WordPress blog can bring you some additional income, and can greatly improve your overall SEO score.
So, how to start a WordPress blog? As with any other WordPress function, setting up your blog section is quick and easy, and as always, completely free!
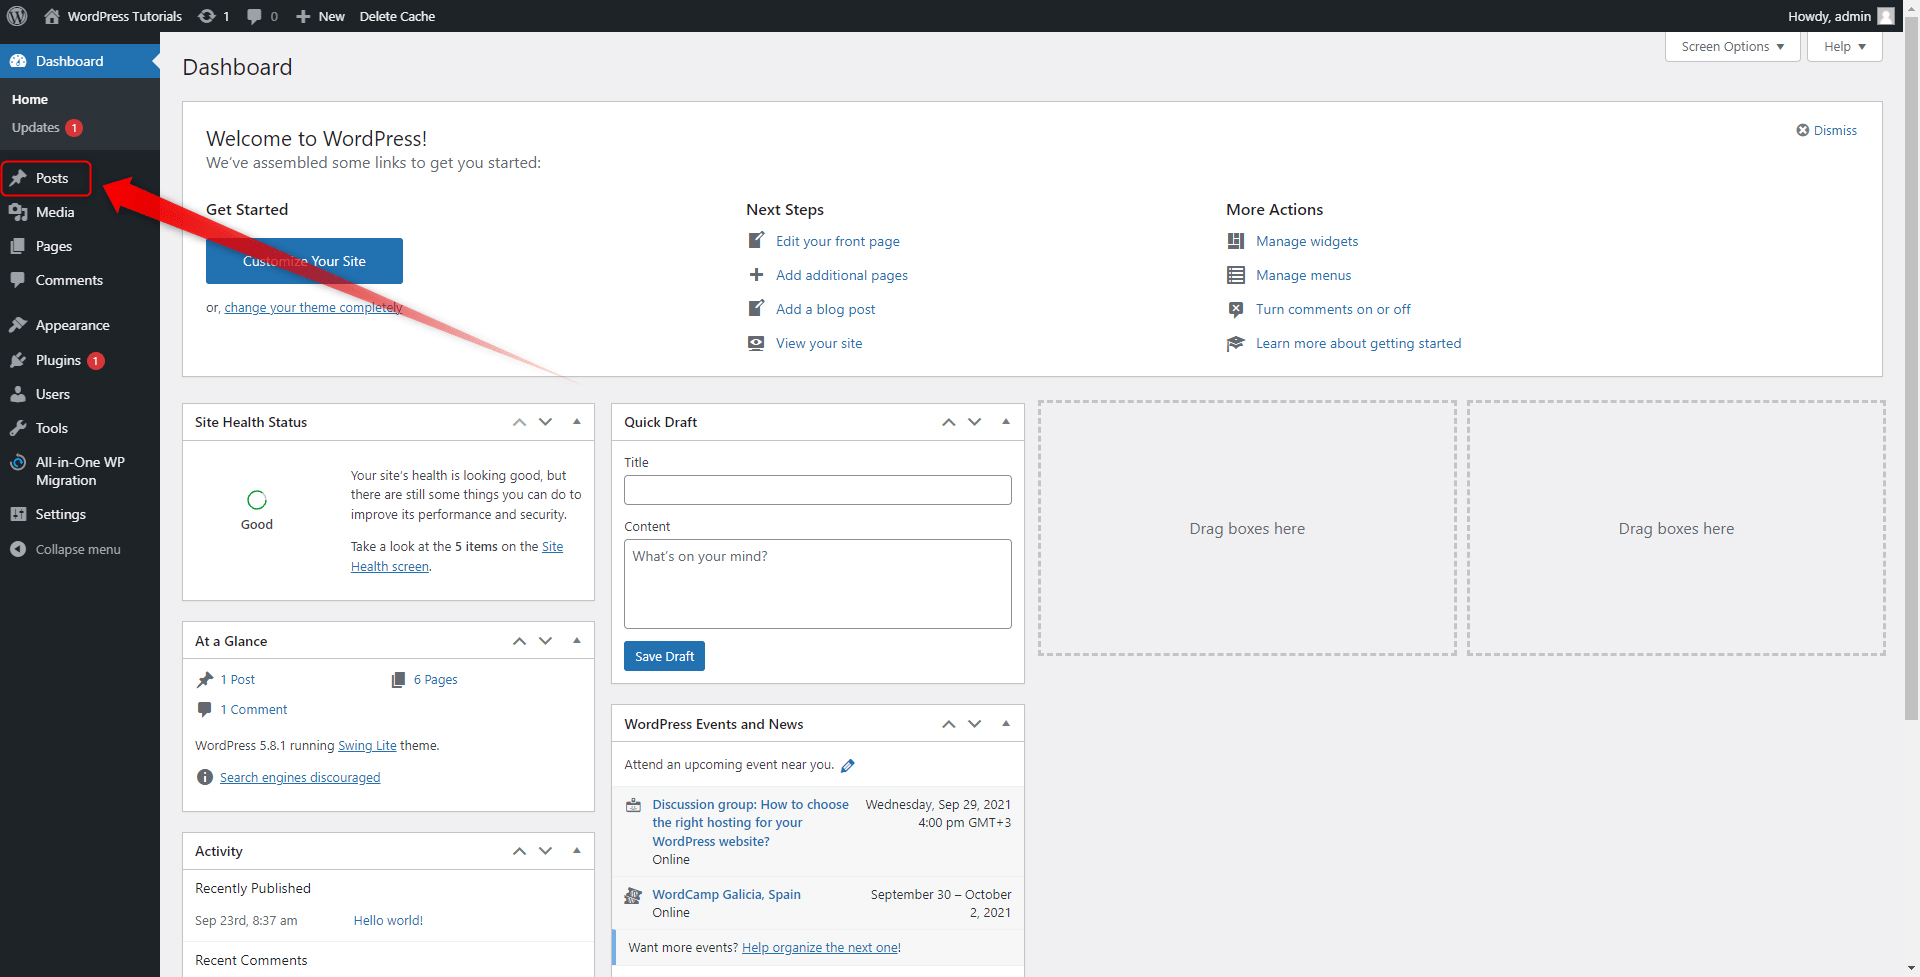
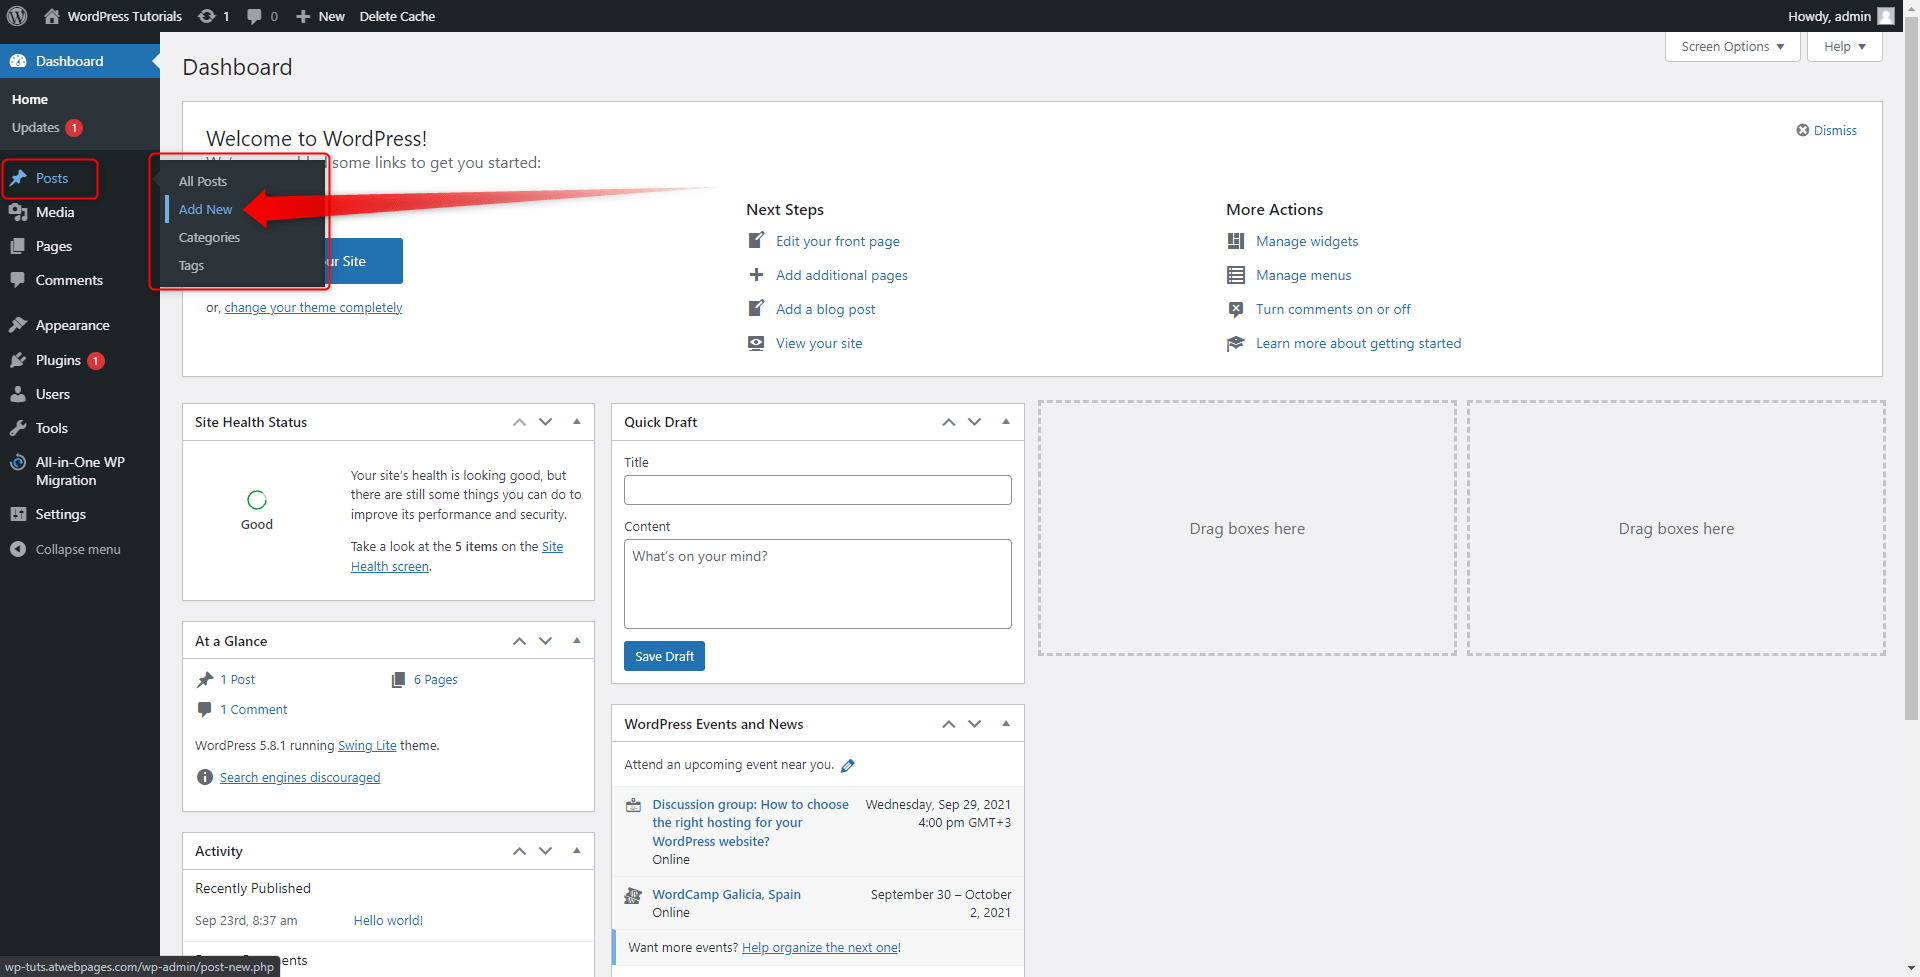
Step 1: Enter your WP Control Panel and head to the Posts menu on the left of the screen. When you hover your cursor over the button, a set of options will appear:
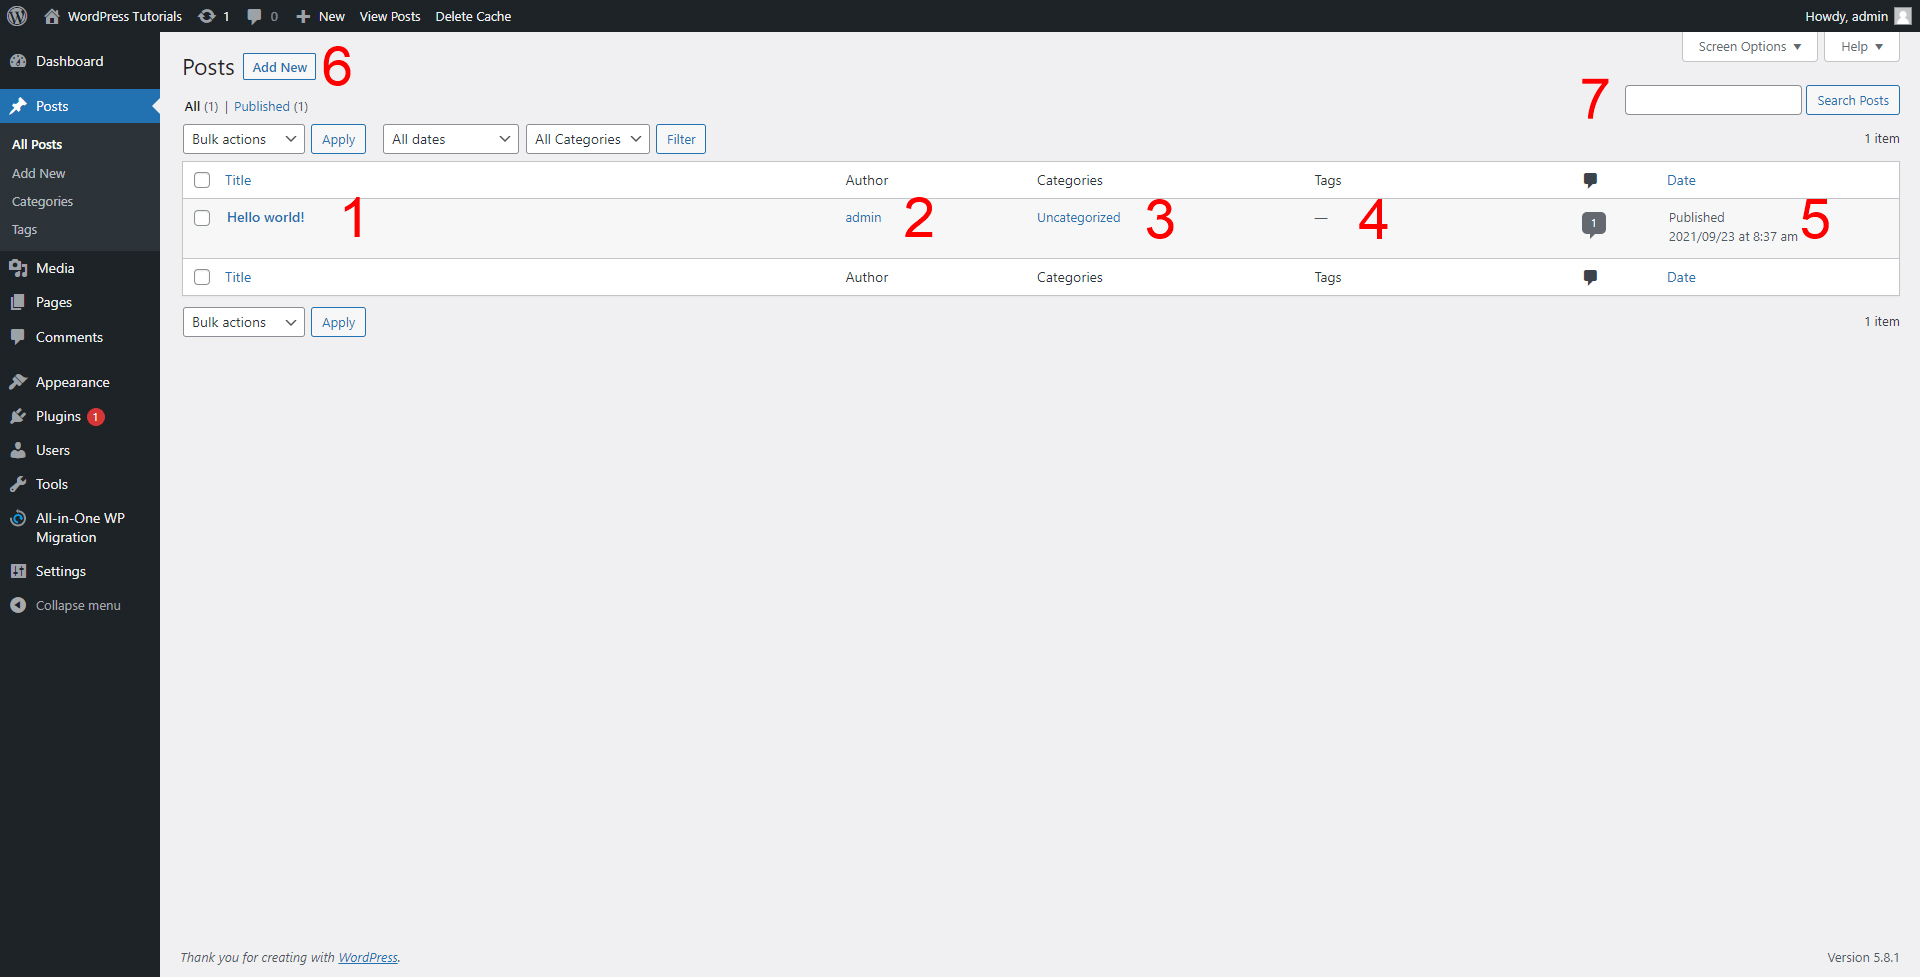
Step 2: Click on the All Posts button. This will open the general Posts menu, and we will first have a look at it before creating an article and publishing it.
Here’s the place where you can quickly access all of your posts, create new ones, make changes to old ones, or simply delete some.
By default, WordPress has created a post-it called Hello World! We will open it and make ourselves familiar with the interface, but before that, we will have a closer look at the menu that we see on the screen:
-
- This is the name of your article, also known as the Heading. When a user opens up the article on the website, the first thing that will appear will be indeed the heading. It is placed just at the top of the main body of the piece. Usually, a well-structured Heading will attract more website visitors and will boost your SEO ranking.
- Here you can see who the author of the post is – and what is the role that he/she takes up. This is quite important, as knowing exactly who and within what user role has created the article can serve as a starting point for future distributing of tasks regarding editing the piece or maintaining the blog or any part of it.
- The Categories tab is a pretty handy one. Categories simply arrange your articles in different logically distributed groups. Imagine starting an automobile industry-focused blog. In this case, the categories can be named as follows: New Models, Tuning Projects, Popular Vehicles, and similar.Of course, the names of the categories and their distribution greatly vary depending on the Blog’s general topic and details.
For example, the categories in the website we are building in this guide can be named as follows – General WordPress knowledge, SEO, Themes, Plugins, Blog, and similar. Each one will contain articles that have something in common with the name of the Category they are sorted in.An important Categories feature is that they are hierarchical – you can create a main Category and add numerous more sub-categories that contain the distributed articles.
When talking about vehicles-focused Blogs, a main category might well be New Vehicles. One of the sub-categories in this main category might be Japanese Vehicles, and another one is American Vehicles. Then you sort your new article describing the latest Toyota Supra in New Vehicles Category and then in the Japanese Vehicles sub-category.
Also, it is important to acknowledge that the Category’s name becomes a part of the This means the name of each category you include in your post will become an irrevocable part of the page’s link. This is why you should follow the same rules of creating names for your Categories that you follow for the creation of Slug names.These include:-Keep the Category name short and to the point.
-Let it be quickly recognizable and easily readable by your visitors
-Include a keyword as a Category name.
- Tags are one more built-in handy tool. They also logically sort your articles, but unlike the Categories, Tag sorting is not hierarchical and every single tag is completely independent and standalone when compared to other tags. Imagine that you created an article reviewing the new 2022 Toyota Supra. You will set up the categories and tags as follows:
Category: New Vehicles
sub-Category: Japanese Vehicles
Tags: Toyota, Supra.
- The date details give a general knowledge about when the article is published.
- This is the Search button – when you build a library of hundreds of articles, the manual search for a particular one can be a daunting task. Here’s where the Search button shines – simply type in the article’s heading, some of its tags, or a keyword, and the built-in WordPress search engine will find the most fitting result.
- The Add New button opens up the tab in which you will start adding text for your article, format it, add Headings, images, and everything else an article needs. We will browse this tab in greater detail a bit further in this guide.
Step 3: Add Categories to your Blog section.
Since we already have an idea of what Categories are, let’s add some.
While in the Posts menu, find the Categories menu in the Sidebar and click it. You will be redirected to this page:
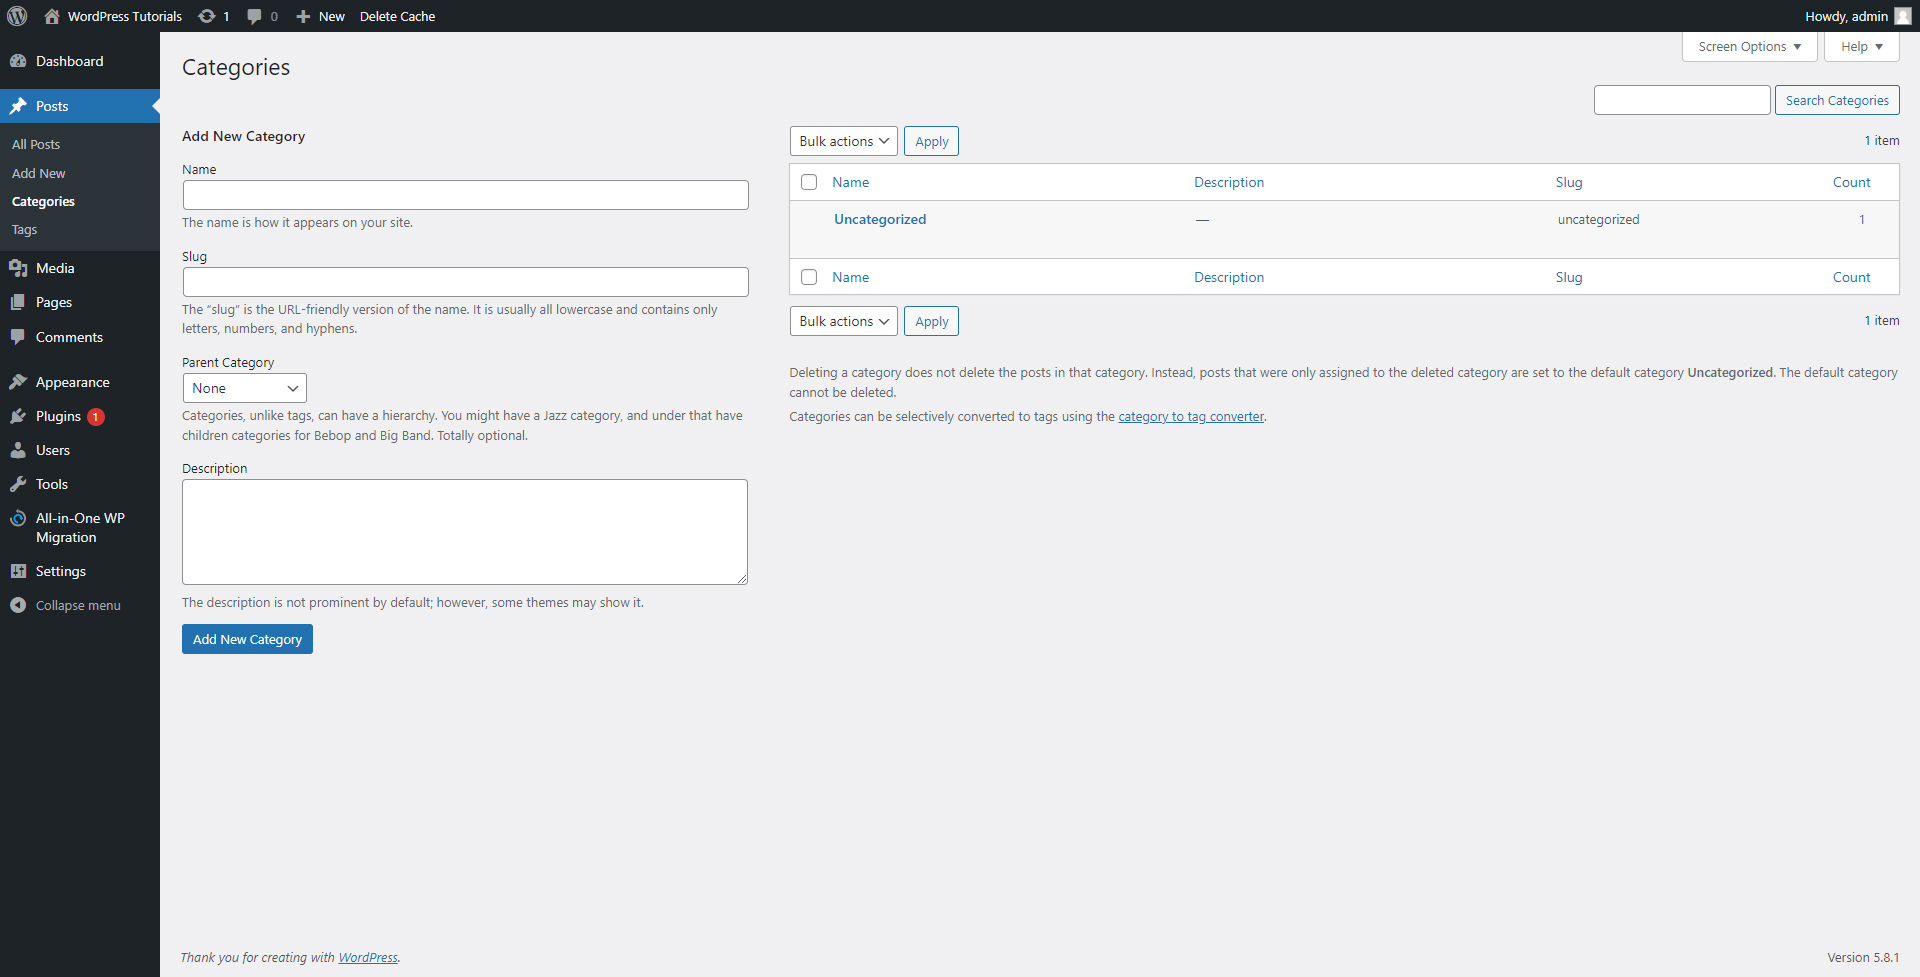
Let’s see how this panel is organized:
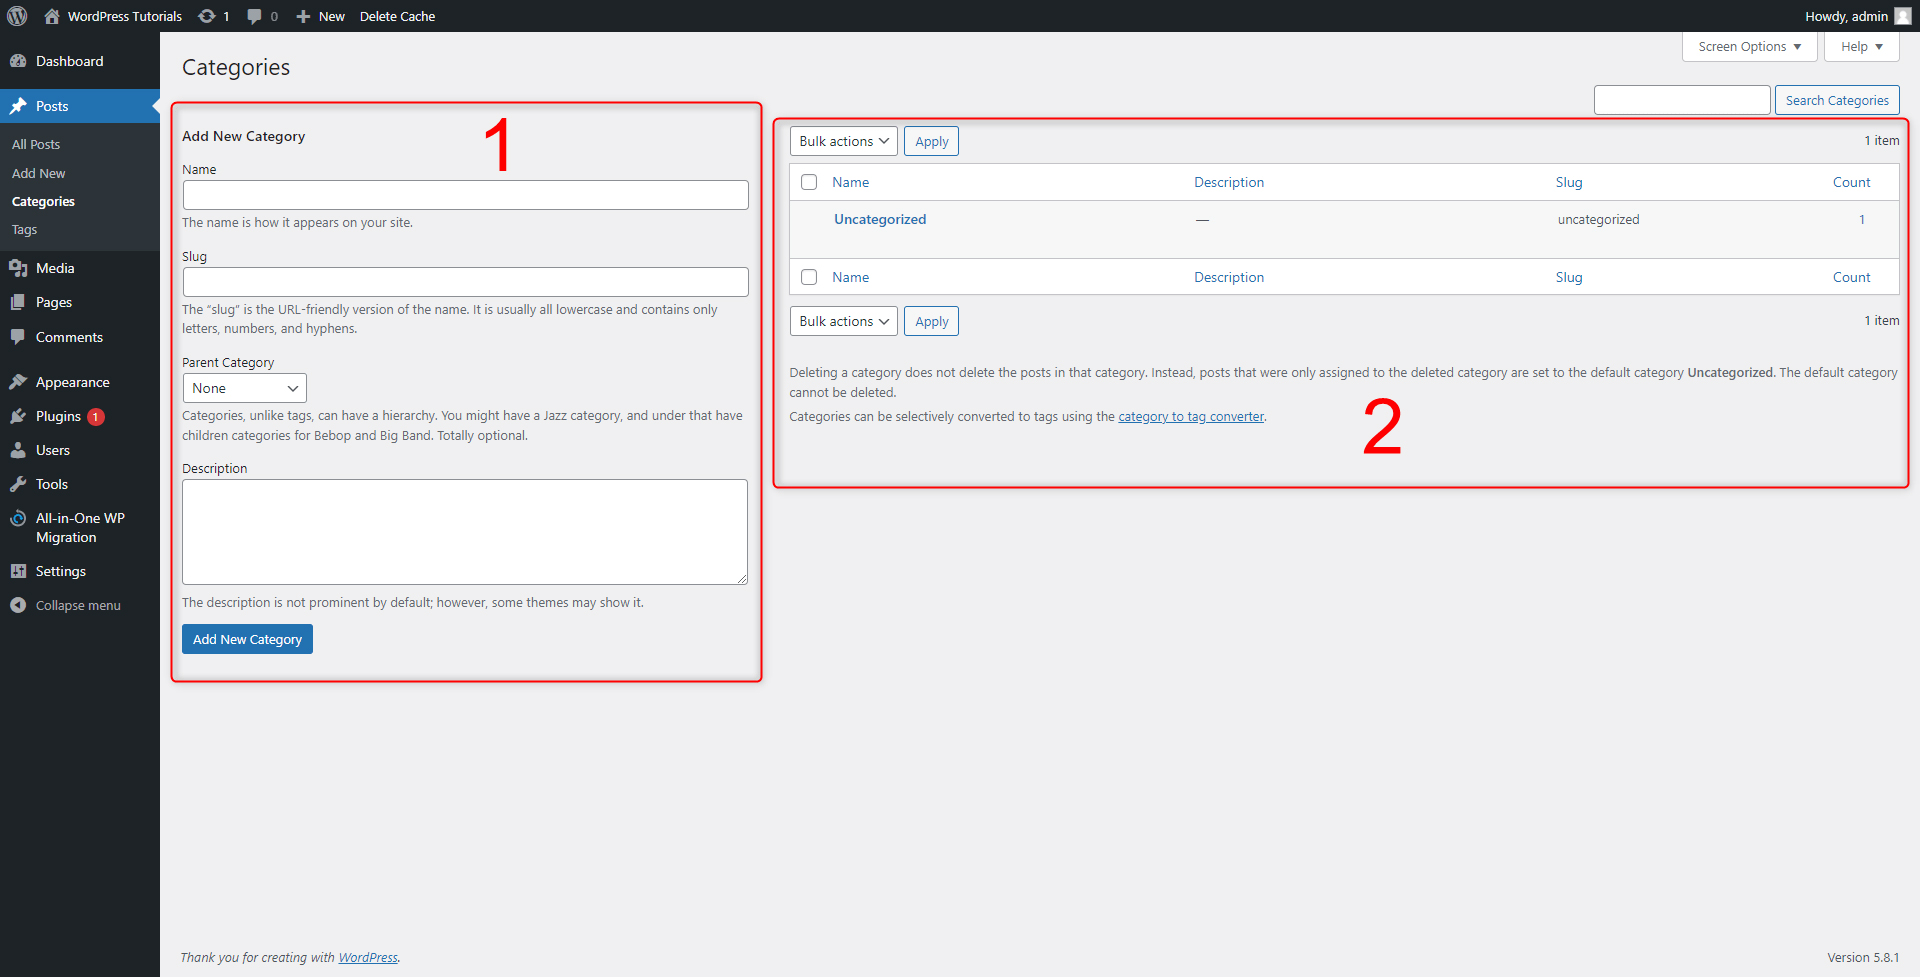
- The left half of the screen is the Category Creation panel – here you will add all the details you need to create a new Category.
- This is the list of all your existing Categories – By default WordPress has created a single one. You can add as many as you wish and all of them will be visible in this panel. From here you will also be able to easily manage your Categories.
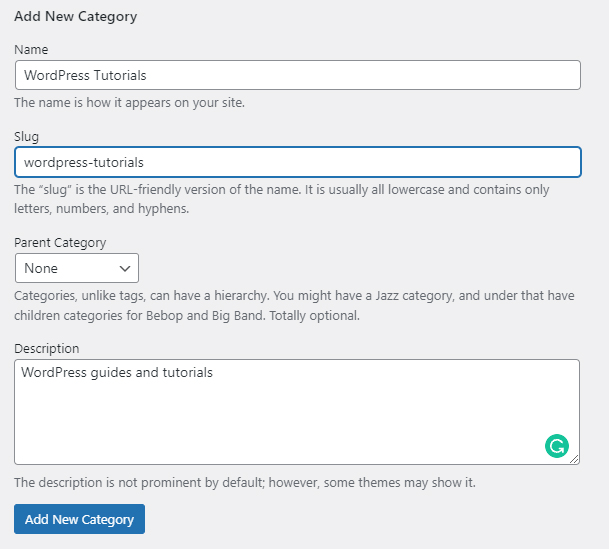
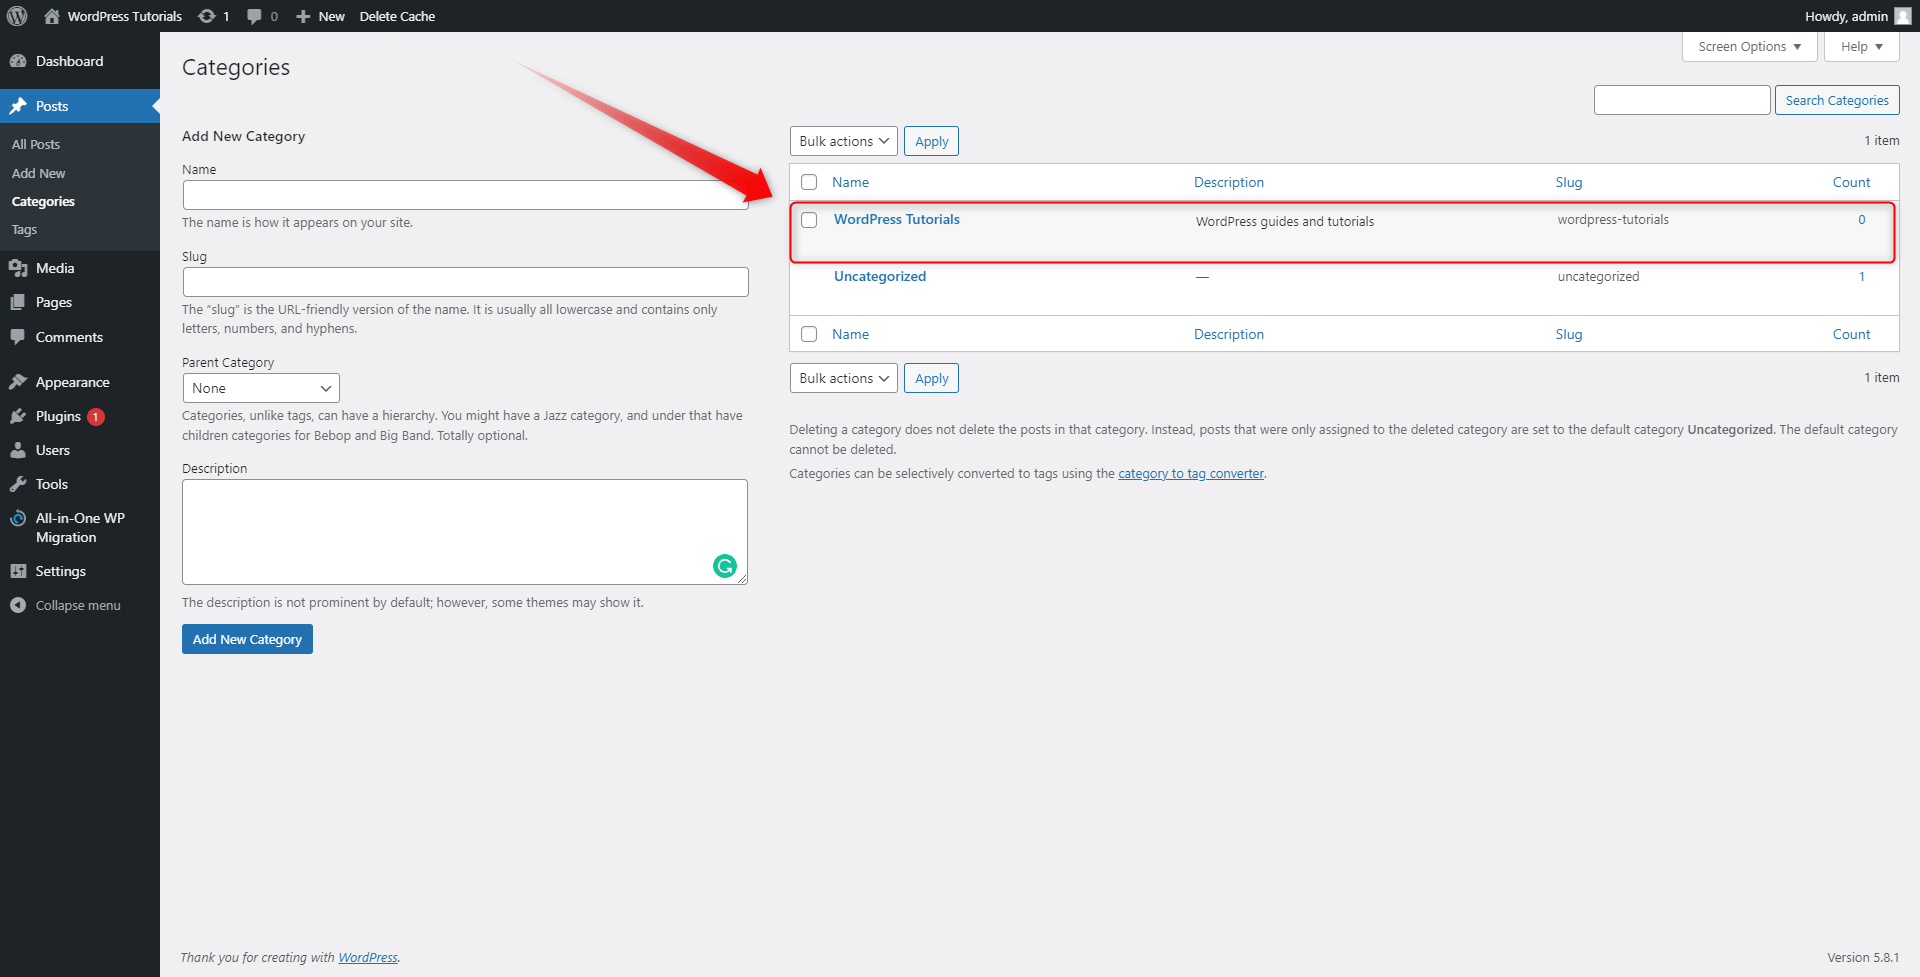
Step 4: Add the details of your new Category:
Choose a short yet descriptive name, decide what the Slug for this category will look like, and add some description. Since this will be your first new Category, it will be most likely a parent Category – in the drop-down Parent Category menu select None. Later in this chapter, we will show you how to add a sub-Category. Then click on the blue Add New Category:
Here’s how we filled the boxes:
Remember that you should create Category names according to your niche and your website’s general topic!
After a second, you will see your new Category listed in the panel on the right:
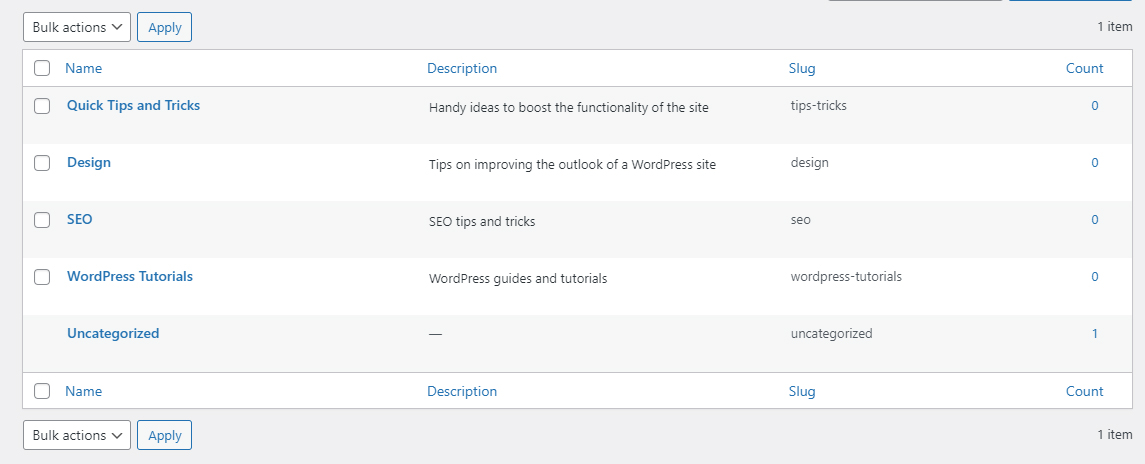
Take your time and add as many categories as you think are enough to sort out your future content. We’ve added a total of 4 Categories:
Before we move on, let’s create a sub-Category. For this task, think of a name that will be a part of a bigger Category. In our particular case, this will be Plugins and we will make it a sub-Category within the larger WordPress Tutorials Category. To do so, simply fill in the details of the new Category to your liking:
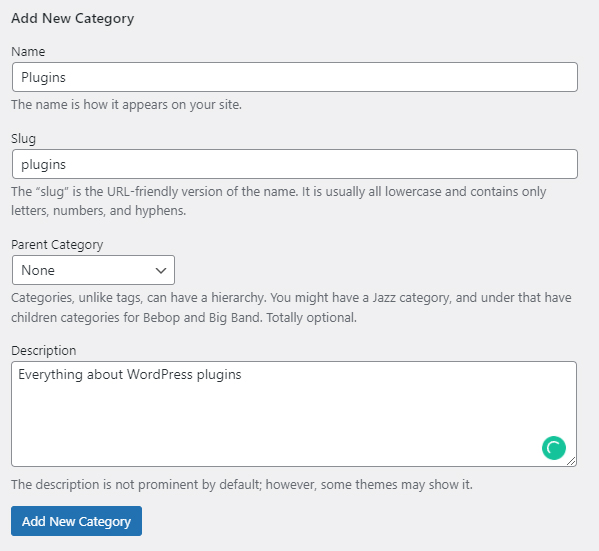
However, before you hit the Add New Category button, have a look at the Parent Category section and menu:
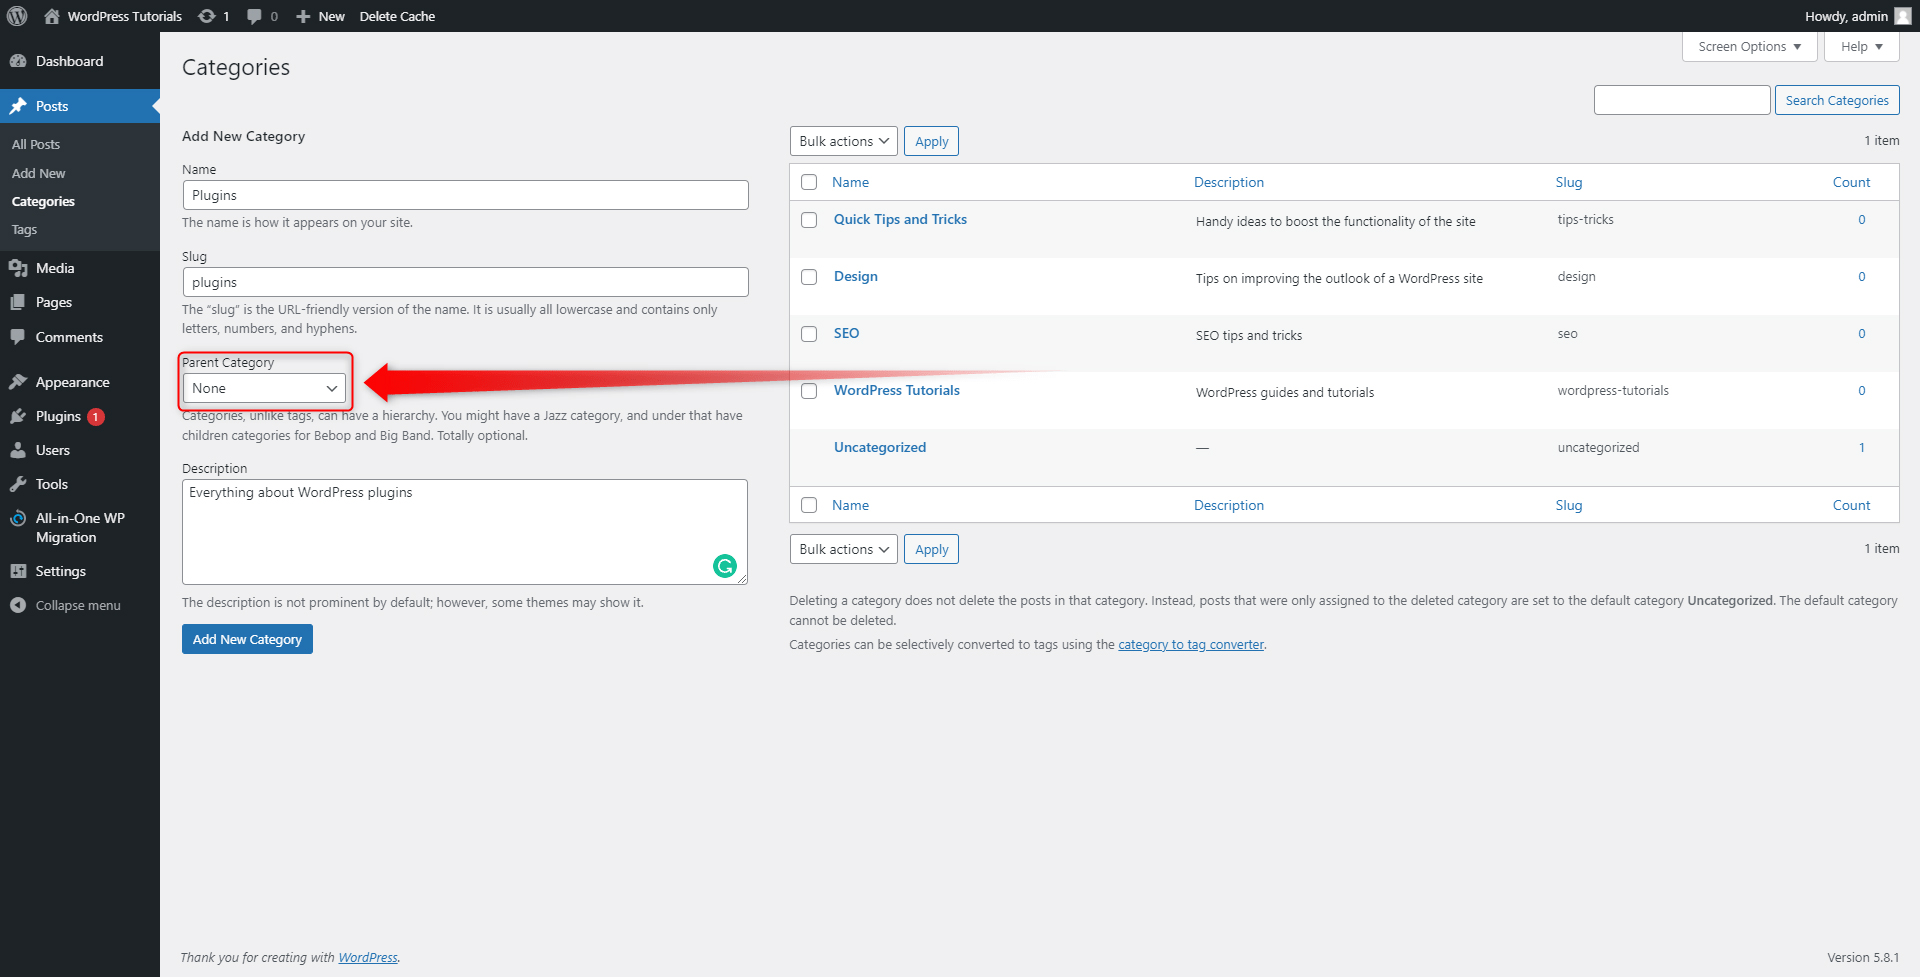
When you click it, a list of options will appear. These options are indeed the already created Categories that can become a parent Category. To make one such, simply click on it:
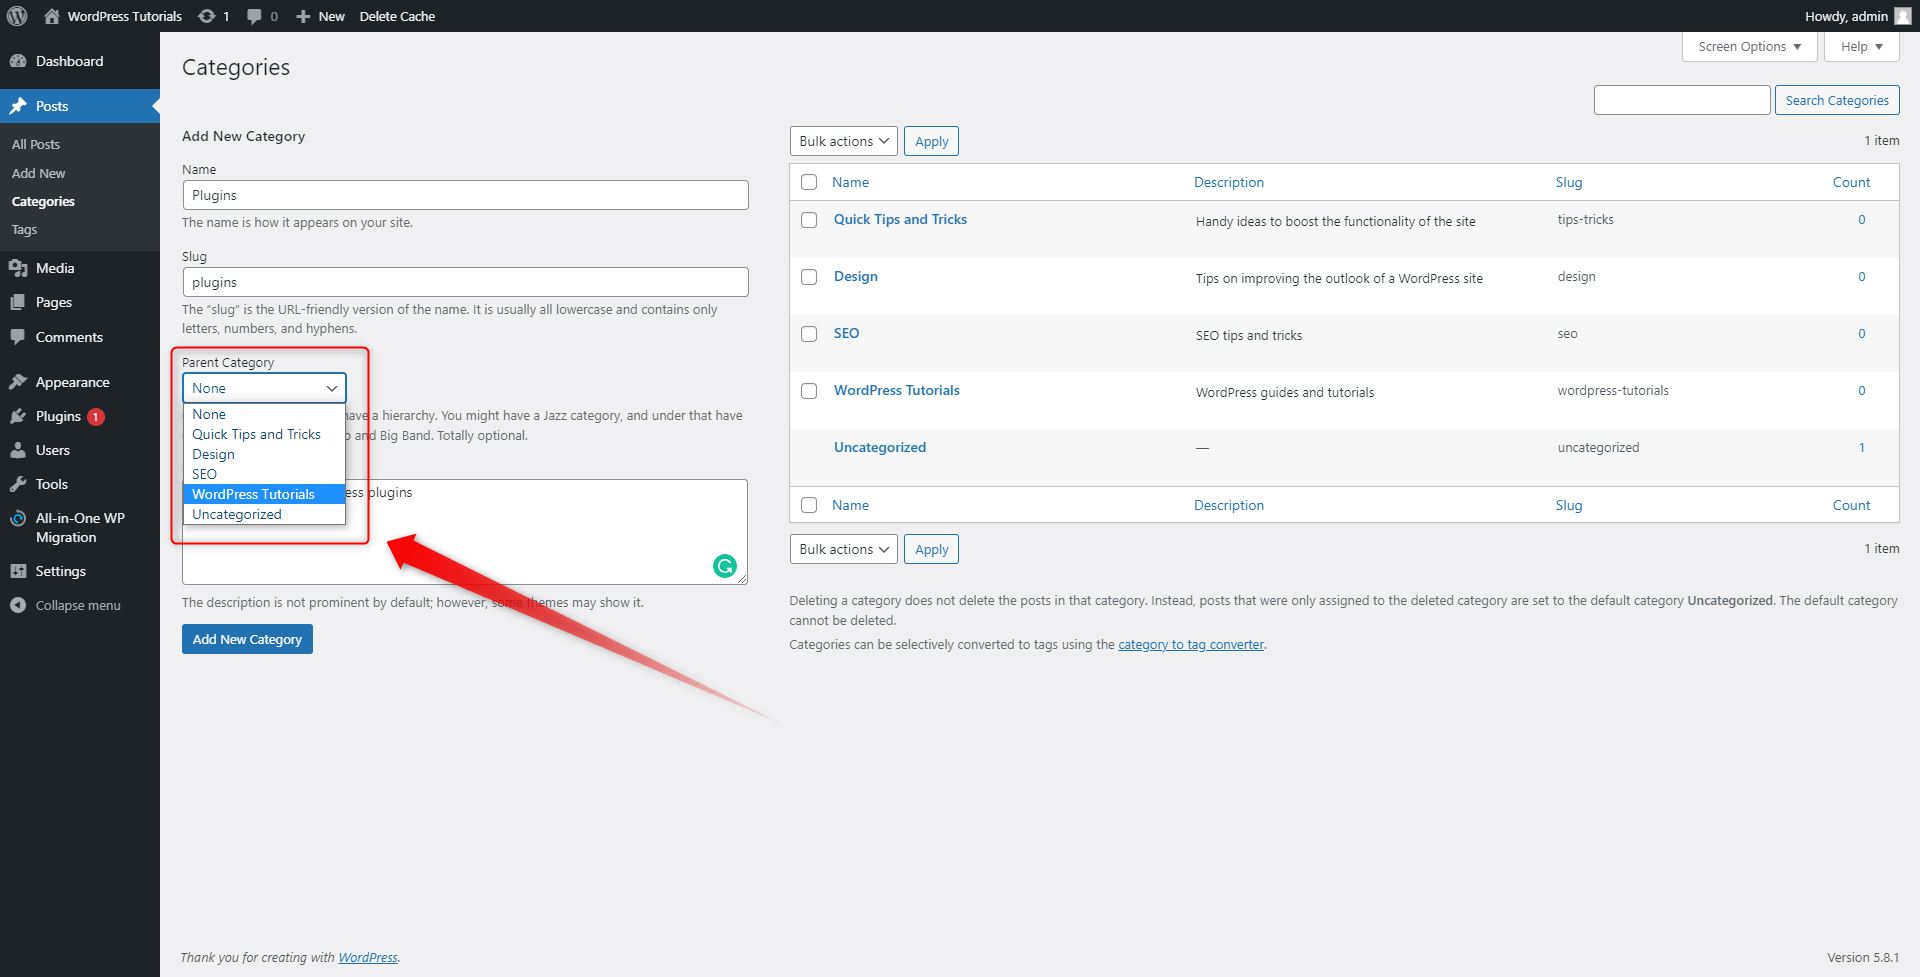
After you selected the parent Category, click on the Add New Category button:
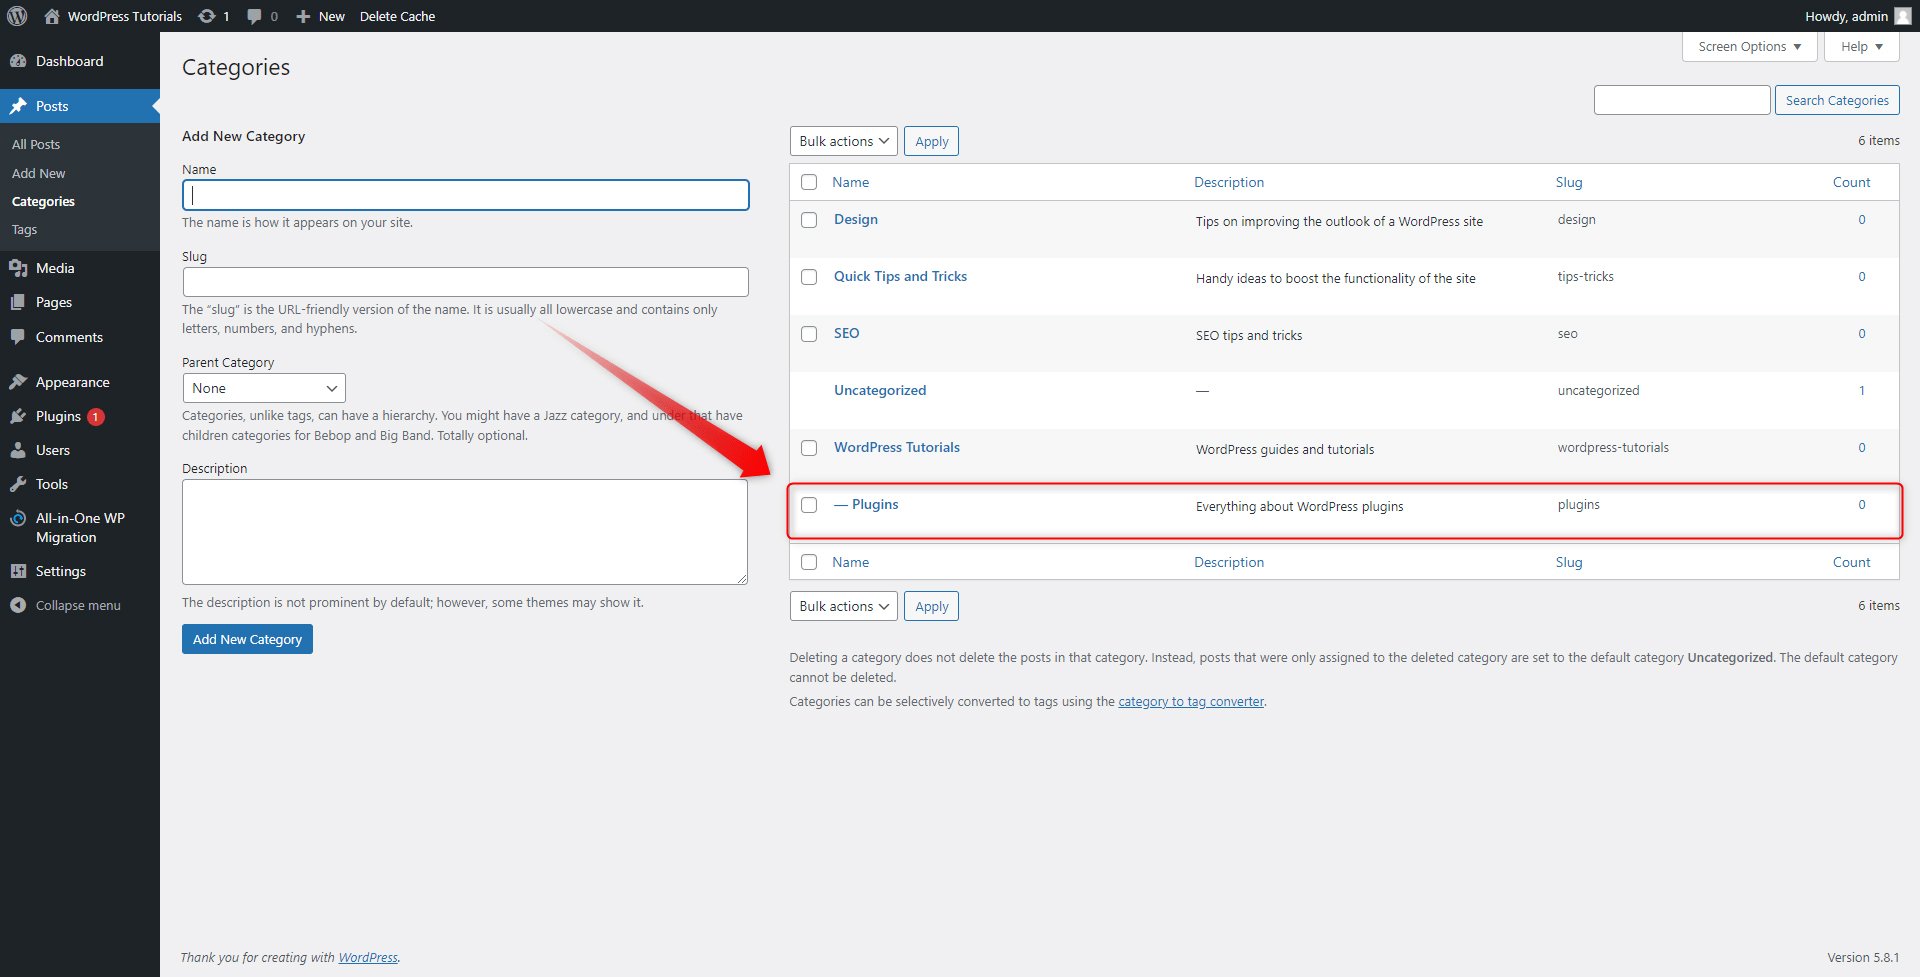
You will see the new sub-Category appearing just below its parent Category. In our case, this is the WordPress Tutorials one.
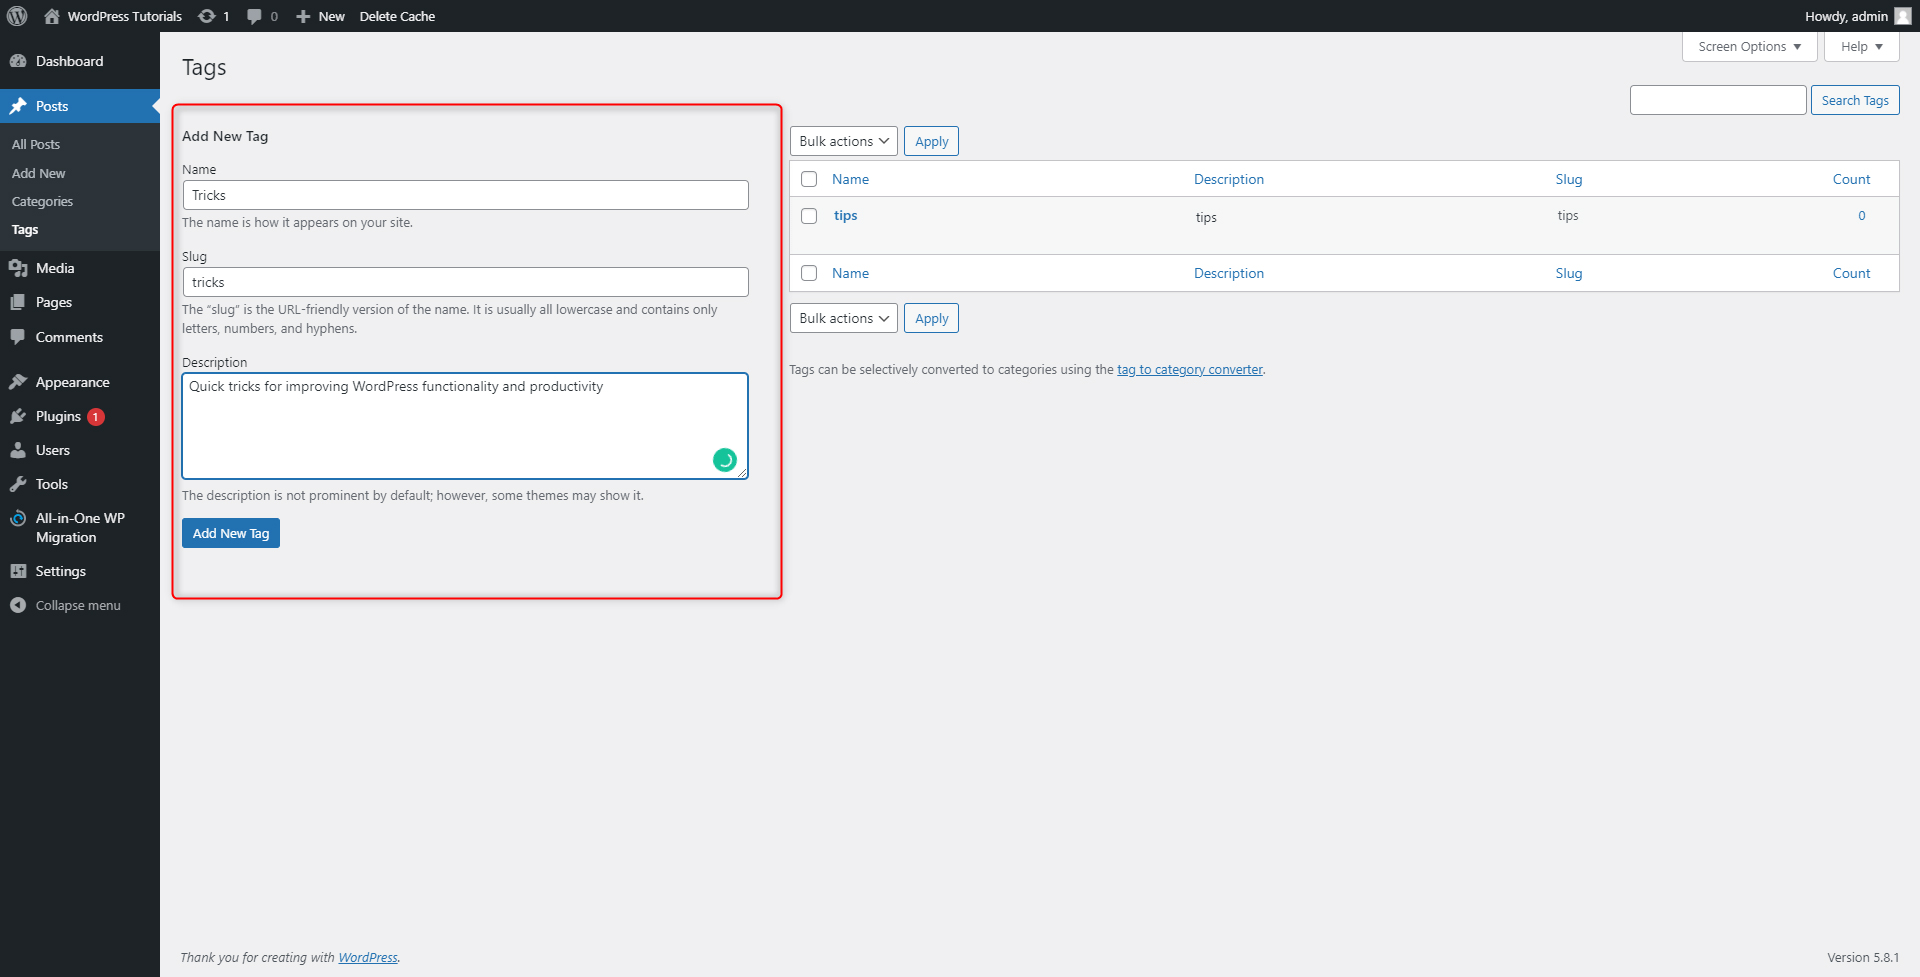
Step 5: Add tags.
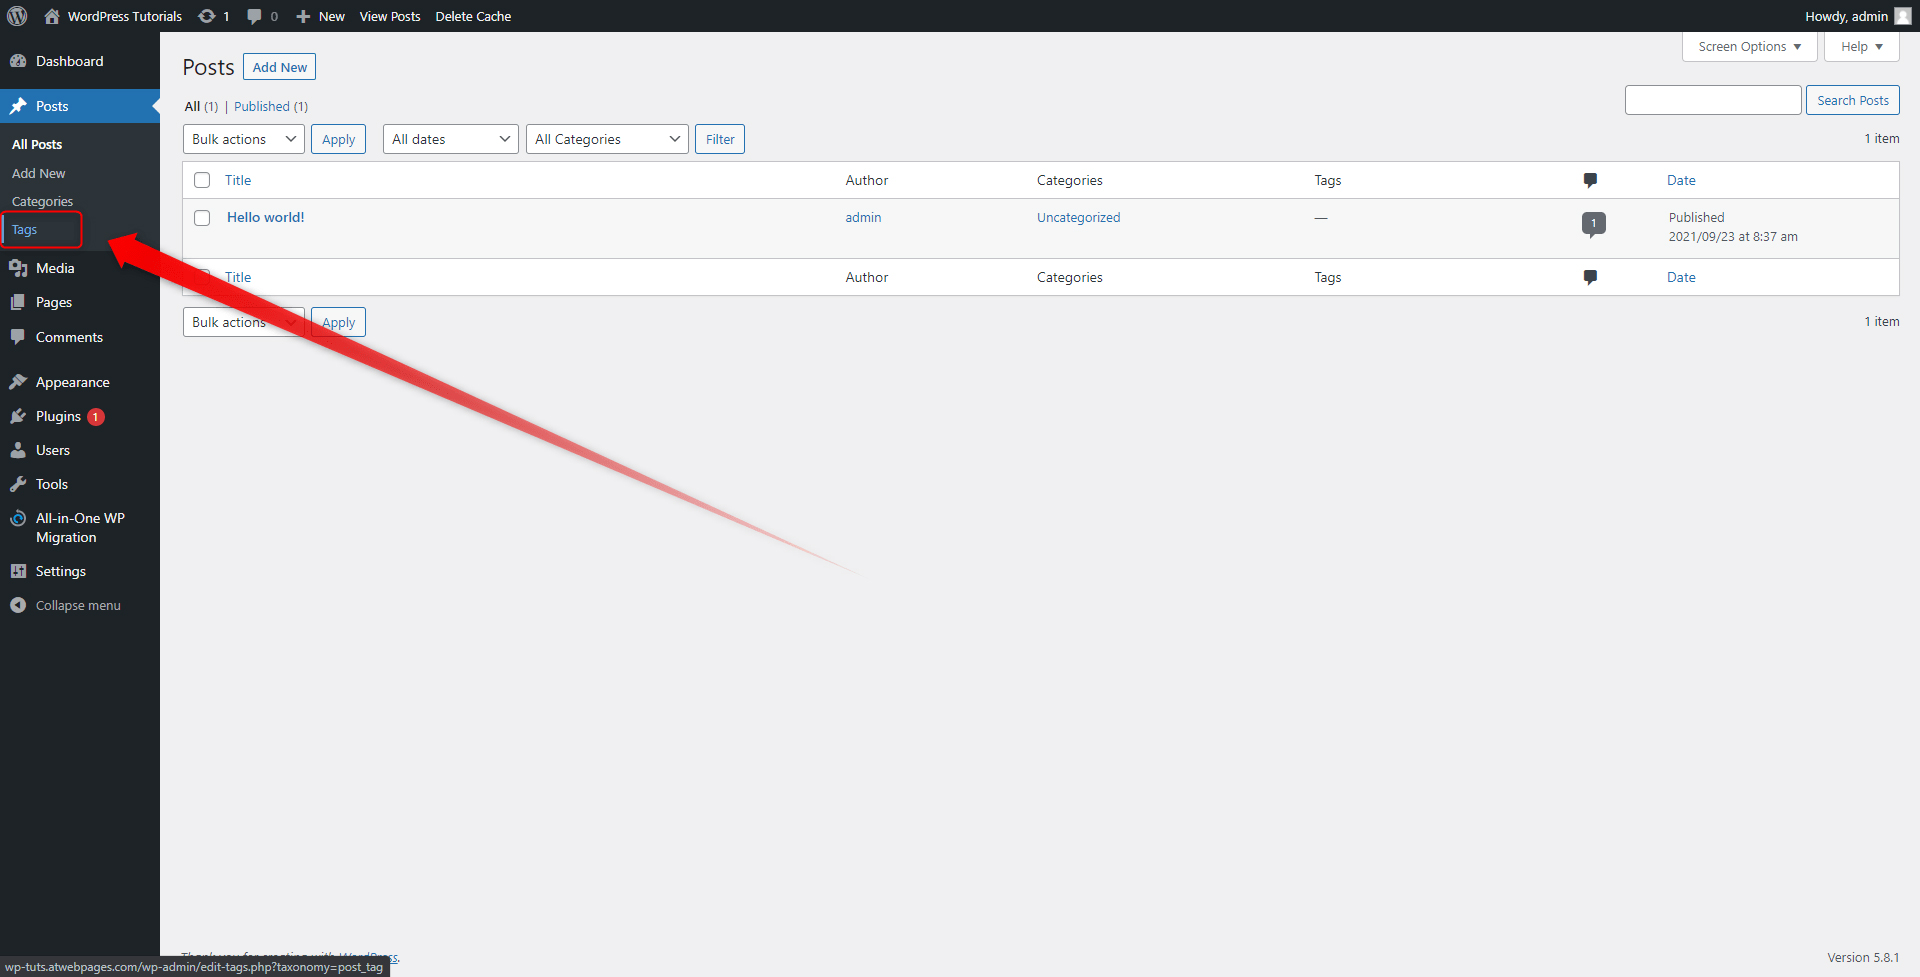
The process is similar to Category creation. While in the Posts menu, simply go to the Tags menu from the Sidebar:
add new tag names according to your website and Blog topic. Add as many as you want:
Since we have already made a complete setup of our Blog section, let’s create our first article, shall we?
How to Create a WordPress Post?
This is the process with the most creativity in mind!
Step 1: First, we must access our Article-creation panel. To do so, simply head to Posts in the Sidebar while in the Control Panel:
Step 2: From the drop-down menu that appears, select Add New:
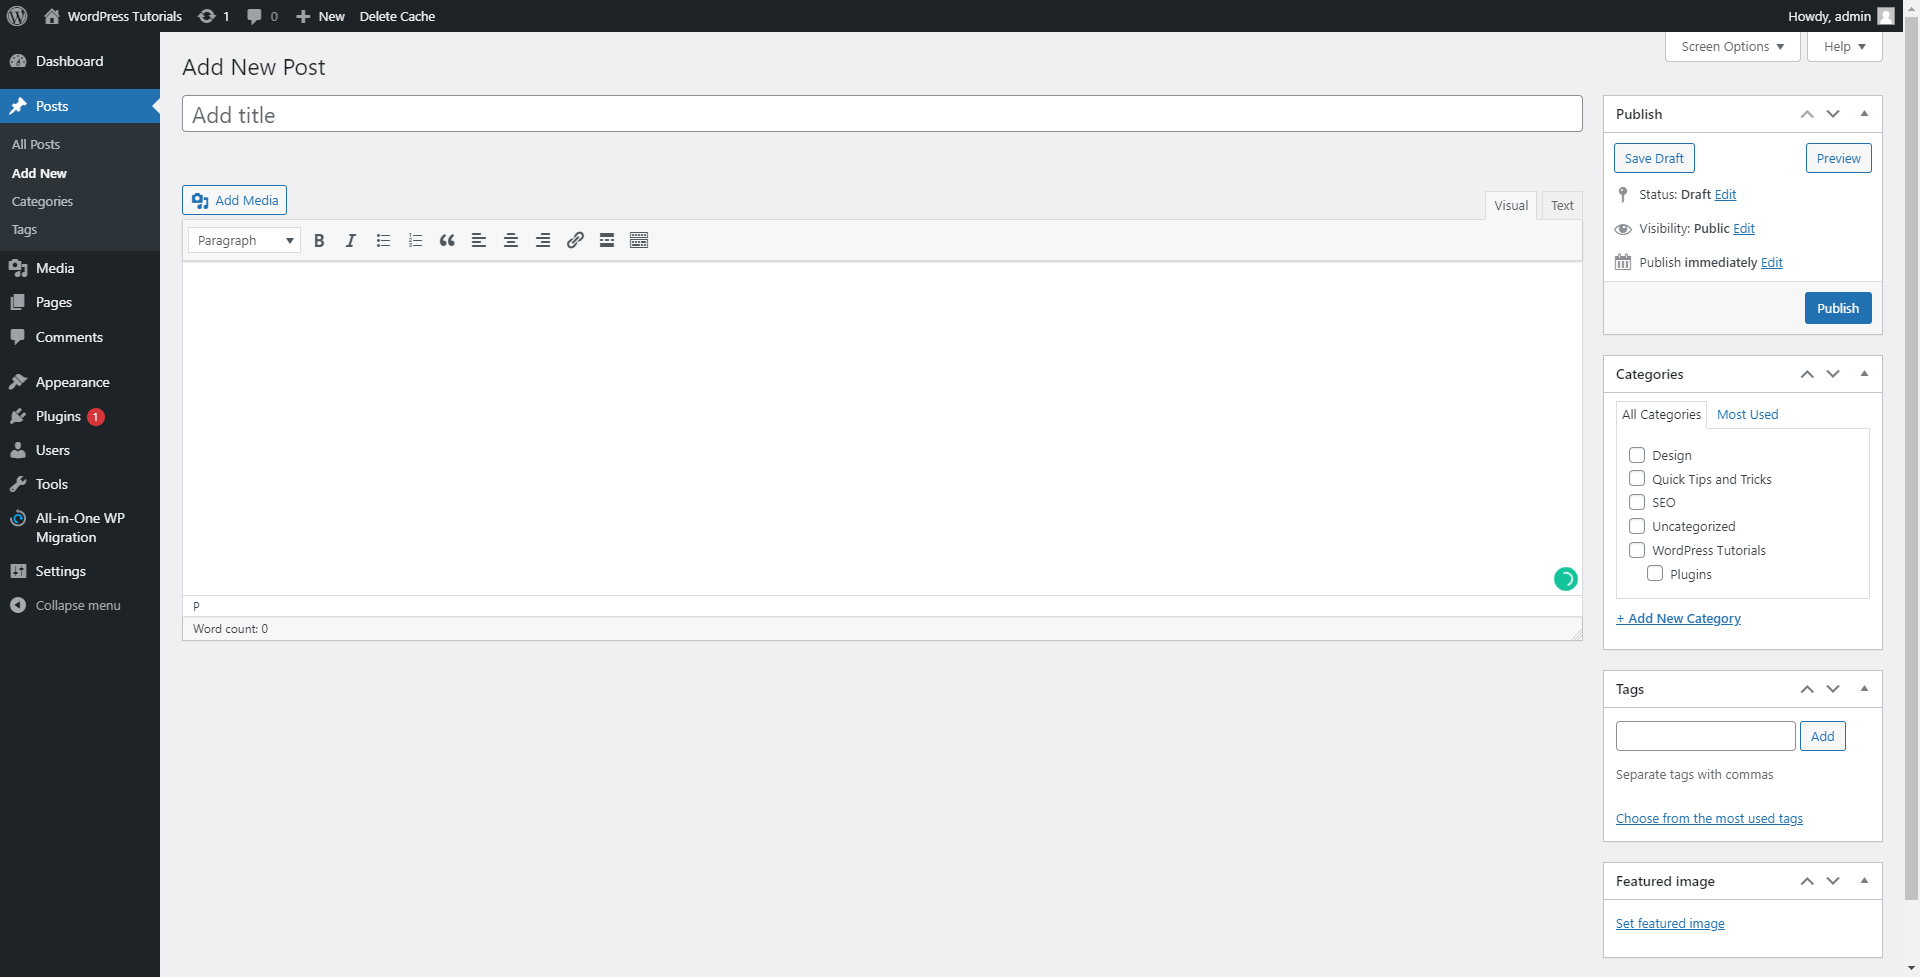
This will open the Article-creation panel. It looks like this:
Now, let’s get familiar with the interface, shall we?
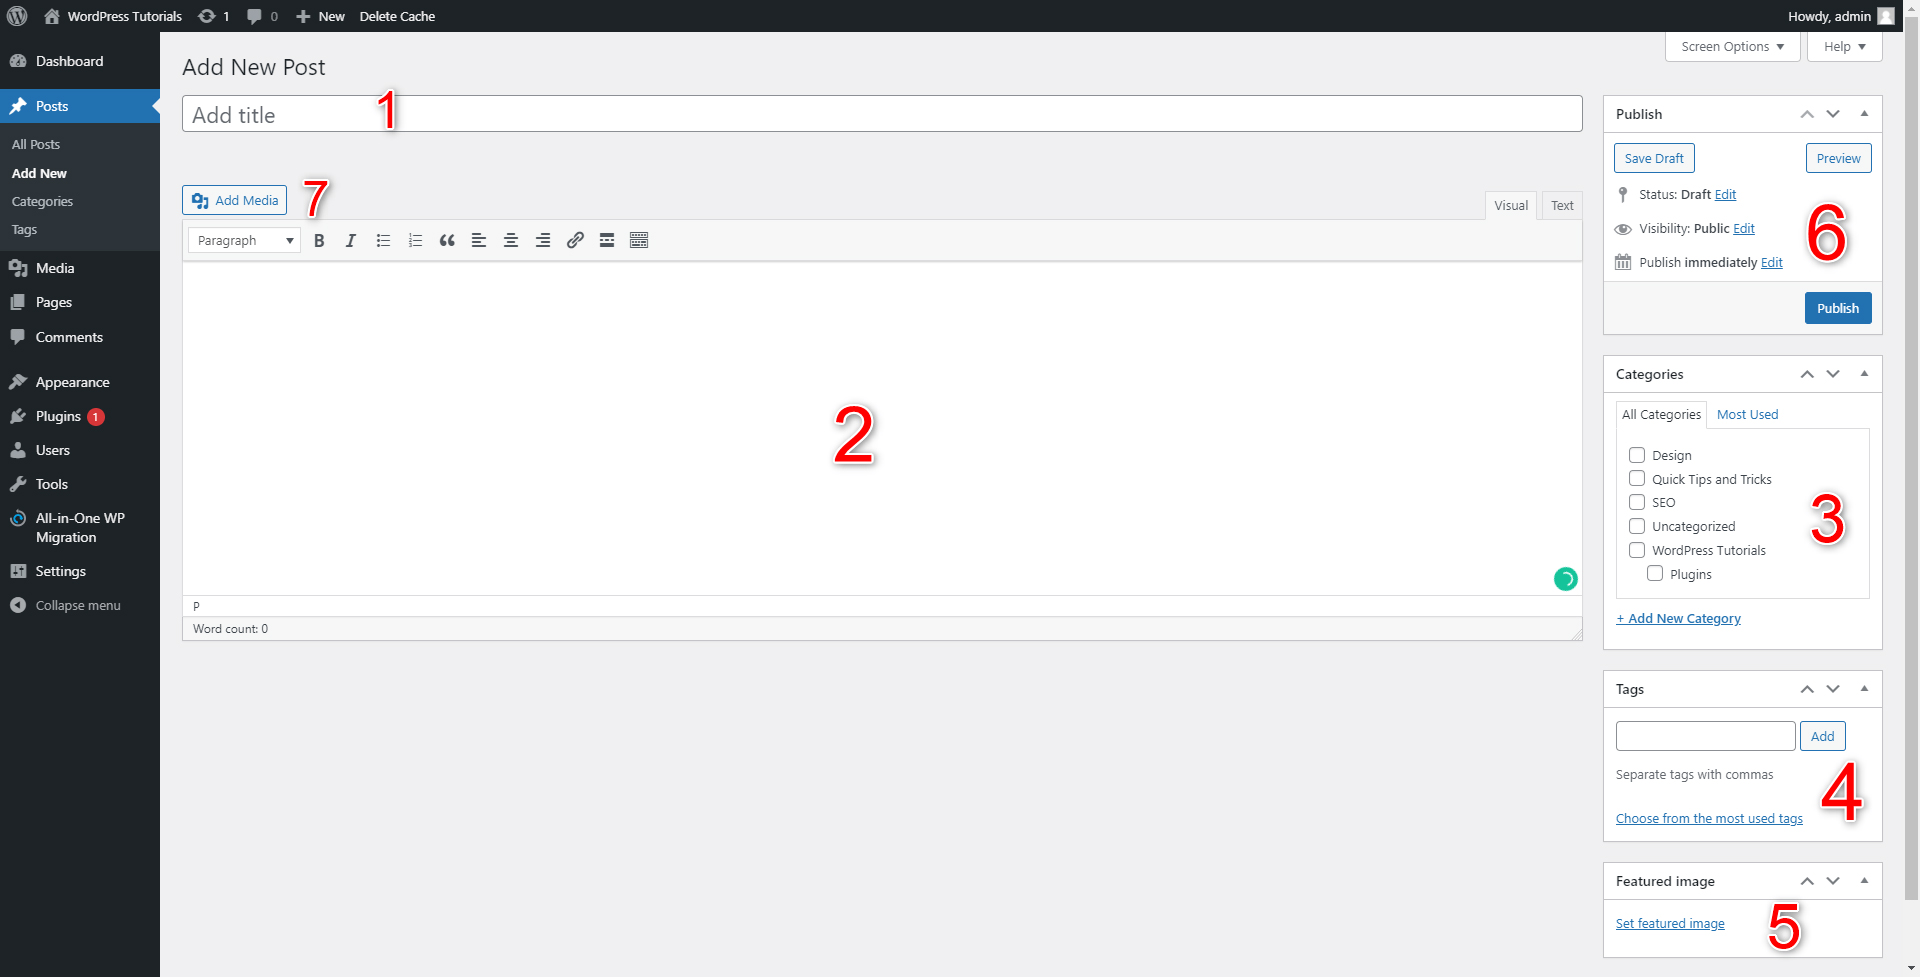
- Here you will add your article’s title. The name should be catchy and, if possible, contain a keyword. This will improve your SEO rankings.
- This is the place where your text will be contained. WordPress comes with numerous tools to edit and modify it – you are able to use Italics, bolding, paragraphs, paragraph subheading, images, links, and tons of other neat features.
- This is the panel with which you are instantly available to sort your article in a chosen Category. Handy, right?
- This is the Tags panel – where you can add tags to your article
- The Featured Image box enables you to choose an image that will become your article’s icon later in the process.
- The Publish Panel lets you publish the article right away, save it as a draft to work on it later, or schedule the publication for later.
- The Add Media button allows you to easily and quickly include images in your article. This is a quite handy feature, as the right image can make the article look even better and more appealing to your readers.
Now, the only thing that remains is to come up with an idea about your first article and write it down!
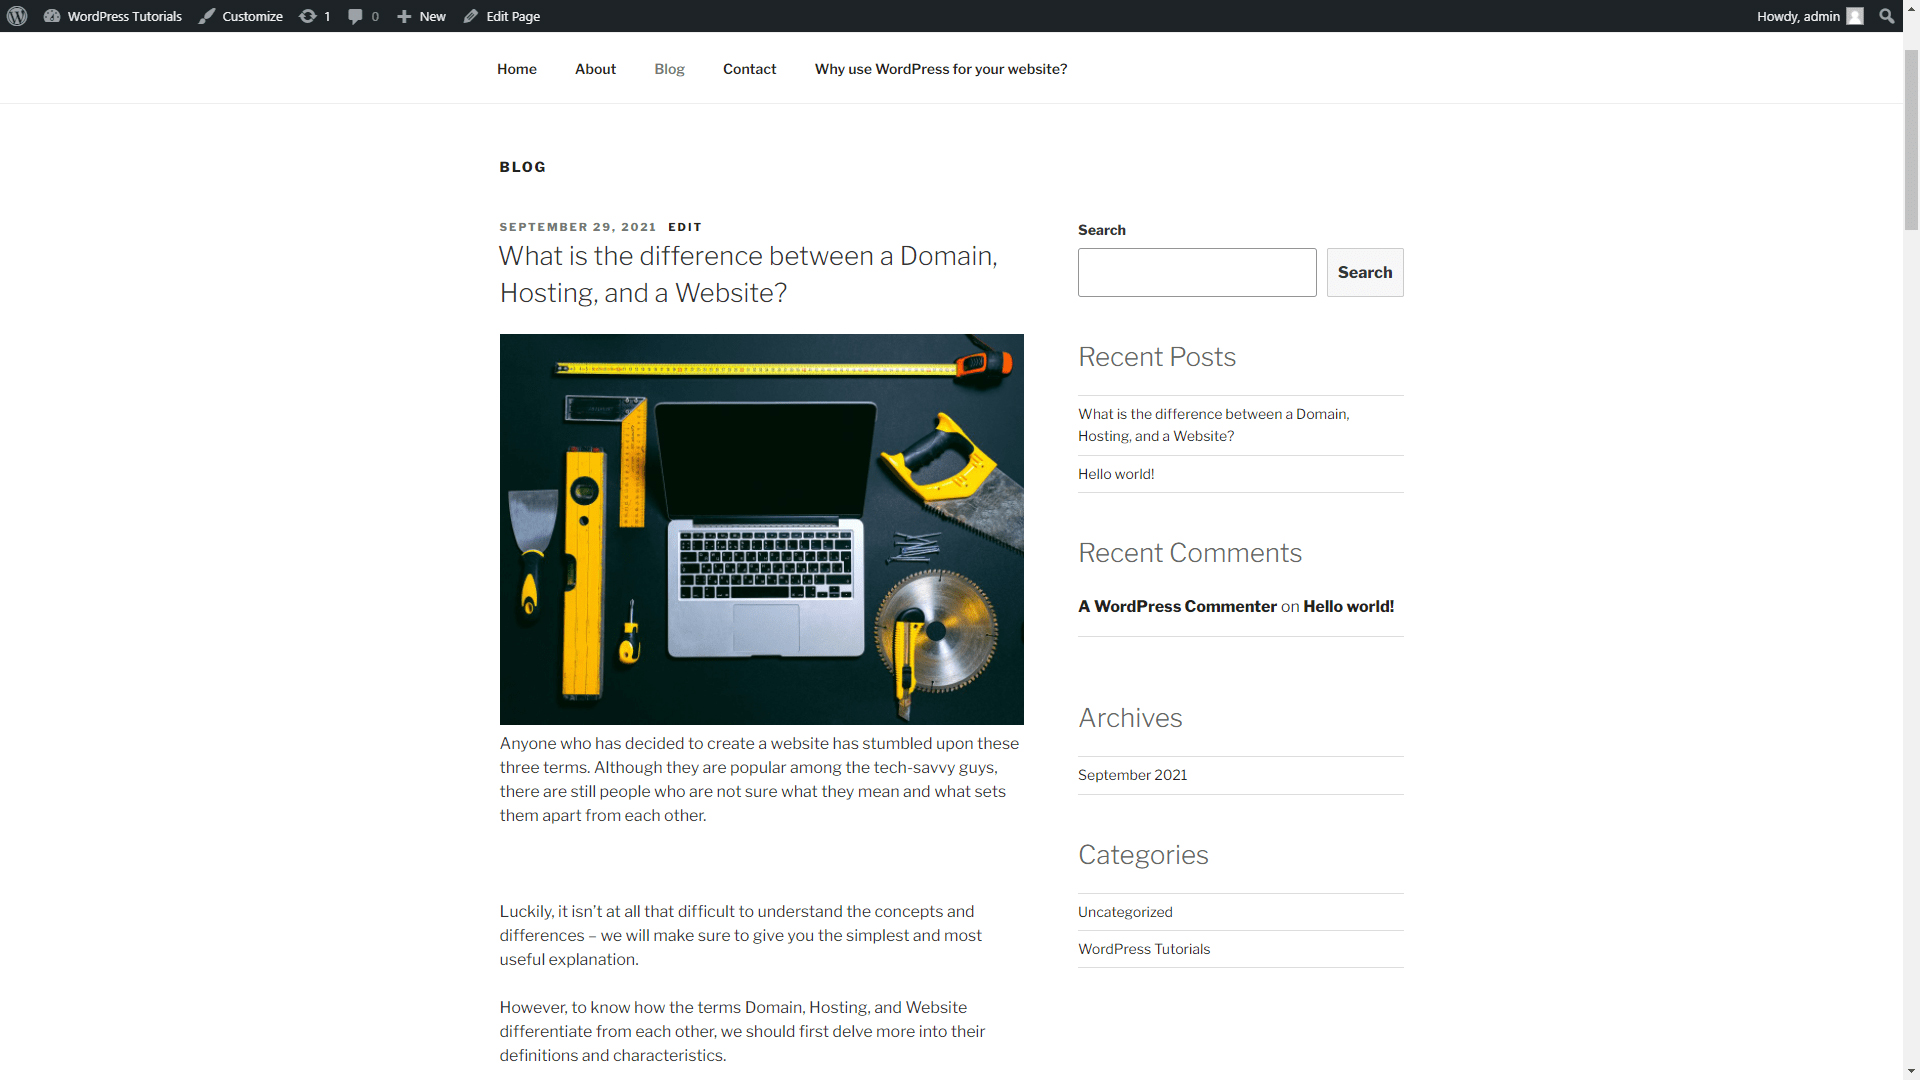
In our case, the first article that we will write down and publish shall be called “What is the difference between a Domain, Hosting, and a Website?”
Here’s what it looks like:

Pretty blank, right? Don’t worry, we will make a few amendments to make it look a bit better:
- First, separate the text into paragraphs.
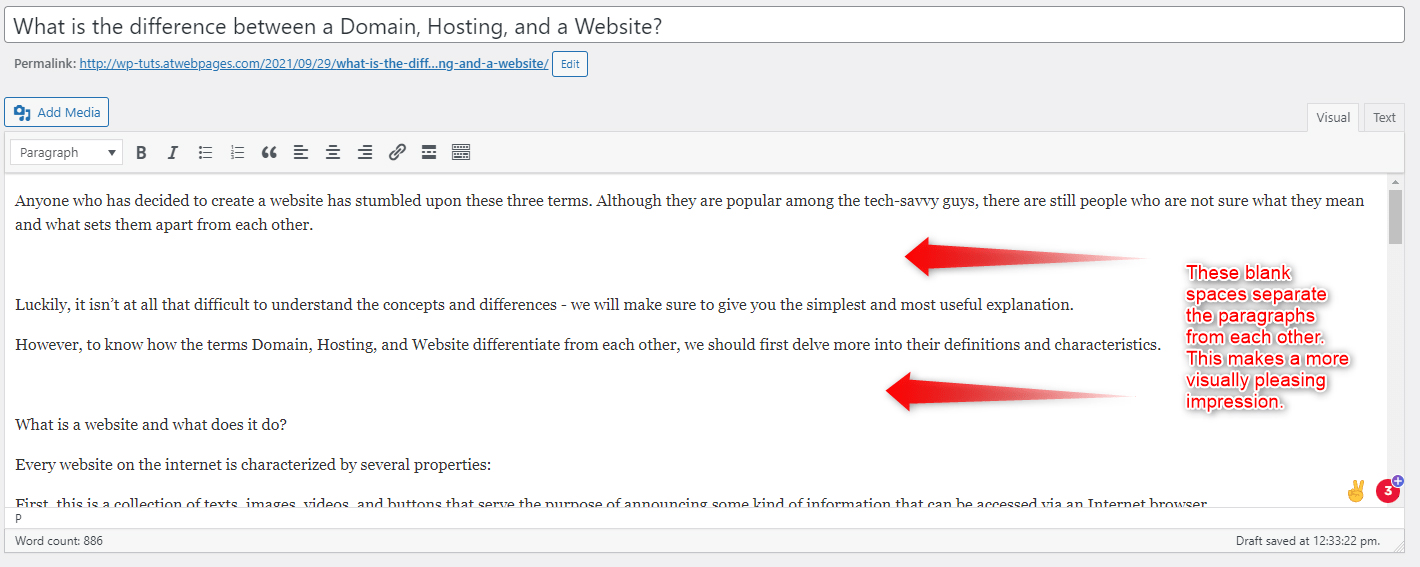
This is quite easily achievable, as you should only add a blank space between two paragraphs:
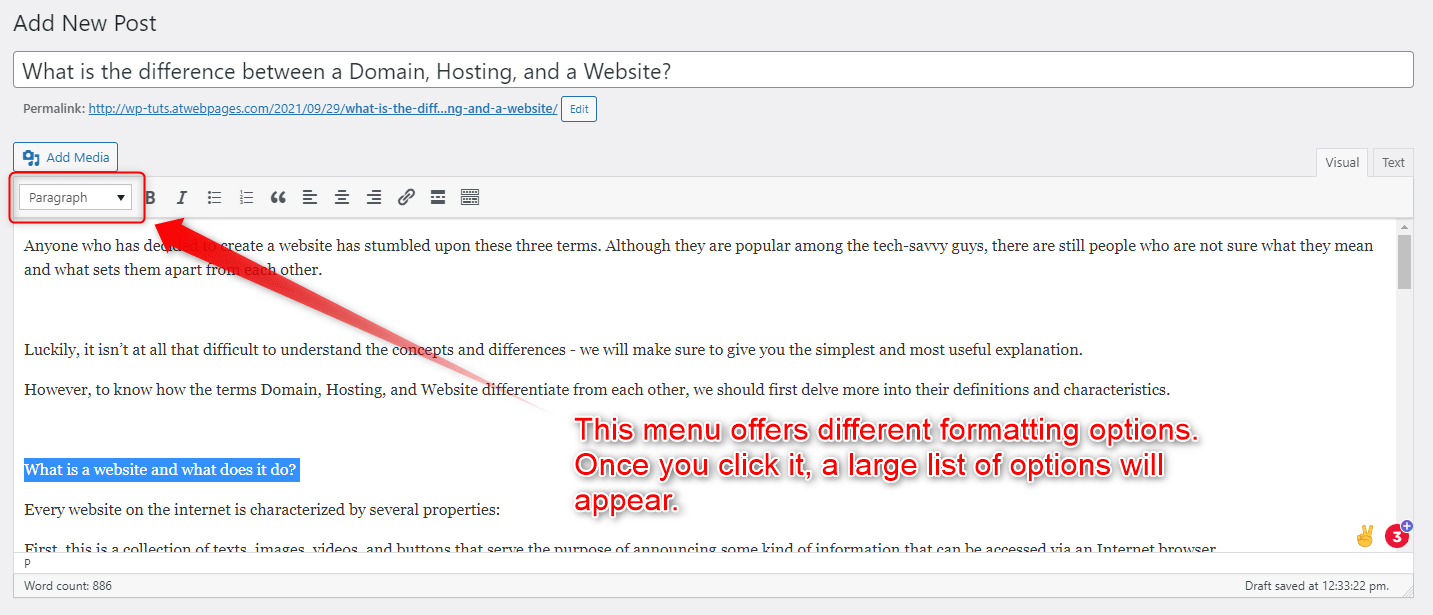
- Add subheadings for each paragraph
To do so, select the text that should become your Subheading and format it to become a Heading 2 text:
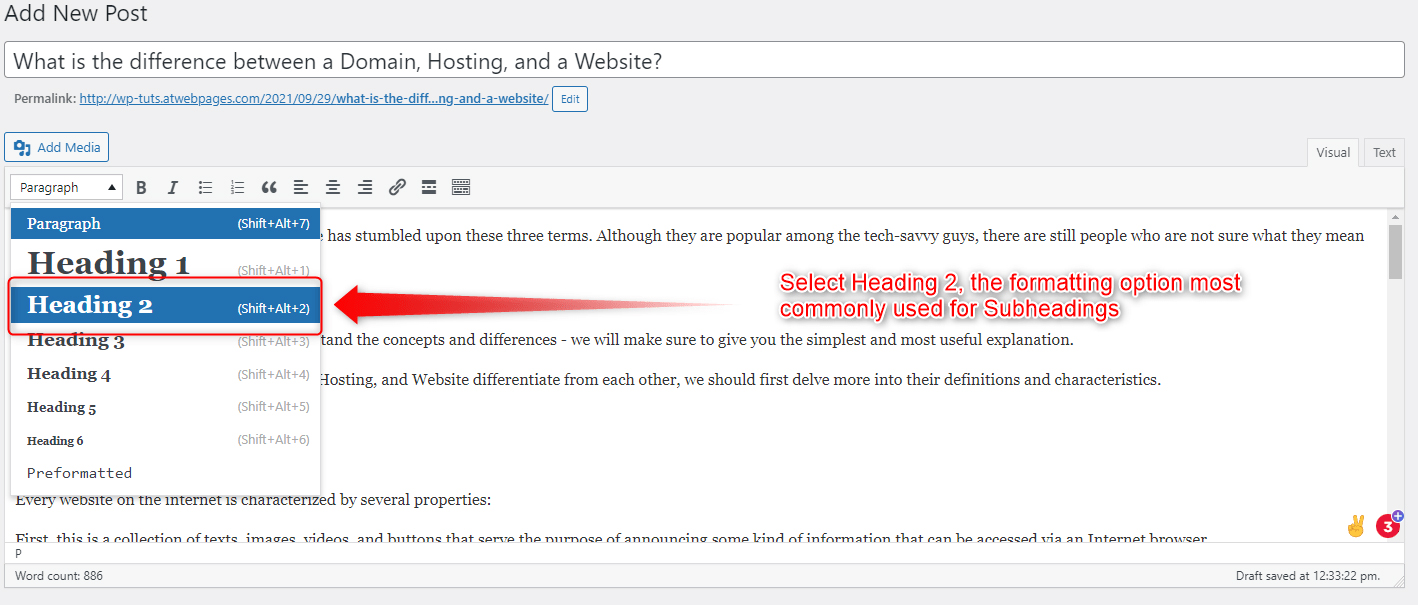
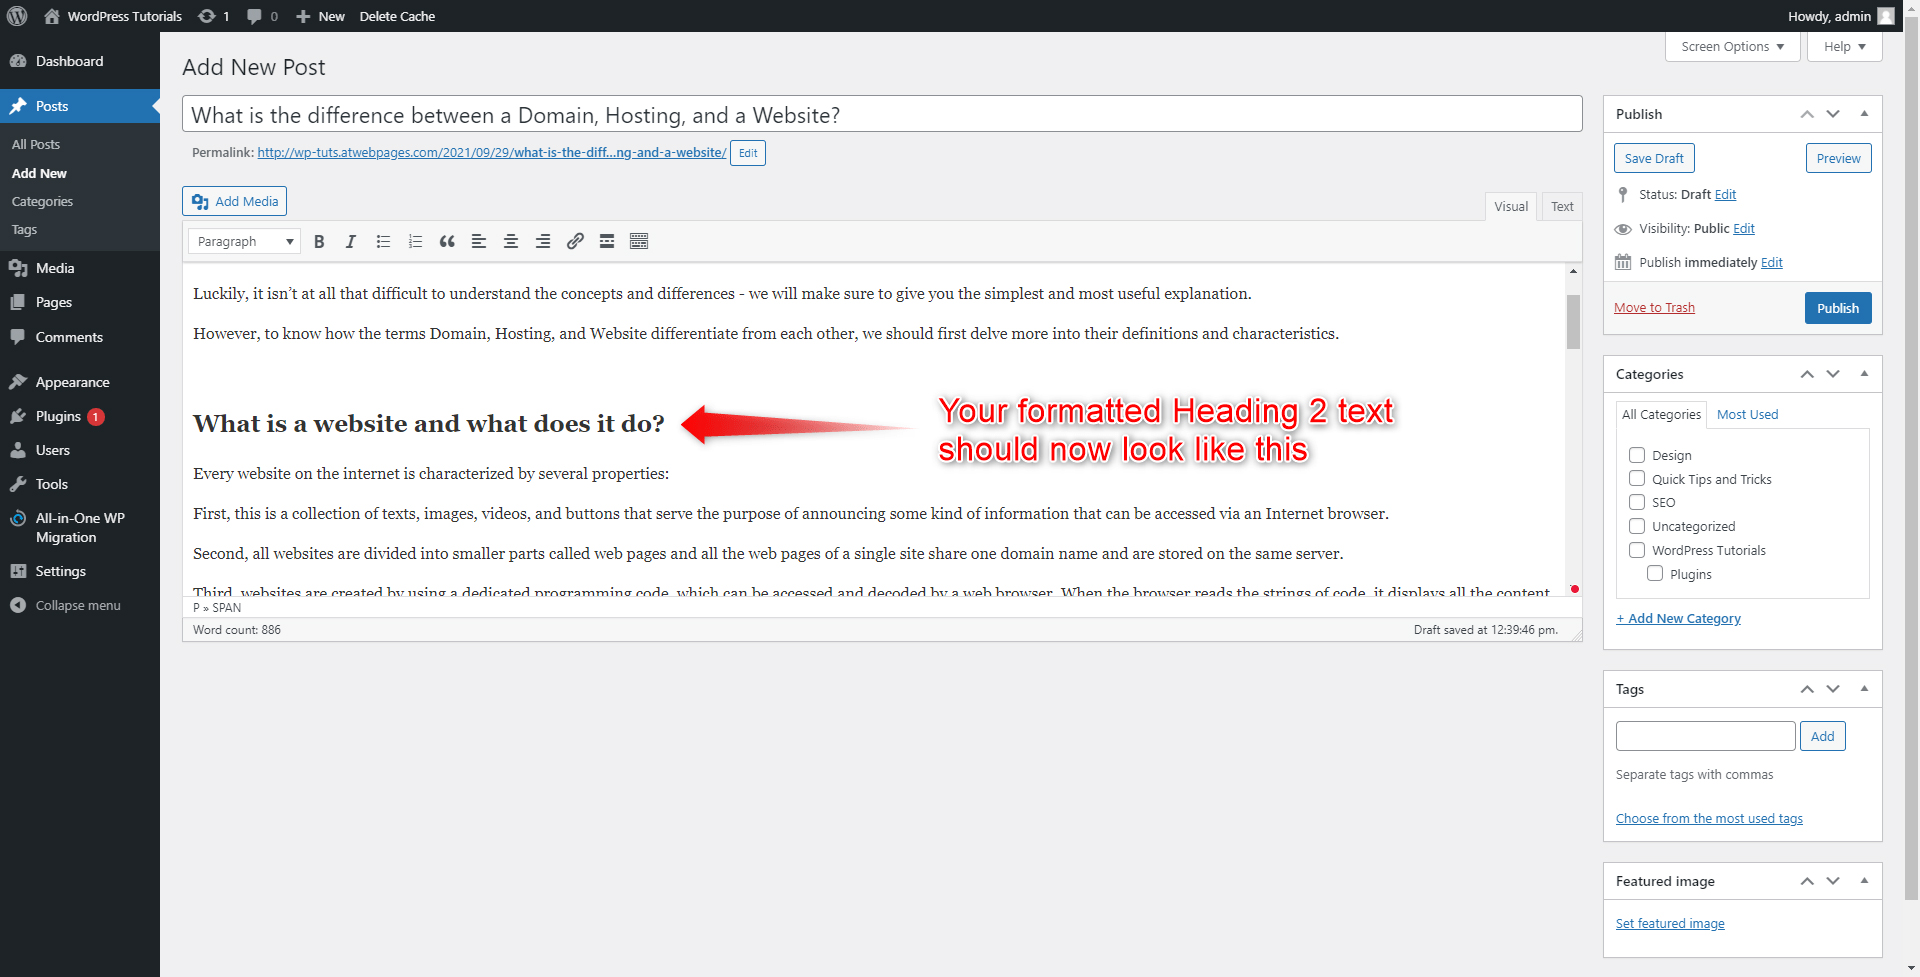
Do so for all your Paragraph Subheadings.
- Include images
Usually, a single image will make a great difference, but we will go even further and add several! To be able to include images in our article, we should first upload some from our computer. To do so, simply click on the Add Media button above the main text of your article:
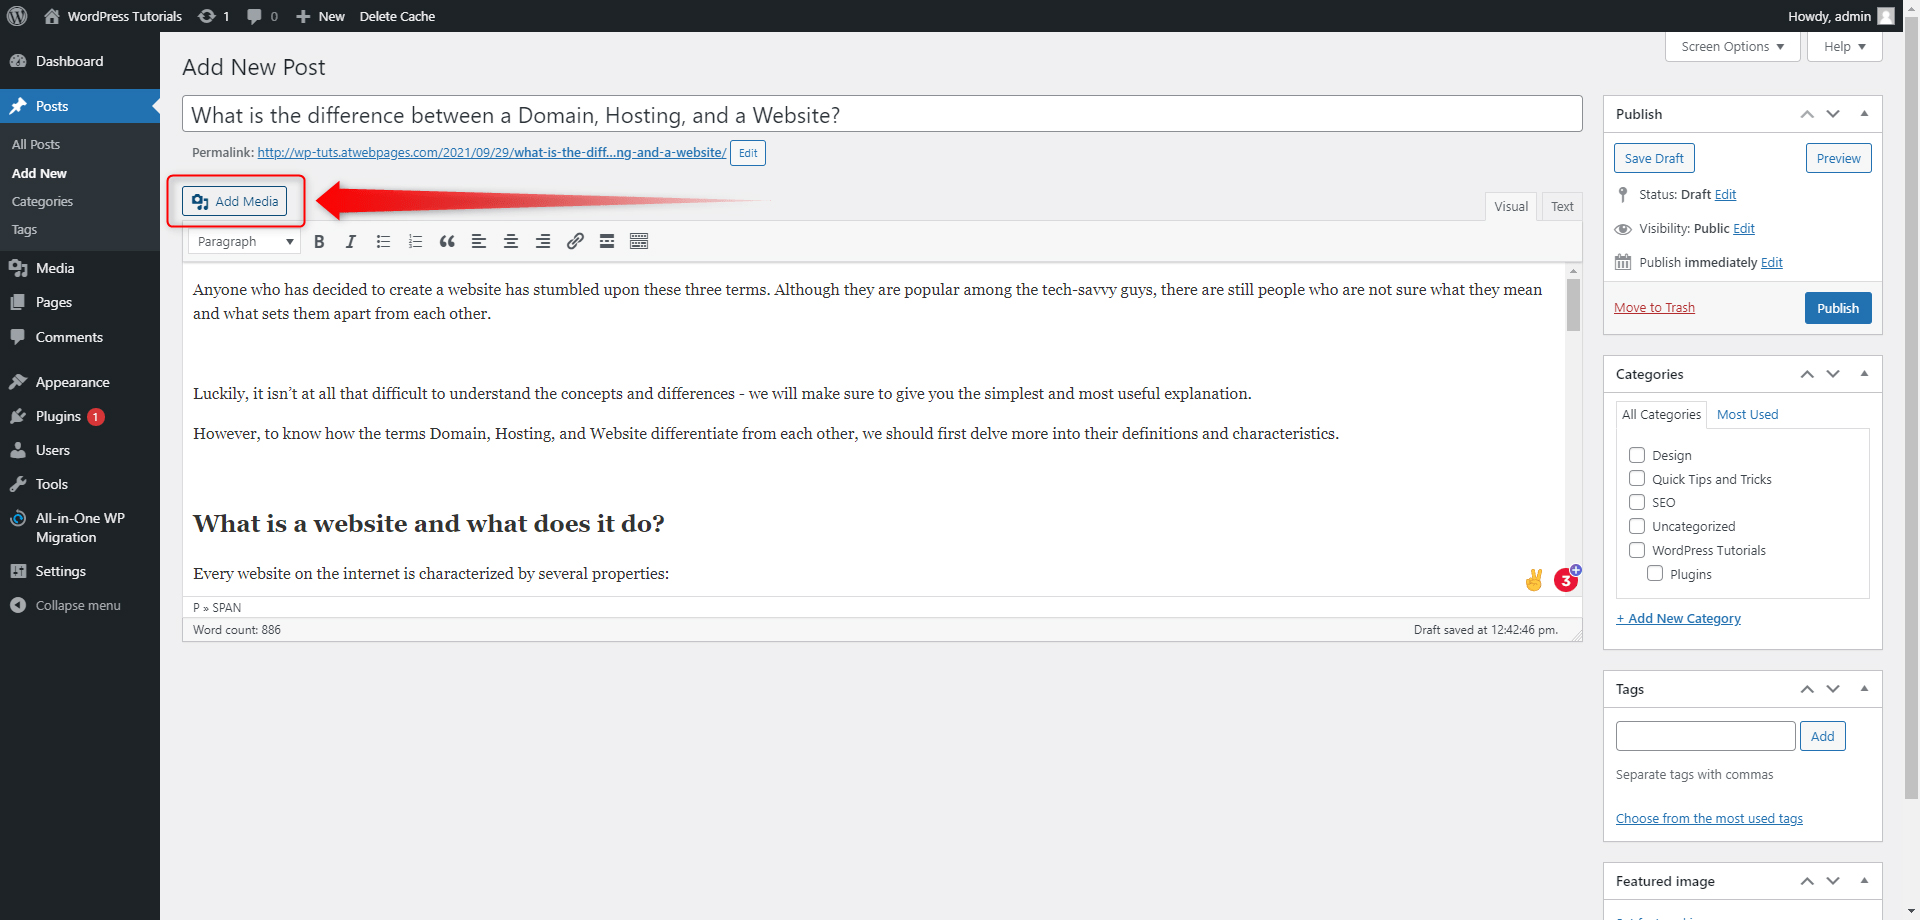
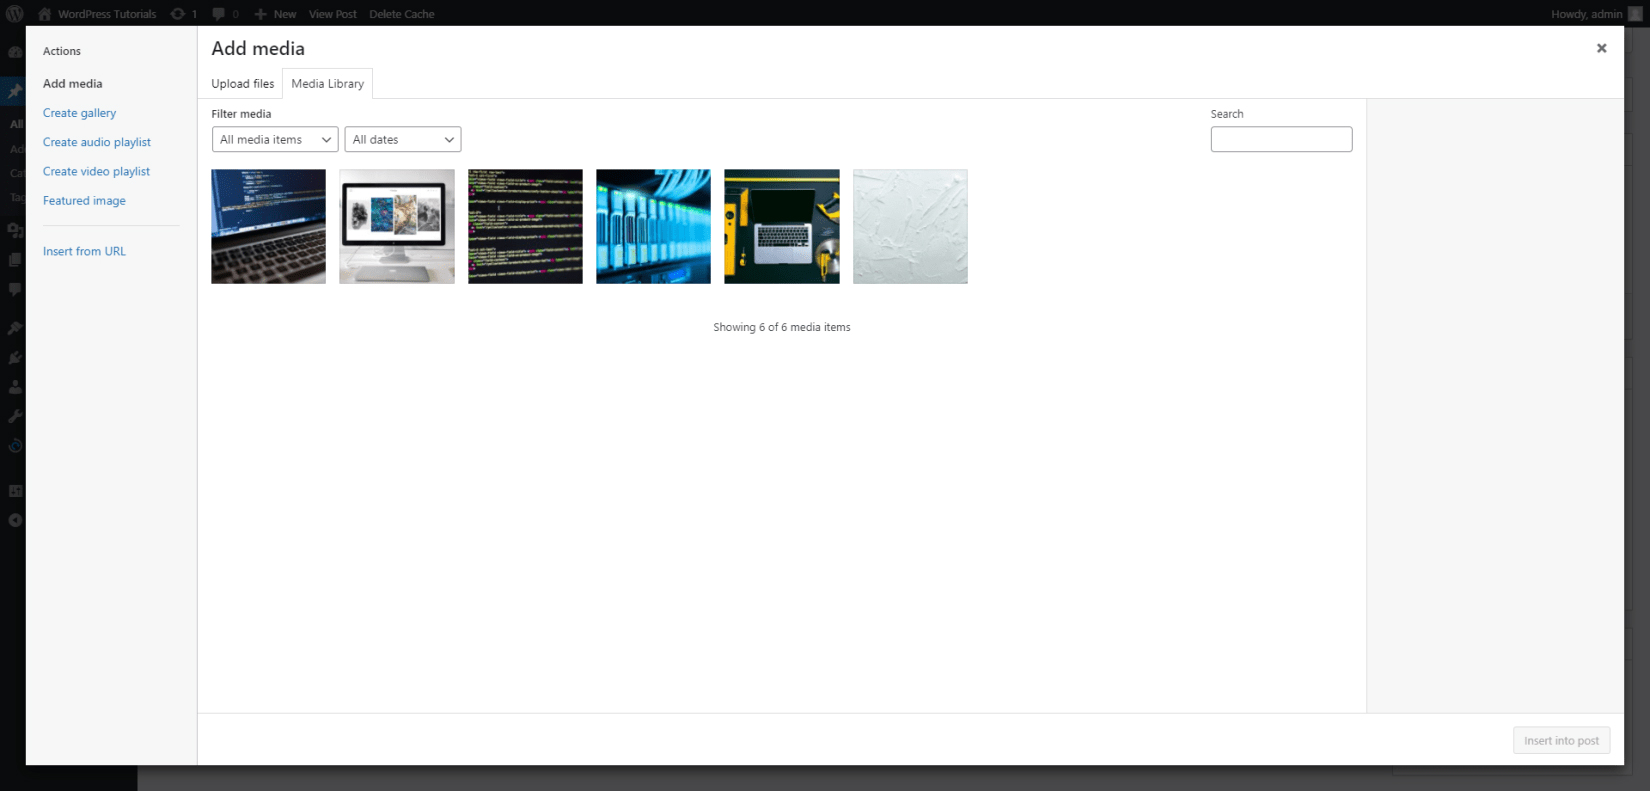
This will open your Media Library. Notice that there are all the pictures you’ve uploaded in WordPress. In our case, we have uploaded only one, which we used for our website’s background. While in Media Library, click on Upload Files:

Now, click on the Select Files button and find your images on your Computer:

Once you select all the images that you wish to include in your article, click Open.
You should be able to see all the uploaded images immediately:
Now, let’s incorporate these into our article. For this demonstration, we will include one at the top of the text and four more just below each Paragraph Subheading.
Of course, you can place the images anywhere you wish – try out different positions and have some fun while doing it! If you wish to see what your article looks like for your visitors before publishing it, simply click on the Preview button in the Publish section. This would show you how your layout turned out to be without actually publishing the piece.
See also:
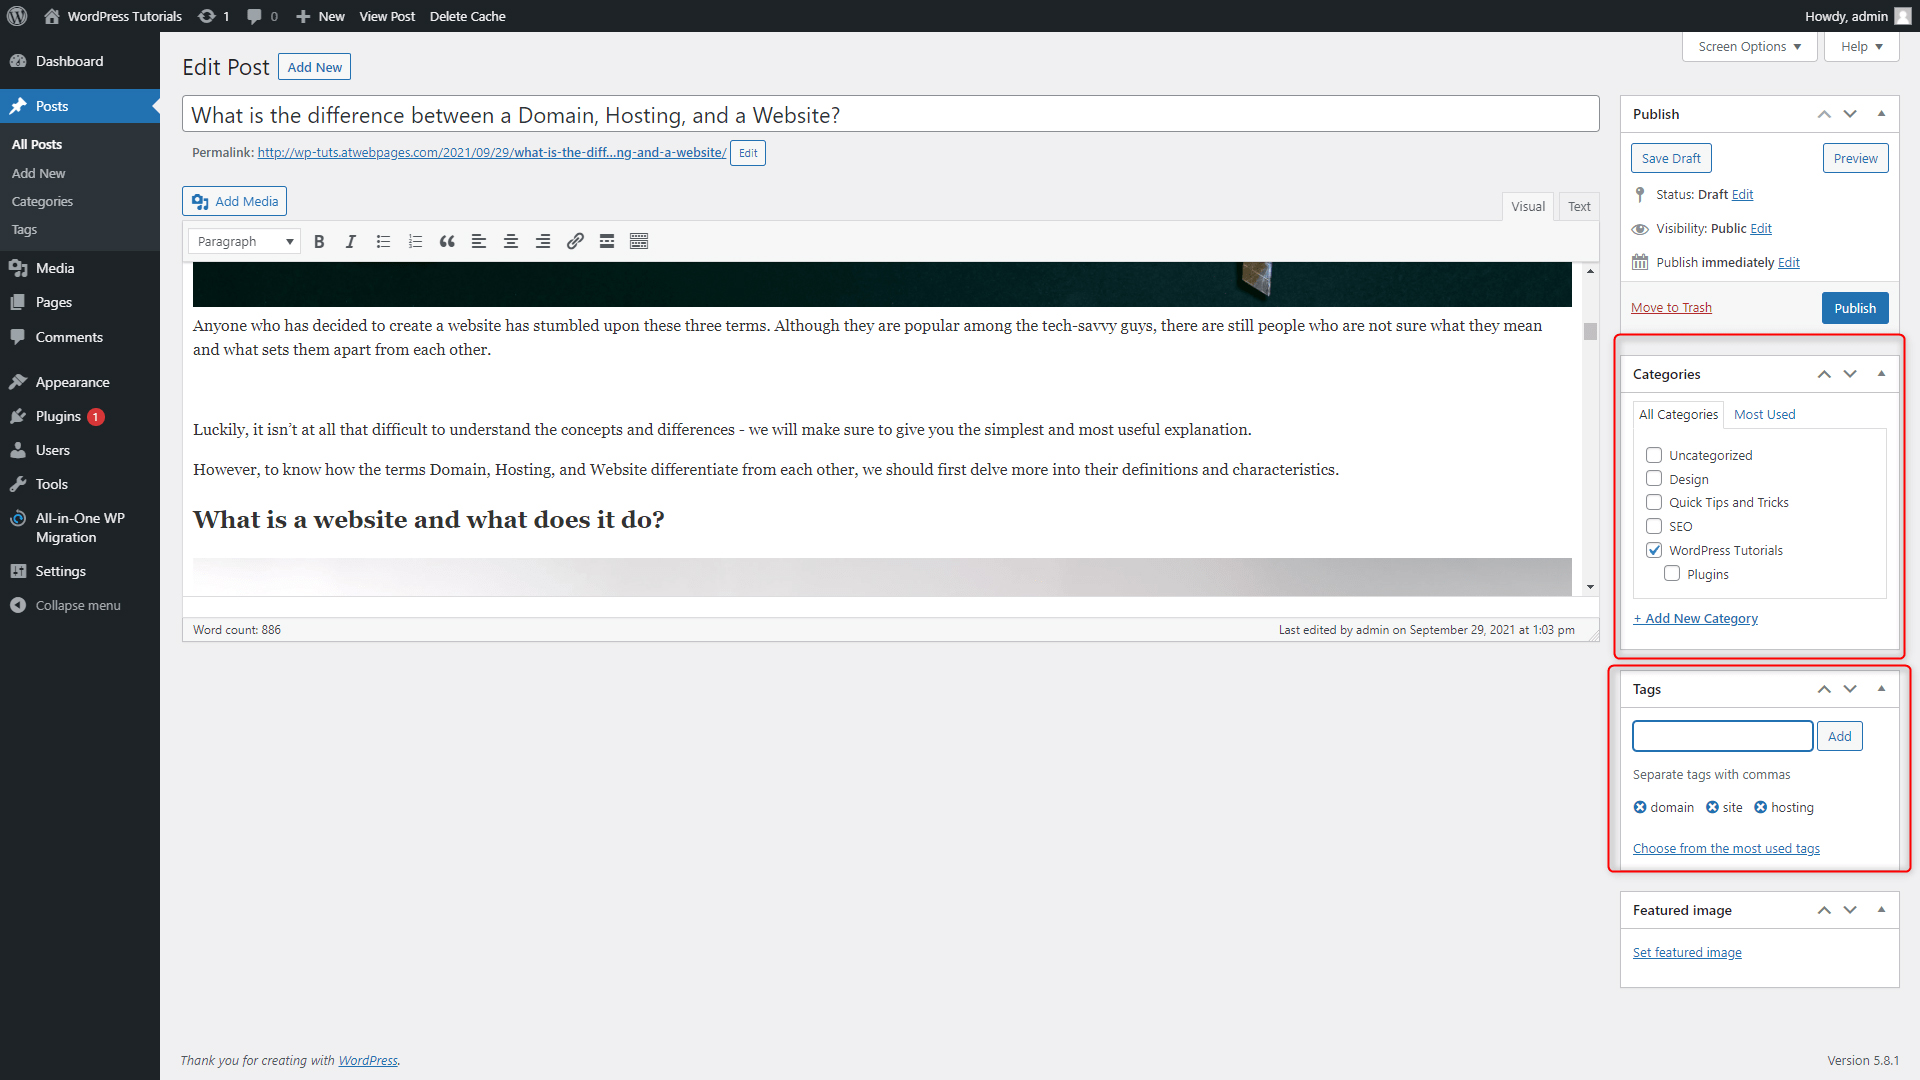
- Add the article in any of your categories and include tags:
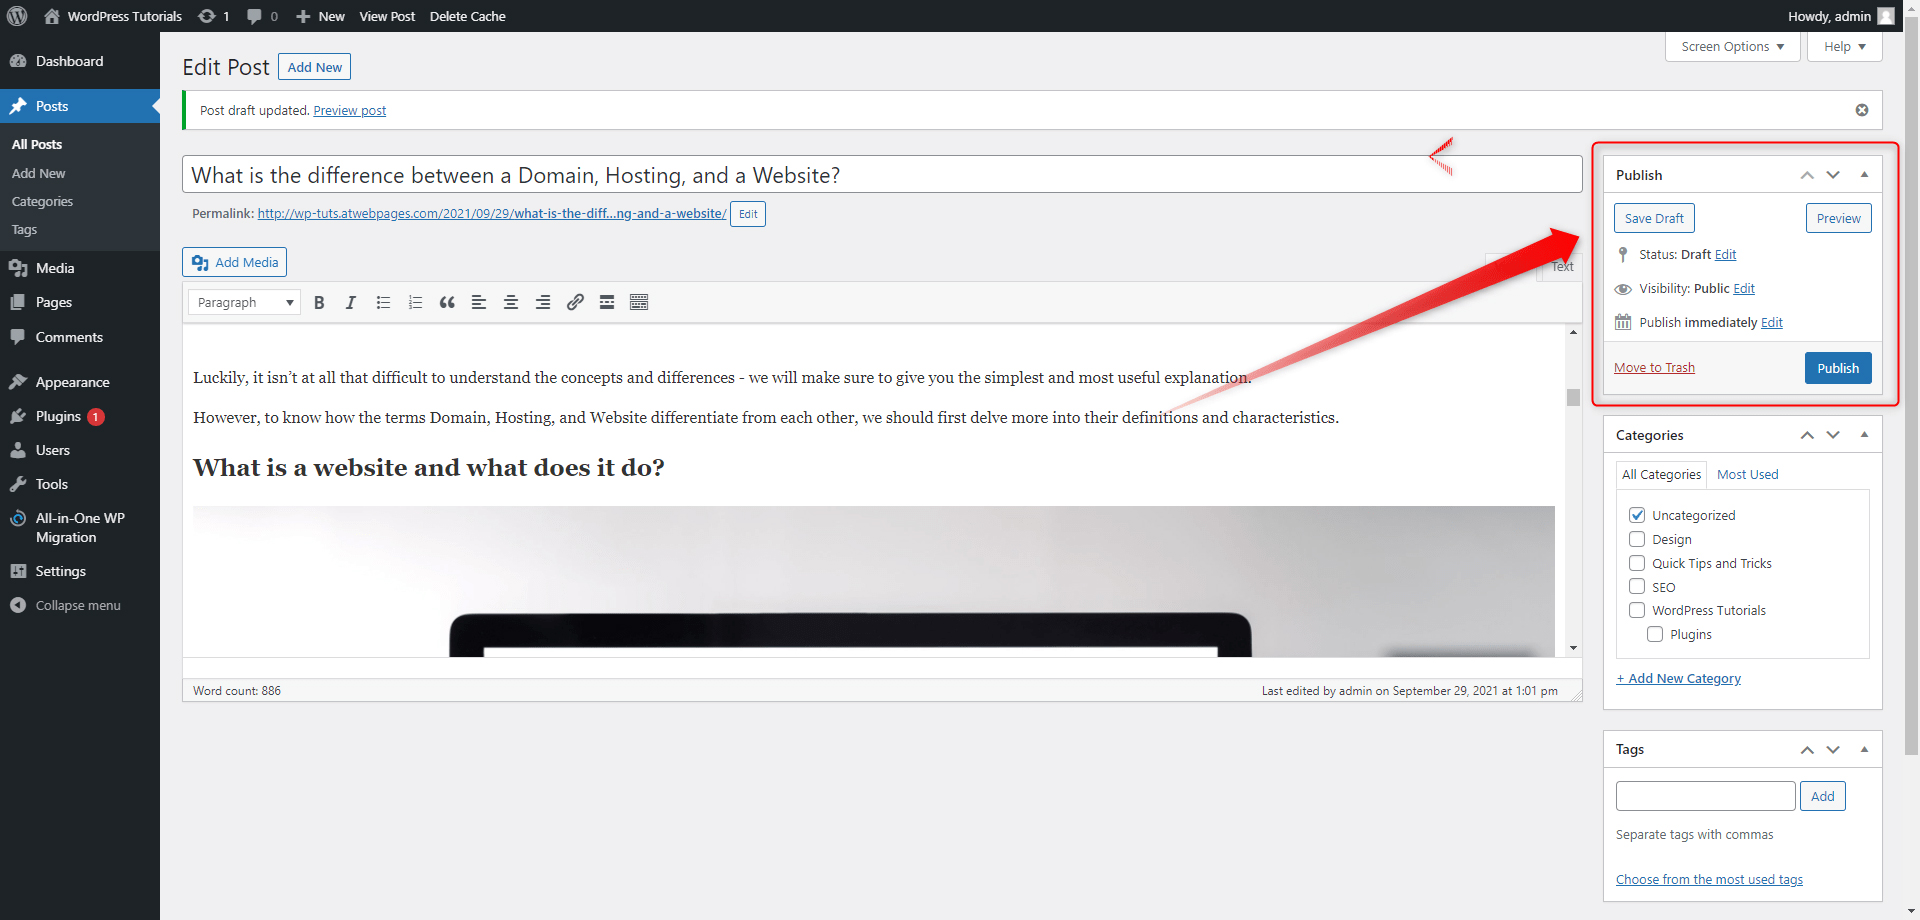
Experiment as much as possible, and when you think you are completely satisfied with your article’s content and layout, hit that Publish button!
Congratulations, you now know how to edit and publish your articles!
Here’s what our first article looks like:
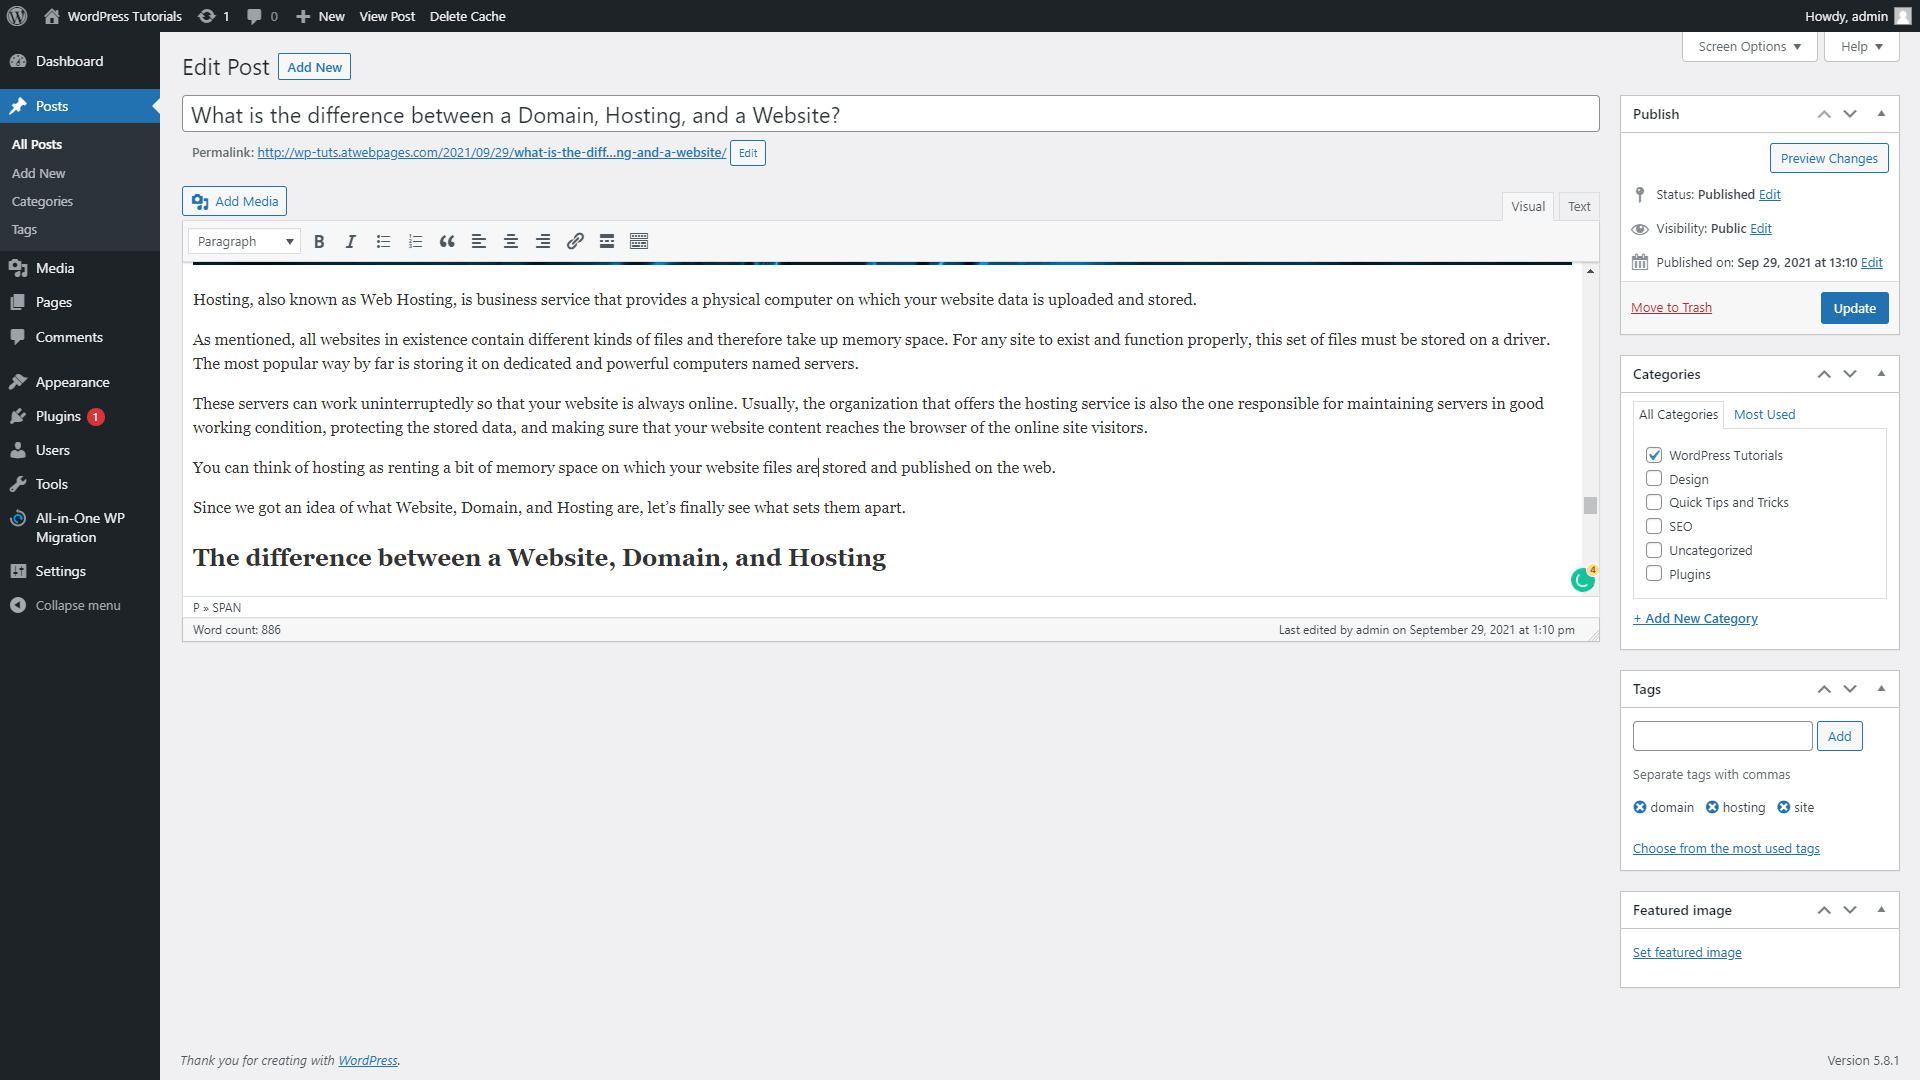
Should you happen to decide to edit your page in any way, simply head to All Posts and hover your cursor over the name of the article you wish to tweak, and click on Edit:
This will open the editorial menu of the article:
Once you are satisfied with all the changes, click on the Update button at the top right corner:
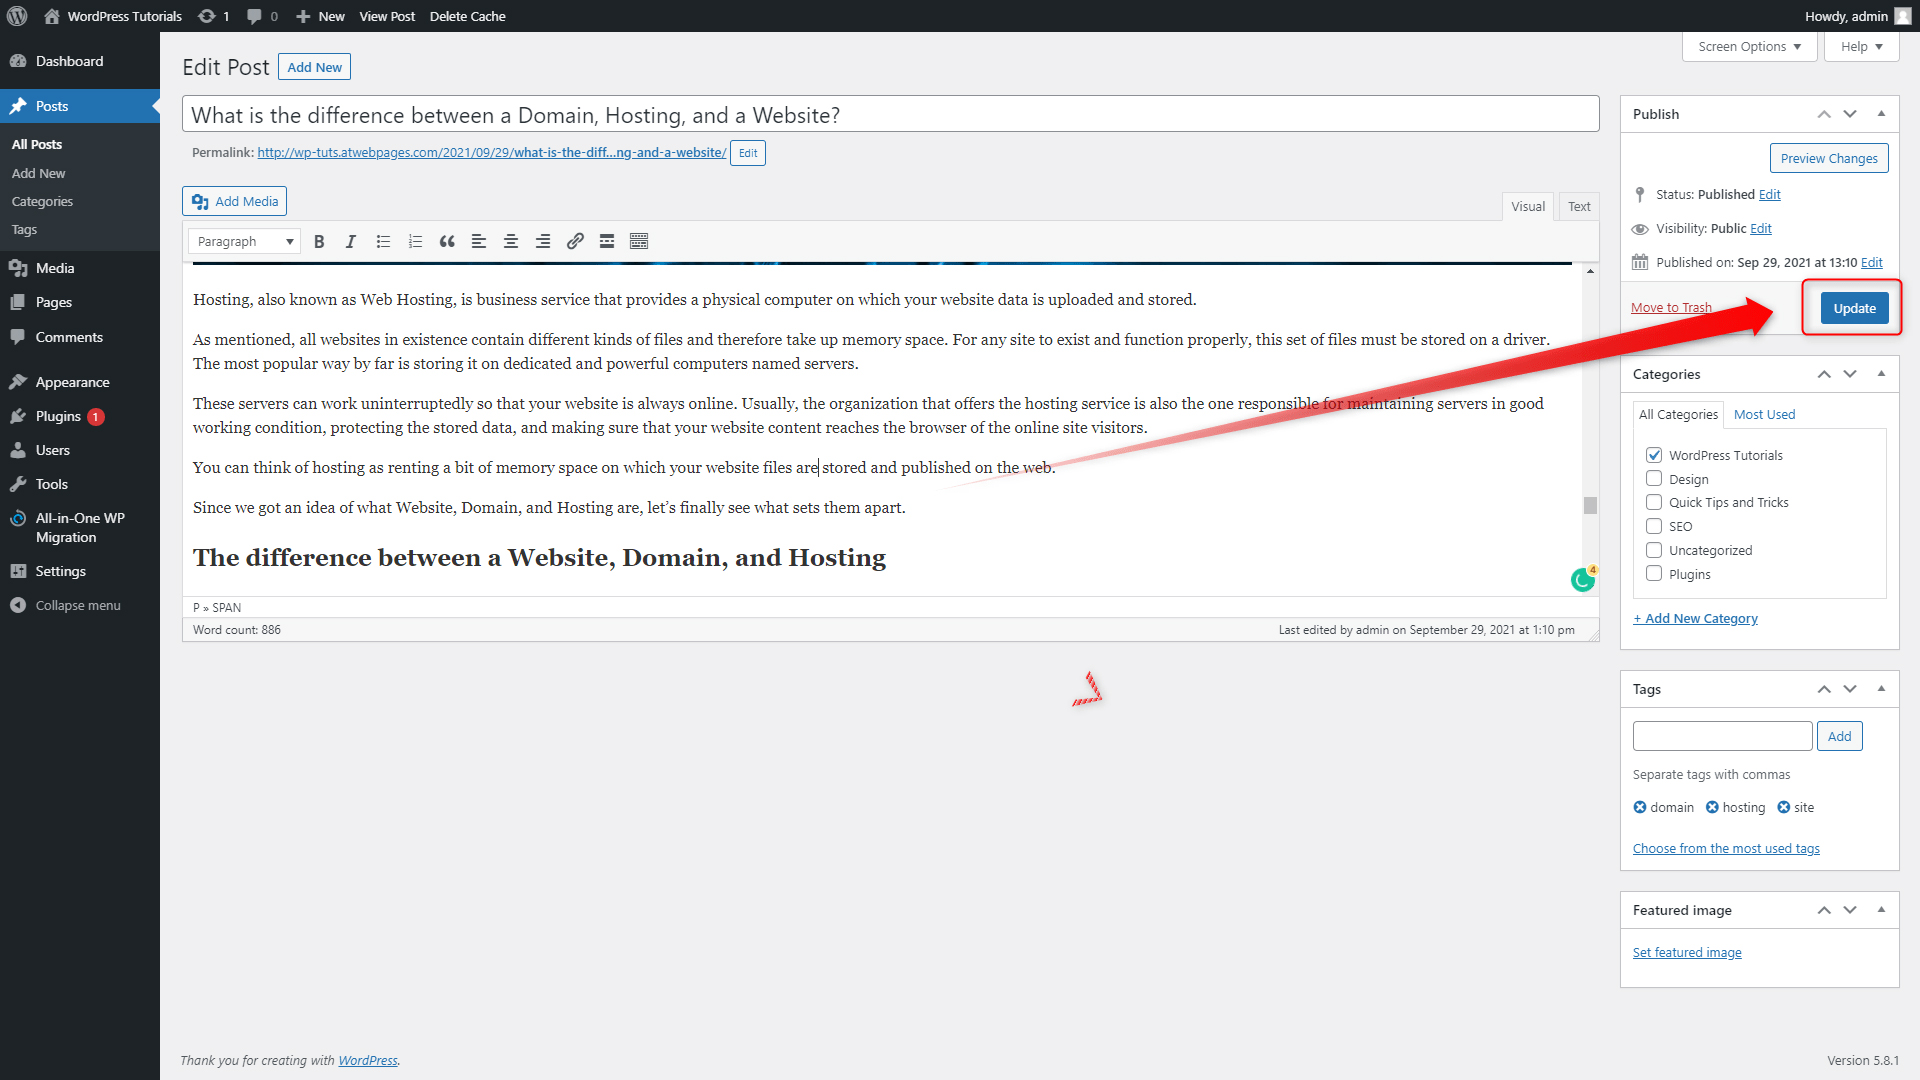
This will apply to all the changes you’ve just made!
ZETTAHOST WordPress Tutorials
Along with this comprehensive guide, ZETTAHOST maintains a rich blog section with tons of useful WordPress articles. You can also check out our comprehensive hosting encyclopedia section. Check out both and learn how to enhance your online presence today!
See also:
ZETTAHOST not only provides reliable hosting, domains, and website security services but can also become your trustworthy partner in the online world. Don’t hesitate to contact us and start a new journey today!
Conclusion
Building a website with WordPress is quite a rewarding experience. You not only can control each phase of the process but also you don’t need to delve into too much technicality or learning informatics.
With the platform’s intuitive design, you can quickly start a blog, or a gallery website, or enhance your business by solidifying your online presence with a beautiful and functional business website, or an e-commerce platform.
In fact, possibilities are quite abundant, and using WordPress makes it only easier to achieve your online goals.
The only way to truly master WordPress is by constantly tweaking your site and experimenting with it. The most efficient way to learn how the CMS works is by trying out new things. So, don’t be shy and tweak as many options as possible and experiment with the final result of your site! In fact, it is best to try and create several websites and see what works and what doesn’t for your preferences and audience.
So, here you have it! A completely functional website, constructed from the ground up.