Installing WordPress sets the beginning of the website crafting journey. Although this is a thrilling moment for many of us, it is also highly likely that you might feel overwhelmed by the endless possibilities of the platform. If this is the case, then this article is just for you!
Since we have already covered the WordPress Basics, it is high time we shared some tips on what to do first when you have finally accessed your Admin Panel.
In this article, you will read about some of the WordPress features that can instantly be modified so that they can fully suit your preferences. In the following sections, you will find out more about how to quickly tweak your website’s tagline, and permalink structure, as well as a comment section, should you add one.
Furthermore, you will also get a glimpse of some handy homepage settings, and some neat tips on how to get the most out of the WordPress options. In fact, this article is a great example of what you can do when you finish building your website with our comprehensive WordPress guide.
16 Things You Need to Do Right After You’ve Installed WordPress
When you install the platform, WordPress launches with some pre-defined settings. Although this might seem handy for the beginner, it is advisable to have a close look at these and make an adjustment or two, because this will ensure that you will get the most out of your site in the long term. Within the next paragraphs, you will read about several of the easiest and yet very effective changes that you can make to your new site, even as a beginner.
Here’s a full list of the 17 things you should do:
- Get Yourself Comfortable with the WordPress
- Customize Your WordPress Profile
- Set Up Your Site Title & Tagline
- Upload a favicon
- Set Your Timezone, Date, and Time Format
- Change the Default Permalink Structure
- Configure Your Comment Section
- Add Your Gravatar
- Set Up a Homepage
- Choose and Apply a suitable WordPress Theme
- Delete Unused Themes
- Install Suitable WordPress Plugins
- Delete Unused Plugins
- Delete the Default Content
- Create a New Default Category
- Setup Your Blog Pages
1. Get Yourself Comfortable with the WordPress Admin Panel
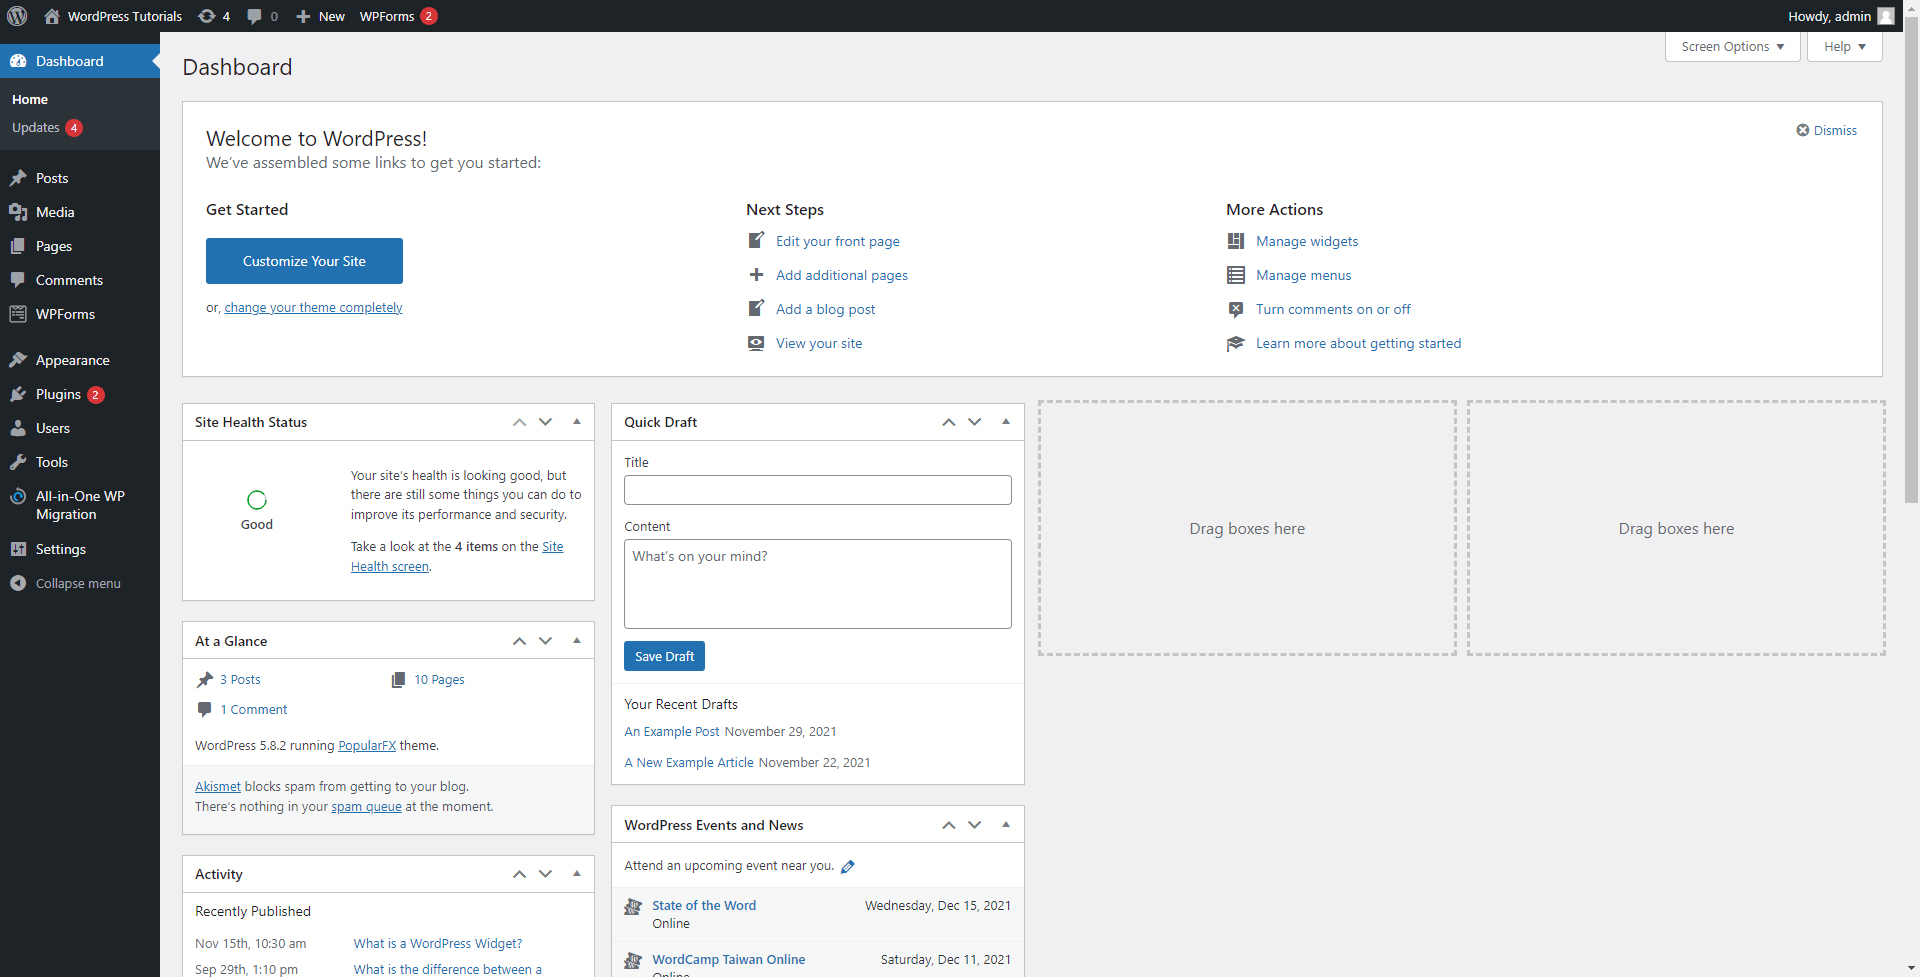
The WordPress Admin Panel, also known as the WordPress Dashboard, is the place from which you will control all of your site’s content, components, and features. Should you decide to add or remove pages, you do it via the Dashboard. You will publish your blog posts from here, as well as add some neat visuals and effects to your site. Also, you will access and adjust all the website’s settings from the Admin Panel. In fact, for every kind of change you want to make to your site, you do it from the Admin Panel. This is why it is important to get yourself comfortable with its layout and have an idea of what is what and how all of the components work together.
Although using the Dashboard might feel like a daunting task, the more you delve the more comfortable and useful the Admin Panel becomes.
One of the best ways to get used to the interface is to take your time and browse all the WordPress menus and settings at a pace comfortable for you. By doing so, you will get the overall insight into what the panel offers, what you can do, and how to access its functionalities.
For starters, you can browse these Dashboard tabs:
- Posts – the tab from which you manage your entire blog section
- Pages – from here you can create, delete and modify your pages and their content.
- Appearance – as the name suggests, from this tab you can modify the layout of your site. From here you can download and update themes, modify them, and tweak all components of your pages.
- Plugins – This is the place from where you manage your WordPress extensions. The tab allows you to browse and install WordPress Plugins, delete them, and set them up in different ways.
However, the tab that you will most likely use the most, in the beginning, is the Settings one. All the general adjustments to your site can be done from here. When you learn how to use the Dashboard, you will occasionally go back to Settings, so it is a great idea to understand how this menu works.
2. Customize Your WordPress Profile
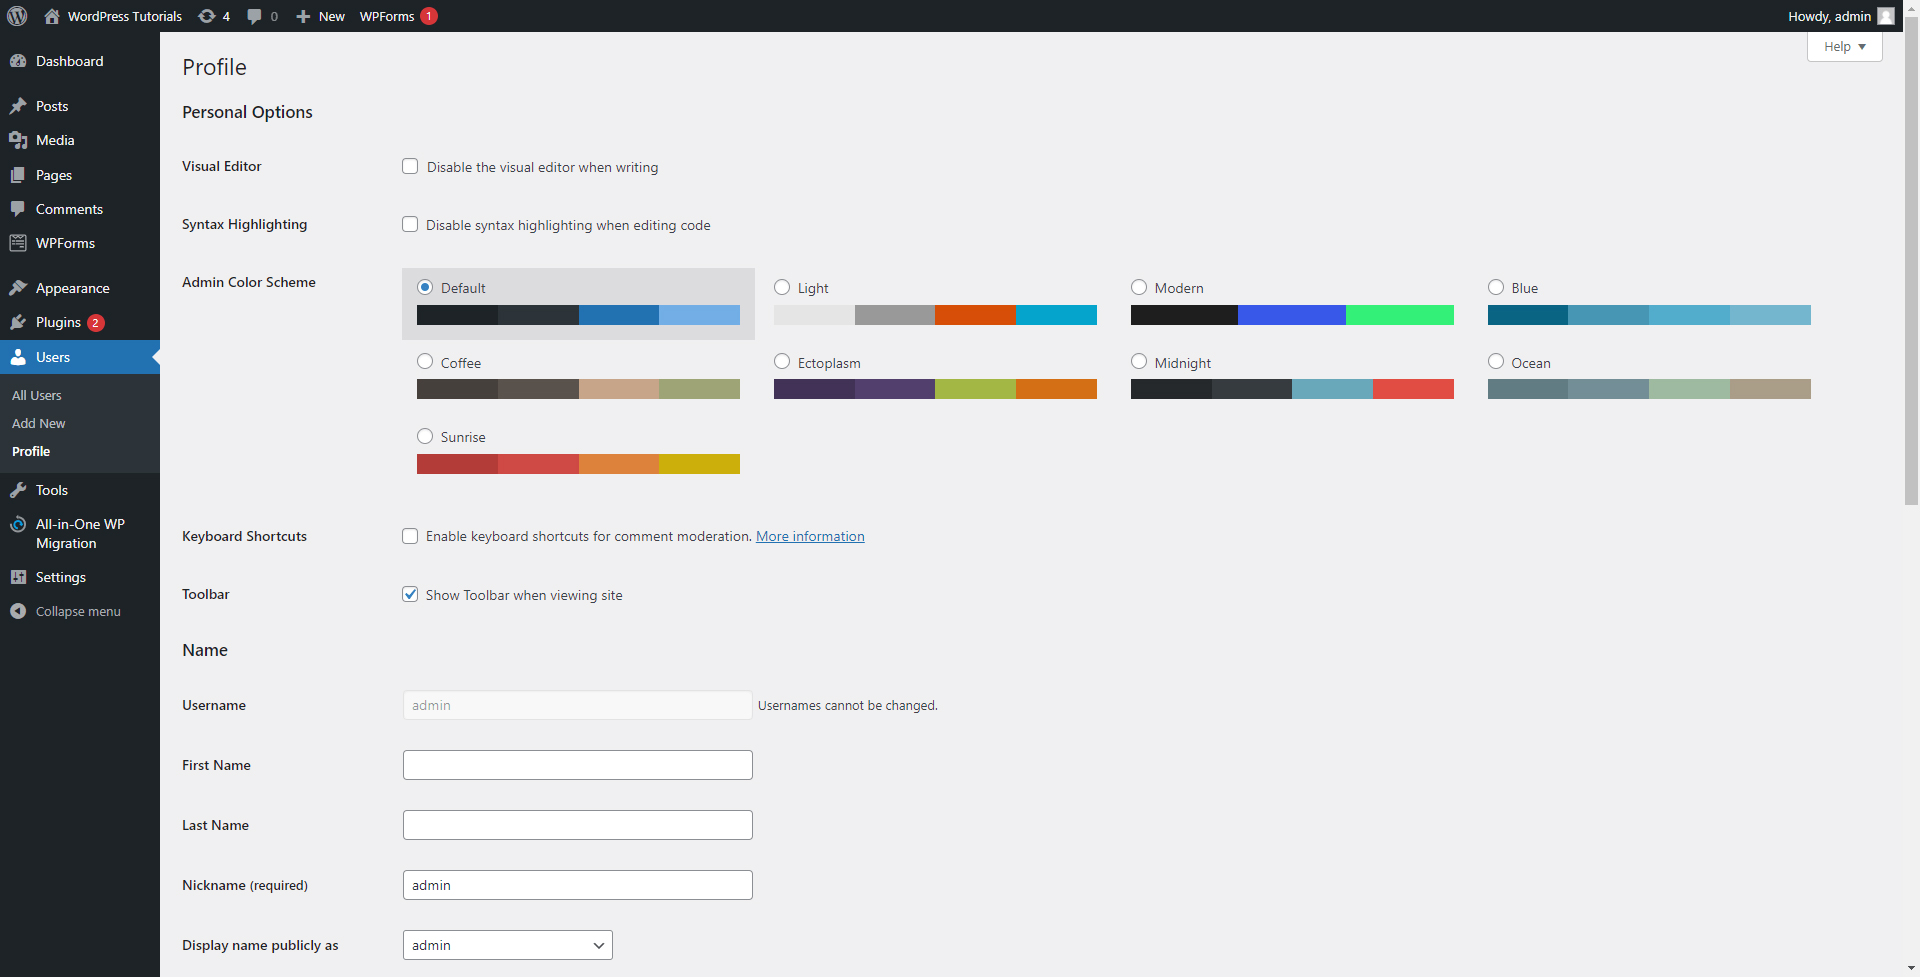
It is always a good idea to share some information about yourself within your site. Including a nickname, email, and some personal details to your profile contributes to an overall better connection with your visitors and gives them a better insight into who is the real character behind the website and behind a particular piece of content.
This approach is especially effective with blogs, as it gives more information about the author of the articles. By including some more info, your readers can get an insight into your expertise and preferred writing topics and also differentiate you from other authors on your site.
Also, the Users tab is the place from which you will assign different WordPress Roles to your teammates. This is a highly beneficial feature, as it contributes to a more effective distribution of tasks with minimal risks for your content.
There’s a lot you can do to make the admin panel comfortable – check out some more customization options you can apply right away
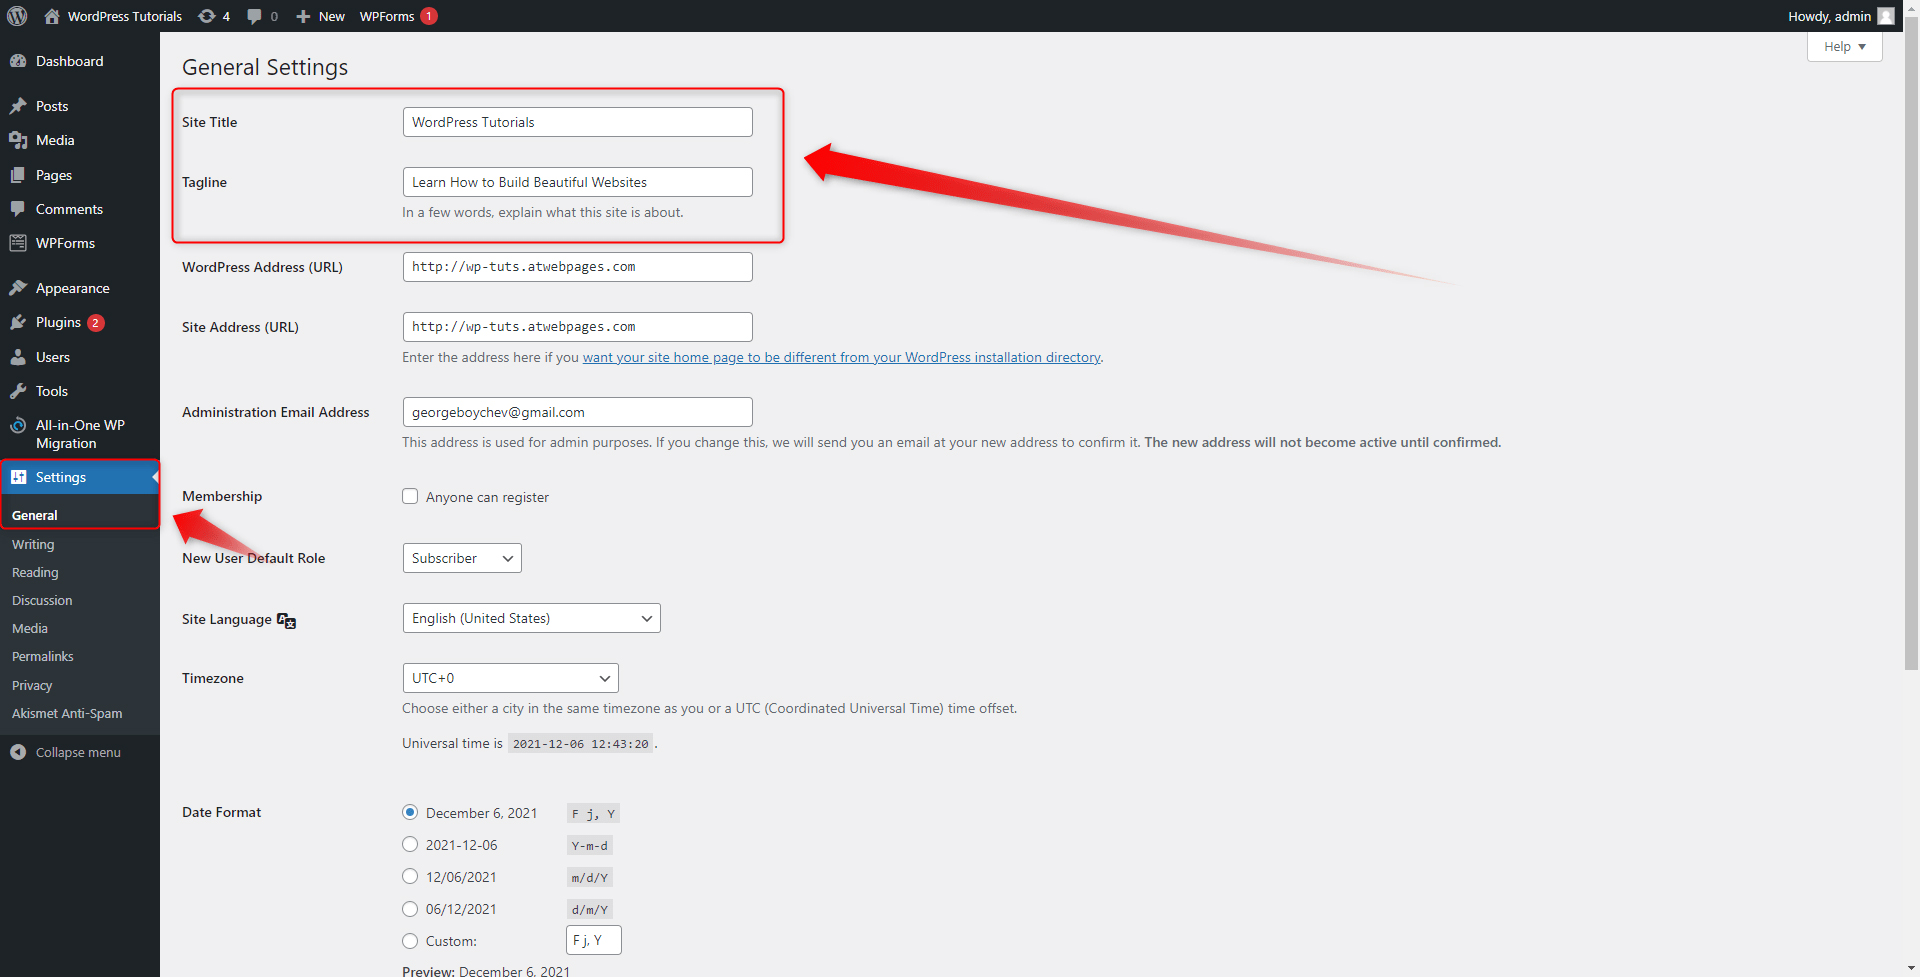
3. Set Up Your Site Title & Tagline
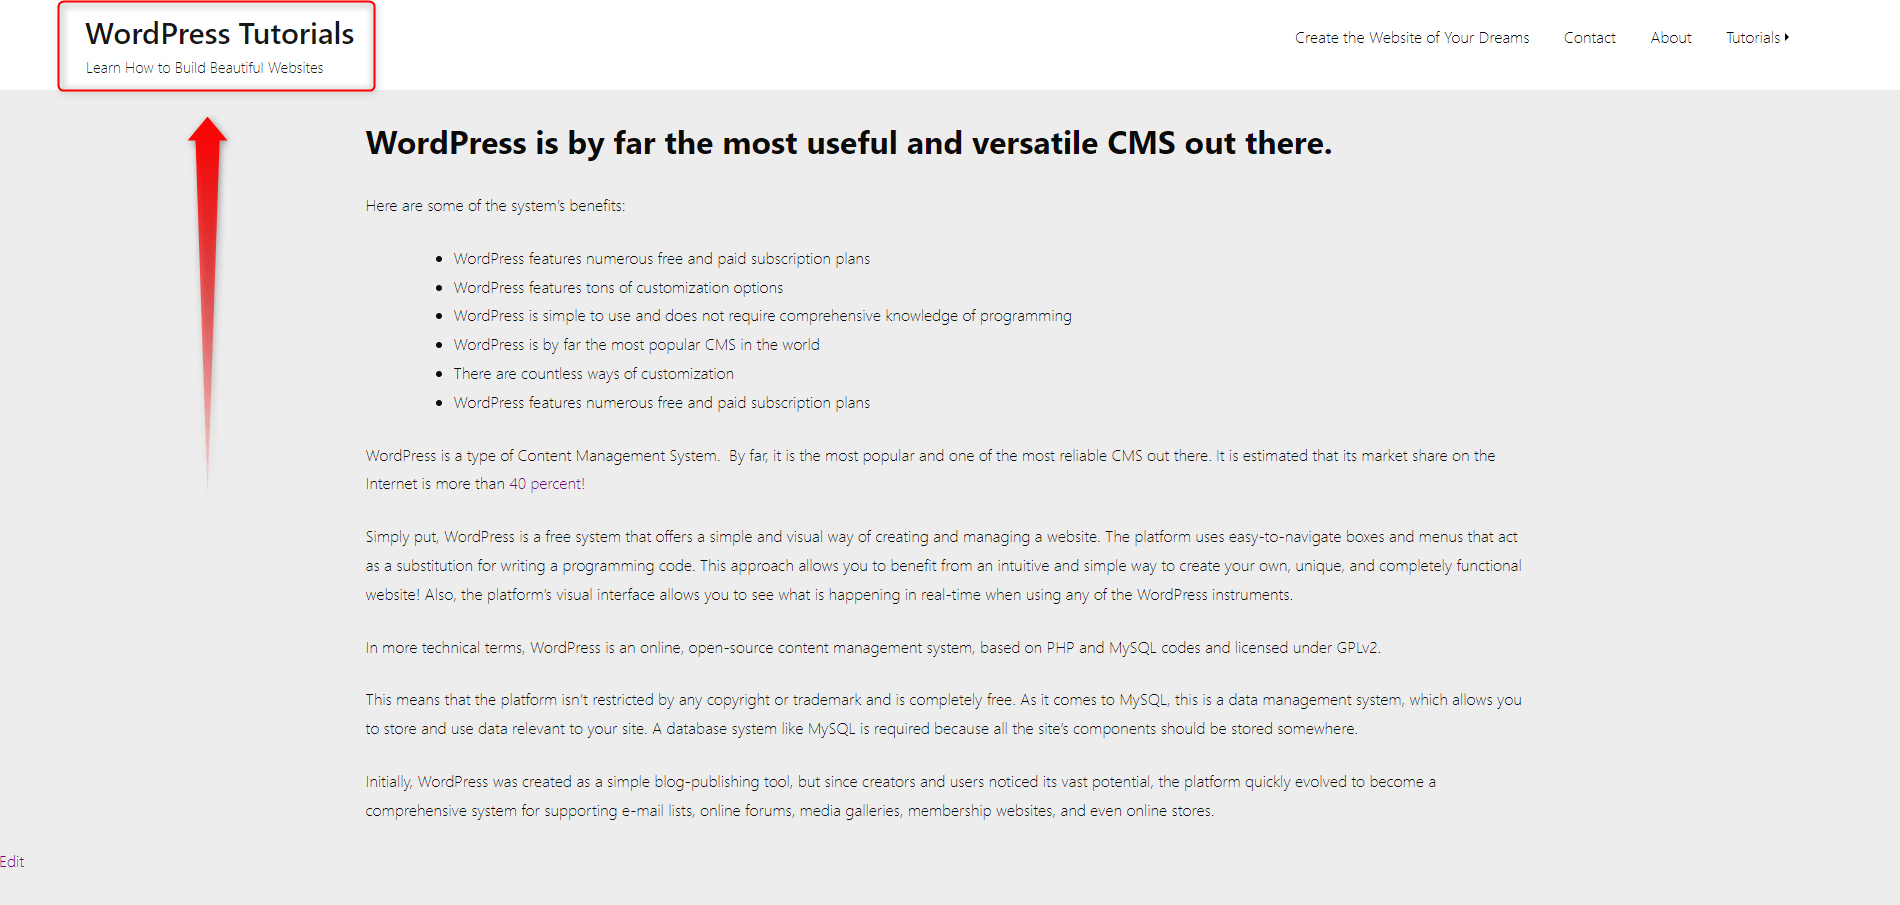
Your site’s name and tagline are essential for identification by search engines and potential visitors. Also, adding a name and a tagline helps people get an insight into what your site is all about.
The Tagline is a short description of what the website’s content is all about. In the majority of cases, it appears right next to the Title and is oftentimes present in the header and footer areas. Just like the site’s title, in order to get the most out of your Tagline, create it short, memorable, and descriptive. It is also advisable to include a keyword and a catchy phrase.
if you want to know more about the tagline and why it is so important for your WordPress website, we suggest you have a look at this article:
How to Add a Title Tag in WordPress
You can access the Site Title and Tagline menu from Settings -> General in your WordPress Dashboard:
4. Upload a Favicon
The Favicon, or the Site Icon, is a tiny logo that appears next to your site’s title in any web browser. Favicons are very handy for two particular reasons:
- Favicons can act as a branding tool, and contribute to the recognition of your brand, should you aim at creating a business website.
- Favicons are handy because they give a unique character to your site and make it instantly recognizable among the browser site tabs.
Since the idea behind WordPress is to make it easy for anyone to create a website, so is the process of uploading and using a preferred site icon. To use any, follow these steps:
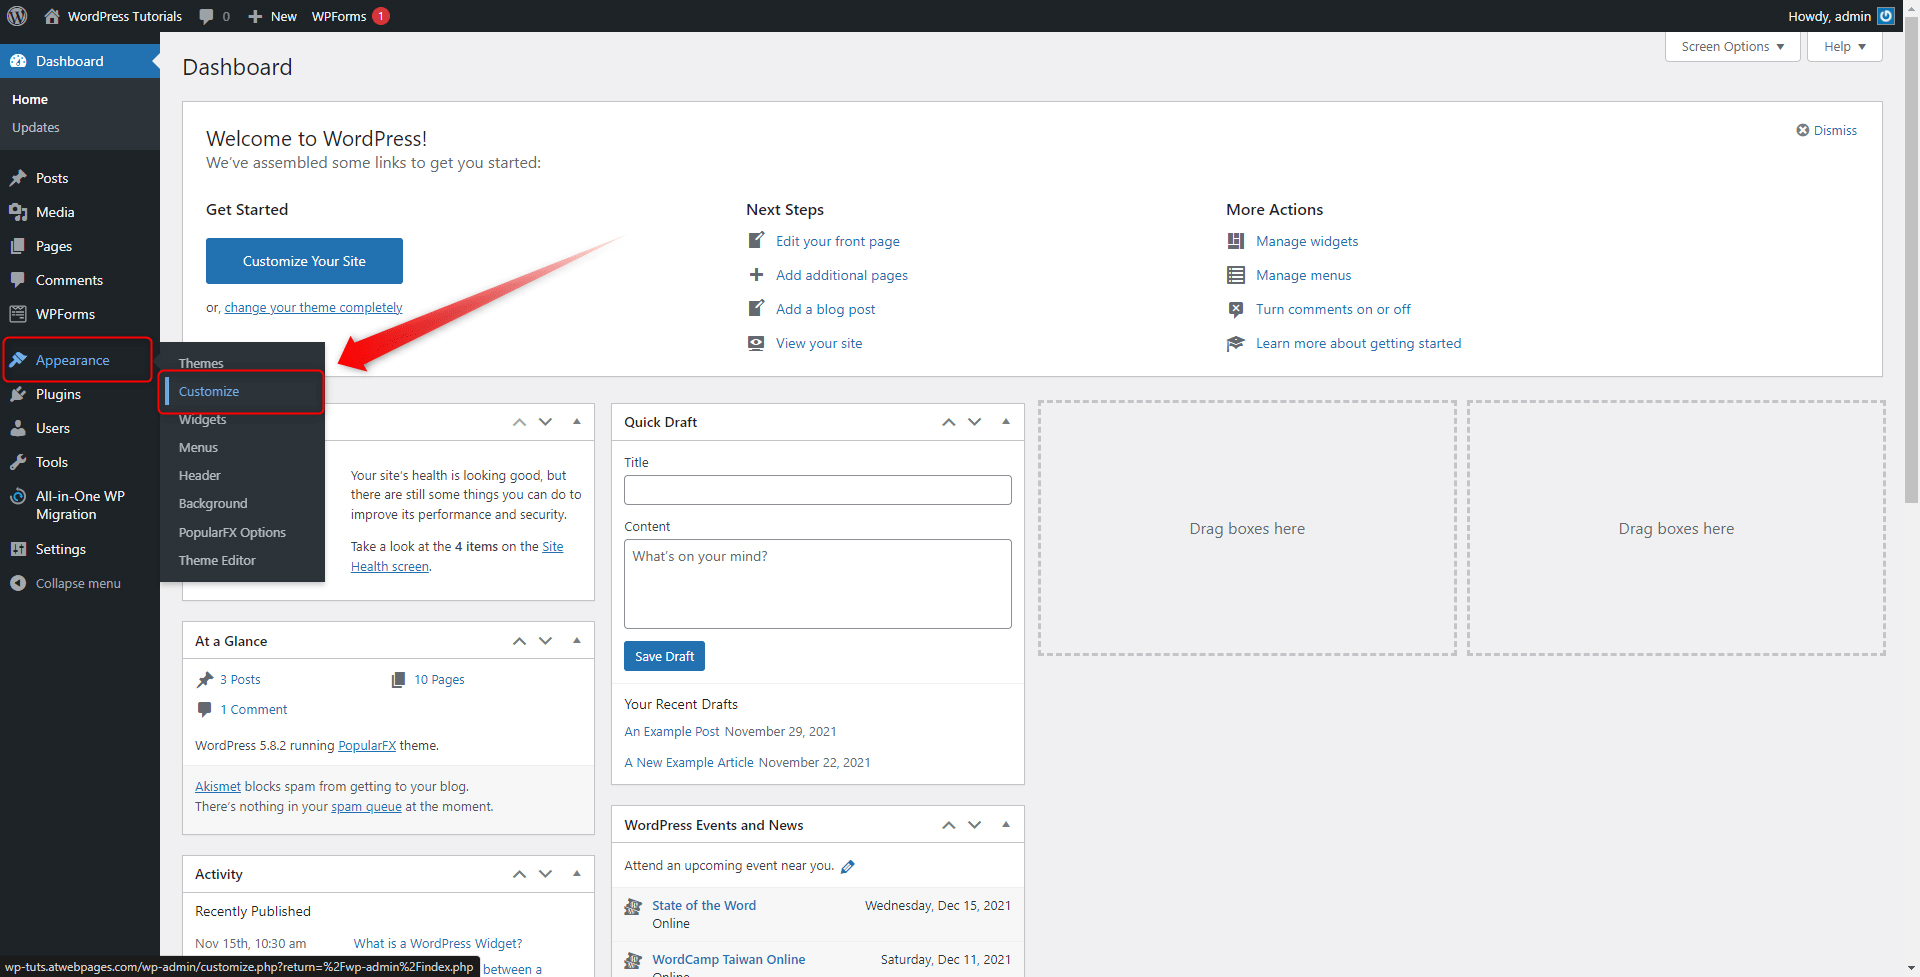
- From your WordPress Dashboard, go to Appearance and from there to Customize:
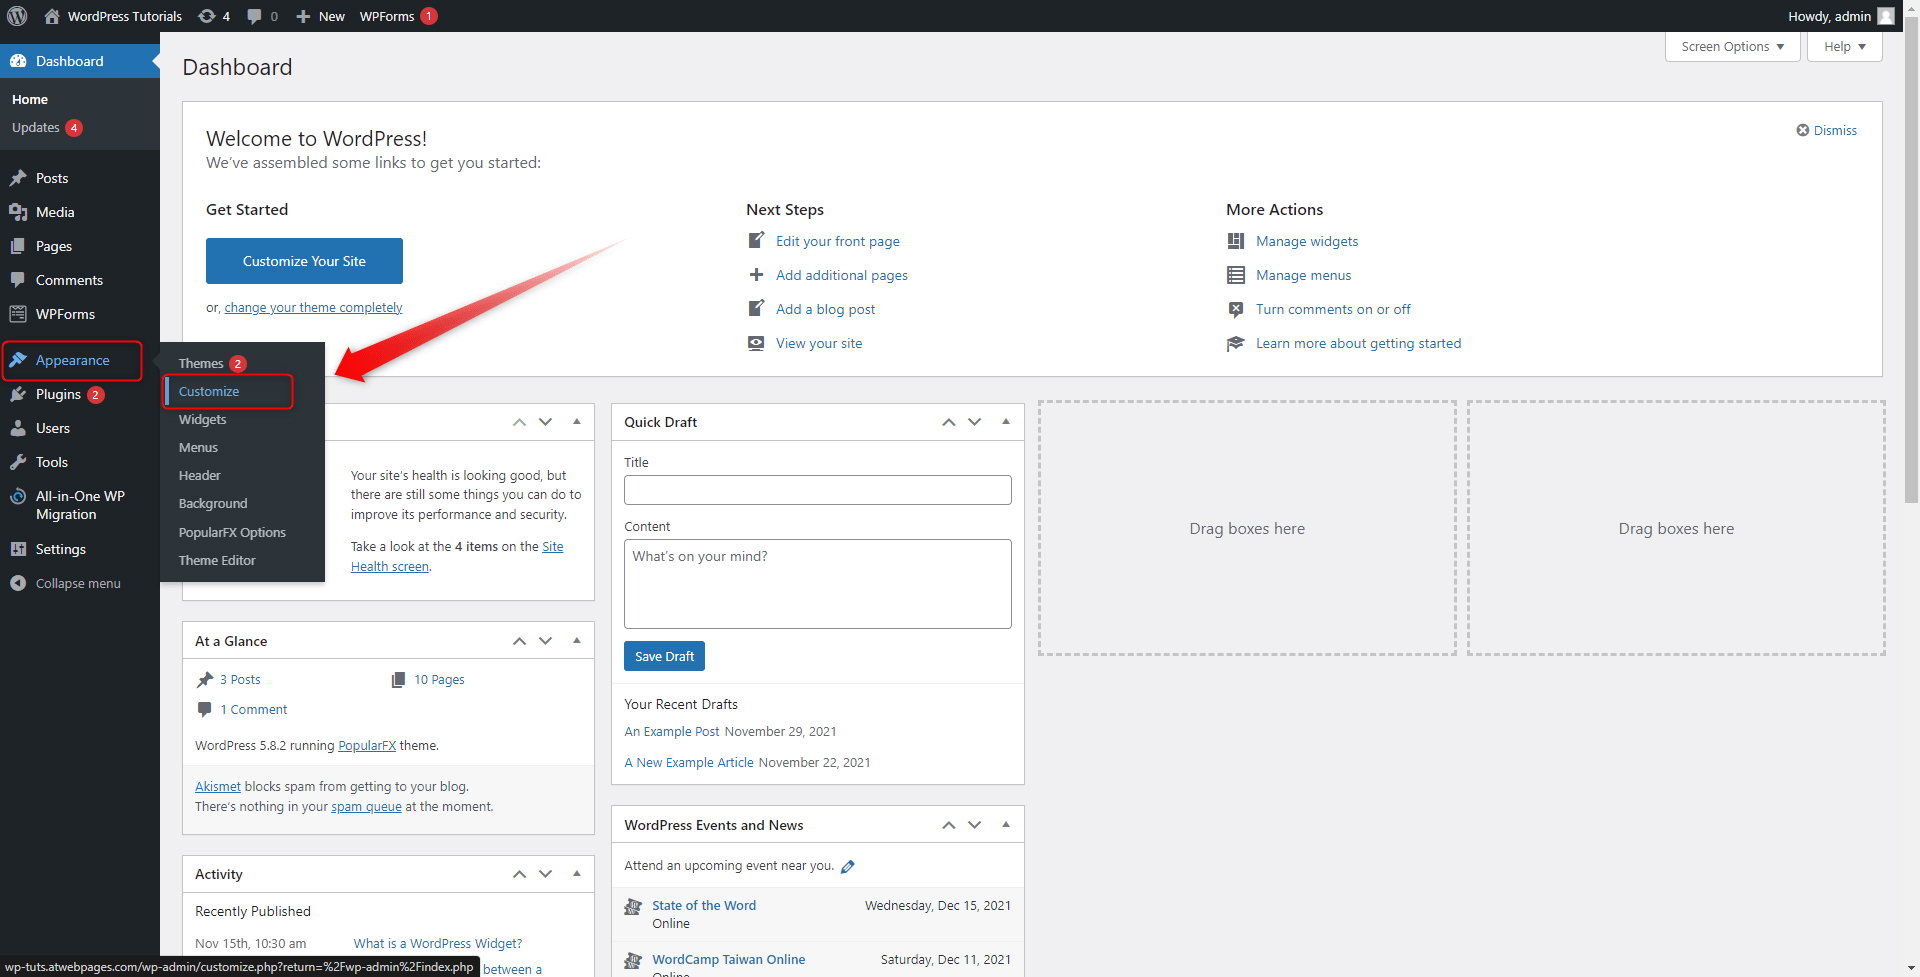
2. In the Customization tab, head toward the Site Identity menu:
- A tab with options will appear. Search for the Site Icon area and follow the instructions there. You will be asked to select and upload a 512×512 pixels image and apply it to the website:
![]()
Also, check out:
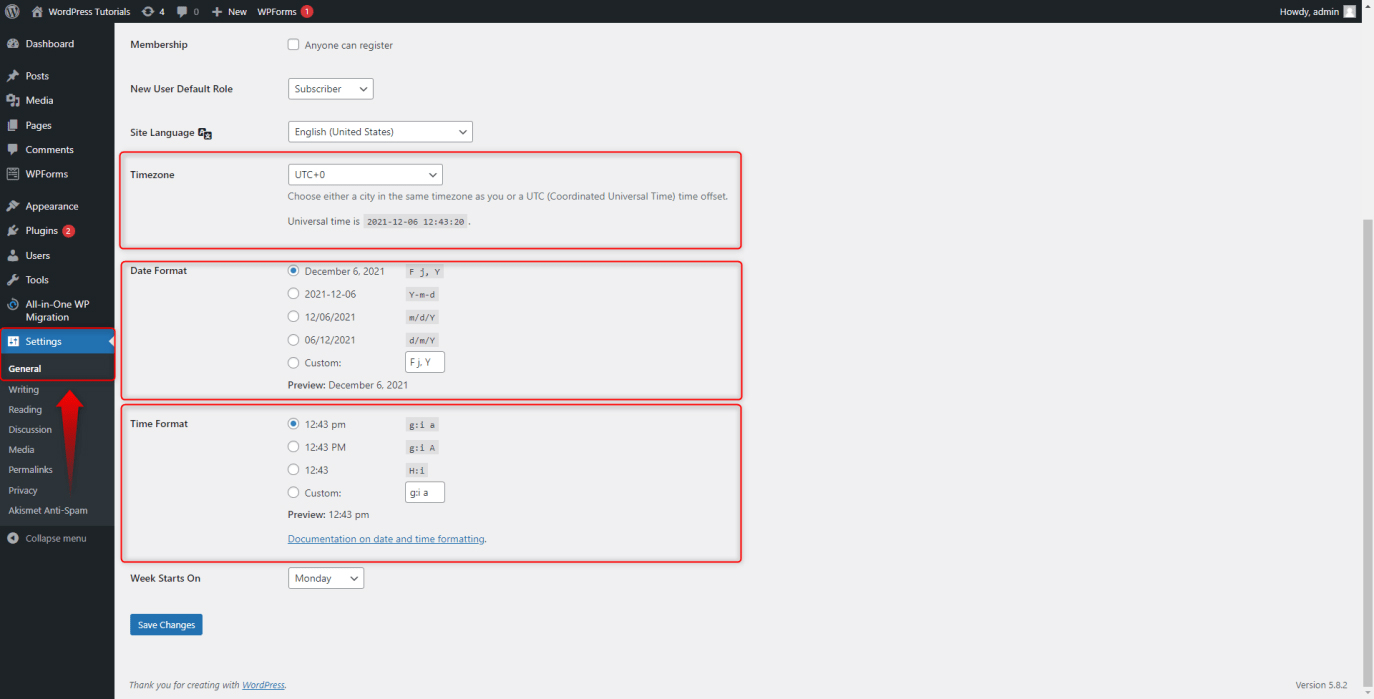
5. Set Your Timezone, Date, and Time Format
Timezone, Date, and Time Format are important for several reasons:
- The Timezone is used to determine the publication of your scheduled posts
- The Date and Time Format determines the layout of the date and hour layouts on your site.
- The Date and Time Format is also an important Permalink component, should you decide to include it in the structure of your permalinks.
To change the default setup, simply go to Settings -> General and search for Timezone, Date Format, and Time Format menus:
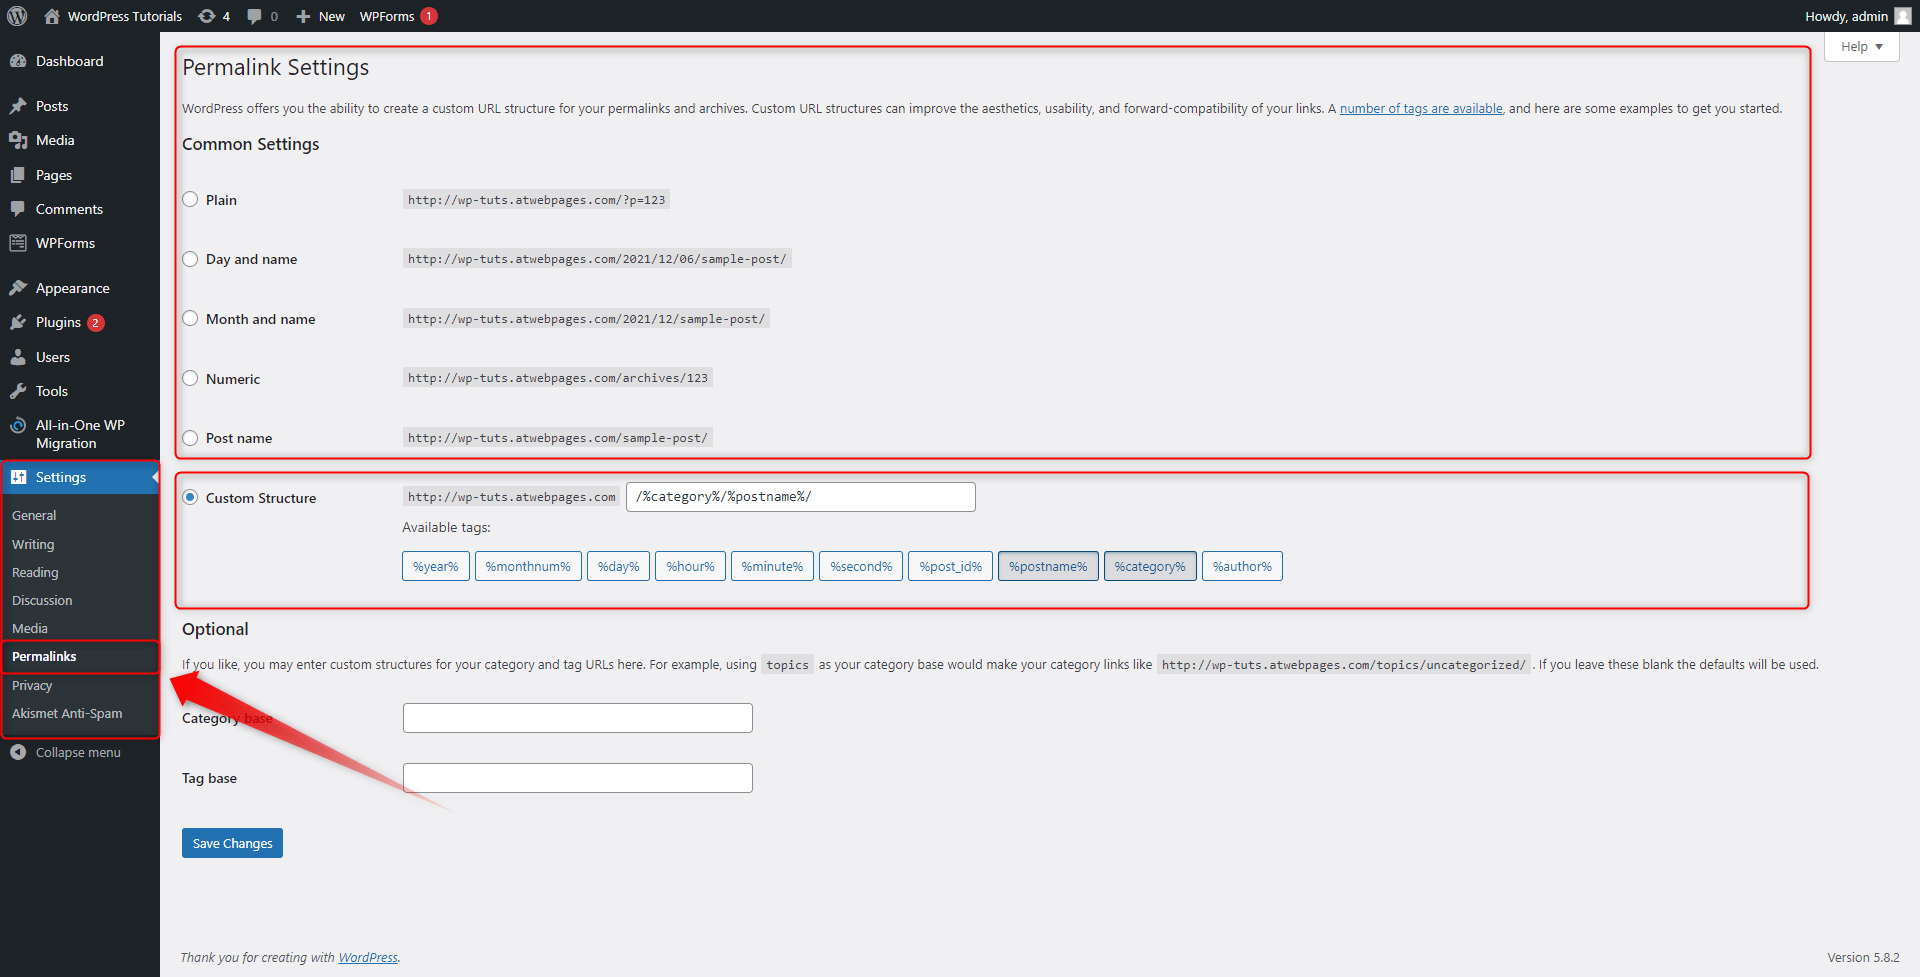
6. Change the Default Permalink Structure
The WordPress Permalinks are fundamental for your visitors and their positive feedback about your site. The proper permalink structure can contribute to a more pleasurable and rewarding user experience, as it can give useful details about where the link points to and what a visitor will find there.
Also, the proper permalink structure contributes to SEO. Adding a keyword can greatly enhance the ranking capabilities of your site.
By default, WordPress has set a structure, however, it is highly advisable to change it, as there are more suitable options. To access the permalinks menu, go to Settings -> Permalinks. From there you can select one of the predefined options, or you can fully customize your Permalinks structure:
If you want to know more about permalinks, then check out our dedicated articles on the topic:
- How to Change the Structure of the WordPress Permalinks
- How to Edit the Slug of the WordPress Permalinks?
- How to Add Links to Your WordPress Posts
7. Configure Your Comment Section
Usually, the comment section is quite prevalent in contemporary blog sites. Depending on the type of site you are aiming at creating, a different set of approaches is advisable when it comes to the comment section. For example, along with other options, you can:
- Require your visitors to register before leaving a comment.
- Set up automatic deletion of comments after a certain amount of time expires.
- Receive a notification email when a user leaves a comment.
- Manually approve comments before their publication.
- Disable the comments section completely.
WordPress provides an entire tab with all kinds of options when it comes to site discussions, comments, and forum structures. To access it, go from Settings to the Discussion menu via the Dashboard:
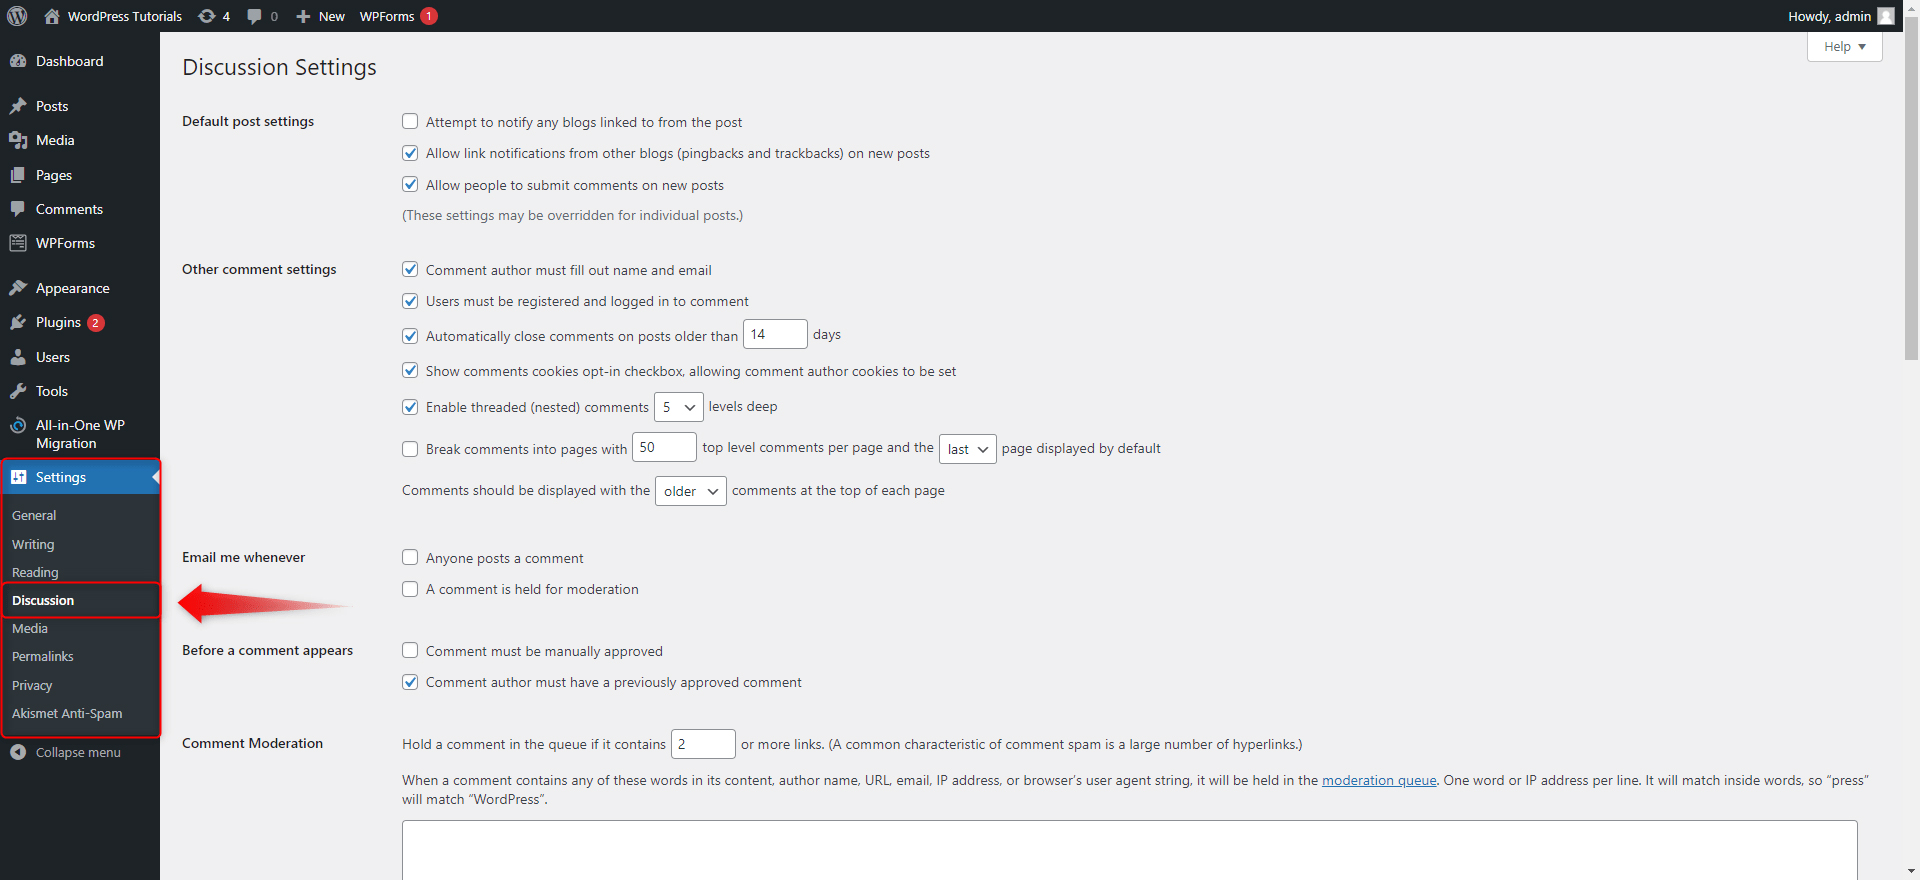
Have a closer look at all the options in this tab and decide for yourself the most convenient and fitting settings for your particular needs.
See also:
- How to Add Reviews to Your WordPress Website
- How to Make a WordPress Site Private
- How to Use Password Protection for Your WordPress Pages
8. Add Your Gravatar
Gravatar is a term that derives from Globally Recognized Avatar and enables you to add comments below as many articles on as many sites as you wish by only using the same email.
This concept is quite handy, as it prevents people from creating numerous accounts for every website they visit only to leave a comment.
To add a gravatar, go to the Discussion tab via the Settings menu and search for the Default Avatar area. From there you can customize your gravatar:
![]()
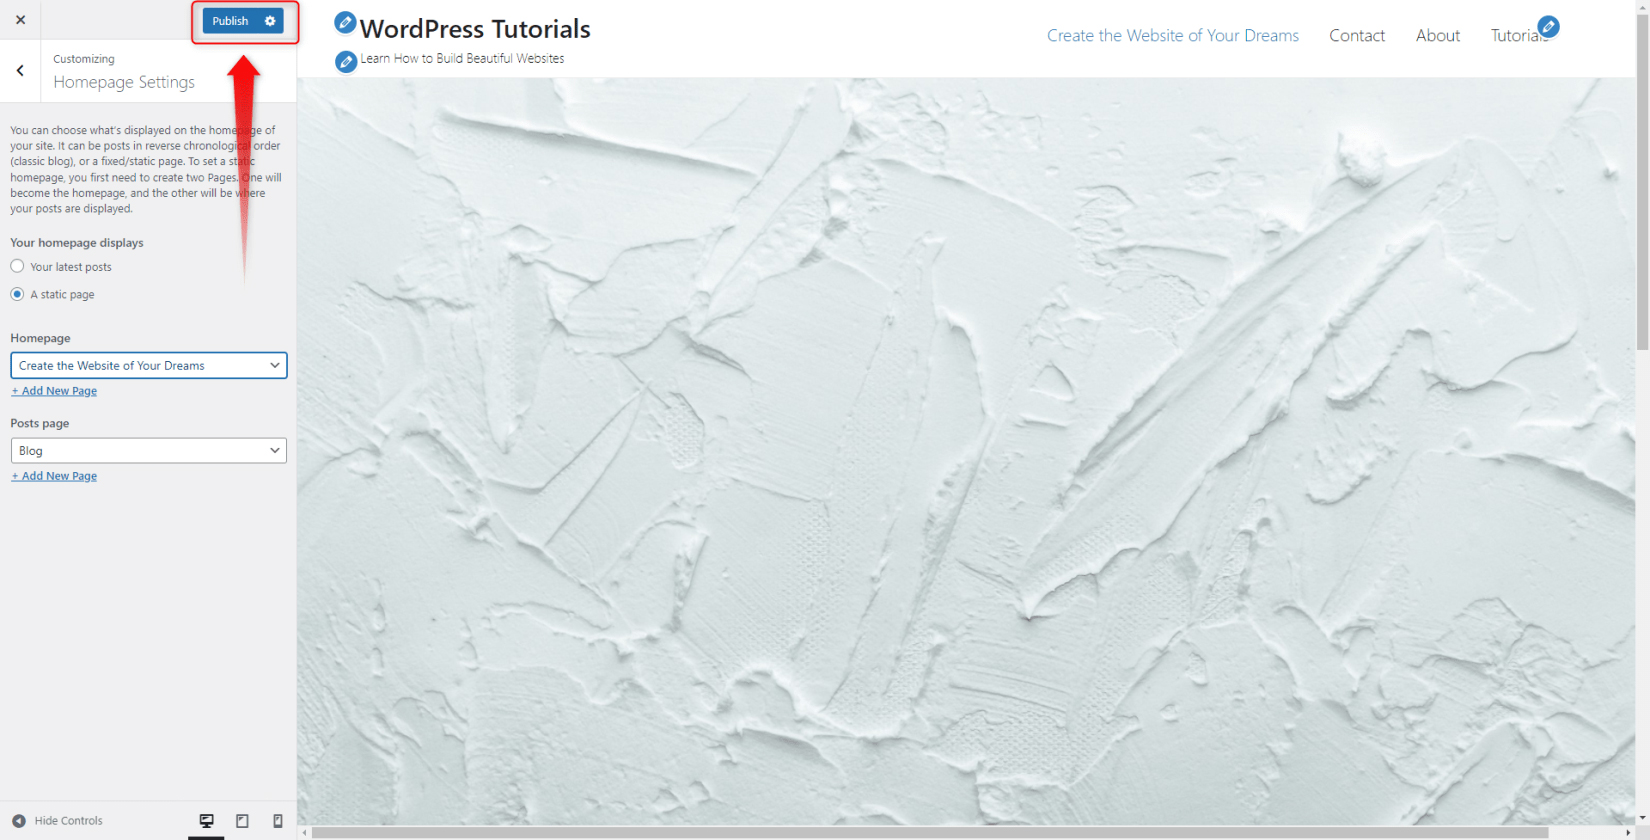
9. Set up a Home Page
The website homepage, also known as a welcome page, is the first page a user sees when entering your site, and most of the time this page contains detailed information about the website’s content, what it does, and menus for all other places in the site. It is advisable to make the front page as appealing as possible, as it can make a great first impression and contribute to a large number of returning visitors.
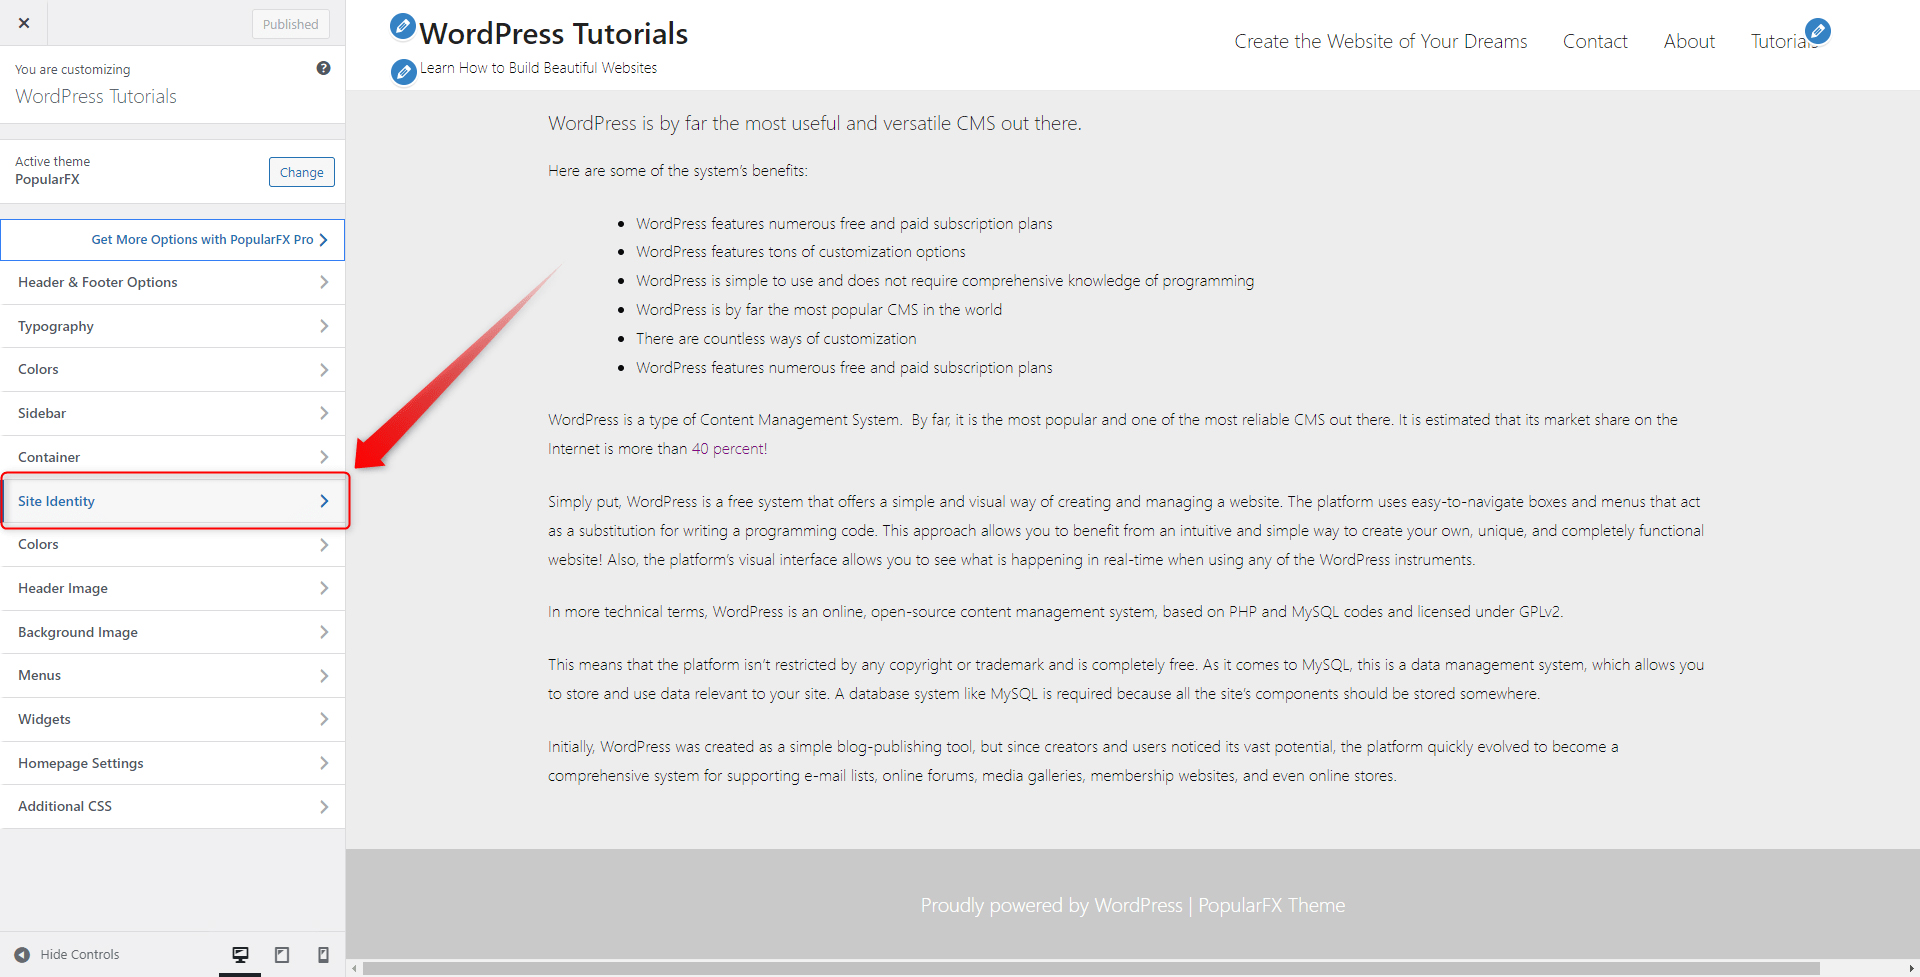
To select your homepage, simply go to Appearance and then open the Customize tab:
From there find and click on the Homepage Settings menu and from the dropdown menu choose a page that would become your new homepage:
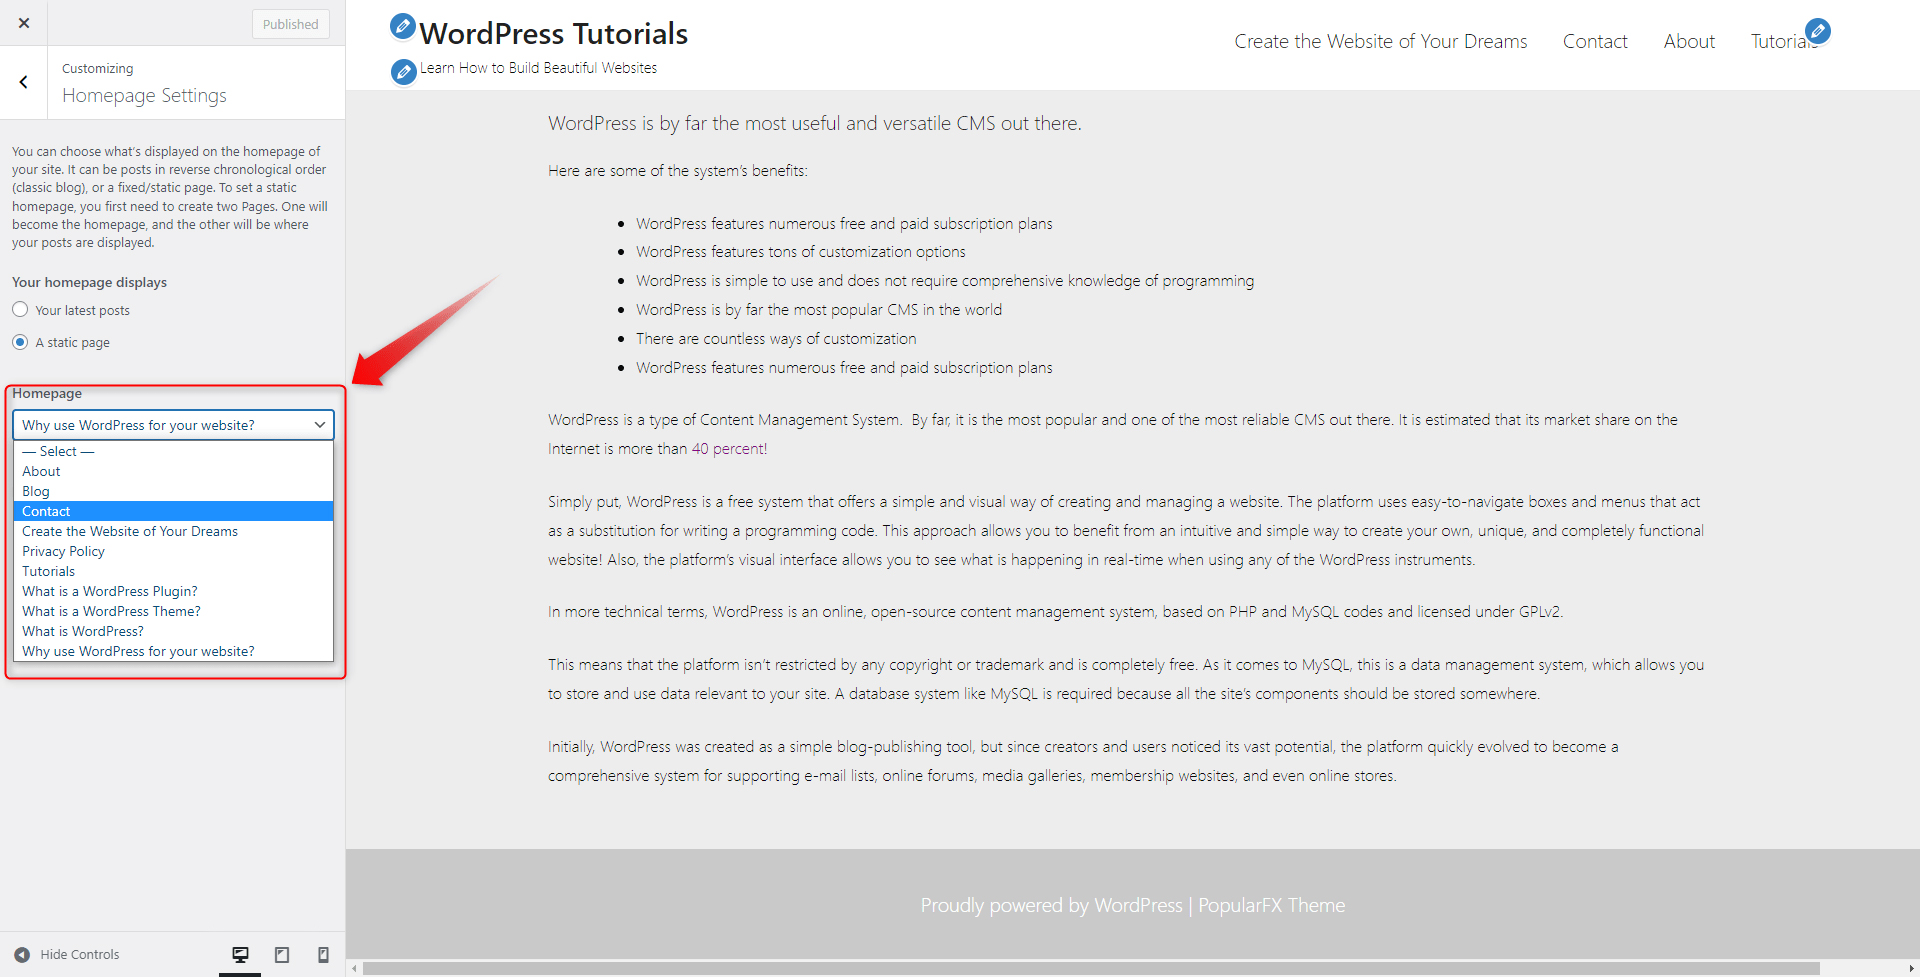
When you have chosen one, click on the blue Publish button at the upper left so the system applies all the changes:
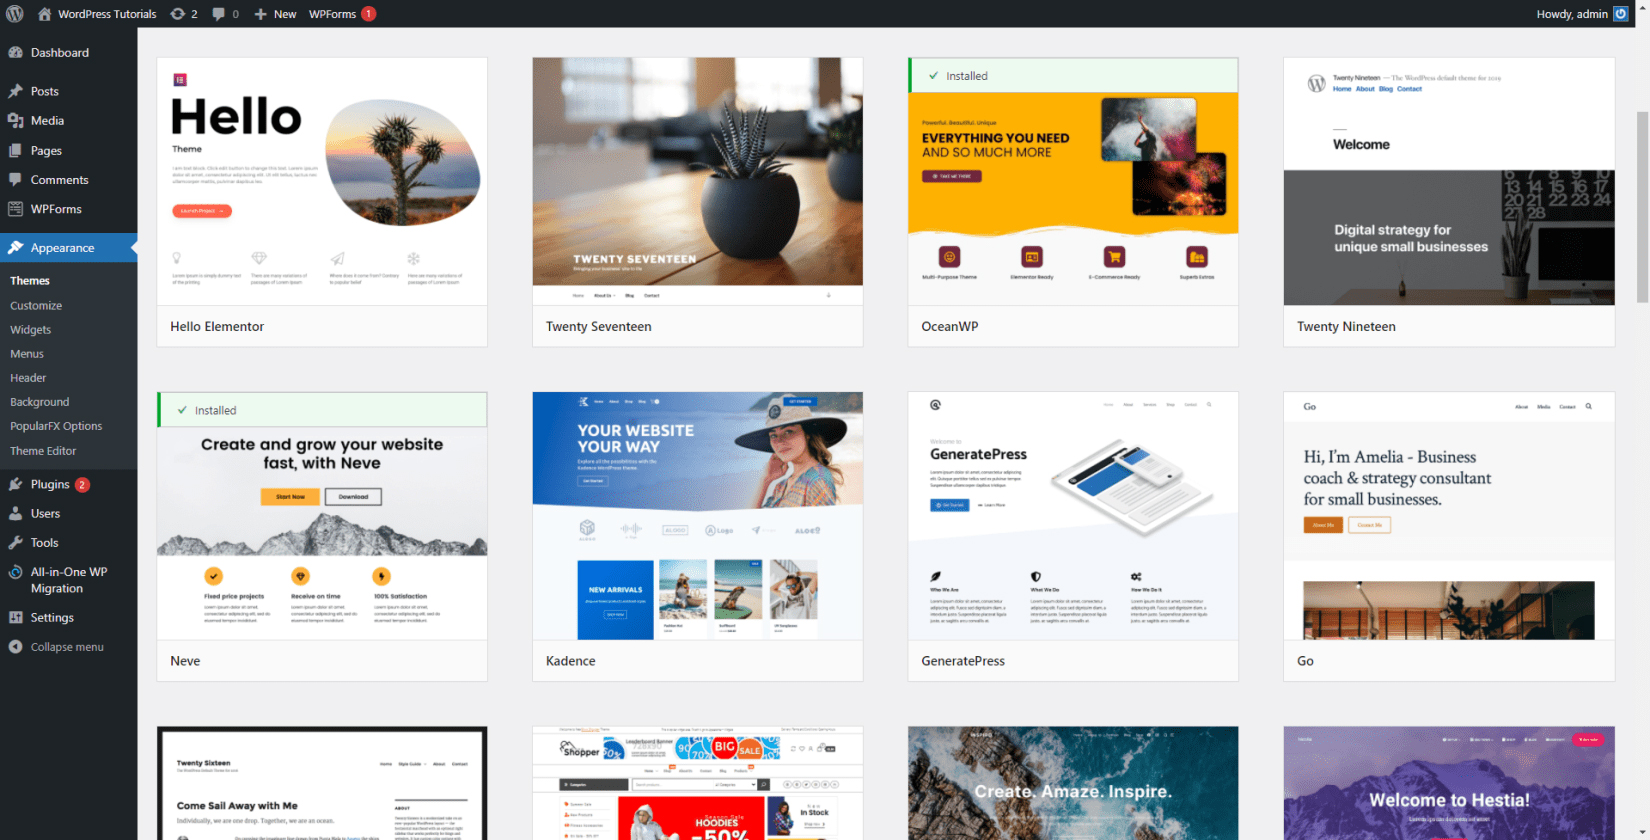
10. Choose and Apply a Suitable WordPress Theme
The WordPress themes determine the general layout of your site. Usually, they play a big role when it comes to the design and the overall vibe of your site. Also, themes can be further customized, so the design possibilities for your new site are quite ample.
When you browse for a suitable theme, keep these in mind:
- There are free and premium themes, and both types can be fitting and useful
- Choose a theme according to the purpose and function of the site – the theme should be fitting for your particular needs.
- Themes allow for further customization like changing the color schemes, adding and removing components, as well as changing their positions.
To browse and apply a theme, go to Appearance -> Themes:

From there click the Add New button and then browse and apply a theme you find most suitable for your needs:
Want to know more about WordPress Themes? Read more here:
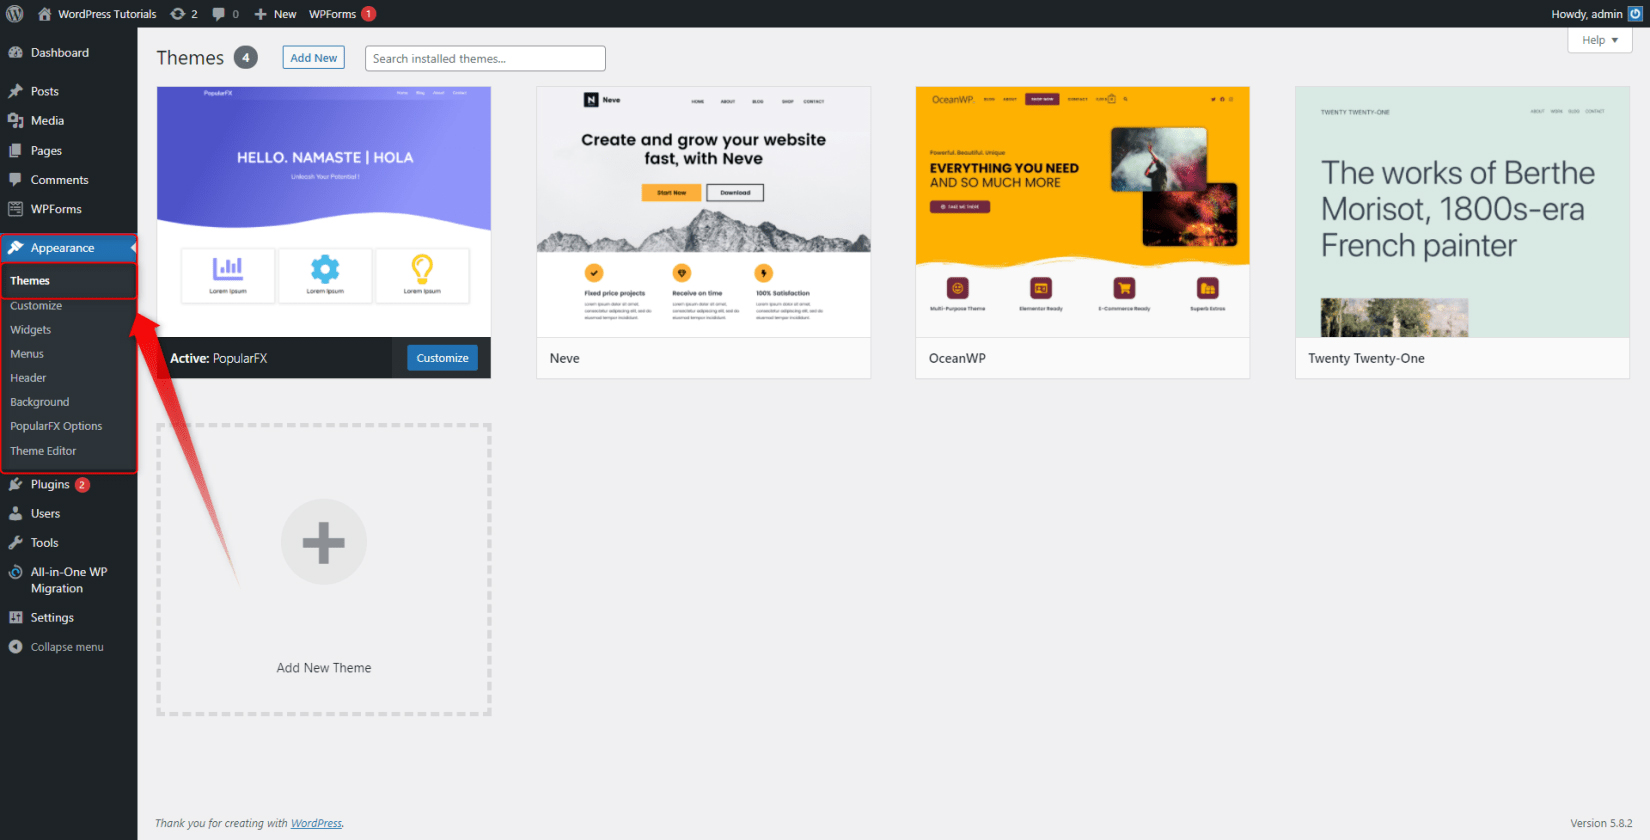
11. Delete Unused Themes
Usually, themes are downloaded and stored. When you search for a fitting layout for your site and try different approaches, it is highly likely to end up with a dozen of different and unused themes.
However, when you find the one that you like and find suitable, it is advisable to delete the rest, as they can stunt the WordPress performance.
To delete a theme, simply go to the Themes tab via the Appearance, where all your downloaded themes are stored, and click on the one you wish to remove. When you do so, a large preview window will appear. At the bottom right of this window, you will see a red Delete button. Click it and confirm:
12. Install Suitable WordPress Plugins
WordPress Plugins are tiny pieces of software that incorporate seamlessly with WordPress and add new functionalities or enhance the already existing ones.
There are plugins for all different needs such as sorting media files, adding image galleries, anti-spam systems, SEO tools, grammar checkers, and all different kinds of tools.
To browse and download the ones that you need, go to Plugins -> Add New and browse the ample list of suggestions:
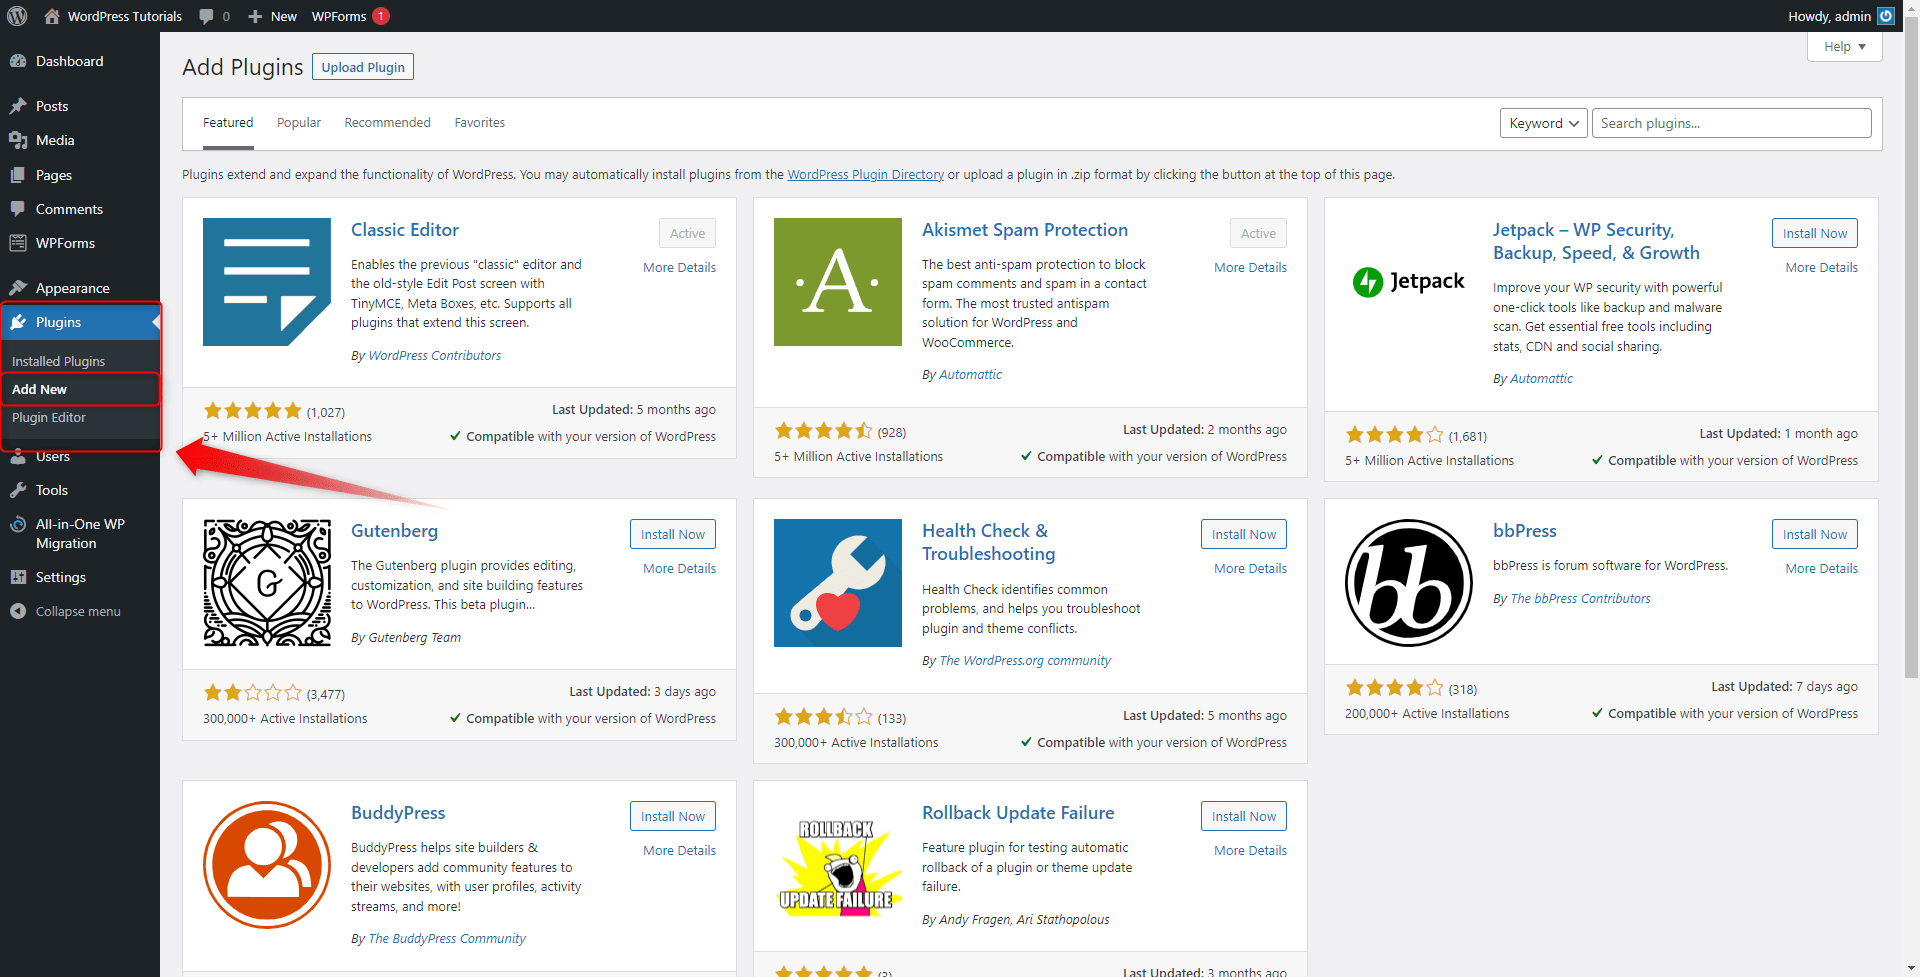
When you have chosen a particular plugin, click on the Install Now button located in the upper right corner of the image box. Once the plugin is installed, this button will turn into Activate. Click it, so you incorporate the plugin into your system:
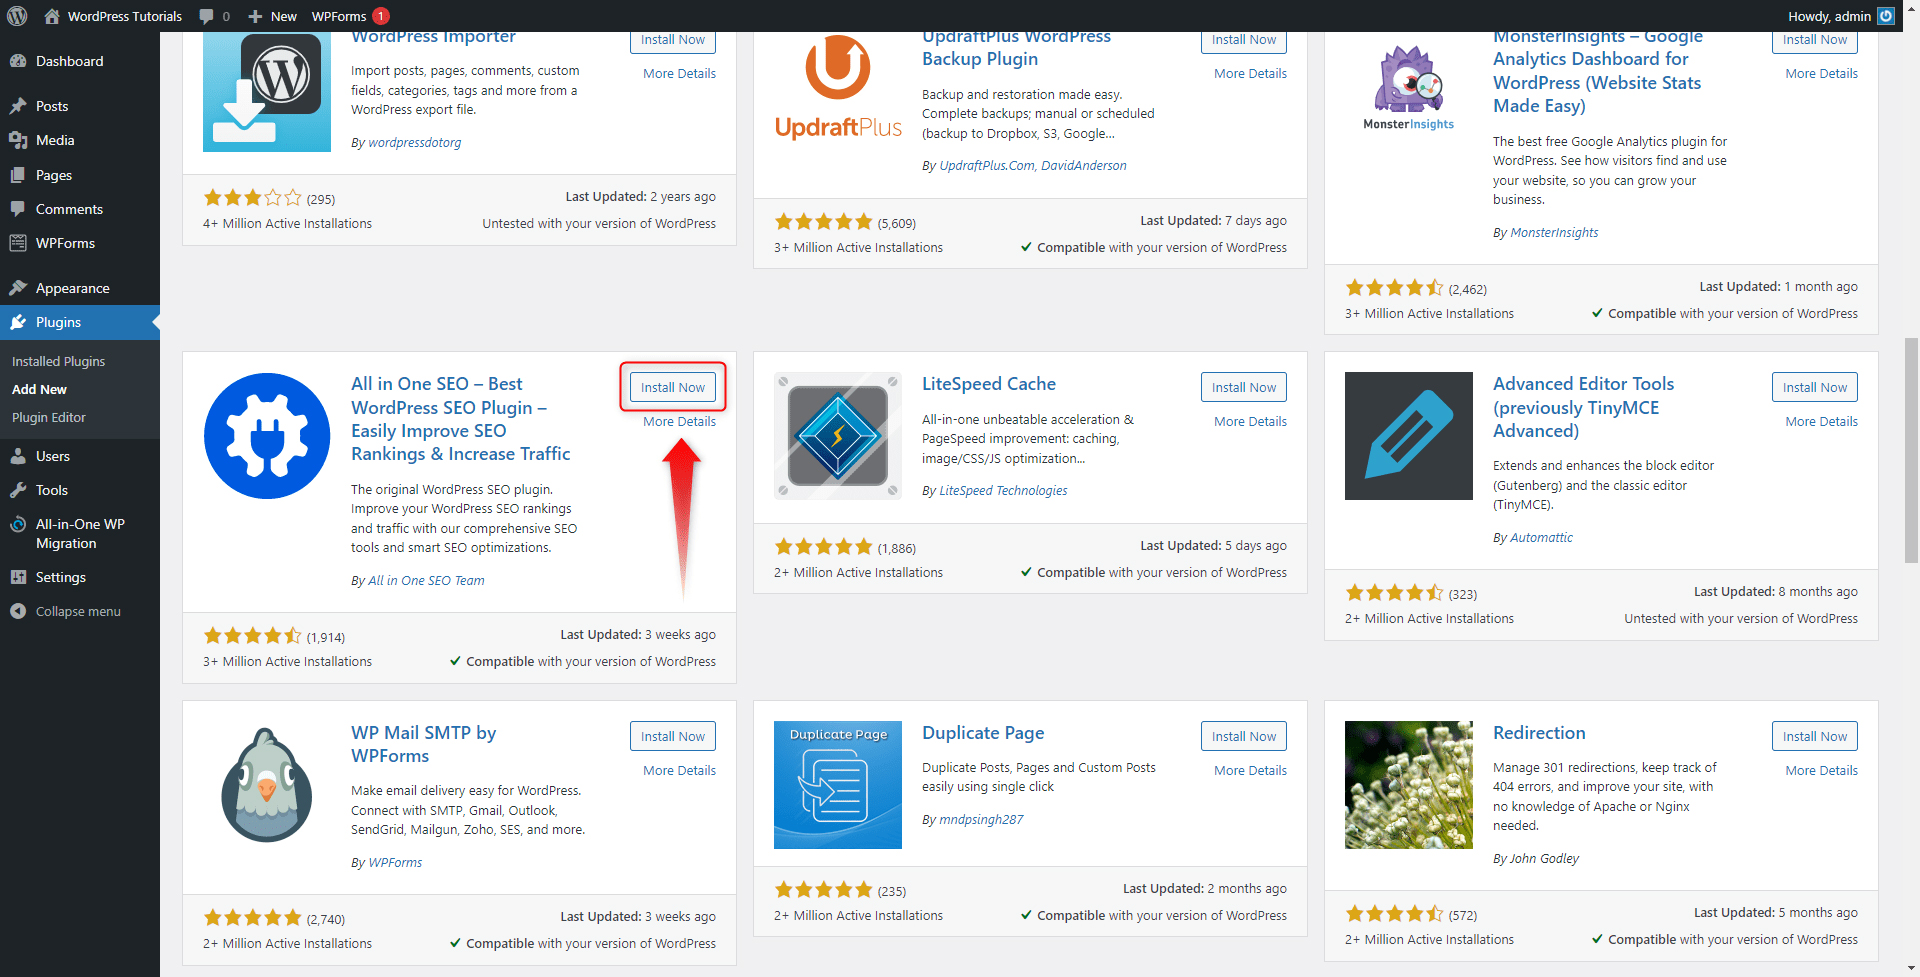
If you are not sure what kinds of plugins you need, first consider downloading such as:
- Caching – search for such a plugin, as the numerous cached files can cause slow loading speeds and an overall unpleasant browsing experience.
- Backup – creating a backup is a sure way to recover your data, should a disaster happen.
- SEO – keeping an eye on your search engine optimization is always a good idea, as this is the main way to generate more leads to your pages.
Want to know more about plugins? Here are some useful articles:
13. Delete the Unused Plugins
Your new site comes with some pre-installed plugins that are not that useful. Also, you might have tried out some plugins that turned out to be not so useful for your needs. In either case, it is best to remove the unused ones, as they can slow the performance of your site.
To delete a plugin, go to the Installed Plugins tab via the Plugins menu. This will open the list of all your installed and activated or deactivated plugins:
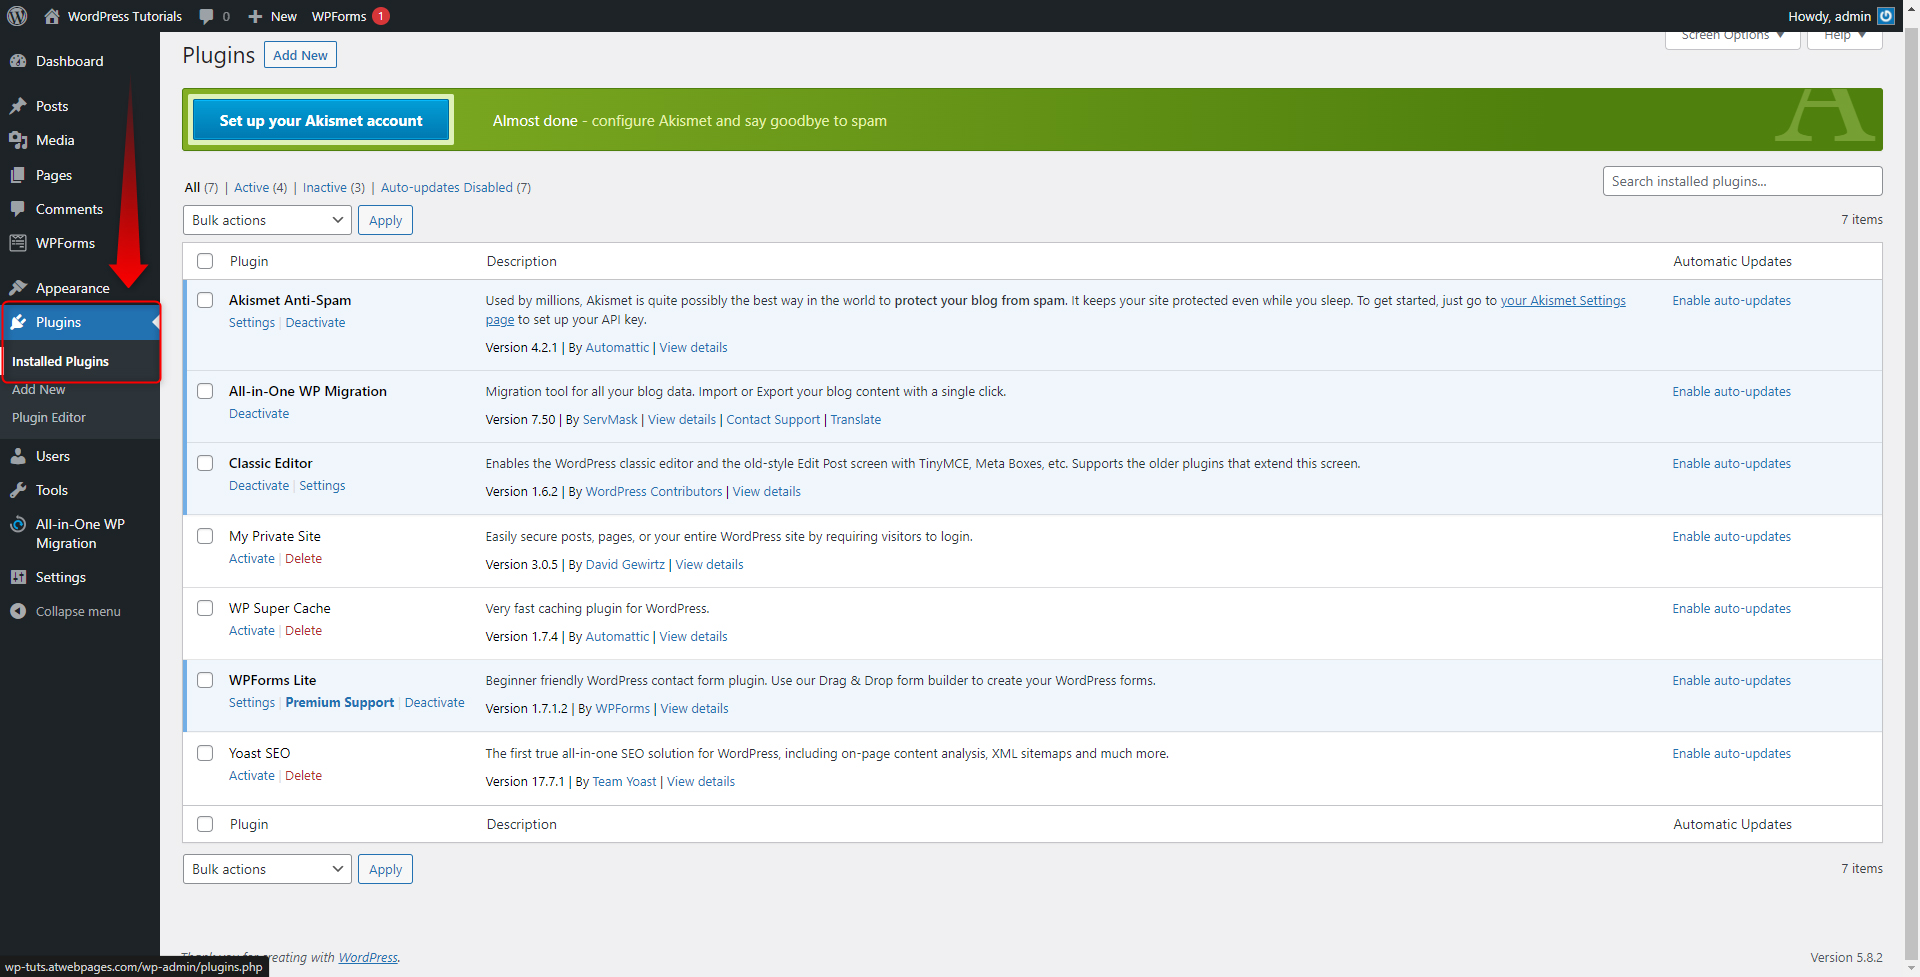
To delete a given plugin, simply click on the Delete button, if it is deactivated. Should it be active, deactivate it first and then click on the Delete button:
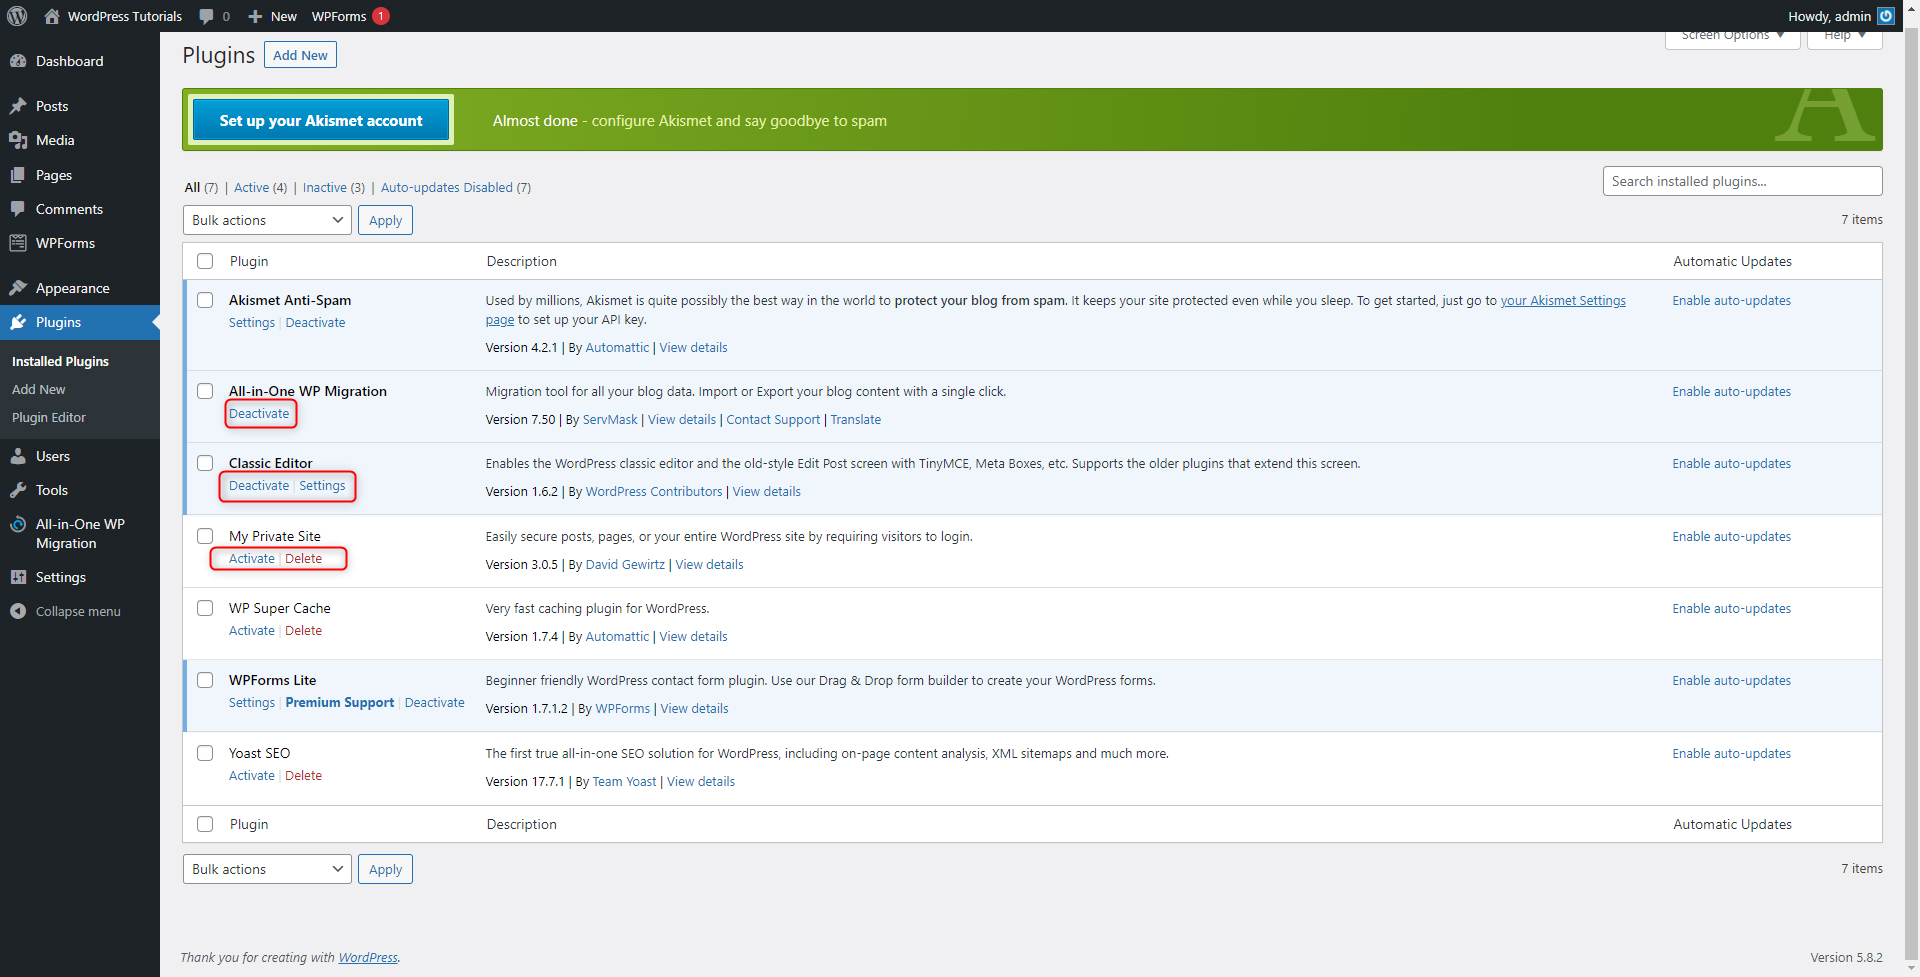
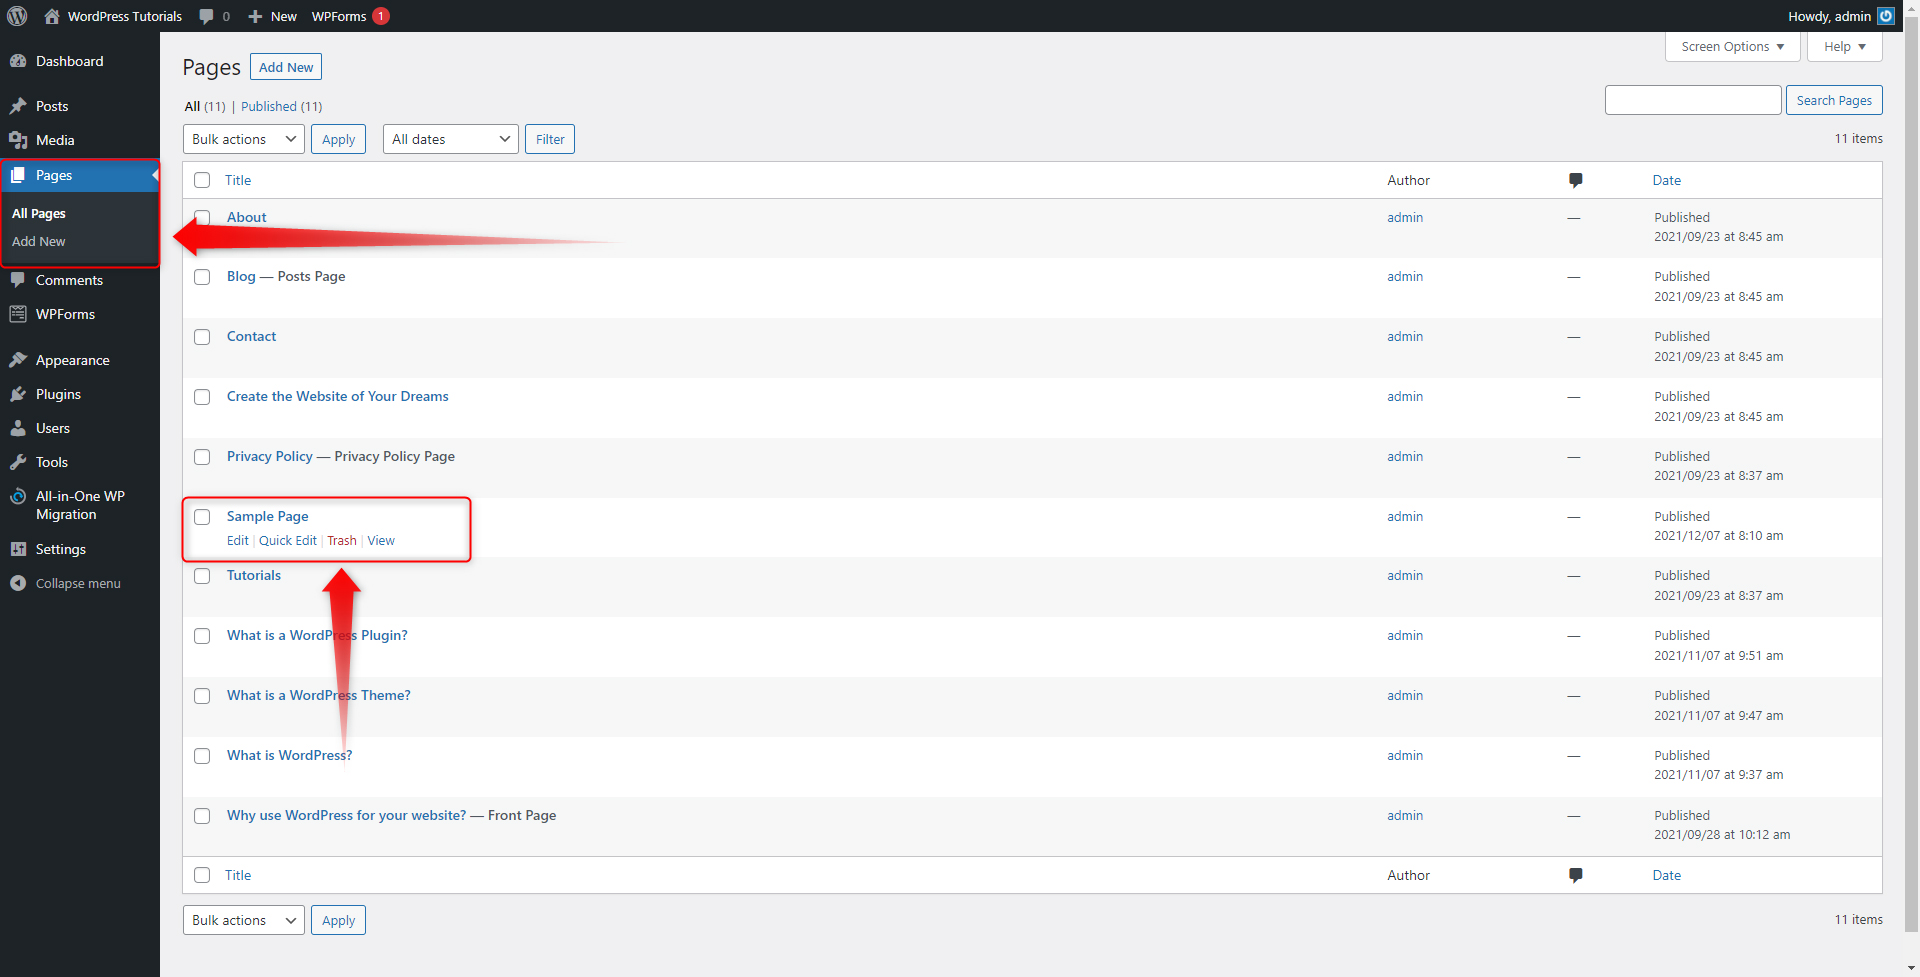
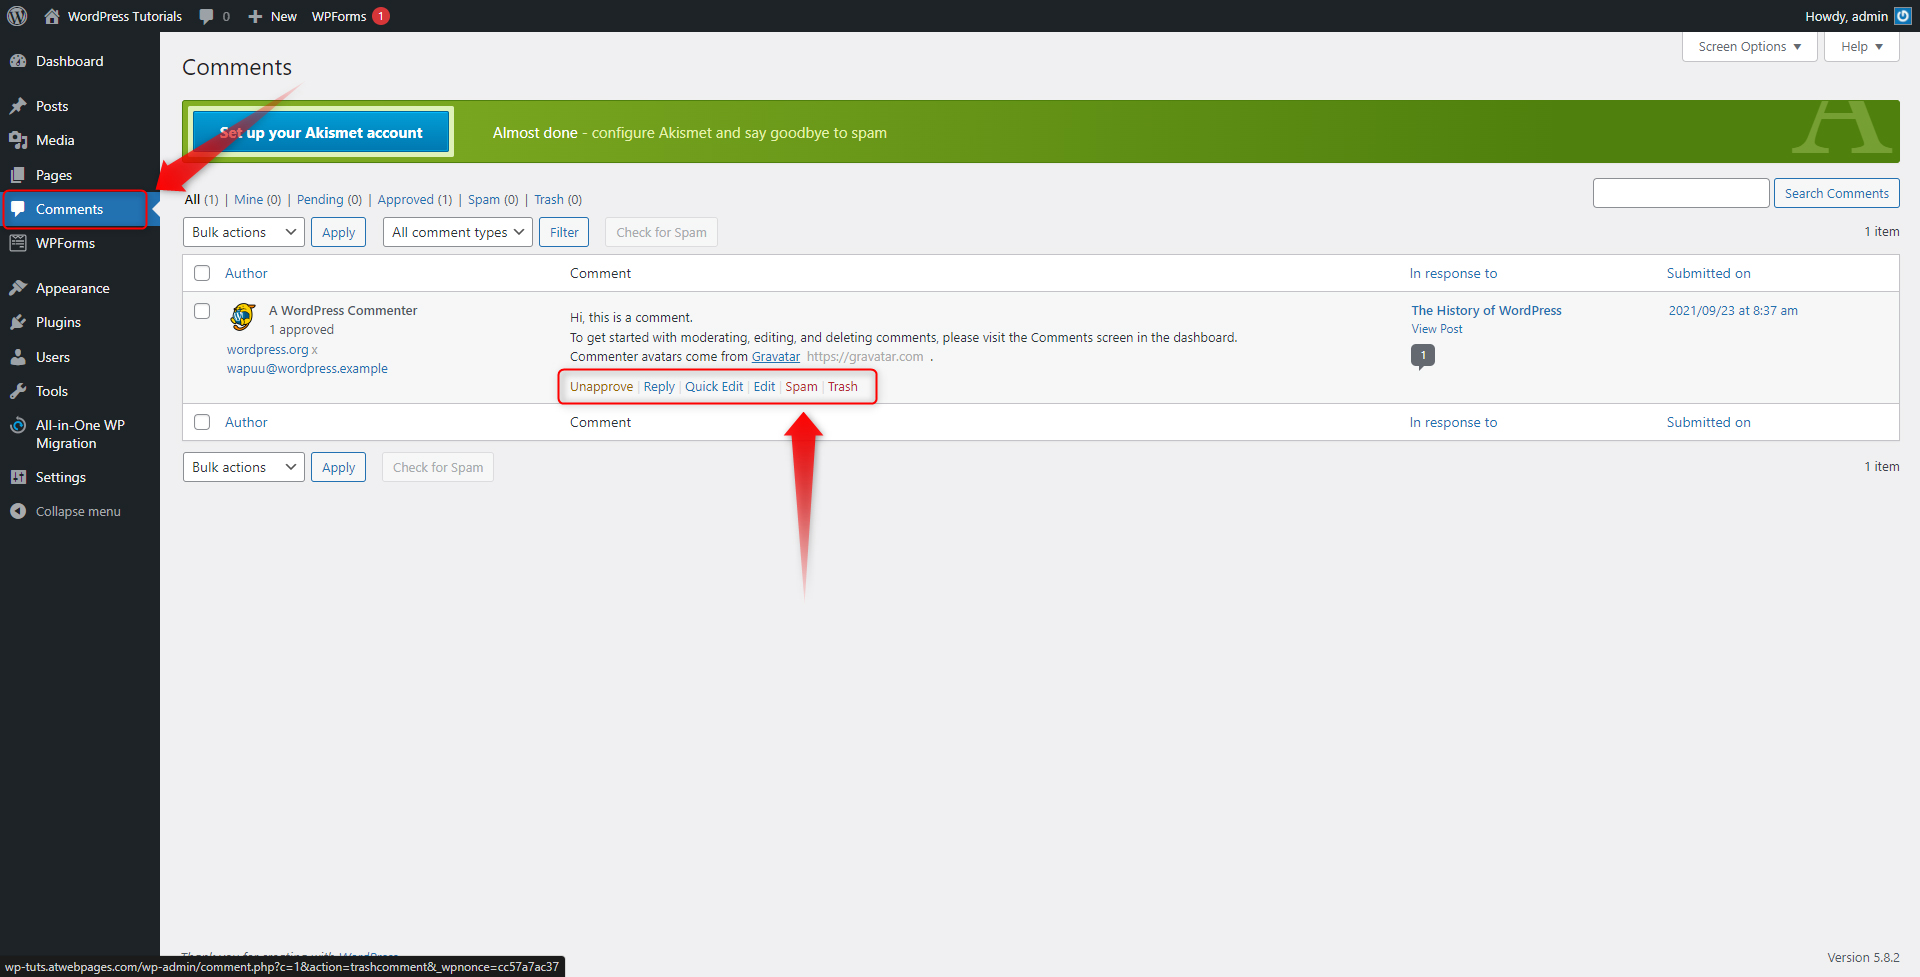
14. Delete the Default Content
The default content is the one that is automatically generated when you install WordPress for the first time. It is comprised of a sample comment, a sample page, and a sample blog post.
To delete the sample post, go to Posts -> All Posts page and hover your mouse cursor over the headline. When you do so, a menu will appear. From there click on Trash. This would delete the sample post:
To delete the sample page, go to Pages -> All Pages and again hover your mouse cursor over the Sample Page heading and again click on Trash:
To delete the sample comment, go to Comments via your Dashboard and delete the comment in the same manner you deleted your sample post and page:
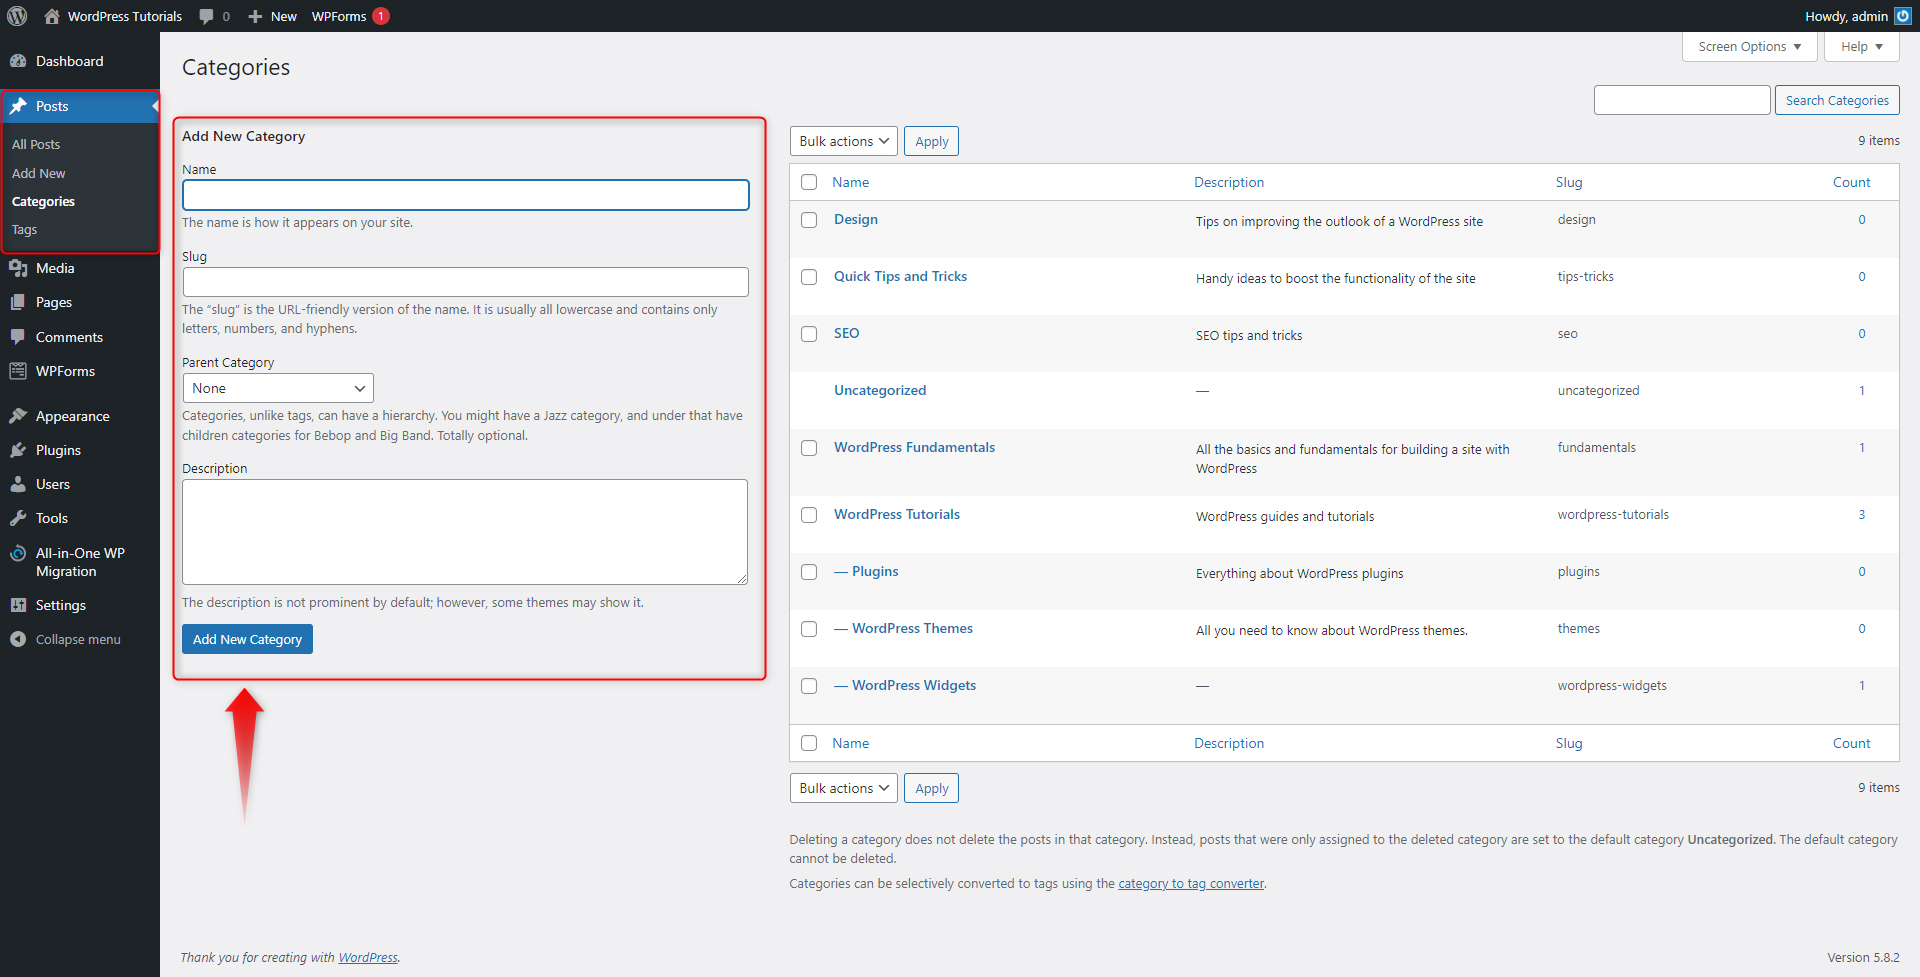
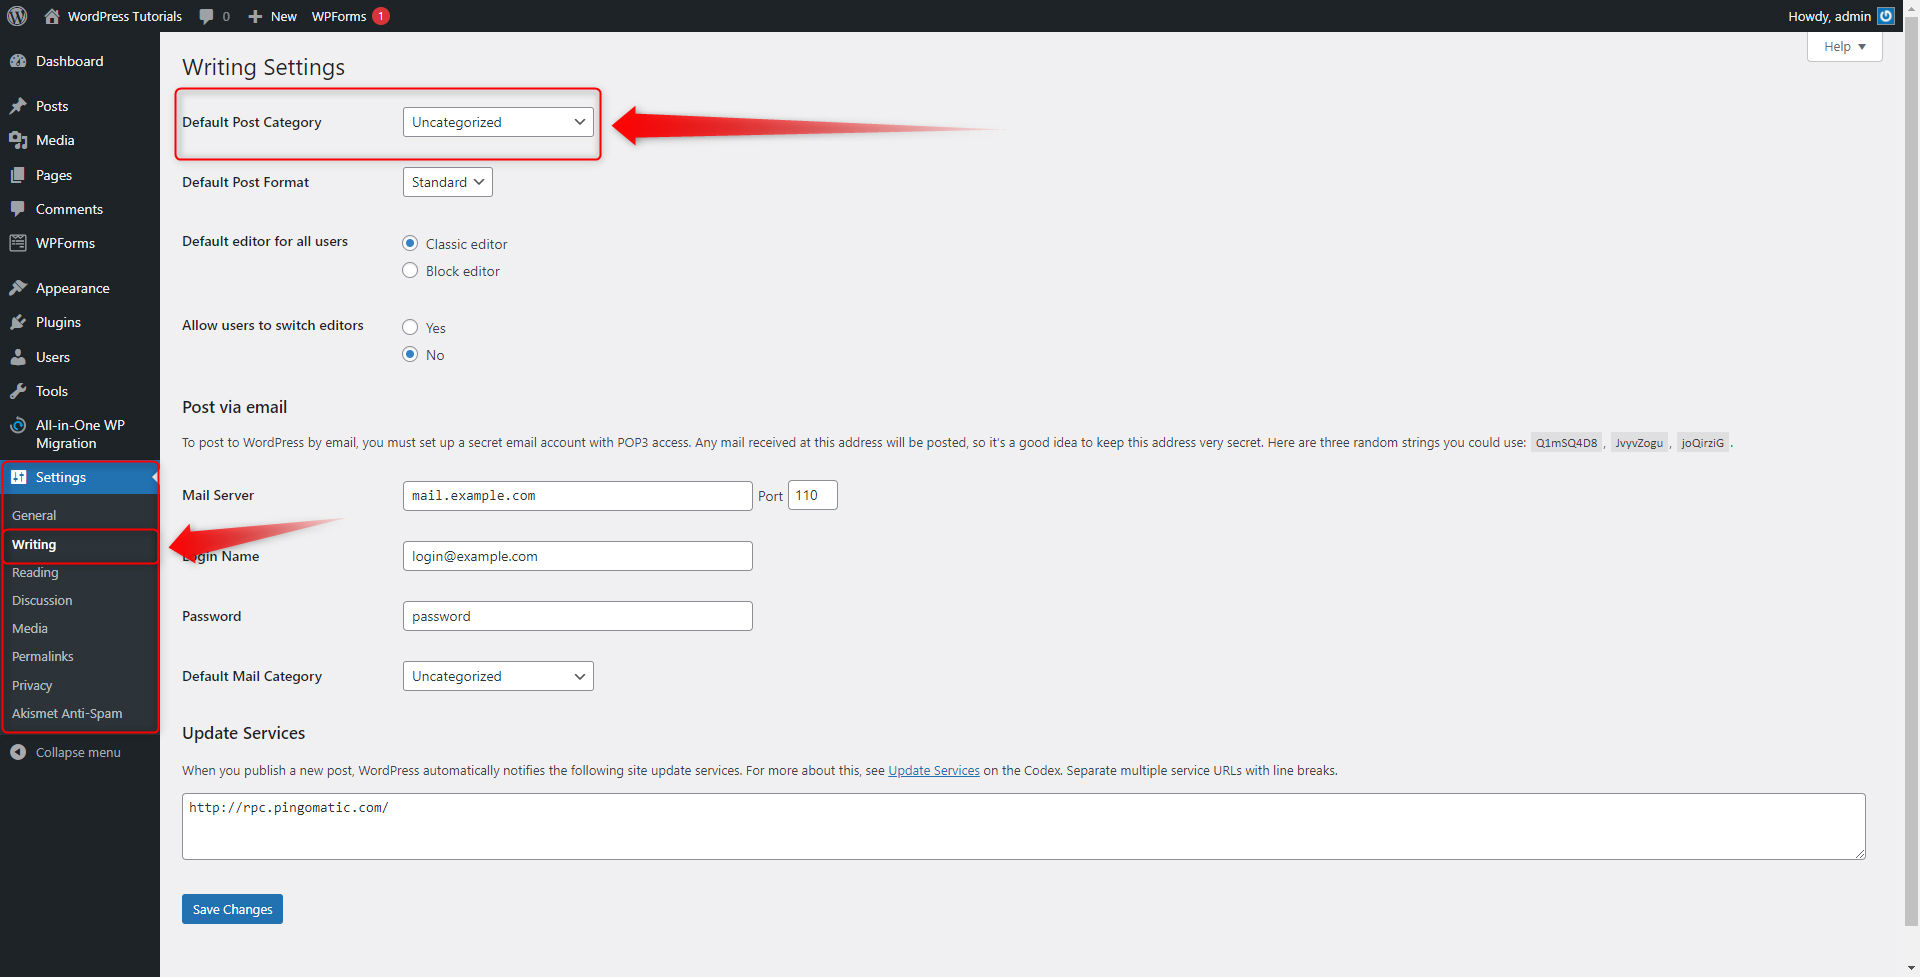
15. Create a New Default Category
Usually, all posts should go to at least one WordPress category. If you haven’t created any, WordPress automatically sorts your blog content to the default Uncategorized category.
To change that, go to Posts -> Categories, and there create a new category:
Now, it is time to make it a default one. Go to Setting->Writing. There you will see a Default Post Category option. From this menu select the one that you’ve just created. This will ensure that your posts will automatically be sorted in this category, should you not specify one:
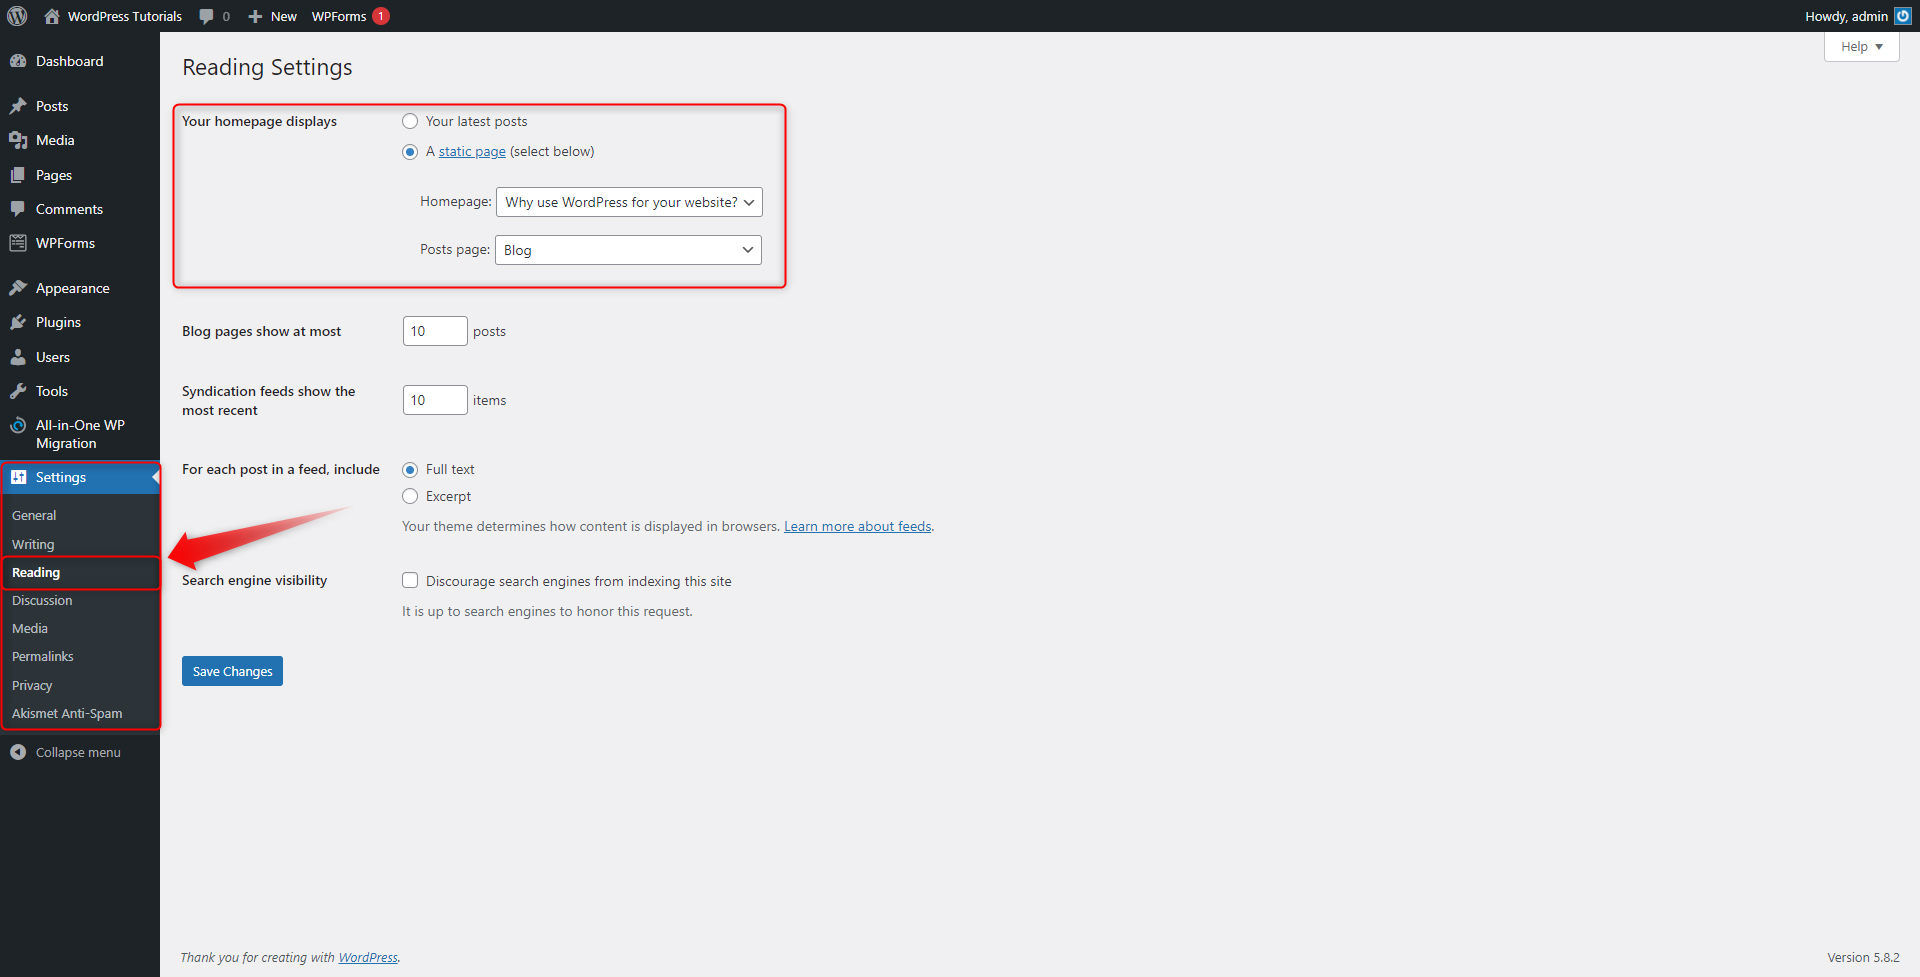
16. Setup Your Front and Blog Pages
By default, WordPress displays your blog posts on your front page. If you wish to change that to a static page, simply go to Settings -> Reading and select which page you wish to use as a front-page:
Also, check out how to format your blog posts for more appealing site content.
Conclusion
If you are completely new to the platform and you have still not installed the platform, then the first thing you should do is register a domain name for your new site and browse our web hosting services. If you have any questions about how to proceed next, don’t hesitate to contact us!
Related: